Table of Contents
- 6.1. Overview
- 6.2. Data Sources and JDBC Connection Pooling
- 6.3. Management of Data Sources and Connection Pools
- 6.4. Data Source Configuration
- 6.5. Cluster Data Source Configuration
- 6.6. Dynamic Data Source Configuration
- 6.6.1. Adding a Data Source
- 6.6.2. Registering a Data Source on a Server
- 6.6.3. Removing a Data Source from a Server
- 6.6.4. Registering a Data Source in a Cluster
- 6.6.5. Removing Data Sources from a Cluster
- 6.6.6. Adding a Server to a Cluster
- 6.6.7. Removing a Server from a Cluster
- 6.6.8. Removing a Cluster
- 6.6.9. Removing a Data Source
- 6.6.10. Modifying Data Source Configuration
- 6.6.11. Checking Data Source Configuration
- 6.7. Dynamically Changing Cluster Data Source Configuration
- 6.7.1. Adding a Cluster Data Source
- 6.7.2. Registering a Cluster Data Source to a Server
- 6.7.3. Removing a Cluster Data Source from the Server
- 6.7.4. Registering a Data Source to a Cluster
- 6.7.5. Removing a Cluster from a Cluster Data Source
- 6.7.6. Adding a Server to a Cluster
- 6.7.7. Removing a Server from a Cluster
- 6.7.8. Removing a Cluster
- 6.7.9. Removing a Cluster Data Source
- 6.7.10. Changing Cluster Data Source Configuration
- 6.7.11. Checking the Cluster Data Source Configuration
- 6.8. Monitoring JDBC Connection Pool
- 6.9. Controlling JDBC Connection Pool
- 6.9.1. Creating a Connection Pool
- 6.9.2. Disabling a Connection Pool
- 6.9.3. Enabling a Connection Pool
- 6.9.4. Replacing a Connection in a Connection Pool
- 6.9.5. Minimizing the Number of Connections in a Connection Pool
- 6.9.6. Returning Connections to Connection Pool
- 6.9.7. Forcibly Destroying Connections in Connection Pool
- 6.10. JEUS JDBC Programming
- 6.11. Global Transaction (XA) and Connection Sharing
- 6.12. Connection Pooling Service Support for Various Users
This chapter describes the basic mechanism of JDBC connection pooling provided by JEUS, how to use the JDBC connection pool, and the data source management method used in the JEUS domain structure.
Web applications usually use a database (DB) to store data. Web application servers (WAS) like JEUS need to communicate with a DB in order to provide database dependent services, such as connection pooling, to applications. The Java Database Connectivity (JDBC) standard defines the interface between the DB clients and DB for an efficient and systematic communication.
The JDBC standard describes how to use DB connections in applications. It also describes how to perform SQL operations and provides related APIs. For more information about the JDBC standard, refer to Sun's JDBC web page (http://www.oracle.com/technetwork/java/javase/tech/index-jsp-136101.html).
JEUS provides connection pooling and other additional services to applications based on JDBC 4.0.
Data source is an object abstracted as a Factory that provides JDBC connections to applications. It internally constructs a JDBC connection pool and provides the connection pooling service.
JDBC connection pooling is a JDBC connection management service. JDBC connection pooling gets and stores a certain number of connections from the DB, and provides them whenever the applications need them. JDBC connection pooling service collects and reuses the connections after use.
Applications do not directly request for a connection to the DB. Instead, they use JNDI lookup to obtain a data source for the DB and requests for a connection through the data source. The data source that received the request sends a connection from its own connection pool to the application. This is how a connection request is processed.
After the application finishes using the connection, JEUS collects the connection and performs the required connection clean up operation. In order to reuse the connection, JEUS puts the connection back into the connection pool and manages it.
The following is the JDBC connection pooling mechanism used on JEUS server.

Note
Instead of creating a connection pool and initializing it at server startup, JEUS creates and initializes a connection pool when a connection request to a data source occurs for the first time in an application.
Since the JDBC Driver is a collection of API implementations that are required for communicating with the DB, JEUS can provide connection pooling and other services by integrating with JDBC certified drivers. Certified drivers are provided through each vendor's website.
JEUS JDBC environment configuration can vary depending on the DB vendor. This is because the properties that each driver requires is different and the detailed properties that need to be configured must be checked in each vendor's JDBC driver manual.
JDBC connection pool is a single framework that allows users to use and manage DB connections more efficiently and provides the connection pooling service.
The following are the benefits of using a connection pool.
-
Higher performance
The system performance can be improved. Creating and deleting DB connections can put a burden on the system. By creating and reusing connections in the connection pool, overhead incurred from creating and deleting connections every time a connection is needed is significantly reduced.
-
Managing connections
The number of concurrent connections can be controlled. Since the number of concurrent connections is limited to the configured value, excessive load is not put on the DB.
A data source is an interface between applications and connection pools, and applications view a data source object as a DB Connection Factory.
Data source connections provide more benefits than java.sql.DriverManager connections.
Performance can be enhanced by selecting a data source to use by considering the characteristics and functions of the following data source types.
Data Source Types
There are three types of data sources.
-
Default data source
javax.sql.DataSource type. This is the default data source type and cannot be used for connection pooling.
-
Connection pool data source
javax.sql.ConnectionPoolDataSource type. JEUS provides a connection pool for this type.
It is usually used in the following situations.
-
When creating applications that can access a database without using XA.
-
When configuring auto-commit to "false" and manually controlling a local transaction.
import java.sql.Connection;

Connection conn = datasource.getConnection();
conn.setAutoCommit(false);
...DB access code... // internally run local transaction of JDBC driver
conn.commit();
-
-
XA data source
javax.sql.XADataSource type. JEUS provides connection pool for this type. It supports connection pooling as well as integration with Global Transactions (hereafter XA).
It's usually used in the following situations.
-
When a Java EE component logic like servlet/EJB need to access two or more DBs.
-
When related logics need to be tied as a sequence of operations even when a Java EE component accesses a single DB.
-
XA Emulation of Connection Pool Data Sources
The local transaction optimization function can be used to increase XA processing performance. It emulates the connections obtained from connection pool data sources so that they can participate in XA transactions. In JEUS 6, XA emulation was enabled by using a local transaction data source type. In JEUS 8, you can set the XA emulation flag in the connection pool data source.
This function is usually used in the following situations.
-
When the DB doesn't support XA, or the JDBC driver doesn't support the javax.sql.XADataSource implementation.
-
When applications need to use XA, but don't want to use an XA data source due to performance problems (basically, when local transaction optimization is needed).
Currently, DBs or JDBC drivers that do not support XA are almost never used. Therefore, this function will usually be used for transaction optimization, but only one local XA data source can participate per XA transaction. A local XA data source is used in the following situations.
-
When Java EE component logics like servlet/EJB use only one DB which does not require the use of XA data source.
-
When using one of multiple DBs used in the Java EE component to process a local transaction to enhance performance.
Note that when multiple DBs are used, transaction recovery may not be properly executed since the connection pool data source that uses the XA emulation function does not support 2-phase commit (2PC).
Note
The XA emulation of a connection pool data source is viewed as a local transaction with auto commit turned off. From the viewpoint of the DB, this is a different type of transaction than XA transaction that is managed by the JEUS transaction manager. Instead, JEUS uses emulation to allow a local transaction to participate in the XA transaction, so that the application can view the transaction as a single transaction.
The following describes features of failover, XA affinity, and associating with ONS for cluster data sources.
A cluster data source is provided to support failover and failback between RAC instances at the JEUS level. RAC (real application cluster) is a DB clustering function provided by Oracle. For more information about RAC, refer to Oracle documentation.
A cluster data source is basically a data source instance with a single JNDI name, and it logically ties multiple individual data sources and manages them. An individual data source (hereafter component data source) that belongs to a cluster data source is also an independent data source with its own individual JNDI name and must be configured as a data source of an RAC instance. A cluster data source operates by delegating connection requests it receives from applications to one of the component data sources. A connection request is delegated only to a component data source that has been verified to process requests successfully. This allows for transparent cluster data source failover in applications.
It is recommended that JEUS cluster data sources be used instead of CTF (connect time failover) provided by Oracle's JDBC driver. Since Oracle CTF performs failover of each connection, recovering all connections in the pool may take a long time when there's a problem with an entire data source. However, JEUS cluster data sources detect problems in each data source and performs failover in data source unit which is more efficient. Furthermore, JEUS cluster data sources provide an automatic failback function.
The methods for using JEUS cluster data sources and using the properties of RAC in Oracle's JDBC drivers are different.
In the first method, since JEUS is responsible for failover, check-query and check-query-period have to be configured in order to check for component data source failure in each RAC instance. However, in the second mechanism, since the driver is responsible for failover, check-query setting is not required. For more information about the cluster data source configuration, refer to "6.5. Cluster Data Source Configuration".
In RAC, global transactions should be processed in one RAC instance rather than in physically distributed multiple RAC instances for better performance.
A cluster data source keeps information that which component data source and RAC instance process the first connection request and then requests connections to the component data source. This is XA affinity that guarantees that global transactions are processed in one RAC instance.
When multiple cluster data sources are associated with one RAC instance, all their requests are processed in the RAC instance. When multiple RACs are associated, XA affinity is also guaranteed for each RAC.
If a and b cluster data sources are associated with RAC A and B respectively, the RAC A and B guarantee XA affinity for connection requests of the a and b cluster data sources respectively. XA affinity is not guaranteed between RAC A and B.
If XA affinity is set, failover, failback, and load balancing will be ignored, and the same data source as an RAC instance associated with XA will be used. If an XA-associated data source is not available, a data source will be used according to a failover, failback, or load balancing policy.
Oracle Notification Service (ONS) enables to share status information between RAC nodes. If ONS is set for RAC, each node in the RAC shares its status with all the other nodes.
Non RAC server components can also get RAC node status if they participate in ONS as an ONS client. Through this, JEUS provides cluster data sources with enhanced features related to ONS.
Cluster data sources associated with ONS internally map each component data source to a relevant RAC instance. This allows to use RAC instance information obtained from ONS for relevant component data source management.
JEUS can get the following status information from ONS as an ONS client.
-
RAC instance up & down notification: Whether an RAC instance starts or ends.
-
Available capacity of each RAC instance (also called runtime load balancing advisory): Available capacity of each RAC instance in percentage when all RAC capacity is 100%.
-
Up & Down Notification of RAC instance
Notifies when an RAC instance starts or ends.
-
Available capacity (%) of each RAC instance (also called runtime load balancing advisory)
Available capacity (%) of each RAC instance out of 100%.
Functions of Cluster Data Sources Associated with ONS
Cluster data sources associated with ONS provide the following functions.
-
Efficient component data source status management
To monitor DB status, polling was used. However, polling has the following issues; it lowers performance because executed during a request processing, and cannot monitor DB status when a network is disconnected. To resolve the issues, RAC instance up & down notification can be used. This not only resolves the polling issues but also efficiently detects whether component data sources are failed or recovered.
-
Efficient load balancing by using runtime load balancing advisory
When available capacity of DB cannot be monitored, only simple round-robin can be used for load balancing. Now more efficient load balancing can be performed because available capacity of each RAC instance can be monitored through runtime load balancing advisory in real time. For example, if component data sources A and B are associated with RAC instances A and B and have 60% and 40% of available capacity respectively, 60% of connection requests are transferred to A and 40% of them are transferred to B.
ONS Configuration
To operate JEUS as an ONS client, ONS library must be installed.
Download ons.jar from an Oracle support site to the $JEUS_HOME/lib/datasources directory. After configuring ONS-related options for cluster data sources, cluster data sources associated with ONS can be used.
First, configure an IP address and a port number used by each RAC node in ONS for ONS communications. This configuration associates cluster data sources and ONS. Cluster data sources associated with ONS can efficiently detect whether component data sources are failed or recovered through ONS by using failover/failback or load balancing. Especially load balancing can be performed more efficiently through runtime load balancing advisory.
Since JEUS has been expanded to a domain structure, the management structures of data source and connection pools have been partially changed. After understanding the underlying concept of the expanded domain structure, it should not be difficult to grasp the knowledge of the changed data source and connection pool management structures.
The minimum unit for running services on JEUS is the server and depending on the circumstances, services can run on multiple servers grouped into a cluster. Servers and clusters can be grouped into a single management unit called a domain. A domain includes a set of servers and clusters that need to be managed in connection to each other. It manages the servers and clusters in the domain and the Domain Administration Server (DAS) manages all services associated with the domain. Excluding DAS, all servers in the domain are called Managed Servers (MSs). DAS can function as both DAS and MS simultaneously, but it is recommended to only use MS to provide services and only use DAS to manage the domain. For more information about JEUS domain structure, refer to "JEUS Domain Guide".
Now, let's look into how data sources and connection pools are managed in the domain structure.
By default, a data source is a resource that is exposed to a domain. This means that the servers and clusters in a domain (more accurately, servers in a cluster) reference the exposed data source configurations to create their own connection pool and provide the connection pool service. A cluster is an abstraction of a group of servers, but it isn't the actual subject that provides the services. Data sources which a cluster references are available on the servers in the cluster. Therefore, the servers in the cluster can reference the data sources that are referenced by the cluster. The servers in a cluster can also individually configure data source references. The server can reference the data sources configured both in the cluster and on itself.
In order to reference a data source on a server or cluster, the data source ID must be registered on the server or cluster. Hence, when a server or a cluster registers a data source ID, the server and servers in the cluster read the registered data source configuration and prepare the information needed to create a connection pool. The information is mapped to the JNDI name of the data source and bound to the server's JNDI repository. Once this process is completed, the application deployed on the server can create and use a connection pool by looking up the data source using its JNDI name.
Note
Data sources are bound to JNDI at the server level. The same JNDI names can be used as long as different data sources are not bound to the JNDI on the same server. This means that data sources with the same JNDI names cannot be referenced simultaneously on the same server.
Data sources are distinguished by the data source ID instead of JNDIs because different data sources can have the same JNDI names. Each data source ID must be set to a unique value at the domain level so that it can be used as an identifier.
The following shows a more detailed example of a domain that consists of DAS and three MSs.
In the previous example, MS1 is registering a cluster data source. Since the cluster data source's component data sources are DS1 and DS2, in order for MS1 to fully use the cluster data source, the component data sources (DS1 and DS2) of the cluster data source must be registered to MS1. With this configuration, after creating the connection pool with DS1 and DS2, MS1 can group them into a cluster and provide the cluster connection pool service.
MS2 and MS3 are also in the cluster. DS3 is registered to the cluster, and thus DS3 is available on both MS2 and MS3 which are in the cluster. This means that MS2 and MS3 can each create a DS3 connection pool to provide the connection pool service.
In addition, MS3 registers DS4 to itself. Now, MS3 can provide connection pool service for both DS3 registered to the cluster and DS4 registered to itself.
Each MS runs the data source and connection pool management services at the server level while DAS runs them at the domain level. DAS service is connected to each MS service. It manages all data sources and connection pools, and processes the data source and connection pool requests from the console tool or WebAdmin.
The first thing to do in using data sources and JDBC connection pools in JEUS is to check if the JDBC driver library exists in the '$JEUS_HOME/lib/datasource/' directory, and to configure the required data source settings. Data source configuration includes the basic configuration for JDBC driver and connection pool configurations.
The configurations can be configured in the console tool or WebAdmin. This section only describes the configuration method using WebAdmin. For information about the configuration method using the console tool, refer to JEUS Reference Book. "4.2.11.2. add-data-source".
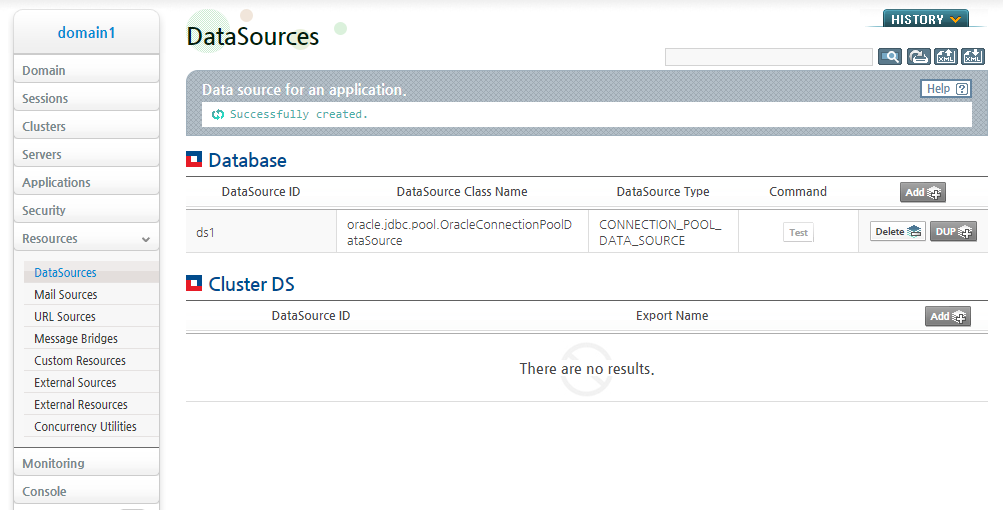
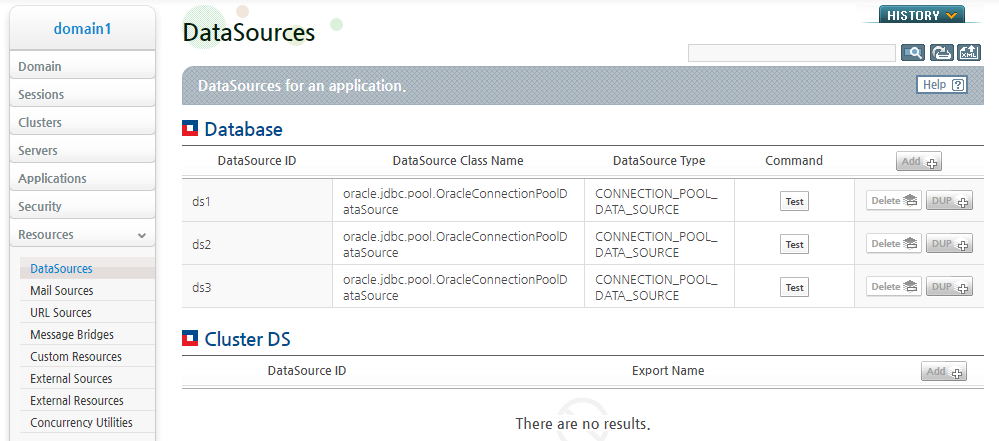
From the left menu, select [Resources] > [DataSources].
Click [LOCK & EDIT] and then click
[ADD] in the Database list
to go to the data source configuration page. In the
Basic tab, you can configure JDBC driver
settings, such as DB access, and advanced settings in the
Advanced Options section. Enter the required
fields, and then click [OK].
-
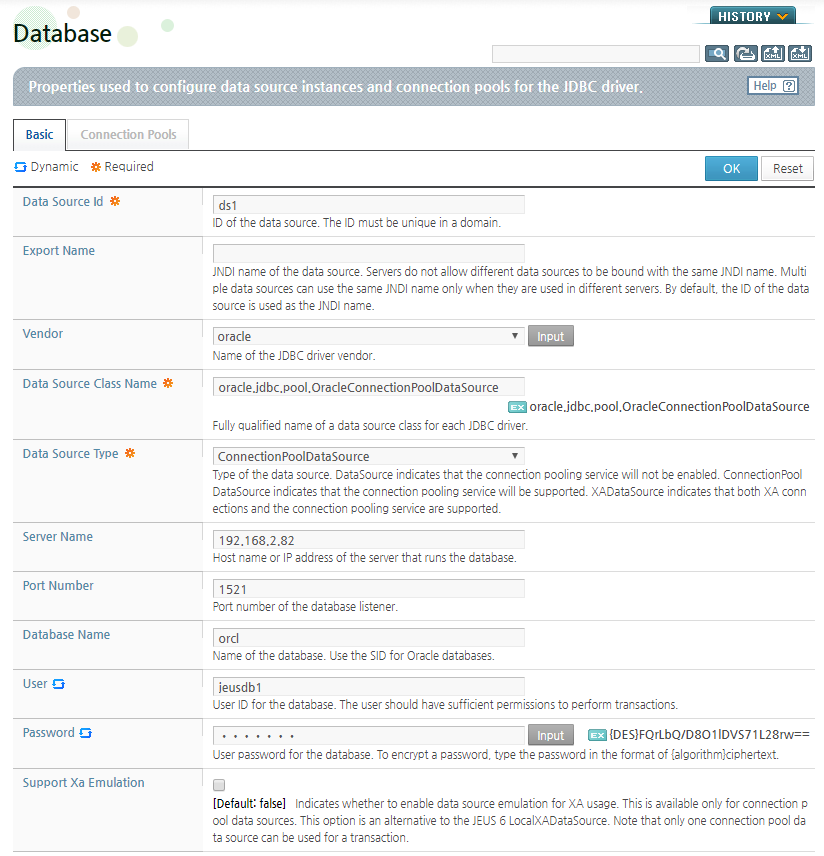
Basic Settings
Item Description Data Source Id Cluster data source ID. It must be unique within the domain. Export Name Cluster data source JNDI name. If two data sources are guaranteed to be bound to different JNDIs on different servers, they can have the same JNDI name. This means that data sources with the same JNDI names are not allowed on the same server. If not set, the cluster data source ID is used as the JNDI name. Vendor Name of the JDBC driver vendor. Data Source Class Name Name of the driver datasource class. Enter a full name including package name. Data Source Type -
DataSource: Connection pooling service is not provided.
-
ConnectionPoolDataSource: Connection pooling service is provided.
-
XADataSource: XA integration is supported with connection pooling service.
Server Name Name or IP of the host server that the DB runs on. Port Number DB listener port number. Database Name DB name. DB SID for Oracle or Tibero. User DB user's ID. The user must have enough permission to process transactions. Password DB user's password. The password must be encrypted in the "{algorithm:keysize}ciphertext" format. Support Xa Emulation Only applicable to the connection pool datasource type. Emulates participation in global transactions. For more information, refer to Section 6.2.3, “XA Emulation of Connection Pool Data Sources” Description Description about the data source. -
-
Advanced Options
Item Description Login Timeout Maximum wait period before connecting to the DB. The unit is in seconds. Isolation Level Transaction Isolation defined in java.sql.Connection. Auto Commit Default Auto Commit setting of the datasource. Options are TRUE, FALSE, and DRIVER.
If Auto Commit is set to DRIVER, JEUS will not be involved in the Auto Commit setting but follow the Auto Commit setting of the JDBC driver. This value is applicable for connection pool datasources or XA datasources that use XA emulation, only if they do not use transactions.
Stmt Query Timeout Query timeout to be applied for java.sql.Statement objects created through connection obtained from a datasource. The unit is in milliseconds.
JEUS is defined using JDBC APIs and calls the query timeout setting method (java.sql.Statement#setQueryTimeout) implemented by a JDBC driver vendor. Query timeout slightly differs according to the JDBC driver vendor.
Pool Destroy Timeout Timeout for destroying a connection pool. The unit is in milliseconds.
Connection pools are destroyed to undeploy an application or shut down a server. Even if network connection is closed while destroying connection pools, the server will wait until the connection pool is destroyed. Such problem can be prevented by using this option. If the Pool Destroy Timeout expires, the application will be undeployed or the server will be shut down.
Property Property that applies to all JDBC drivers. Enter a property in the 'Name:Type=Value' format. Multiple properties are separated by a comma (,). Action On Connection Leak Defines a JEUS action to enable when a JDBC connection is not properly returned after it is used by an application. The application is usually a stateless component such as Servlet/JSP, stateless SessionBean, or MDB. If not set, the server setting is applied.
-
NO_ACTION: no action is performed.
-
WARNING: logs non-returned JDBC connection information. You can configure SMTP handler setting to receive email notifications.
-
AUTO_CLOSE: logs non-returned JDBC connection information and reclaims the connection. You can configure SMTP handler setting to receive email notifications.
For more information about SMTP handler, refer to "2.3.2.2. Action On Resource Leak".
-
After completing the basic configuration in "6.4.1. Configuration Method", click [OK] to check that the data source has been added to the Database list.
Click on the newly added data source ID to return to the basic configuration page. For the detailed description of each item, refer to "6.4.1. Configuration Method".
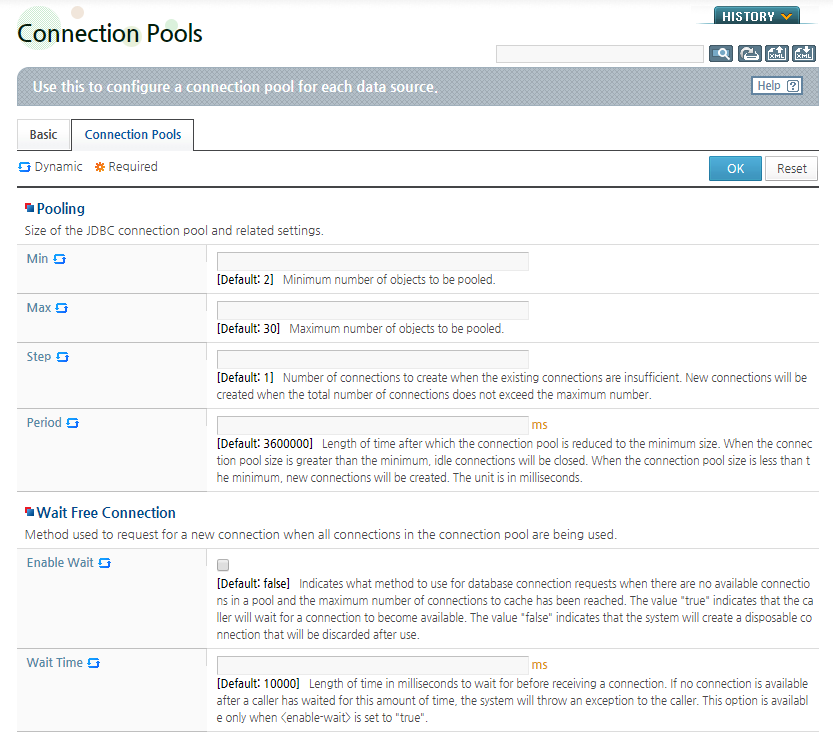
Click the [Connection Pools] tab to configure the connection pool. Enter the required items and then click [OK].
 |
 |
The following describes each configuration item.
-
JDBC connection pool size and related settings.
Item Description Min Minimum number of connections in the connection pool. Max Maximum number of connections in the connection pool. Step Number of DB connections to get, if connections are insufficient and the number of connections in the connection pool is smaller than the maximum value. Period Interval for adjusting the connection pool size based on the minimum value. If the connection pool size is bigger than the minimum value, unused connections are closed. If the size is smaller than the minimum value, new DB connections are added. (Unit: ms) -
Method for handling a connection request when all connections in the connection pool are occupied.
Item Description Enable Wait Method for handling connection requests, when there are no available connections in the pool and no more connections can be added.
-
true : Wait for an available connection.
-
false : Create a new connection, but it will be discarded without entering the pool after use. This type of connection is called a disposable connection.
Wait Time Timeout to wait for a connection if "enable-wait" is "true". If a connection cannot be obtained within the time period, JEUS generates a timeout exception. (Unit: ms) -
-
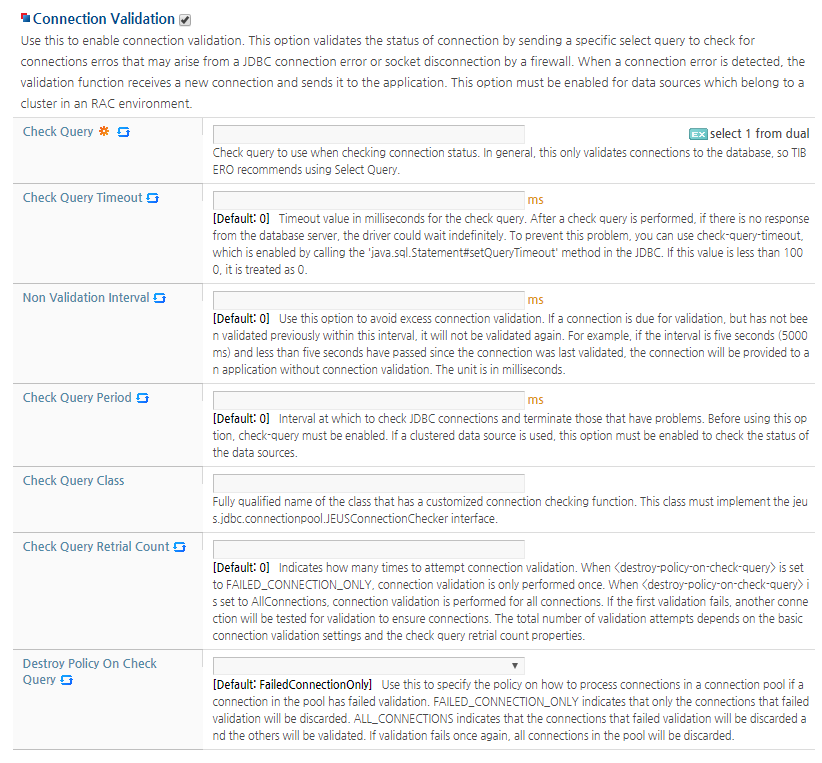
The function that executes a specific query to validate the connection status before passing the connection to the application that requested it.
Useful for checking disconnection due to an internal JDBC connection error and socket dropouts due to firewall.
When there's a problem with the connection, a new connection from the DB is sent to the application. This configuration is required if the data source is in a cluster data source of RAC.
Item Description Check Query Query (query-check) used to check the connection.
Since this is generally used to only validate DB connections, it is recommended to use a simple select query.
Starting from JEUS 7 Fix # 2, you can use the isValid method added to java.sql.Connection in JDK1.6 instead of performing check-query to check database connection. You can enter "use isValid method" instead of the query statement.
Configuration (Check Query Timeout, Check Query Period, etc.) related to connection validation are applied the same way when using the isValid method.
Check Query Timeout When check-query is executed to check the connection status, the driver can be in the wait state indefinitely if the DB does not respond. This value is applied to the check-query to avoid this situation.
This value can be set by using the java.sql.Statement#setQueryTimeout method defined in the JDBC API. (Unit: ms)
If the value is less than 1000ms, the value is set to 0.
Non Validation Interval Option to reduce the overhead caused by frequent connection checks. (Unit: ms)
This configuration skips the connection check if the interval between the last check and the current check is within the interval.
For example, if the configuration value is 5000 ms and 5 seconds has not passed since the last connection check, connections are sent to the applications without checking.
Check Query Period Option to check and delete faulty connections in a connection pool at a specified interval.
Each data source in a cluster data source must configure this setting to check its own state. (Unit: ms)
Check Query Class Class name including the package name that is implemented by users or developers to customize the connection check function.
The class must implement the interface, jeus.jdbc.connectionpool.JEUSConnectionChecker. For more information, refer to "JEUSConnectionChecker Interface".
Check Query Retrial Count When "Destroy Policy On Check Query" is set to the default value of " FAILED_CONNECTION_ONLY", the connection check is executed only once.
When "Destroy Policy On Check Query" is set to "ALL_CONNECTIONS", if a connection problem is detected during the initial connection check, then another connection check is performed for another connection. A total of two connection checks can be performed, and they increment the basic connection check count that determines the final total check count.
Destroy Policy On Check Query Policy for other connections in the connection pool when invalid connections are detected.
-
FAILED_CONNECTION_ONLY: Delete only invalid connections.
-
ALL_CONNECTIONS: Delete the invalid connections and validate other connections in the connection pool. If another invalid connection is detected in the pool, delete all connections from the connection pool.
-
-
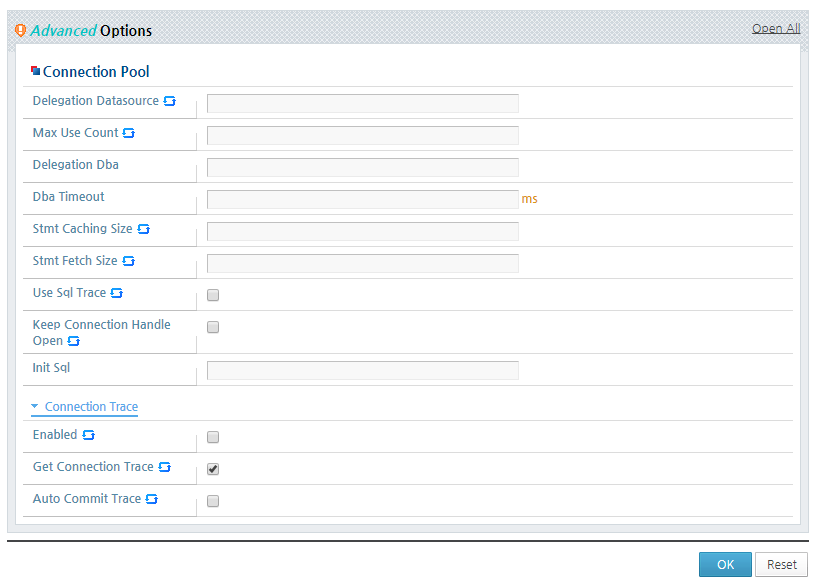
Add-on functions of the connection pool.
Item Description Delegation Datasource When a request does not involve a transaction, it is better to get a connection through a connection pool data source instead of an XA data source.
This is because the XA connection, which involves transaction-related functions, gives more burden on the system, and in this case, the two provide the same functionality. When using the XA data source, specify the connection pool data source to delegate connection requests that are not related to transactions.
This setting can be used to prevent unexplained exceptions that may occur when Oracle and DB2 use XA connections for both with or without transactions.
Max Use Count Maximum number of times a connection can be used. If a connection is used more than the specified number, the connection will be replaced by a new connection.
The default value is 0, meaning connections are not replaced.
Delegation Dba JNDI name of the data source (hereafter DBA delegation data source) that has the permission to forcibly terminate database sessions (DBA permission). If there is a delay in handling a query through the connection received from the data source, a query to forcibly terminate the DB session is sent to the DB through the DBA delegation data source. After the application handles exceptions that occurred due to the disabled connection, it closes the connection. Then JEUS deletes the connection and gets a new connection from the DB and puts it in the connection pool.
Currently, this function is supported for Tibero, Oracle, and Sybase. This function is used to suspend queries that take too long to process for JDBC driver version 2.0 or earlier. For JDBC driver version 3.0 or later, it is recommended to use java.sql.Statement#setQueryTimeout instead of forcibly terminating DB sessions.
Especially for XA data sources, if DB sessions are terminated while XA is normally processing, the XA operation can generate an error. In this case, the statement query timeout and transaction timeout properties should be used instead.
Dba Timeout Timeout for the delegation DBA data source to wait for a query to finish using a connection. If the time expires, it sends a query to the DB to forcibly terminate the DB session. This only applies when the Delegation Dba is set. (Unit: ms) Stmt Caching Size JDBC driver parses the SQL statements sent as parameters whenever an application requests for a PreparedStatement. Since this can affect the system performance, JEUS provides a function that internally caches the prepared statements. This sets the number of prepared statements to be cached.
Stmt Fetch Size Fetch size of a JDBC driver statement. Use Sql Trace Option to display SQL queries running on each connection. If the jeus.jdbc.sql logger level is set to FINE, the SQL query history can be checked in the server logs. If set, the statement implementation class of the JDBC driver will be wrapped by JEUS class. Therefore, the applications that cast and use the statement objects of the JDBC driver cannot use this function. Keep Connection Handle Open Option to always keep the connection handle (or logical connection) open when the connection pooling is used.
[Note 1]
-
It is recommended to use this setting when the Universal Driver (JCC) type 4 provided by IBM DB2 is using the XA data source. This is because "hang up" occurs when threads open and close connection handles that are physically different from each other.
Since the threads internally use and share the same vector (java.util.Vector), when a thread occupies a vector lock and falls into an infinite loop, then other threads are also put in an infinite wait for the lock. The root cause of the hang up is unknown, not the internal logic of DB2. However, according to the test result, no error occurred when the connection handle is always left open. When the connection handle is always left open, the thread only accesses the internal share vector when the connection handle is created for the first time and when the physical connection is closed.
-
This bug has been fixed for DB2 driver 3.53.95 and later. IBM's official bug report number is 'APAR IZ41181' and can be found in the DB2 9.5 Fixpak 4 document.
[Note 2]
If set, the connection handle cannot be closed which means that the driver does not clear the task when the connection is closed. For example, when using this setting with Oracle's JDBC driver and auto-commit set to false, if the connection is closed without executing a commit or rollback, then commit, which normally executes automatically, does not execute.
Init Sql SQL query that is processed first after a connection has been created. -
-
Settings to enable connection trace.
Item Description Enabled Option to enable connection trace.
-
false: overrides 'Get Connection Trace' and 'Auto Commit Trace' settings.
Get Connection Trace Allows the application to check the stack trace when java.sql.DataSource#getConnection is called. Auto Commit Trace Writes logs and stack trace in the server log when java.sql.Connection#setAutoCommit is called. You must set the log level of the jeus.jdbc.connection-trace logger to FINE to use this option. -
JEUSConnectionChecker Interface
The following is the specification of the interface mentioned in the Check Query Class configuration, jeus.jdbc.connectionpool.JEUSConnectionChecker. To use a custom check-query function, you must implement the interface and set the class as a Check Query Class.
[Example 6.1] jeus.jdbc.connectionpool.JEUSConnectionChecker
public interface JEUSConnectionChecker {
   void checkConnection(Connection vcon) throws SQLException;
   void setQueryString(String query);
   void setQueryTimeout(int timeout);
}
| Method | Description |
|---|---|
| checkConnection() | Called during the actual connection check call. The developer can implement the tasks to perform during connection check in this method. |
| setQueryString() | If check query string is configured, it is given as an argument for use in the connection check. |
| setQueryTimeout() | If Check Query Timeout is configured, it is given as an argument for use in the connection check. |
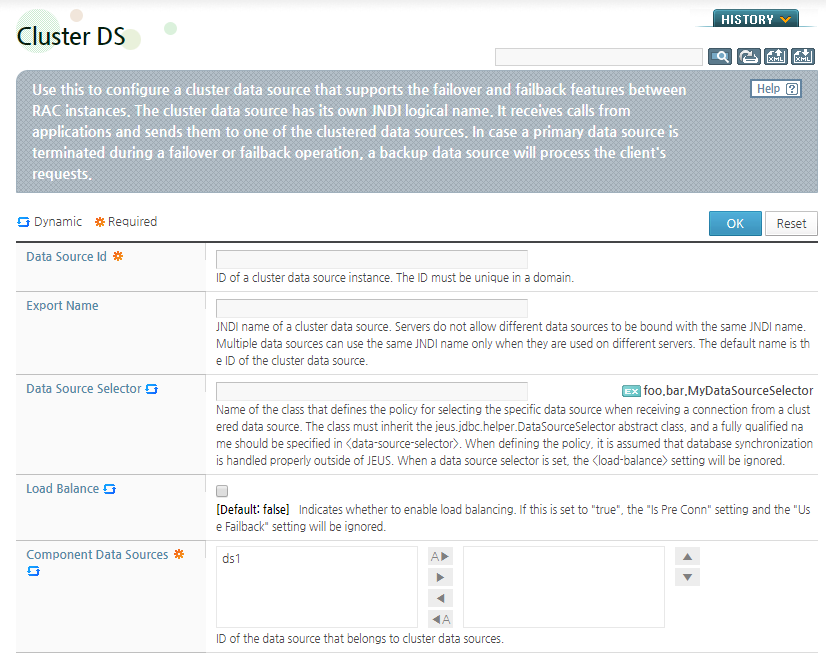
This chapter describes how to configure a cluster data source.
The configuration can be set by using the console tool or WebAdmin. This section only describes the configuration method using WebAdmin. For information about the configuration method using the console tool, refer to JEUS Reference Book. "4.2.11.1. add-cluster-data-source".
From the left menu of the WebAdmin home page, select [Resources] > [DataSources] to go to the Data Source page ([Figure 6.4]). Click [Lock & Edit] to get the lock. Go to the basic cluster data source configuration page by clicking [Add] from the Cluster DS list.
 |
The following describes each item.
-
Basic information
Item Description Data Source Id Cluster data source ID. It must be unique within the domain. Export Name Cluster data source JNDI name. If two data sources are guaranteed to be bound to different JNDIs on different servers, they can have the same JNDI name. This means that data sources with the same JNDI names are not allowed on the same server. If not set, the cluster data source ID is used as the JNDI name. Data Source Selector When getting a connection from a cluster data source, users or developers can define the policy for selecting a component data source.
To define a selector, implement the jeus.jdbc.helper.DataSourceSelector interface, and include the implementation class package name in the class name. For more information, refer to "DataSourceSelector Interface".
If set, the Load Balance setting is ignored. You must define the policy taking synchronization into consideration.
Load Balance Option to use load balancing. If set to true, the Use Failback setting is ignored. Component Data Sources Data source IDs of the component data sources in the cluster data source. Select the data source IDs from the list on the left of the WebAdmin Component Data Sources page and move them to the list on the right. You can change the order of the selected data source IDs and the order determines the primary data source. -
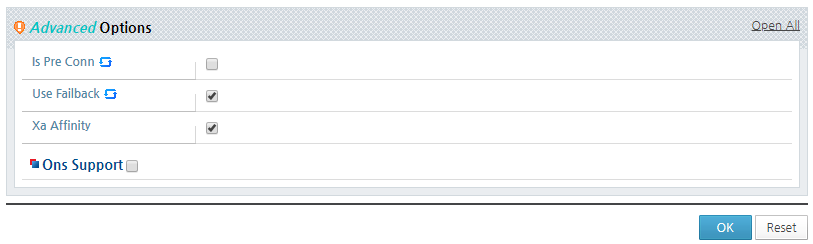
Advanced options
Item Description Is Pre Conn Option to create connection pool of component data sources in the cluster data source in advance. Creating the connection pool in advance can be beneficial for performance, but is not a good use of resources. Use Failback Since only failover is supported in the earlier versions of JEUS, this option is provided for backward compatibility. This determines whether to failback using the main data source after failing over by using the assistant data source. By default, failback is used. To use failback, the 'Check Query' and 'Check Query Period' settings must be set for the main data source. Xa Affinity Option to set global transaction affinity. If this option is used, performance of handling global transactions will be improved because the transactions are processed in one RAC instance. Ons Support Specifies a cluster data source associated with ONS. Cluster data sources associated with ONS can efficiently detect whether component data sources are failed or recovered through ONS. In addition, more efficient load balancing can be supported by using runtime load balancing advisory.
The following can be configured.
-
Ons Config
IP address and port number used for ONS communications of RAC nodes in ONS. A cluster data source establishes a socket connection by using the IP address and port number and then operates as an ONS client.
Example:
nodes=host1:6200,host2:6200
-
DataSourceSelector Interface
The following is the jeus.jdbc.helper.DataSourceSelector interface specification mentioned in the Data Source Selector configuration. The user can define a policy for selecting a component data source by implementing this interface and configuring the implementation class as a Data Source Selector.
[Example 6.2] jeus.jdbc.helper.DataSourceSelector
public interface DataSourceSelector {
   public void setComponentDataSourceList(List<String> componentDataSourceList);
   public String selectDataSource();
}
| Method | Description |
|---|---|
| setComponentDataSourceList() | Gets the list of component data source IDs that belong to the cluster data source. |
| selectDataSource | Defines the policy for selecting a component data source in a cluster data source. The return value is the ID of the data source selected through the defined policy. In most environments, multiple request threads can simultaneously access a connection obtained from a cluster data source. Hence, synchronization should usually be considered when implementing the policy. |
The following DataSourceSelector interface can be implemented based on these specifications. This DataSourceSelector implementation has a 2:1 selection ratio for the two data sources in the cluster data source.
[Example 6.3] DataSourceSelector Implementation Example
package foo.bar;
import jeus.jdbc.helper.DataSourceSelector
public class MyDataSourceSelector implements DataSourceSelector {
    List<String> componentDataSourceList = new ArrayList<String>();

    // Guarantee synchronization
    AtomicInteger dataSourceIndex = new AtomicInteger(0);

    public void setComponentDataSourceList(List<String> componentDataSourceList) {
        this.componentDataSourceList.addAll(componentDataSourceList);
    }

    public String selectDataSource() {
        int reminder = (dataSourceIndex.getAndIncrement() & 0x7fffffff) % 3;
        if(reminder < 2) {
            return componentDataSourceList.get(0);
        }
        else {
            return componentDataSourceList.get(1);
        }
    }
}
A cluster data source delegates the connection request processing to one of its component data sources. If load balancing is not configured, then the cluster data source always delegates connection request processing to the main component data source. However, if an error is detected in the main component data source, then a new component data source is used as the main component data source in order to guarantee uninterrupted processing of connection requests. This is called the cluster data source failover.
To failback after a failover, it must be checked to see if the previous main component data source has been recovered. The check is done using the check queries that are periodically sent to the component data source. In order to use failback in the cluster data source, the 'Check Query' and 'Check Query Period' settings must be configured for each component data source in the cluster. To only use failover, set 'Use Failback' to 'false'. Failover commands can be executed manually. For more information, refer to JEUS Reference Book. "4.2.12.3. control-cluster-data-source".
Note
It is beneficial to set the 'Destroy Policy On Check Query' configuration of the component data source to 'ALL_CONNECTIONS'. Otherwise, inaccessible connections can remain in the connection pool of the faulty component data source for some time after the failover. Although they are cleaned up during periodic connection checks, it is preferable that they are destroyed when failover occurs.
A newly added feature in JEUS 7 is the support of dynamic configuration. This means that some settings can be changed dynamically at runtime so that they are applied immediately without restarting JEUS. For more information about dynamic configuration, refer toJEUS Domain Guide. "Chapter 3. Changing Domain Settings".
This section shows how to dynamically change data source related configurations through examples. Knowledge about JEUS domain structure and data source management structure in the domain, and about using each data source configuration item are required for you to better understand the explanation in this section. For information about JEUS domain structure, refer to JEUS Domain Guide. "1.3. Components". For information about the data source management structure in the domain, refer to"6.3. Management of Data Sources and Connection Pools". For information about each configuration item, refer to "6.4. Data Source Configuration".
Dynamic changes can be applied in the console tool or WebAdmin. Both methods are described in this section. Abbreviated commands and option names are used for describing the console tool method. For more information about how to use abbreviated commands and option names, execute 'help' in the console tool or refer to JEUS Reference Book. "4.2.11. Data Source Commands" and JEUS Reference Book. "4.2.12. Connection Pool Controlling and Monitoring Commands".
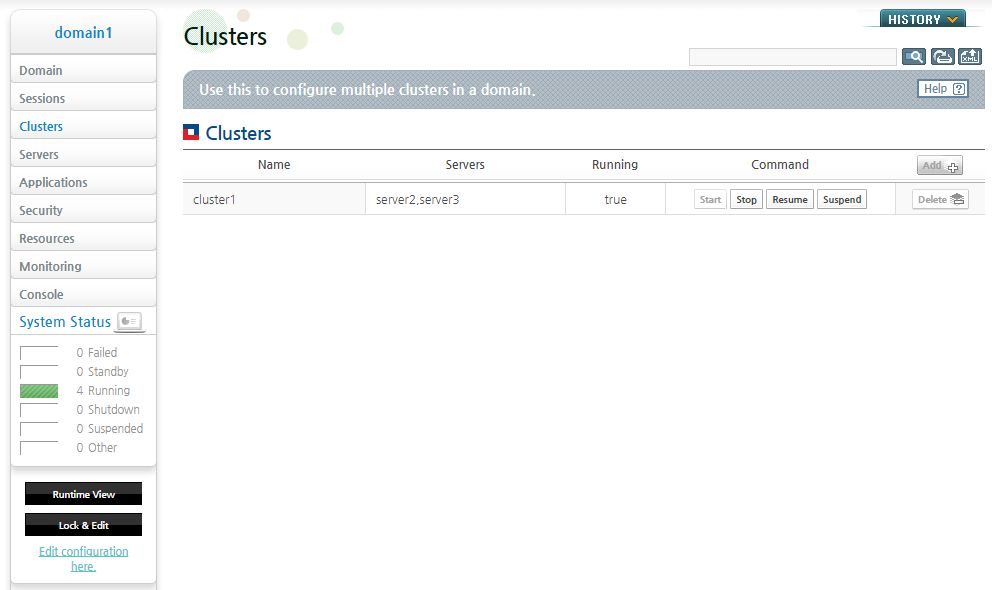
First perform some preparation tasks to help with the explanation. Create a domain named domain1 and a DAS named adminServer. After starting DAS, add three MSs named server1, server2, and server3 to domain1 and start them. Then, group server2 and server3 to a cluster named cluster1. For information about configuration methods related to the domain, cluster, and server, refer to JEUS Domain Guide. "Chapter 2. Creating a Domain", JEUS Domain Guide. "Chapter 5. JEUS Clustering", and "Chapter 2. JEUS Configuration", respectively. The example in this section assumes that the aforementioned preparation tasks have been completed.
Note
Since all examples are related, it is recommended to read them in order.
It is possible to add dynamic data sources. Adding a data source involves registering the data source configuration to the domain so that it can be referenced by the server and cluster in the domain.
Using WebAdmin
The following describes how to add a data source in WebAdmin.
-
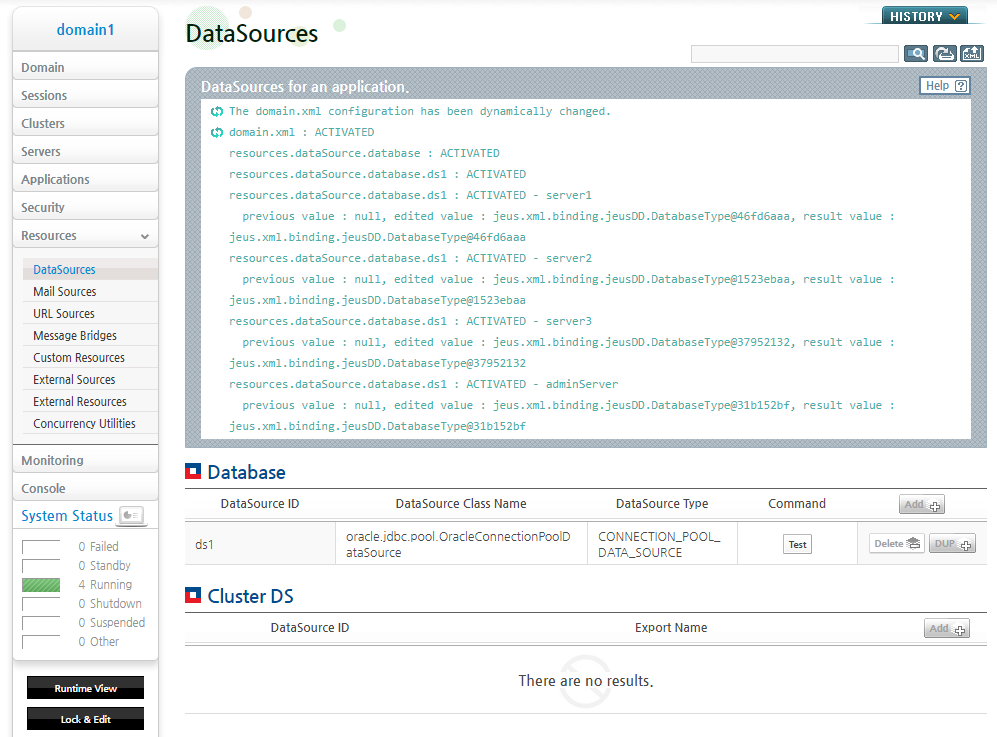
From the left menu of the WebAdmin home page, select [Resources] > [DataSources] to go to the Data Source page ([Figure 6.4]).
-
Click [Lock & Edit] to get the lock.
-
Click [Add] in the Database list to go to the page for dynamically adding a data source to a domain.
The following is an example of entering some configurations, and adding a data source with the ID ds1 to the domain. Enter the required items and then click [OK]. For information about each item, refer to "6.4.1. Configuration Method".
-
Click [Apply Changes] to add ds1 to the domain. The following shows ds1 being added to the domain. Repeat the previous steps to add two more data sources, ds2 and ds3 to domain1 to continue with the rest of the examples.
Note
In WebAdmin, you can easily add a new data source by copying the settings from an existing data source. From the left menu of the WebAdmin home page, select [Resources] > [DataSources] to go to the Data Source page. Right click on a data source from the list and click [DUP] and edit some settings (Data Source ID, Export Name, Port Number, Database Name, User, Password, and Property) to create a new data source using the selected data source.
Using Console Tool
You can use the add-data-source command to dynamically add a data source to the domain. To add a data source using add-data-source, you must configure each data source properties. For more information about add-data-source, refer to JEUS Reference Book. "4.2.11.2. add-data-source".
The following example adds a data source with ID ds1 to domain1 by using the add-data-source command.
[DAS]domain1.adminServer>addds -id ds1 -dst ConnectionPoolDataSource -dscn
oracle.jdbc.pool.OracleConnectionPoolDataSource -sn 192.168.1.165 -pn 1521 -dn ora10g
-user jeustest1 -password jeustest1 -property driverType;java.lang.String;thin
Successfully performed the ADD operation for data source [ds1] to domain.
Check the results using "add-data-source"
Execute add-data-source to check the result.
[DAS]domain1.adminServer>addds
Shows the current configuration
Data sources in domain
====================================================================
+------+-----------------------------------------------------------+
| ds1  | common data source                                        |
+------+-----------------------------------------------------------+
====================================================================
Repeat the previous steps to add two more data sources, ds2 and ds3 to domain1 to continue with the rest of the examples.
To reference and use the data sources after adding them to the domain, you must register them on the server. Data sources must be registered on the server to bind their information to the JNDI repository to allow applications deployed on the server to look them up. Data sources can be registered dynamically.
Using WebAdmin
The following describes how to register a data source to a server in WebAdmin.
-
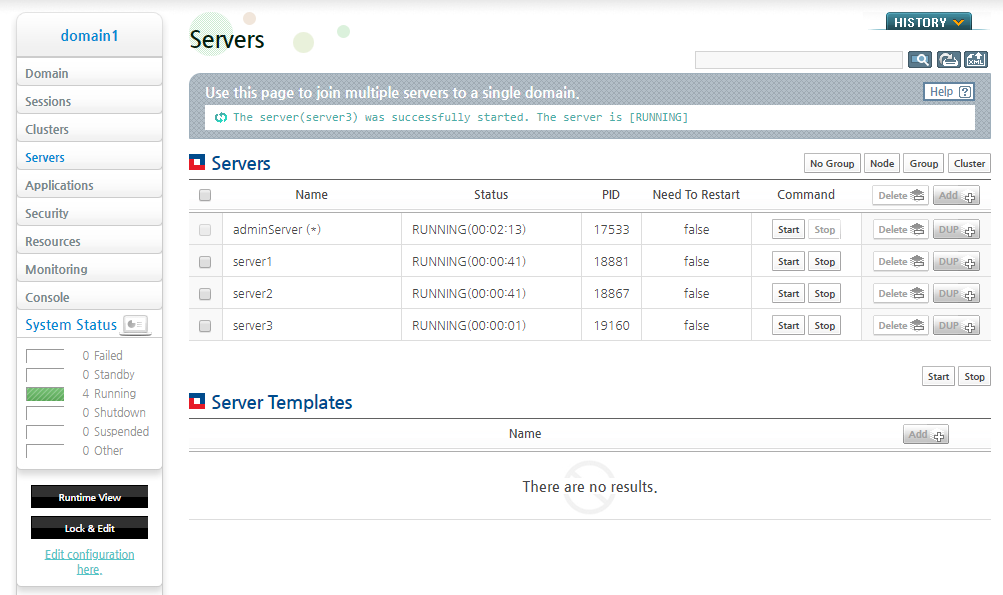
Select [Servers] from the left menu of WebAdmin to go to the Servers page.
-
Click [Lock & Edit] to get the lock.
-
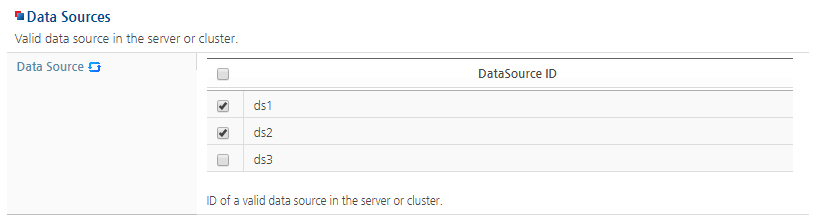
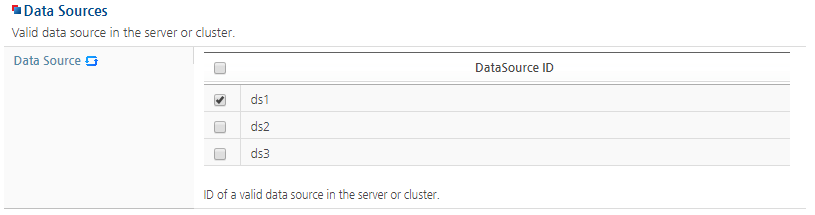
Select a server from the Servers page to go to the Server page where you can dynamically add a data source. Check the ds1 and ds2 check boxes, and then click [OK] to add the data sources to server1 as follows:
-
Click [Apply Changes] to register ds1 and ds2 on server1. The following shows that ds1 and ds2 are registered on server1.
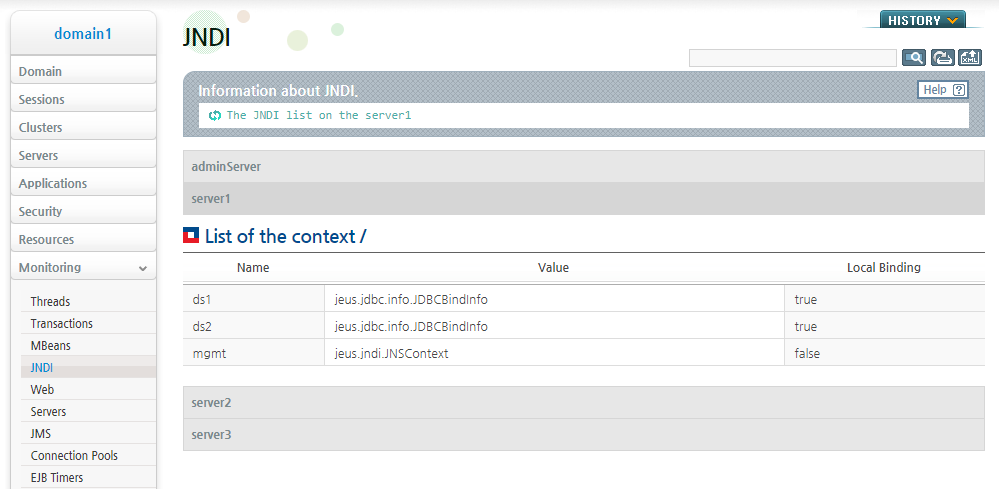
-
Check the JNDI monitoring information to see that ds1 and ds2 are bound to the JNDI repository of server1. Since no JNDI name was specified for the data sources, their data source ID is used as the JNDI name.
Using Console Tool
The add-data-sources-to-server command is used to dynamically add data sources to a server. For more information about using add-data-sources-to-server, refer toJEUS Reference Book. "4.2.3.2. add-data-sources-to-server".
The following is an example of registering ds1 and ds2 on server1 by executing add-data-sources-to-server.
[DAS]domain1.adminServer>adddstosvr -server server1 -ids ds1,ds2
Successfully performed the ADD operation for data sources to the server [server1].
Check the results using "add-data-sources-to-server -server server1"
As shown in the previous result message, the result of registering ds1 and ds2 can be checked by executing 'add-data-sources-to-server -server server1'.
[DAS]domain1.adminServer>adddstosvr -server server1
Shows the current configuration.
Data sources registered in the server [server1].
=========================================================
+--------------------------------------------+----------+
| data sources                               | ds1, ds2 |
+--------------------------------------------+----------+
=========================================================
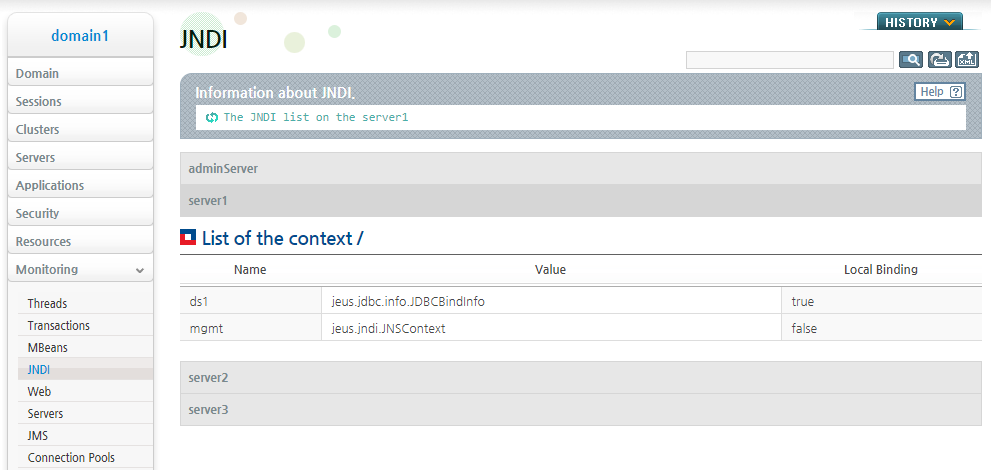
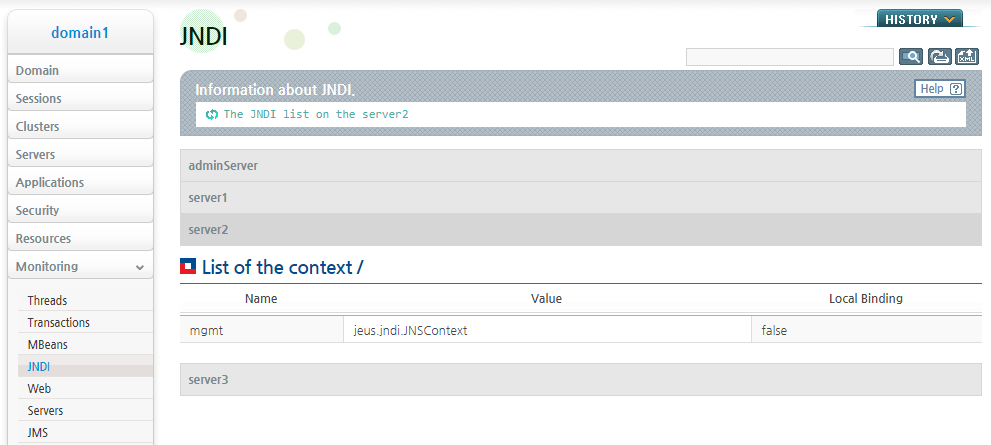
Execute jndilist to verify that ds1 and ds2 are bound to the JNDI repository of server1. Since a separate JNDI name has been entered for each data source, each data source ID is also used as the JNDI name.
[DAS]domain1.adminServer>jndilist -server server1
The JNDI list on the server1
List of the context /
================================================================================
+-------------+------------------------------------------------+---------------+
|     Name    |                      Value                     | Local Binding |
+-------------+------------------------------------------------+---------------+
| ds1         | jeus.jdbc.info.JDBCBindInfo                    | true          |
| ds2         | jeus.jdbc.info.JDBCBindInfo                    | true          |
| JEUSMQ_DLQ  | jeus.jms.common.destination.JeusQueue          | false         |
| mgmt        | jeus.jndi.JNSContext                           | false         |
+-------------+------------------------------------------------+---------------+
================================================================================
A data source registered on a server can be removed dynamically. If a data source is removed from a server, the data source information is unbound from JNDI and connection pool, if exists, is destroyed.
Using WebAdmin
The following describes how to remove a data source from a server in WebAdmin.
-
Select [Servers] from the left menu of WebAdmin to go to the Servers page.
-
Click [Lock & Edit] to get the lock.
-
Select a server from the Servers page to go to the Server page where you can dynamically remove a data source. Uncheck the ds2 check box, and then click [OK] to remove the data source from server1 as follows:
-
Click [Apply Changes] to remove ds2 from server1.
-
Check the JNDI monitoring information to see that ds2 is unbound from the JNDI repository of server1.

Using the Console Tool
The remove-data-sources-from-server command is used to dynamically remove a data source from a server. For more information about using remove-data-sources-from-server, refer toJEUS Reference Book. "4.2.3.30. remove-data-sources-from-server".
The following is an example of removing ds2 from server1 by executing remove-data-sources-from-server.
[DAS]domain1.adminServer>rmdsfromsvr -server server1 -ids ds2
Successfully performed the REMOVE operation for data sources from the server [server1].
Check the results using "remove-data-sources-from-server -server server1"
Execute remove-data-sources-from-server -server server1 to verify that ds2 has been removed from server1 and only ds1 remains.
[DAS]domain1.adminServer>rmdsfromsvr -server server1
Shows the current configuration.
Data sources registered in the server [server1].
=============================================================
+---------------------------------------------------+-------+
| data sources                                      | ds1   |
+---------------------------------------------------+-------+
=============================================================
Execute jndilist to verify that ds2 is removed from the JNDI repository of server1 and only ds1 is still bound to JNDI.
[DAS]domain1.adminServer>jndilist -server server1
The JNDI list on the server1
List of the context /
================================================================================
+-------------+------------------------------------------------+---------------+
|     Name    |                      Value                     | Local Binding |
+-------------+------------------------------------------------+---------------+
| ds1         | jeus.jdbc.info.JDBCBindInfo                    | true          |
| JEUSMQ_DLQ  | jeus.jms.common.destination.JeusQueue          | false         |
| mgmt        | jeus.jndi.JNSContext                           | false         |
+-------------+------------------------------------------------+---------------+
================================================================================
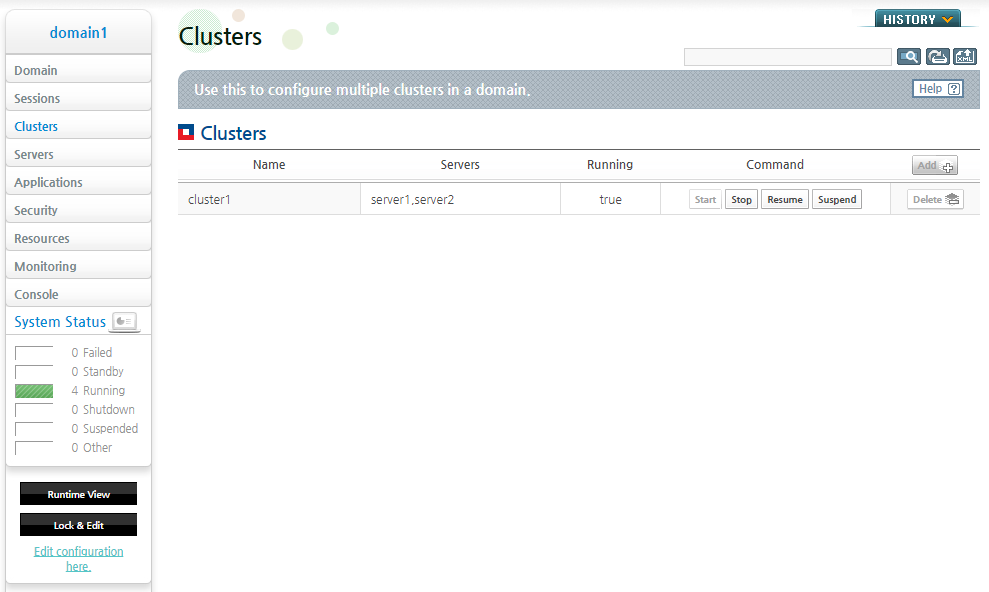
Like registering a data source on a server, a data source can be registered in a cluster. A data source registered in a cluster is valid on all servers in the cluster. Hence, a server in a cluster can use a data source registered in the cluster as if it is registered on the server. As a data source can be registered dynamically on the server, it can also be dynamically registered in a cluster.
Using WebAdmin
The following describes how to register data sources in a cluster in WebAdmin.
-
Select [Clusters] from the left menu of WebAdmin to go to the Clusters page.
-
Click [Lock & Edit] to get the lock.
-
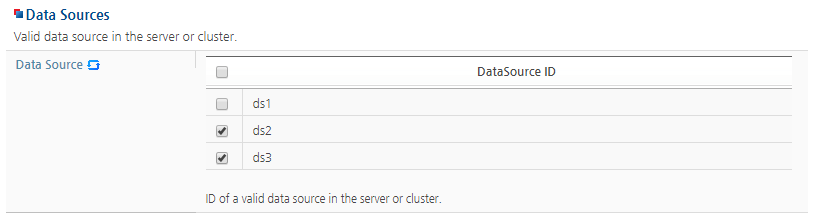
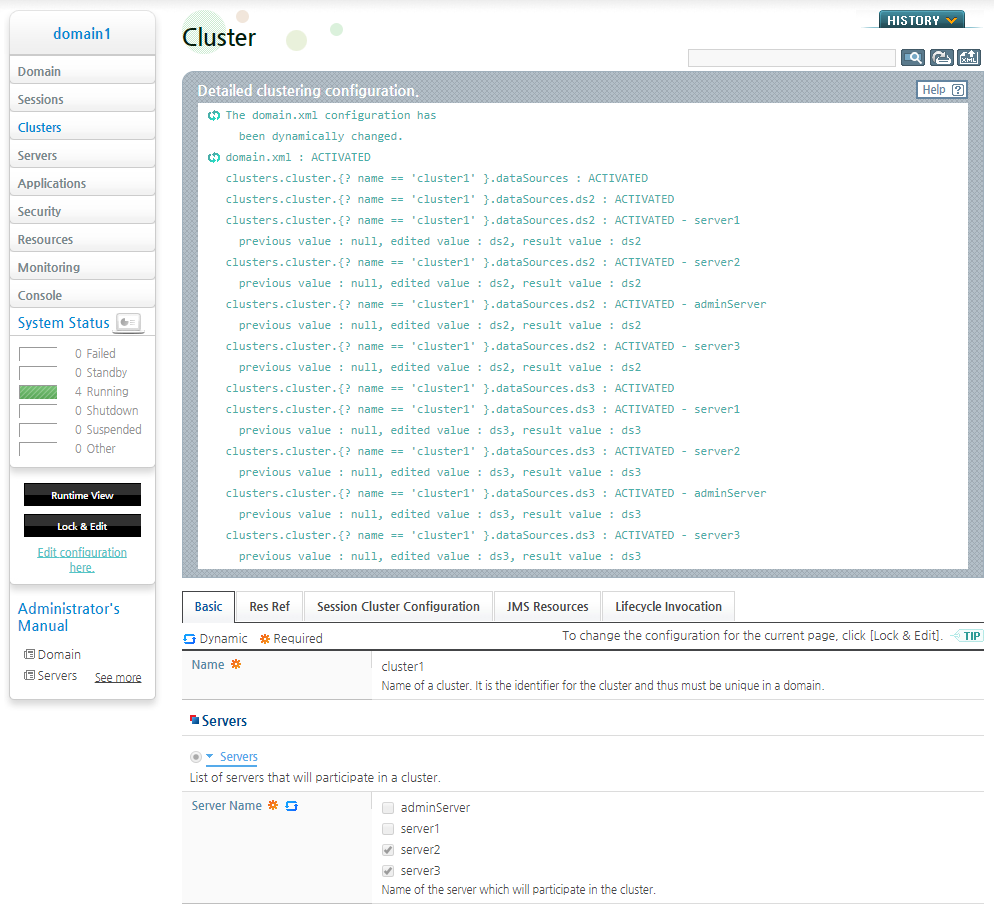
Select a cluster from the Clusters page to dynamically add a data source. Check the ds2 and ds3 check boxes, and then click [OK] to add the data sources to the cluster as follows:
-
Click [Apply Changes] to register ds2 and ds3 in cluster1.
-
Since ds2 and ds3 are registered in cluster1, server2 and server3 in cluster1 can use ds2 and ds3. This means ds2 and ds3 are JNDI bound to the JNDI repository of server2 and server3. When the JNDI monitoring information for server2 and server3 are checked, it can be seen that ds2 and ds3 are JNDI bound.
Using the Console Tool
The add-data-sources-to-cluster command is used to dynamically add data sources to a cluster. For detailed information about how to use add-data-sources-to-cluster, refer toJEUS Reference Book. "4.2.4.4. add-data-sources-to-cluster".
The following is an example of registering ds2 and ds3 to cluster1 by executing add-data-sources-to-cluster.
[DAS]domain1.adminServer>adddstocluster -cluster cluster1 -ids ds2,ds3
Successfully performed the ADD operation for data sources to the cluster [cluster1].
Check the results using "add-data-sources-to-cluster -cluster cluster1"
As shown in the previous result message, the result of registering ds2 and ds3 to cluster1 can be checked by executing 'add-data-sources-to-cluster -cluster cluster1'.
[DAS]domain1.adminServer>adddstocluster -cluster cluster1
Shows the current configuration.
The data sources registered in the cluster [cluster1].
=========================================================
+--------------------------------------------+----------+
| data sources                               | ds2, ds3 |
+--------------------------------------------+----------+
=========================================================
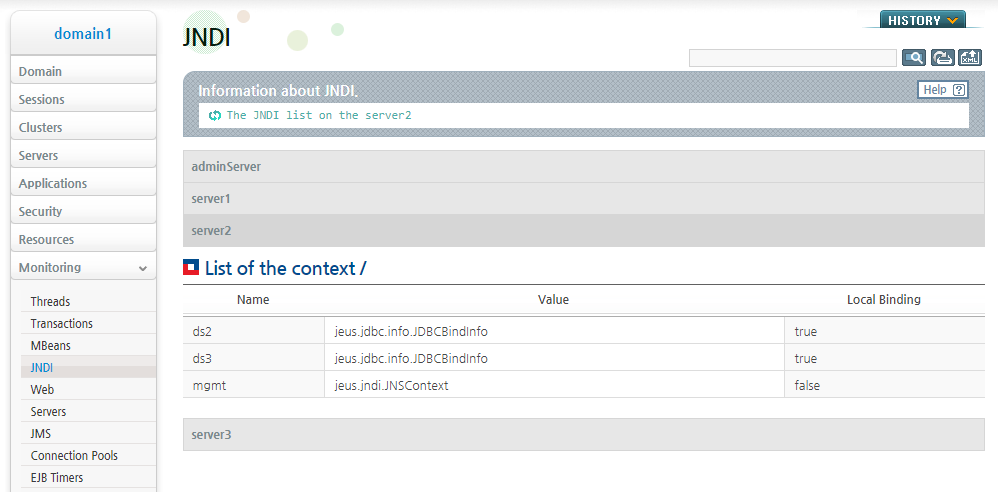
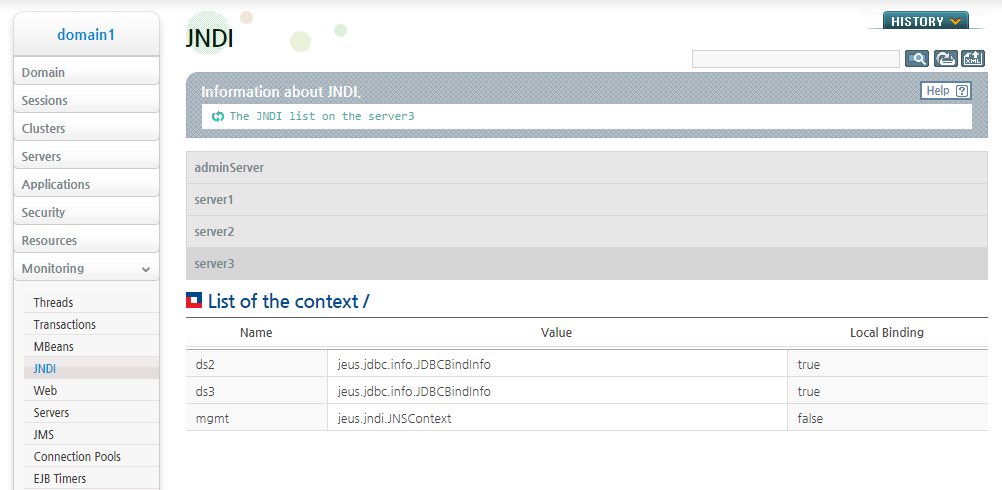
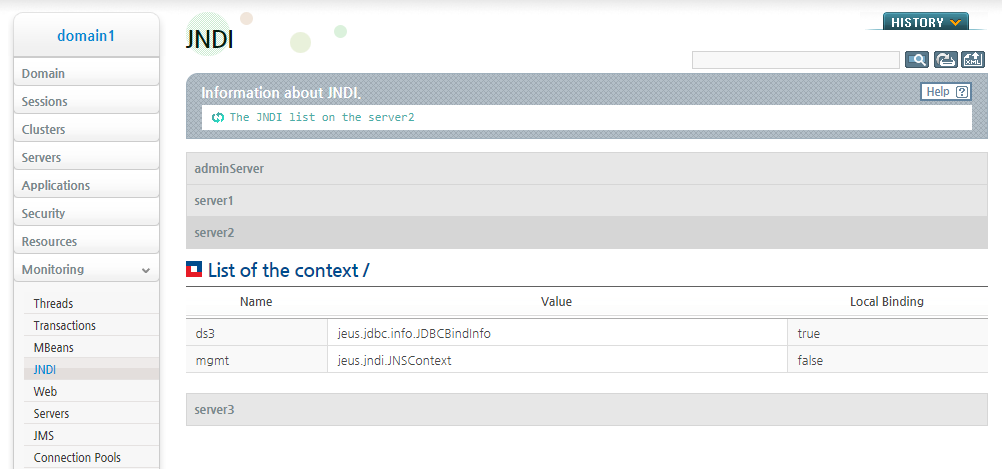
Now that data sources ds2 and ds3 are registered in cluster1, server2 and server3 in cluster1 can use ds2 and ds3. This means that ds2 and ds3 are JNDI bound to the JNDI repository of server2 and server3. Execute jndilist to verify that ds2 and ds3 are bound to the JNDI repository of server2.
[DAS]domain1.adminServer>jndilist -server server2
The JNDI list on the server2
List of the context /
================================================================================
+-------------+------------------------------------------------+---------------+
|     Name    |                      Value                     | Local Binding |
+-------------+------------------------------------------------+---------------+
| ds2         | jeus.jdbc.info.JDBCBindInfo                    | true          |
| ds3         | jeus.jdbc.info.JDBCBindInfo                    | true          |
| JEUSMQ_DLQ  | jeus.jms.common.destination.JeusQueue          | false         |
| mgmt        | jeus.jndi.JNSContext                           | false         |
+-------------+------------------------------------------------+---------------+
================================================================================
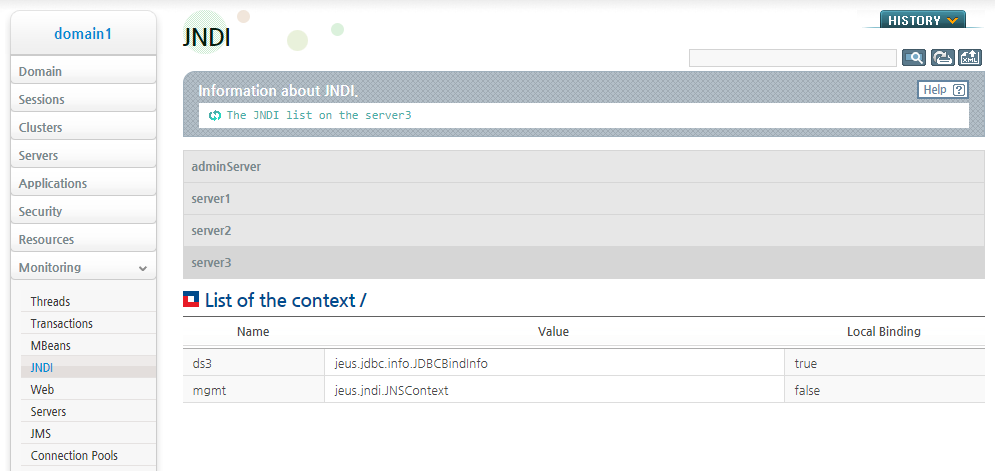
Execute jndilist again to verify that ds2 and ds3 are bound to the JNDI repository of server3.
[DAS]domain1.adminServer>jndilist -server server3
The JNDI list on the server3
List of the context /
================================================================================
+-------------+------------------------------------------------+---------------+
|     Name    |                      Value                     | Local Binding |
+-------------+------------------------------------------------+---------------+
| ds2         | jeus.jdbc.info.JDBCBindInfo                    | true          |
| ds3         | jeus.jdbc.info.JDBCBindInfo                    | true          |
| JEUSMQ_DLQ  | jeus.jms.common.destination.JeusQueue          | false         |
| mgmt        | jeus.jndi.JNSContext                           | false         |
+-------------+------------------------------------------------+---------------+
================================================================================
As data sources can be dynamically removed from a server, they can also be dynamically removed from a cluster. If all data sources registered in a cluster are removed, then all servers in the cluster that were using those data sources cannot use them anymore. If a data source is removed from a cluster, the data source information is unbound from JNDI and connection pool, if exists, is also destroyed on each server.
Using WebAdmin
The following describes how to remove a data source from a cluster in WebAdmin.
-
Select [Clusters] from the left menu of WebAdmin to go to the Clusters page.
-
Click [Lock & Edit] to get the lock.
-
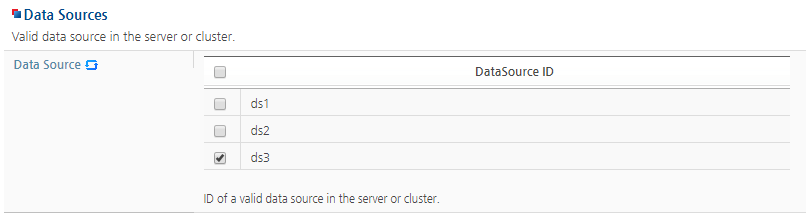
Select a cluster from the Clusters page to dynamically remove a data source. Uncheck the ds2 check box, and then click [OK] to remove the data source from cluster1 as follows:
-
Click [Apply Changes] to remove ds2 from cluster1.
-
Now that data source ds2 is removed from cluster1, server2 and server3 in cluster1 can no longer use ds2 as before. This means that ds2 is unbound from the JNDI repository of server2 and server3, and the connection pool of ds2, if exists, is also destroyed.
Check the JNDI monitoring information to see that ds2 is no longer JNDI bound to server2.
ds2 is also no longer JNDI bound to server3.

Using the Console Tool
The remove-data-sources-from-cluster command is used to dynamically remove a data source from a cluster. For more information about how to use remove-data-sources-from-cluster, refer toJEUS Reference Book. "4.2.4.34. remove-data-sources-from-cluster".
The following is an example of removing ds2 from cluster1 by executing remove-data-sources-from-cluster.
[DAS]domain1.adminServer>rmdsfromcluster -cluster cluster1 -ids ds2
Successfully performed the REMOVE operation for data sources from the cluster [cluster1].
Check the results using "remove-data-sources-from-cluster -cluster cluster1"
Execute 'remove-data-sources-from-cluster -cluster cluster1' to verify that ds2 has been removed from cluster1 and only ds3 remains.
[DAS]domain1.adminServer>rmdsfromcluster -cluster cluster1
Shows the current configuration.
The data sources registered in the cluster [cluster1].
=============================================================
+---------------------------------------------------+-------+
| data sources                                      | ds3   |
+---------------------------------------------------+-------+
=============================================================
Now that ds2 is removed from cluster1, server2 and server3 in cluster1 can no longer use ds2. This means that ds2 is unbound from the repository of server2 and server3 and the connection pool for ds2, if exists, is also destroyed.
Execute jndilist to verify that ds2 is removed from the JNDI repository of server2.
[DAS]domain1.adminServer>jndilist -server server2
The JNDI list on the server2
List of the context /
================================================================================
+-------------+------------------------------------------------+---------------+
|     Name    |                      Value                     | Local Binding |
+-------------+------------------------------------------------+---------------+
| ds3         | jeus.jdbc.info.JDBCBindInfo                    | true          |
| JEUSMQ_DLQ  | jeus.jms.common.destination.JeusQueue          | false         |
| mgmt        | jeus.jndi.JNSContext                           | false         |
+-------------+------------------------------------------------+---------------+
================================================================================
Execute jndilist to verify that ds2 is removed from the JNDI repository of server3.
[DAS]domain1.adminServer>jndilist -server server3
The JNDI list on the server3
List of the context /
================================================================================
+-------------+------------------------------------------------+---------------+
|     Name    |                      Value                     | Local Binding |
+-------------+------------------------------------------------+---------------+
| ds3         | jeus.jdbc.info.JDBCBindInfo                    | true          |
| JEUSMQ_DLQ  | jeus.jms.common.destination.JeusQueue          | false         |
| mgmt        | jeus.jndi.JNSContext                           | false         |
+-------------+------------------------------------------------+---------------+
================================================================================
A server can be dynamically added to a cluster. This involves modifying both the cluster and server configuration, and data source configuration can also be affected by this.
When a server is dynamically added to a cluster, data sources registered on the cluster is available to the newly added server.
However, any data sources previously registered on the newly added server are unbound from JNDI and their connection pool, if exists, is also destroyed.
Using WebAdmin
The following describes how to add a server to a cluster in WebAdmin.
-
Select [Clusters] from the left menu of WebAdmin to go to the Clusters page.
-
Click [Lock & Edit] to get the lock.
-
Select a cluster from the Clusters page to dynamically add a server. Check the server1 check box, and then click [OK] to add the server to the cluster as follows:
-
Click [Apply Changes] to add server1 to cluster1.
-
Now that server1 is added to cluster1, server1 can use ds3 registered in cluster1. This means that ds3 is JNDI bound to the JNDI repository of server1. Also, ds1, which was registered on server1, is still valid on server1.
When the JNDI monitoring information for server1 is checked, it can be seen that ds3 and ds1 are JNDI bound.

Using the Console Tool
The add-servers-to-cluster command is used to dynamically add a server to a cluster. For more information about how to use add-servers-to-cluster, refer toJEUS Reference Book. "4.2.4.8. add-servers-to-cluster".
The following is an example of adding server1 to cluster1 by executing add-servers-to-cluster.
[DAS]domain1.adminServer>add-servers-to-cluster cluster1 -servers server1
Successfully performed the ADD operation for The server list for cluster(cluster1)..
Check the results using "list-clusters cluster1 or add-servers-to-cluster cluster1"
As shown in the previous result message, the result of adding server1 to cluster1 can be checked by executing 'list-clusters cluster1' or 'add-servers-to-cluster cluster1'.
[DAS]domain1.adminServer>add-servers-to-cluster cluster1
Shows the current configuration.
The server list for cluster(cluster1).
===================================================================
+-----------------+-----------------------------------------------+
| List of Servers | server2, server3, server1                     |
+-----------------+-----------------------------------------------+
===================================================================
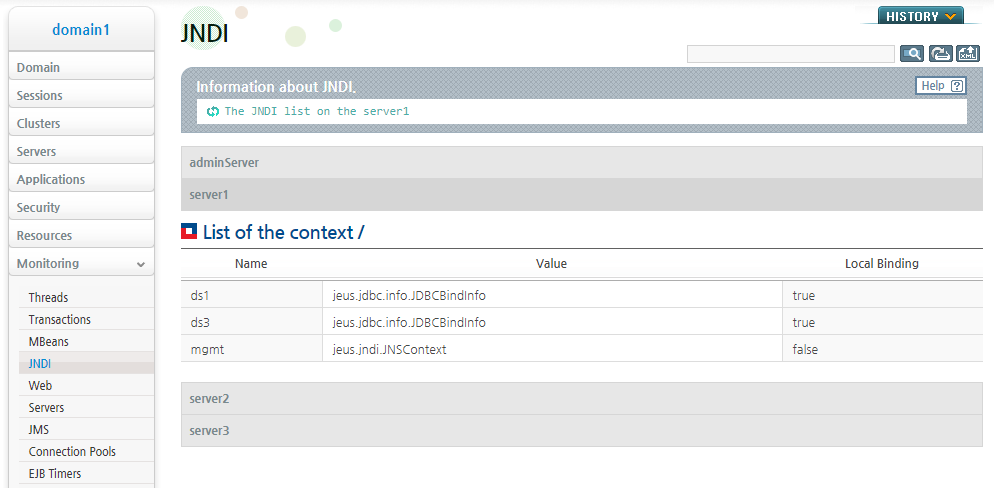
Now that server1 is added to cluster1, server1 can use ds3 registered in cluster1. This means that ds3 is JNDI bound to the JNDI repository of server1. Also, ds1, which was registered on server1, is still valid on server1.
When the JNDI monitoring information for server1 is checked, it can be seen that ds3 and ds1 are JNDI bound.
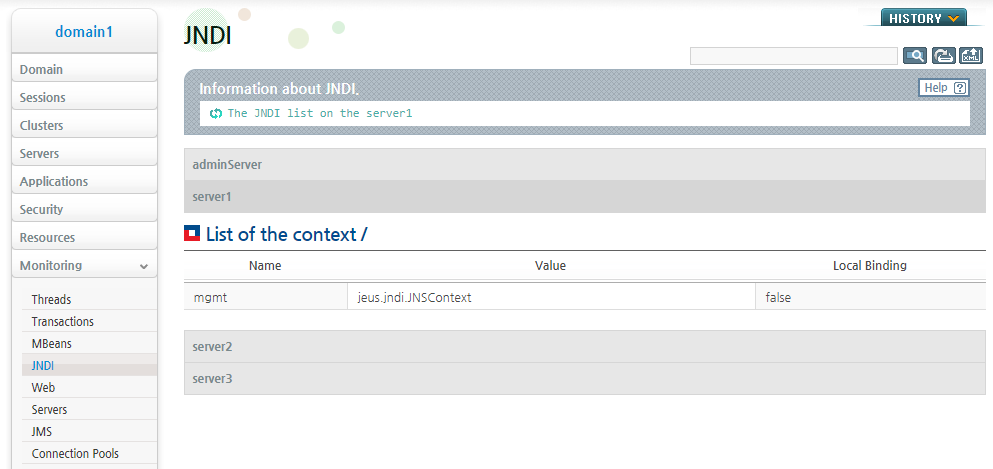
[DAS]domain1.adminServer>jndilist -server server1
The JNDI list on the server1
List of the context /
================================================================================
+-------------+------------------------------------------------+---------------+
|     Name    |                      Value                     | Local Binding |
+-------------+------------------------------------------------+---------------+
| ds1         | jeus.jdbc.info.JDBCBindInfo                    | true          |
| ds3         | jeus.jdbc.info.JDBCBindInfo                    | true          |
| JEUSMQ_DLQ  | jeus.jms.common.destination.JeusQueue          | false         |
| mgmt        | jeus.jndi.JNSContext                            | false         |
+-------------+------------------------------------------------+---------------+
================================================================================
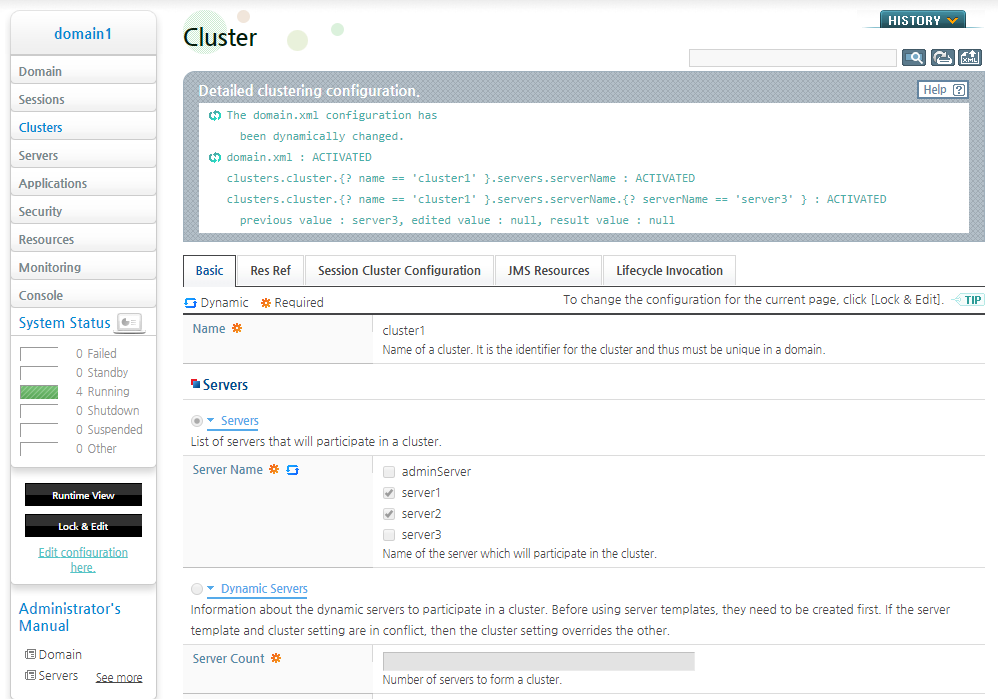
A server can be dynamically removed from a cluster. Same as in dynamically adding a server to a cluster, dynamically removing a server from a cluster also involves modifying both the cluster and server configurations. This may also affect data source configurations.
When a server is dynamically removed from a cluster, the data source registered to the cluster is no longer valid on the server that is deleted from the cluster. The server removed from the cluster unbinds all data source information registered to the cluster and connection pool, if exists, is also destroyed.
However, any data sources that were previously registered on the server are JNDI bound and their connection pool, if exists, is recreated.
Using WebAdmin
The following describes how to remove a server from a cluster in WebAdmin.
-
Select [Clusters] from the left menu of WebAdmin to go to the Clusters page.
-
Click [Lock & Edit] to get the lock.
-
Select a cluster from the Clusters page to dynamically remove a server.Unheck the server3 check box, and then click [OK] to remove the server from cluster1 as follows:
-
Click [Apply Changes] to remove server3 from cluster1.
-
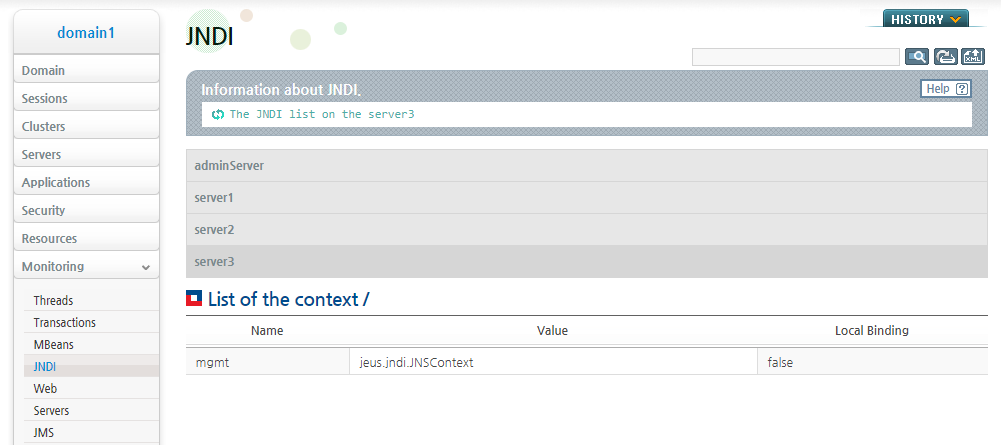
Now that server3 is removed from cluster1, server3 can no longer use ds3 registered to cluster1. This means ds3 is unbound from the JNDI repository of server3 and the connection pool of ds3, if exists, is also destroyed.
When the JNDI monitoring information for server3 is checked, it can be seen that no data source is JNDI bound to server3.

Using the Console Tool
The remove-servers-from-cluster command is used to dynamically remove a server from a cluster. For more information about how to use remove-servers-from-cluster, refer toJEUS Reference Book. "4.2.4.38. remove-servers-from-cluster".
The following is an example of removing server3 from cluster1 by executing remove-servers-from-cluster.
[DAS]domain1.adminServer>remove-servers-from-cluster cluster1 -servers server3
Successfully performed the REMOVE operation for The server list for cluster(cluster1)..
Check the results using "list-clusters cluster1 or remove-servers-from-cluster cluster1"
As shown in the previous result message, execute 'list-clusters cluster1' or 'remove-servers-from-cluster cluster1'. To verify that server3 has been removed from cluster1.
[DAS]domain1.adminServer>remove-servers-from-cluster cluster1
Shows the current configuration.
The server list for cluster(cluster1).
===========================================================
+-----------------+---------------------------------------+
| List of Servers | server2, server1                      |
+-----------------+---------------------------------------+
===========================================================
Now that server3 is removed from cluster1, server3 can no longer use ds3 registered to cluster1. This means that ds3 is unbound from the JNDI repository of server3 and the connection pool of ds3, if exists, is also destroyed.
Execute jndilist to verify that ds3 is removed from the JNDI repository of server3.
[DAS]domain1.adminServer>jndilist -server server3
The JNDI list on the server3
List of the context /
================================================================================
+-------------+------------------------------------------------+---------------+
|     Name    |                      Value                     | Local Binding |
+-------------+------------------------------------------------+---------------+
| JEUSMQ_DLQ  | jeus.jms.common.destination.JeusQueue          | false         |
| mgmt        | jeus.jndi.JNSContext                           | false         |
+-------------+------------------------------------------------+---------------+
================================================================================
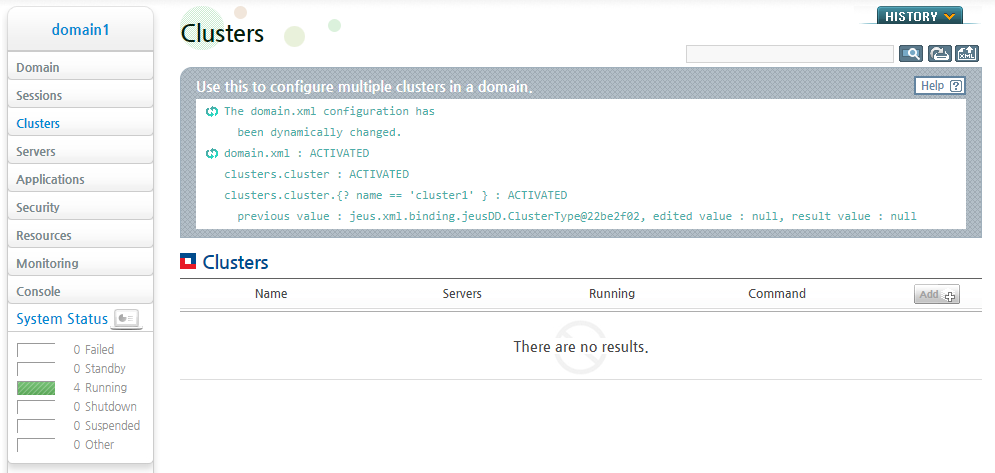
A cluster can be removed from a domain. This involves modifying both the domain and cluster configuration, and data source configuration can also be affected by this.
When a cluster is removed from the domain, all data sources registered to the cluster are no longer valid on the servers in the cluster. The servers in the removed cluster unbinds all the data source information registered to the cluster and their connection pool, if exists, is also destroyed.
However, any data sources that were previously registered on the servers in the removed cluster are JNDI bound and their connection pool, if exists, is recreated.
Using WebAdmin
The following describes how to remove a cluster in WebAdmin.
-
Select [Clusters] from the left menu of WebAdmin to go to the Clusters page.
-
Click [Lock & Edit] to get the lock.
-
Click [Delete] for cluster1 to remove it.
-
Click [Apply Changes] to remove cluster1 from the domain.
-
Now that cluster1 is removed from domain1, server1 and server2 in cluster1 can no longer use ds3 registered in cluster1. This means that ds3 in the JNDI repository of server1 and server2 are unbound, and the connection pool of ds3, if exists, is also destroyed.
When the JNDI monitoring information for server1 is checked, it can be seen that ds3 is unbound and only ds1 remains bound.
It can also be seen that no data source is JNDI bound to the JNDI repository of server2.

Using the Console Tool
The remove-cluster command is used to dynamically remove a cluster from the domain. For more information about how to use remove-cluster, refer toJEUS Reference Book. "4.2.4.31. remove-cluster".
The following is an example of removing cluster1 from domain1 by executing remove-cluster.
[DAS]domain1.adminServer>remove-cluster cluster1
Successfully performed the REMOVE operation for cluster (cluster1).
Check the results using "list-clusters or remove-cluster"
As shown in the previous result message, execute 'list-clusters' or 'remove-cluster' to verify that cluster1 has been removed from domain1.
[DAS]domain1.adminServer>remove-cluster
Shows the current configuration
cluster list
=================================================================
+-------------------------------------------------------+-------+
| List of Clusters                                      | empty |
+-------------------------------------------------------+-------+
=================================================================
Now that cluster1 is removed from domain1, server1 and server2 in cluster1 can no longer use ds3 registered in cluster1. This means that ds3 is unbound from the JNDI repository of server1 and server2 and the connection pool of ds3, if exists, is also destroyed.
Execute jndilist to verify that ds3 is unbound from the JNDI repository of server1 only ds1 remains bound.
[DAS]domain1.adminServer>jndilist -server server1
The JNDI list on the server1
List of the context /
================================================================================
+-------------+------------------------------------------------+---------------+
|     Name    |                      Value                     | Local Binding |
+-------------+------------------------------------------------+---------------+
| ds1         | jeus.jdbc.info.JDBCBindInfo                    | true          |
| JEUSMQ_DLQ  | jeus.jms.common.destination.JeusQueue          | false         |
| mgmt        | jeus.jndi.JNSContext                           | false         |
+-------------+------------------------------------------------+---------------+
================================================================================
Execute jndilist to verify that no data source is bound to the JNDI repository of server2.
[DAS]domain1.adminServer>jndilist -server server2
The JNDI list on the server2
List of the context /
================================================================================
+-------------+------------------------------------------------+---------------+
|     Name    |                      Value                     | Local Binding |
+-------------+------------------------------------------------+---------------+
| JEUSMQ_DLQ  | jeus.jms.common.destination.JeusQueue          | false         |
| mgmt        | jeus.jndi.JNSContext                           | false         |
+-------------+------------------------------------------------+---------------+
================================================================================
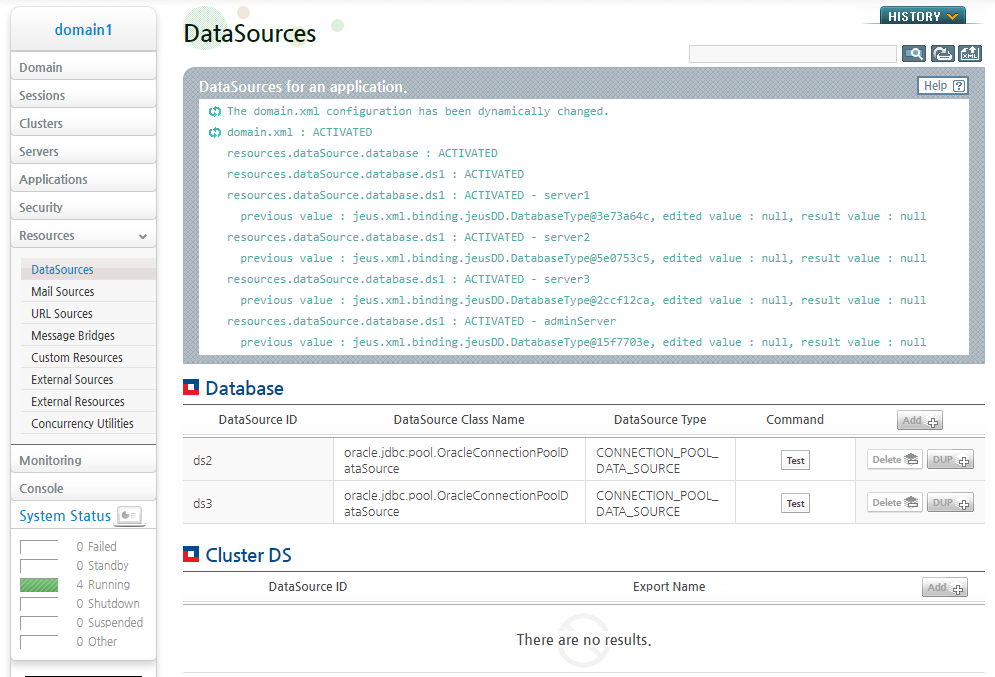
A data source can be dynamically removed from a domain. When a data source is removed from a domain, the deleted data source is no longer valid on the servers and cluster that were using it. The servers that were using the removed data source unbinds the data source and its connection pool, if exists, is also destroyed.
Using WebAdmin
Since ds1 is currently registered on server1, to remove ds1 from the domain, first the check box for Delete Reference in the WebAdmin configuration menu must be checked. For information about how to adjust the environment configuration menu in WebAdmin, refer toJEUS WebAdmin Guide. "2.3.1. Header".
The following describes how to remove a data source in WebAdmin.
-
Select [Resources] > [DataSources] from the left menu of WebAdmin to go to the DataSources page.
-
Click [Lock & Edit] to get the lock.
-
Click [Delete] for ds1 to remove it.
-
Click [Apply Changes] to permanently remove ds1 from the domain.
-
Now that ds1 is removed from domain1, server1 can no longer use ds1. This means that ds1 is unbound from the JNDI repository of server1 and the connection pool of ds1, if exists, is destroyed.
Check the JNDI repository of server1 to verify that ds1 has been removed.
Using the Console Tool
The remove-data-source command is used to dynamically remove a data source from the domain. For more information about remove-data-source refer toJEUS Reference Book. "4.2.11.8. remove-data-source".
The following is an example of removing ds1 from domain1 by executing remove-data-source.
[DAS]domain1.adminServer>rmds -id ds1
Successfully performed the REMOVE operation for data source [ds1] from the domain.
================================================================================
+---------------------------------------------------------+--------+-----------+
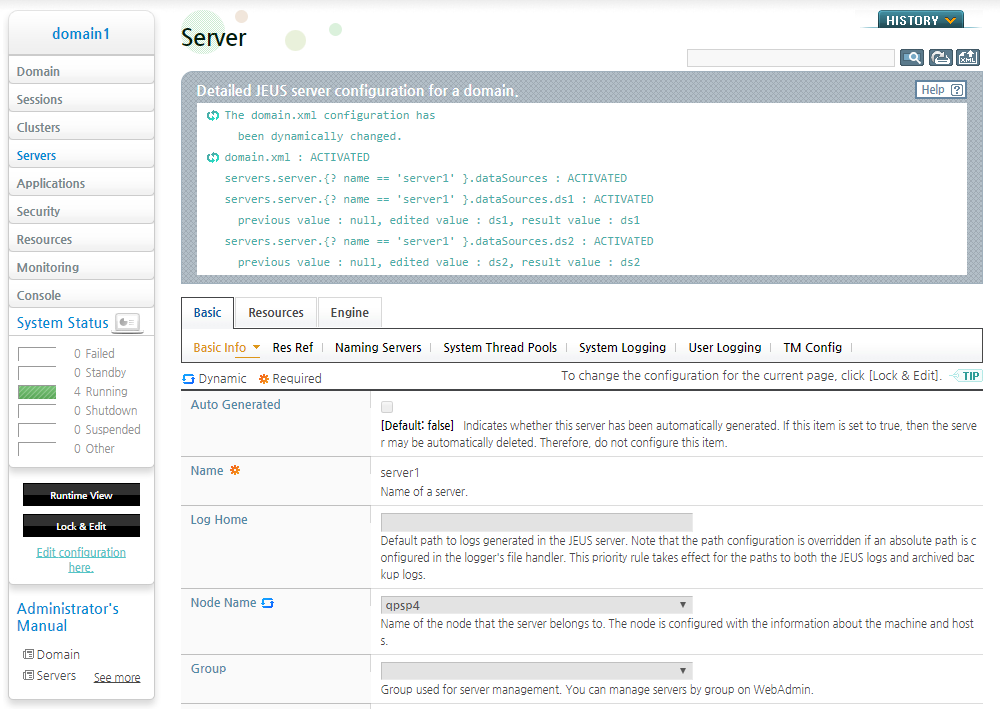
| resources.dataSource.database | MODIFY | ACTIVATED |
| servers.server.{? name == 'server1' }.dataSources | MODIFY | ACTIVATED |
+---------------------------------------------------------+--------+-----------+
================================================================================
Check the results using "remove-data-source"
The previous result message shows that executing remove-data-source to delete ds1 has also modified server1 to which ds1 was registered. The result shows that ds1 as well as ds1 information on server1 have been removed from domain1. When a dynamic configuration command is executed in this way, the result shows all related configuration changes that have occurred at runtime due to the command execution. For more information about how to use dynamic configuration commands, refer toJEUS Domain Guide. "Chapter 3. Changing Domain Settings".
As shown in the previous result message, the result can be checked by executing remove-data-source without any options.
[DAS]domain1.adminServer>rmds
Shows the current configuration.
Data sources in domain
====================================================================
+------+-----------------------------------------------------------+
| ds2  | common data source                                        |
| ds3  | common data source                                        |
+------+-----------------------------------------------------------+
====================================================================
Now that ds1 is removed from domain1, server1 can no longer use ds1. This means that ds1 is unbound from the JNDI repository of server1 and the connection pool of ds1, if exists, is also destroyed.
Execute jndilist and verify that ds1 is unbound from the JNDI repository of server1.
[DAS]domain1.adminServer>jndilist -server server1
The JNDI list on the server1
List of the context /
================================================================================
+-------------+------------------------------------------------+---------------+
|     Name    |                      Value                     | Local Binding |
+-------------+------------------------------------------------+---------------+
| JEUSMQ_DLQ  | jeus.jms.common.destination.JeusQueue          | false         |
| mgmt        | jeus.jndi.JNSContext                           | false         |
+-------------+------------------------------------------------+---------------+
================================================================================
So far, we saw how data sources are managed when a data source, server, or cluster is added or removed. This section describes how to modify the data source configuration.
As discussed in"6.4. Data Source Configuration", the data source configuration largely consists of the basic configurations needed for driver set up and the connection pool configuration. The driver set up configurations cannot be changed dynamically, but some basic configurations and most of the connection pool configurations can be changed dynamically. When static configurations are changed they are recorded in the configuration file but not applied to runtime. The server must be restarted to apply the changes to runtime. The dynamic configuration changes are also recorded in the configuration file, and they are applied immediately to runtime.
There are various dynamic data source configurations, and we will look into examples of the minimum and maximum connection value of the connection pool which are expected to change dynamically frequently. The configurations are changed and verified using the data source ds2, and ds2 is registered on server1 and its connection pool is created. The method for registering data sources on the server have already been described. From here on, the method for creating the actual ds2 connection pool on server1 is described.
Using WebAdmin
The following describes how to create a connection pool in WebAdmin.
-
In WebAdmin, from the left menu, select [Monitoring] > [Connection Pools] and then select a server to create a connection pool that is valid on the server. Click ds2 to create a connection pool for ds2.
-
Connection pool information for ds2 is displayed. Click [Create] to create the connection pool.
-
A connection pool for ds2 is created.
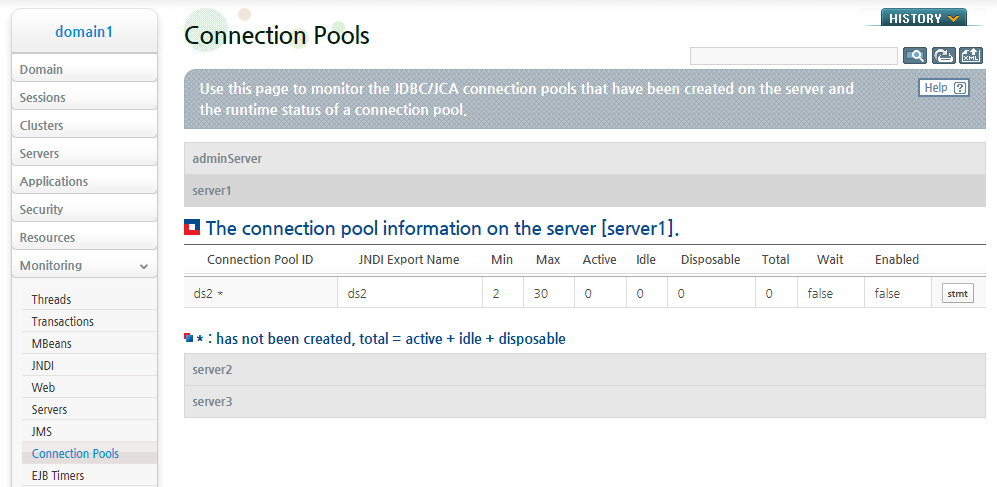
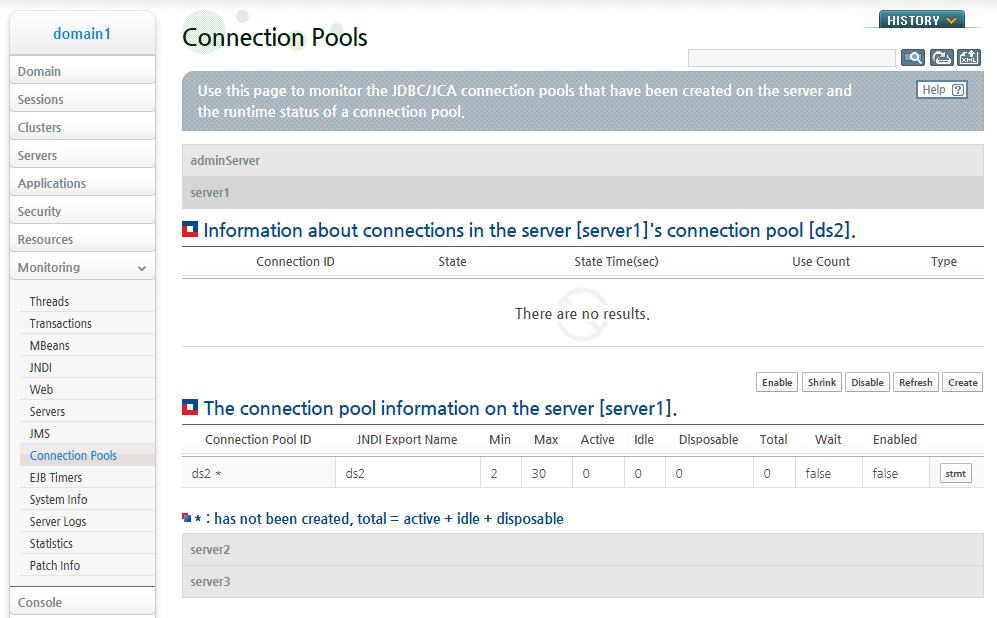
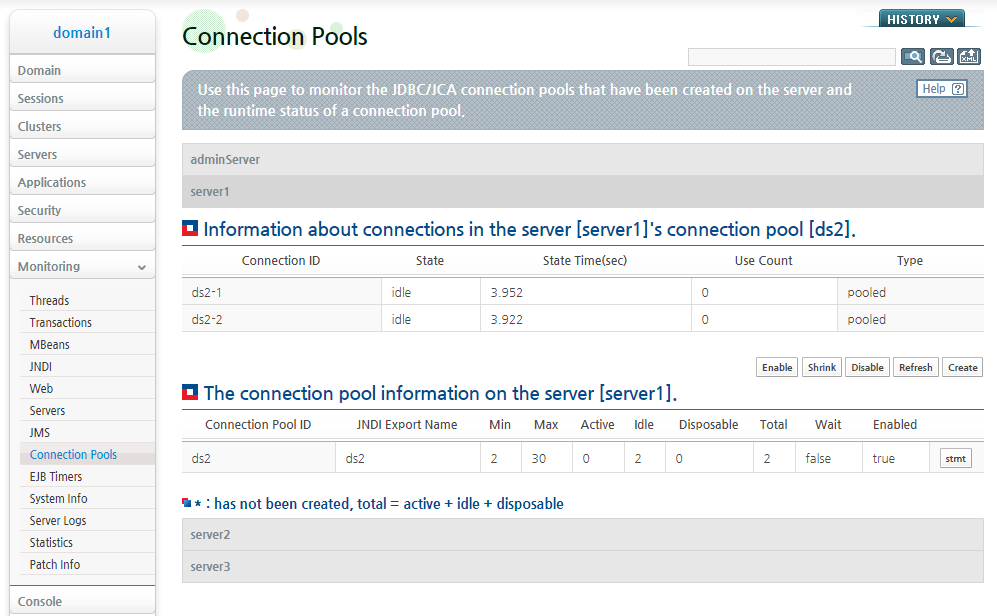
The minimum connection value is set to 2 and the maximum connection value is set to 30 for the runtime connection pool of ds2. This is the default value when ds2 is initially added to the domain. The following describes the process of changing the minimum and maximum connection values of ds2.
-
Select [Resources] > [DataSources] from the left menu of WebAdmin to go to the DataSources page.
-
Click [Lock & Edit] to get the lock.
-
Select a data source from the Database list to dynamically configure the data source. The following is an example of changing the minimum and maximum values of the ds2 connection pool to 10 and 50 respectively.
Set the configuration values of Min and Max to 10 and 50, and click [OK] .
-
To apply the changes to the minimum and maximum connection values of ds2 connection pool, click [Apply Changes].
-
The following shows the changes applied to the ds2 connection pool created in server1.
-
The following page shows the result of creating ds2 connection pool on server1, and configuring its minimum and maximum runtime connection values.
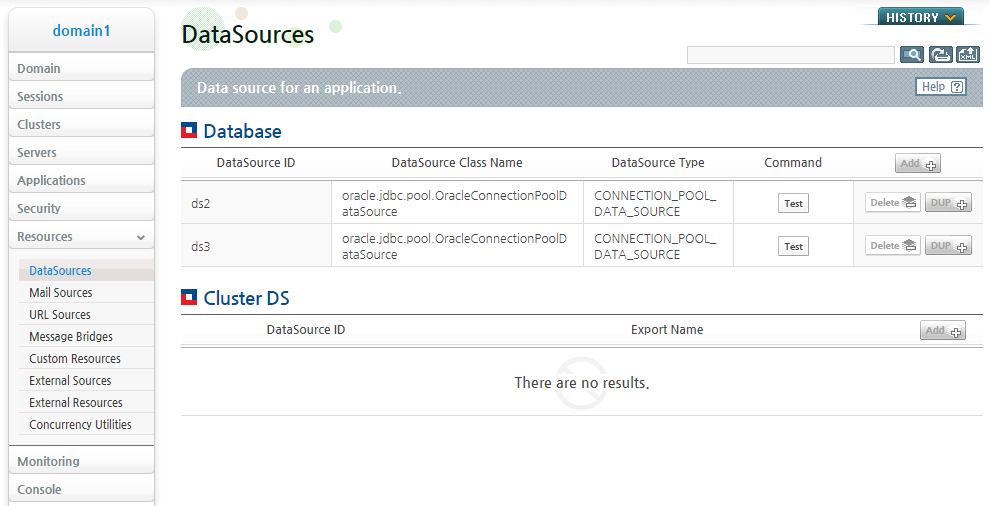
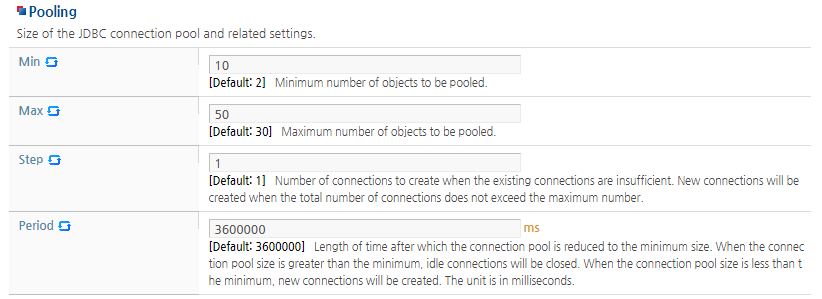
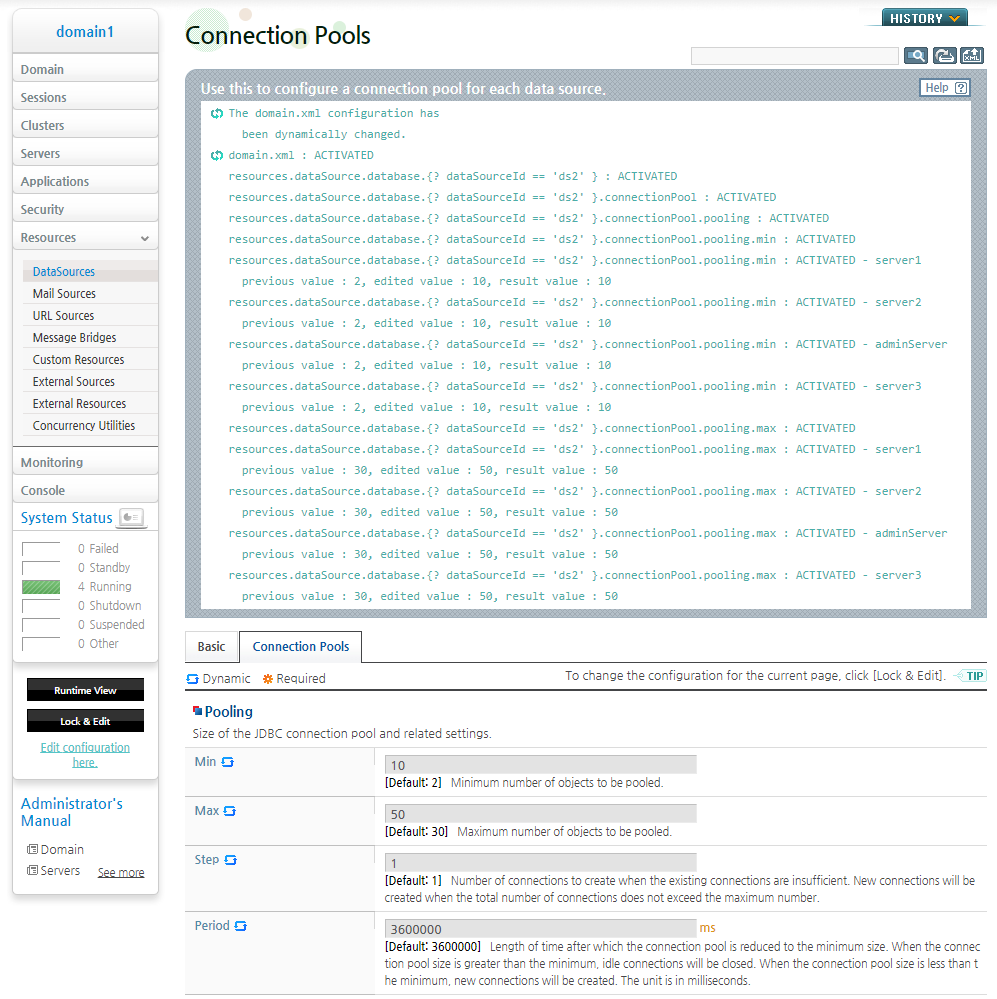
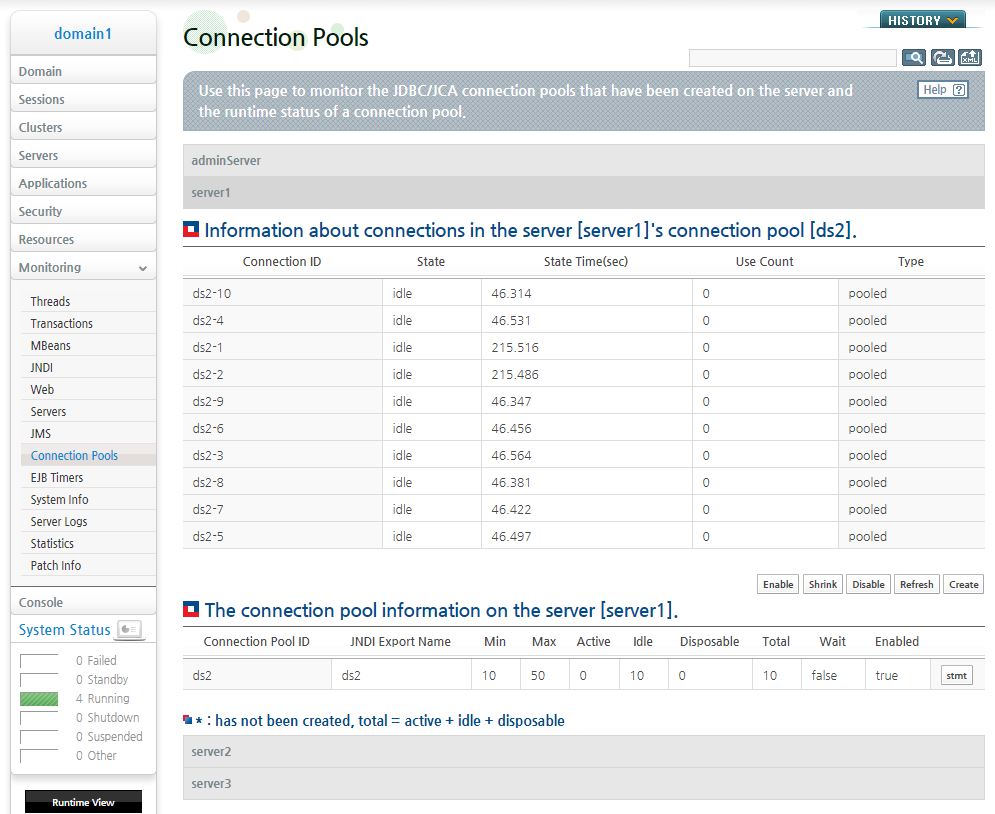
Using the Console Tool
The create-connection-pool command is used to create a connection pool. For more information about create-connection-pool, refer to JEUS Reference Book. "4.2.12.4. create-connection-pool".
The following is an example of creating a connection pool for ds2 by executing create-connection-pool. The result message shows that the connection pool for ds2 has been created on server1.
[DAS]domain1.adminServer>createcp -id ds2
Servers that successfully created a connection pool : server1
Servers that failed to create a connection pool : none.
Execute connection-pool-info to check the minimum and maximum connection values of the runtime connection pool. For more information about this command, refer to JEUS Reference Book. "4.2.12.1. connection-pool-info".
The following is an example of checking the minimum and maximum connection values of the ds2 runtime connection pool created on server1 by executing connection-pool-info.
[DAS]domain1.adminServer>cpinfo -server server1
The connection pool information on the server [server1].
================================================================================
+--------+-----+-----+--------+-----+--------+-----+--------+-----+-----+------+
| Connec | Min | Max | Active | Act | Active | Idle| Dispos | Tot | Wait| Enab |
|  tion  |     |     |   Max  | ive | Average|     |  able  | al  |     | led  |
|Pool ID |     |     |        |     |        |     |        |     |     |      |
+--------+-----+-----+--------+-----+--------+-----+--------+-----+-----+------+
| ds2    |   2 |  30 |      0 |   0 |    0.0 |   2 |      0 |   2 | fal | true |
|        |     |     |        |     |        |     |        |     |se   |      |
+--------+-----+-----+--------+-----+--------+-----+--------+-----+-----+------+
* : has not been created, total = active + idle + disposable
================================================================================
As shown in the previous example, the minimum and maximum connection values of the ds2 runtime connection pool are configured to 2 and 30 respectively. These are the default values set when ds2 is initially added to the domain.
The following describes how to change the minimum and maximum connection values of ds2.
Execute modify-data-source to dynamically change the data source configurations. All configurations that can be changed with modify-data-source can be checked by executing 'help' or referring to JEUS Reference Book. "4.2.11.6. modify-data-source". Dynamic configurations and related options are tagged to show which ones are dynamic configurations.
The following is an example of changing ds2's minimum and maximum connection values to 10 and 50 by executing modify-data-source.
[DAS]domain1.adminServer>modifyds -id ds2 -min 10 -max 50
Successfully performed the MODIFY operation for configuration of the data source [ds2].
Check the results using "modify-data-source -id ds2"
As shown in the previous result message, the result can be checked by executing 'modify-data-source -id ds2'.
[DAS]domain1.adminServer>modifyds -id ds2
Shows the current configuration.
configuration of the data source [ds2]
================================================================================
+----------------------------+-------------------------------------------------+
| id                         | ds2                                             |
| export-name                | ds2                                             |
| data-source-class-name     | oracle.jdbc.pool.OracleConnectionPoolDataSource |
| data-source-type           | ConnectionPoolDataSource                        |
| server-name                | 192.168.1.165                                   |
| port-number                | 1521                                            |
| database-name              | ora10g                                          |
| user                       | jeustest1                                       |
| password                   | jeustest1                                       |
| login-timeout              | 0                                               |
| auto-commit                | DRIVER                                          |
| stmt-query-timeout         | 0                                               |
| pool-destroy-timeout       | 10000                                           |
| property                   | driverType;java.lang.String;thin                |
| support-xa-emulation       | false                                           |
| min                        | 10                                              |
| max                        | 50                                              |
| step                       | 1                                               |
| period                     | 3600000                                         |
| enable-wait                | false                                           |
| wait-time                  | 10000                                           |
| max-use-count              | 0                                               |
| dbaTimeout                 | -1                                              |
| stmt-caching-size          | -1                                              |
| stmt-fetch-size            | -1                                              |
| connection-trace           | false                                           |
| get-connection-trace       | true                                            |
| auto-commit-trace          | false                                           |
| use-sql-trace              | false                                           |
| keep-connection-handle-open| false                                           |
+----------------------------+-------------------------------------------------+
================================================================================
The following is an example of checking the minimum and maximum connection values of the ds2 runtime connection pool created on server1 by executing connection-pool-info. The minimum and maximum connection values of ds2 runtime have been changed to 10 and 50 respectively.
[DAS]domain1.adminServer>cpinfo -server server1
The connection pool information on the server [server1].
================================================================================
+--------+-----+-----+--------+-----+--------+-----+--------+-----+-----+------+
| Connec | Min | Max | Active | Act | Active | Idle| Dispos | Tot | Wait| Enab |
|  tion  |     |     |   Max  | ive | Average|     |  able  | al  |     | led  |
|Pool ID |     |     |        |     |        |     |        |     |     |      |
+--------+-----+-----+--------+-----+--------+-----+--------+-----+-----+------+
| ds2    |  10 |  50 |      0 |   0 |    0.0 |  10 |      0 |  10 | fal | true |
|        |     |     |        |     |        |     |        |     |se   |      |
+--------+-----+-----+--------+-----+--------+-----+--------+-----+-----+------+
* : has not been created, total = active + idle + disposable
================================================================================
In JEUS 7 and later versions, it is not recommended to manually edit the configuration settings in the configuration file. To check the settings, it is recommended to use the data source configuration commands instead of directly accessing the configuration file.
This section describes how to check the data source configurations using WebAdmin and the console tool.
Using WebAdmin
The following describes how to check the data source configurations in WebAdmin.
-
Select [Resources] > [DataSources] from the left menu of WebAdmin to go to the Data Source page. Select a data source from the Database list to check the data source configurations.
-
The following is an example of checking the configurations of ds2.
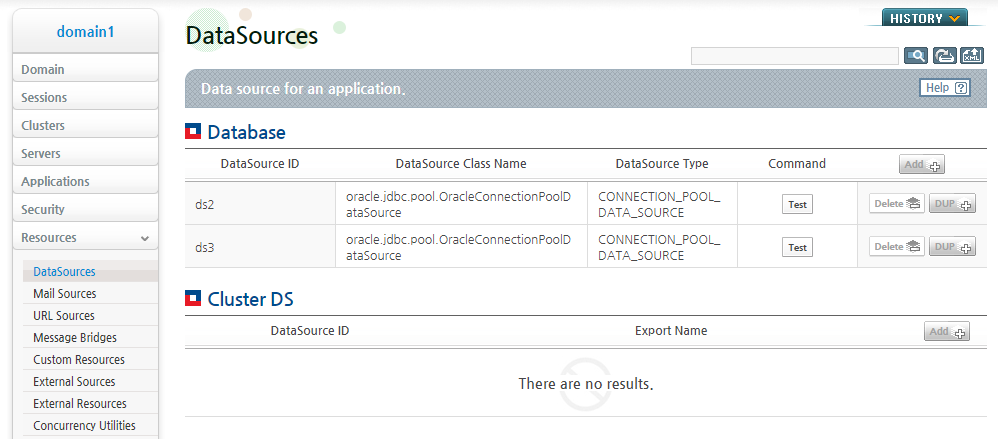
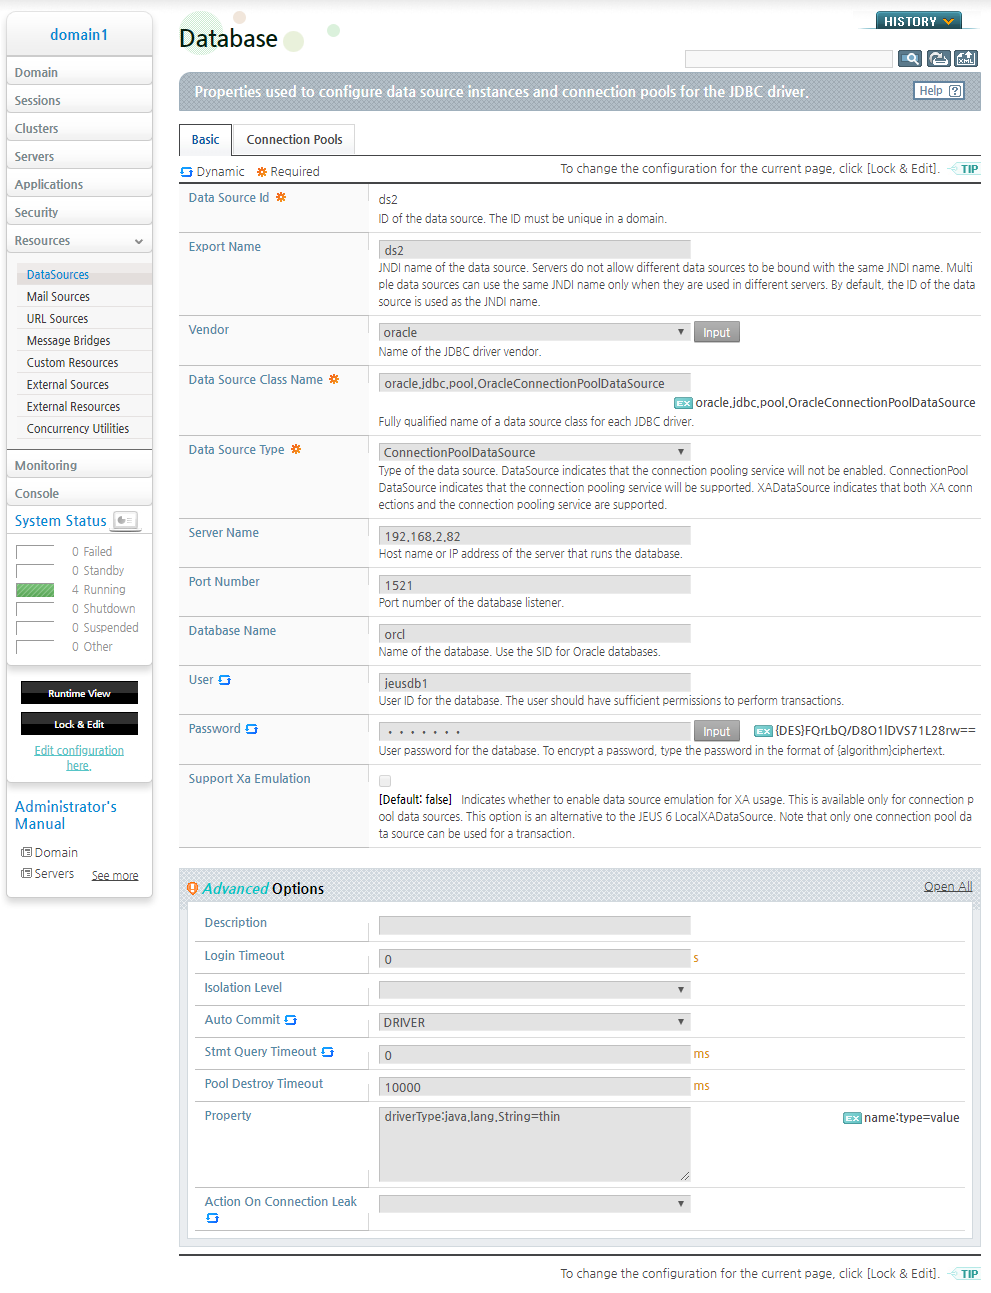
Using the Console Tool
The list-data-sources command is used to check the list of all data sources that exist in the domain.
The following is an example of checking the data sources in the domain by executing list-data-sources.
[DAS]domain1.adminServer>lsds
The list of data sources
================================================================================
+----------------+----------------------+--------------------------------------+
| Data Source ID |   JNDI Export Name   |           Data Source Type           |
+----------------+----------------------+--------------------------------------+
| ds2            | ds2                  | ConnectionPoolDataSource             |
| ds3            | ds3                  | ConnectionPoolDataSource             |
+----------------+----------------------+--------------------------------------+
================================================================================
If a data source ID is given as an option, data source configuration details are displayed.
The following is an example of checking the detailed configuration of ds2 by executing list-data-sources.
[DAS]domain1.adminServer>lsds -id ds2
The configuration of the data source [ds2]
================================================================================
+----------------------------+-------------------------------------------------+
|     Configuration name     |               Configuration value               |
+----------------------------+-------------------------------------------------+
| id                         | ds2                                             |
| export-name                | ds2                                             |
| data-source-class-name     | oracle.jdbc.pool.OracleConnectionPoolDataSource |
| data-source-type           | ConnectionPoolDataSource                        |
| server-name                | 192.168.1.165                                   |
| port-number                |                                            1521 |
| database-name              | ora10g                                          |
| user                       | jeustest1                                       |
| password                   | jeustest1                                       |
| login-timeout              |                                               0 |
| auto-commit                | DRIVER                                          |
| stmt-query-timeout         |                                               0 |
| pool-destroy-timeout       |                                           10000 |
| property                   | [driverType;java.lang.String;thin]              |
| support-xa-emulation       | false                                           |
| min                        |                                              10 |
| max                        |                                              50 |
| step                       |                                               1 |
| period                     |                                         3600000 |
| enable-wait                | false                                           |
| wait-time                  |                                           10000 |
| max-use-count              |                                               0 |
| dbaTimeout                 |                                              -1 |
| stmt-caching-size          |                                              -1 |
| stmt-fetch-size            |                                              -1 |
| connection-trace           | false                                           |
| get-connection-trace       | true                                            |
| auto-commit-trace          | false                                           |
| use-sql-trace              | false                                           |
| keep-connection-handle-open| false                                           |
+----------------------------+-------------------------------------------------+
================================================================================
By using examples, this section describes how to dynamically change the configurations related to cluster data sources. For better understanding, knowledge about JEUS domain structure and data source management structure in the domain are required. Knowledge about using each configuration item of the cluster data source is also required.
For information about JEUS domain structure, refer to JEUS Domain Guide. "1.3. Components". For information about the data source management structure in the domain and how to use each configuration item, refer to "6.3. Management of Data Sources and Connection Pools" and "6.5. Cluster Data Source Configuration".
Dynamic changes can be applied in the console tool or WebAdmin. Both methods are described in this section. Abbreviated commands and option names are used for describing the console tool method. For more information about how to use abbreviated commands and option names, execute 'help' in the console tool or refer to JEUS Reference Book. "4.2.12. Connection Pool Controlling and Monitoring Commands".
First perform some preparation tasks to help with the explanation. Create a domain named domain1 and a DAS named adminServer. After starting DAS, add three MSs named server1, server2, and server3 to domain1 and start them. Then, group server2 and server3 to a cluster named cluster1. For information about configuration methods related to the domain, cluster, and server, refer to JEUS Domain Guide. "Chapter 2. Creating a Domain", JEUS Domain Guide. "Chapter 5. JEUS Clustering", and "Chapter 2. JEUS Configuration". From here on, it is assumed that the aforementioned preparation tasks have been completed.
Note
Since all examples are related to each other, the contents of this section should be read in order.
Like other data sources, a cluster data source can also be added dynamically. Always keep in mind that when a cluster data source is added, the component data sources in the cluster data source must also be added.
This section describes an example of adding a cluster data source made up of data sources ds1 and ds2 to domain1. The cluster data source ID is cds1.
Using WebAdmin
The data sources ds1 and ds2 which are the component data sources of cds1 have to be added to domain1. For information about how to add a data source to the domain in WebAdmin, refer to "6.6.1. Adding a Data Source". From here on, it is assumed that ds1 and ds2 have been added to domain1.
-
Select [Resources] > [DataSources] from the left menu of WebAdmin to go to the DataSources page.
-
Click [Lock & Edit] to get the lock.
-
Click [Add] in the Cluster DS list to go to the page for dynamically adding a data source to a domain. The following is an example of adding a cluster data source with the ID cds1 to the domain. When finished, click [OK].
-
Click [Apply Changes] to add cds1 to the domain.
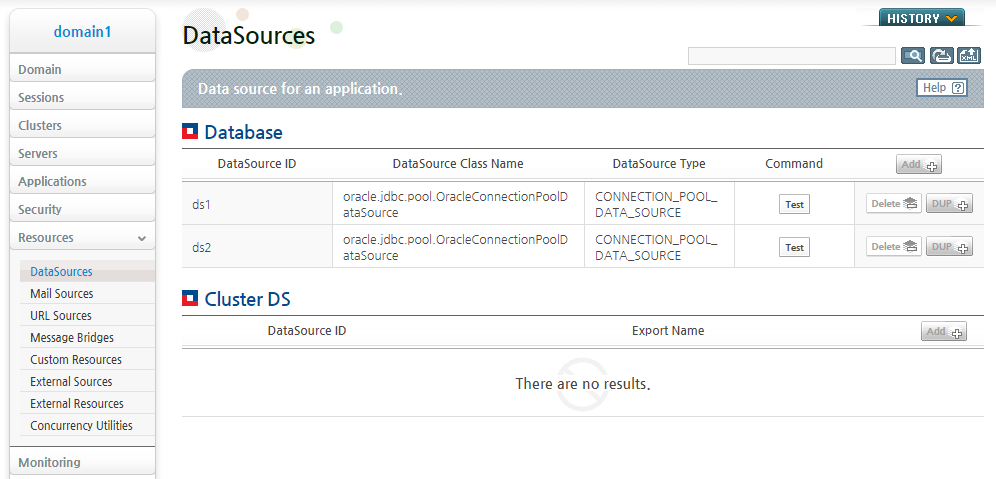

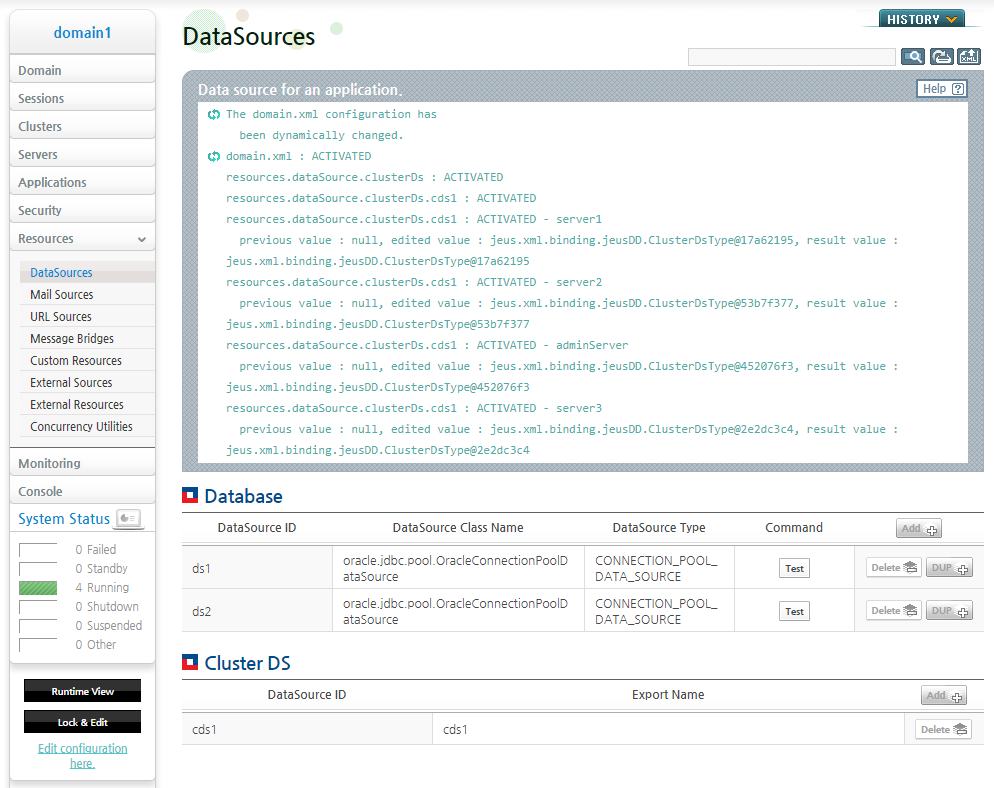
Using the Console Tool
The data sources ds1 and ds2 that are the component data source of cds1 must be added to domain1.
The following is an example of adding ds1 and ds2 to domain1 by executing add-data-source. For more information about using add-data-source, refer to JEUS Reference Book. "4.2.11.2. add-data-source".
[DAS]domain1.adminServer>addds -id ds1 -dst ConnectionPoolDataSource -dscn oracle.jdbc.pool.OracleConnectionPoolDataSource -sn 192.168.1.165 -pn 1521 -dn ora10g -user jeustest1 -password jeustest1 -property driverType;java.lang.String;thin
Successfully performed the ADD operation for data source [ds1] to domain.
Check the results using "add-data-source"

[DAS]domain1.adminServer>addds -id ds2 -dst ConnectionPoolDataSource -dscn oracle.jdbc.pool.OracleConnectionPoolDataSource -sn 192.168.1.165 -pn 1521 -dn ora10g -user jeustest1 -password jeustest1 -property driverType;java.lang.String;thin
Successfully performed the ADD operation for data source [ds2] to domain.
Check the results using "add-data-source"
After adding ds1 and ds2 to domain1, add cds1 to domain1.
Execute add-cluster-data-source to dynamically add a cluster data source. For more information about using add-cluster-data-source, refer to JEUS Reference Book. "4.2.11.1. add-cluster-data-source". Option values corresponding to each cluster data source configuration items must be given with the command.
The following is an example of entering some required configurations by executing add-cluster-data-source and adding the cluster data source cds1 to domain1.
[DAS]domain1.adminServer>addcds -id cds1 -cds ds1,ds2
Successfully performed the ADD operation for cluster data source [cds1] to domain.
Check the results using "add-cluster-data-source"
As shown in the previous result message, the result of adding cds1 can be checked by executing add-cluster-data-source without any options.
[DAS]domain1.adminServer>addcds
Shows the current configuration.
Data sources in domain
====================================================================
+------+-----------------------------------------------------------+
| ds1  | common data source                                        |
| ds2  | common data source                                        |
| cds1 | cluster data source                                       |
+------+-----------------------------------------------------------+
====================================================================
To use a cluster data source, it must be registered to a server like other data sources. Only when a cluster data source is registered on a server, the cluster data source information is bound to the JNDI repository of the server. After this, deployed applications can look up the cluster data source, but the component data sources grouped into the cluster data source must be registered on the server.
Each component data source provides the connection pool service, and their connection pool is created on the server. To use the cluster data sources as desired, the component data sources in the cluster data source must be registered on the server where the cluster data source is registered on.
This section describes how to register cds1 to server1.
Using WebAdmin
The component data sources ds1 and ds2 of cds1 must also be registered on server1. For information on registering a data source to a server in WebAdmin, refer to "6.6.2. Registering a Data Source on a Server". Hereafter, it is assumed that ds1 and ds2 are registered on server1.
-
Select [Servers] from the left menu of WebAdmin to go to the Servers page.
-
Click [Lock & Edit] to get the lock.
-
Select a server from the Servers page to go to the Server page where you can dynamically add a data source.
Check the cds1 check box, and then click [OK] to add the data source to server1 as follows:
-
Click [Apply Changes] to register cds1 to server1.
-
When the JNDI monitoring information for server1 is checked, it can be seen that cds1 and its component data sources ds1 and ds2 are bound to the JNDI repository of server1. Since the JNDI name of cds1 has not been specified, the data source ID is also used as the JNDI name.
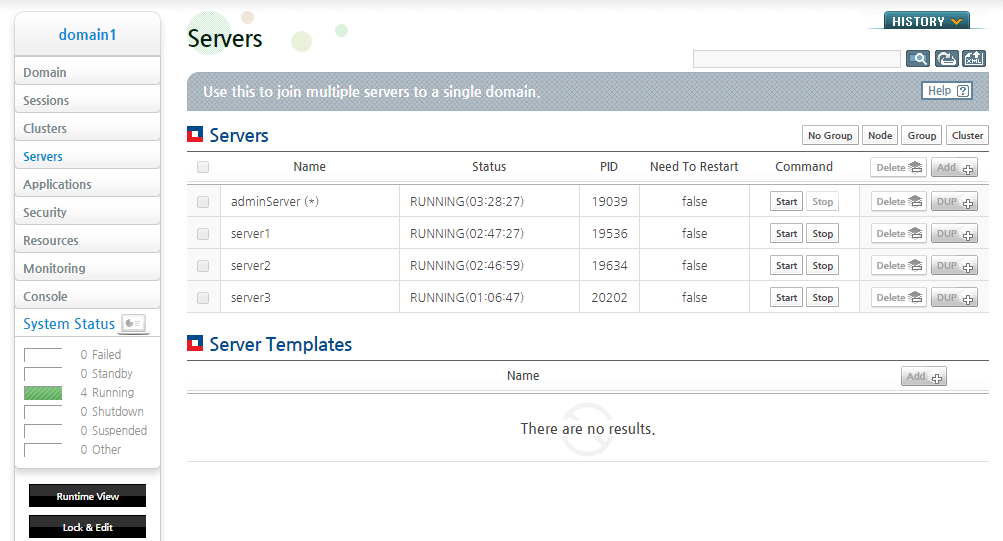
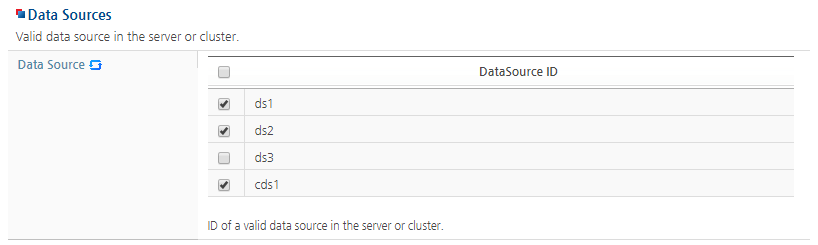
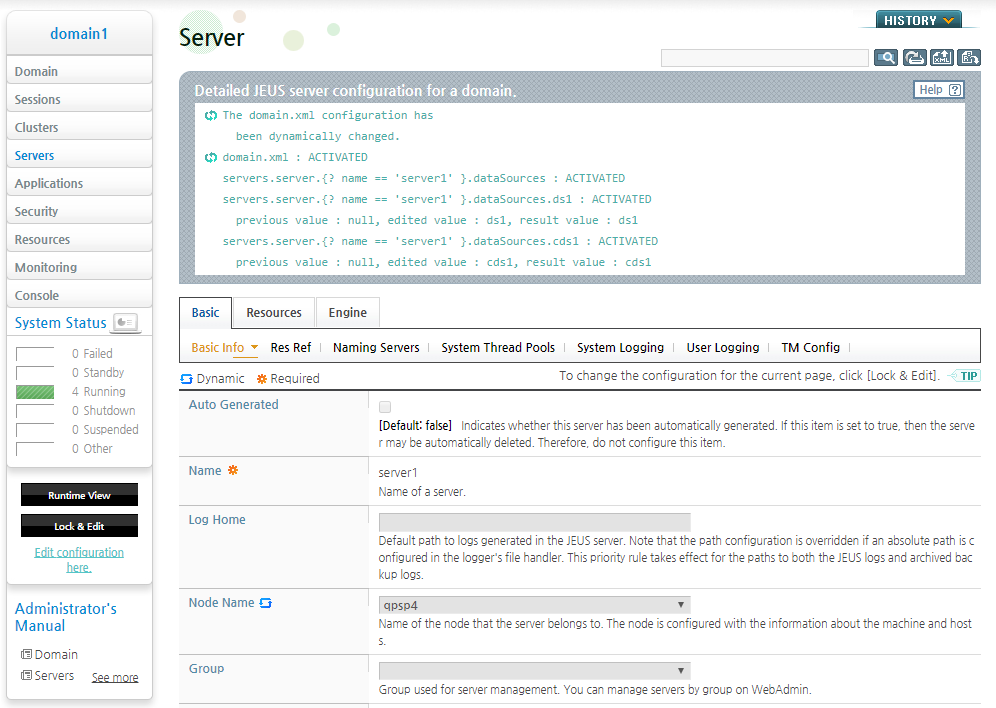

Using the Console Tool
The component data sources ds1 and ds2 of cds1 must also be registered on server1.
The following is an example of registering ds1, ds2, and cds1 on server1 by executing add-data-sources-to-server. For more information about how to use add-data-sources-to-server, refer to JEUS Reference Book. "4.2.3.2. add-data-sources-to-server".
[DAS]domain1.adminServer>adddstosvr -server server1 -ids ds1,ds2,cds1
Successfully performed the ADD operation for data sources to the server [server1].
Check the results using "add-data-sources-to-server -server server1"
As shown in the previous result message, the result of registering ds1,ds2, and cds2 can be checked by executing 'add-data-sources-to-server -server server1'.
[DAS]domain1.adminServer>adddstosvr -server server1
Shows the current configuration.
Data sources registered in the server [server1].
==========================================================
+--------------+-----------------------------------------+
| data sources | ds1, ds2, cds1                          |
+--------------+-----------------------------------------+
==========================================================
Execute jndilist to verify that ds1, ds2, and cds1 are bound to the JNDI repository of server1.
[DAS]domain1.adminServer>jndilist -server server1
The JNDI list on the server1
List of the context /
================================================================================
+-------------+------------------------------------------------+---------------+
|     Name    |                      Value                     | Local Binding |
+-------------+------------------------------------------------+---------------+
| cds1        | jeus.jdbc.info.JDBCBindInfo                    | true          |
| ds1         | jeus.jdbc.info.JDBCBindInfo                    | true          |
| ds2         | jeus.jdbc.info.JDBCBindInfo                    | true          |
| JEUSMQ_DLQ  | jeus.jms.common.destination.JeusQueue          | false         |
| mgmt        | jeus.jndi.JNSContext                           | false         |
+-------------+------------------------------------------------+---------------+
================================================================================
Cluster data sources registered on the server can also be dynamically removed from the server like other data sources.
Like other data sources, when a cluster data source is removed from the server, the cluster data source information is unbound from JNDI. Cluster data source does not have its own connection pool, and the actual connection pool is created in the component data sources in the cluster data source. Therefore, when a cluster data source is removed from a server, unlike other data sources, the 'destroy' command does not execute for the connection pool. Although it may be assumed that the connection pool of the component data sources in the cluster data source will be destroyed, since each component data source can function as an independent data source, it is neither unbound from JNDI nor destroyed.
Using WebAdmin
The following describes how to remove a cluster data source from a server in WebAdmin.
-
Select [Servers] from the left menu of WebAdmin to go to the Servers page.
-
Click [Lock & Edit] to get the lock.
-
Select a server from the Servers page to go to the Server page where you can dynamically remove a data source. Uncheck the cds1 check box, and then click [OK] to remove the data source from server1 as follows:
-
Click [Apply Changes] to remove cds1 from server1.
-
When the JNDI monitoring information for server1 is checked, it can be seen that cd1 is unbound from the JNDI repository of server1.
After cds1 had been removed from the server1, ds1 and ds2 still exist in server 1. They are used as data source in server1. However, from the point of view of data source management, ds1 and ds2 need to be removed from the server along with cds1 as they were registered when cds1 was added to the server.
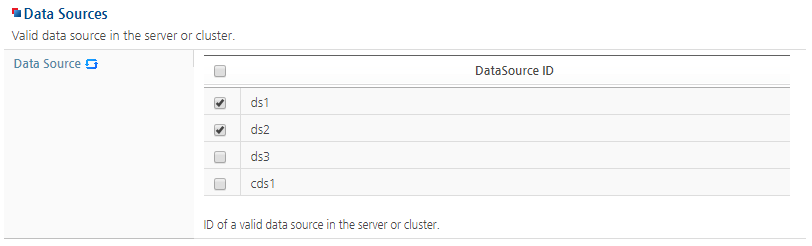

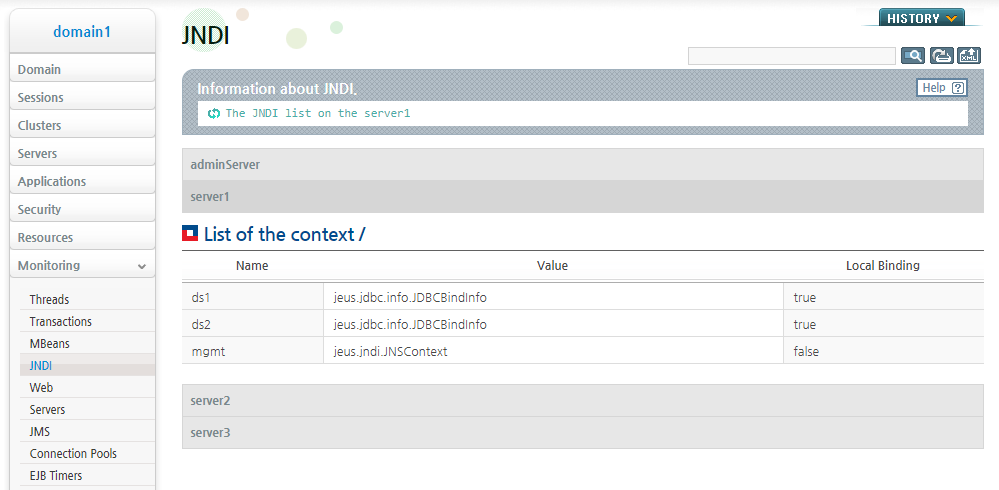
Using the Console Tool
The remove-data-sources-from-server command is used to dynamically remove a cluster data source from the server. For more information about how to use remove-data-sources-from-server, refer to JEUS Reference Book. "4.2.3.30. remove-data-sources-from-server".
The following is an example of removing cds1 from server1 by executing remove-data-sources-from-server.
[DAS]domain1.adminServer>rmdsfromsvr -server server1 -ids cds1
Successfully performed the REMOVE operation for data sources from the server [server1].
Check the results using "remove-data-sources-from-server -server server1"
As shown in the previous result message, the result of removing cds1 from server1 can be checked by executing 'remove-data-sources-from-server -server server1'.
[DAS]domain1.adminServer>rmdsfromsvr -server server1
Shows the current configuration.
Data sources registered in the server [server1].
=========================================================
+--------------------------------------------+----------+
| data sources                               | ds1, ds2 |
+--------------------------------------------+----------+
=========================================================
It shows that cds1 has been removed, and ds1 and ds2 still remain registered.
Execute jndilist to verify that cds1 has been unbound from the JNDI repository of server1.
[DAS]domain1.adminServer>jndilist -server server1
The JNDI list on the server1
List of the context /
================================================================================
+-------------+------------------------------------------------+---------------+
|     Name    |                      Value                     | Local Binding |
+-------------+------------------------------------------------+---------------+
| ds1         | jeus.jdbc.info.JDBCBindInfo                    | true          |
| ds2         | jeus.jdbc.info.JDBCBindInfo                    | true          |
| JEUSMQ_DLQ  | jeus.jms.common.destination.JeusQueue          | false         |
| mgmt        | jeus.jndi.JNSContext                           | false         |
+-------------+------------------------------------------------+---------------+
================================================================================
Cluster data sources can be dynamically registered to a cluster like other data sources. Cluster data sources registered to a cluster are valid on all servers in the cluster. Therefore, servers in a cluster can use the cluster data source registered on the cluster as if it was registered on each server. Like registering a cluster data source to a server, the component data sources in the cluster data source must be registered with the cluster data source to a cluster.
This section describes the process of registering cds1 to cluster1.
Using WebAdmin
The component data sources ds1 and ds2 of cds1 must also be registered to cluster1. For more information about how to register a data source to a cluster in WebAdmin, refer to "6.6.4. Registering a Data Source in a Cluster". From here on, it is assumed that ds1 and ds2 are registered to cluster1.
The following describes how to register a cluster data source in WebAdmin.
-
Select [Clusters] from the left menu of WebAdmin to go to the Clusters page.
-
Click [Lock & Edit] to get the lock.
-
Select a cluster from the Clusters page to dynamically add a cluster data source. Check the cds1 check box, and then click [OK] to add the data source to the cluster as follows:
-
[Apply Changes] to register cds1 to cluster1.
-
Now that ds1, ds2, and cds1 are registered to cluster1, they can be used by server1 and server2 in cluster1.
When checking the JNDI repository of server2, it can be seen that ds1 and ds2 is registered and cds1 is JNDI bound.
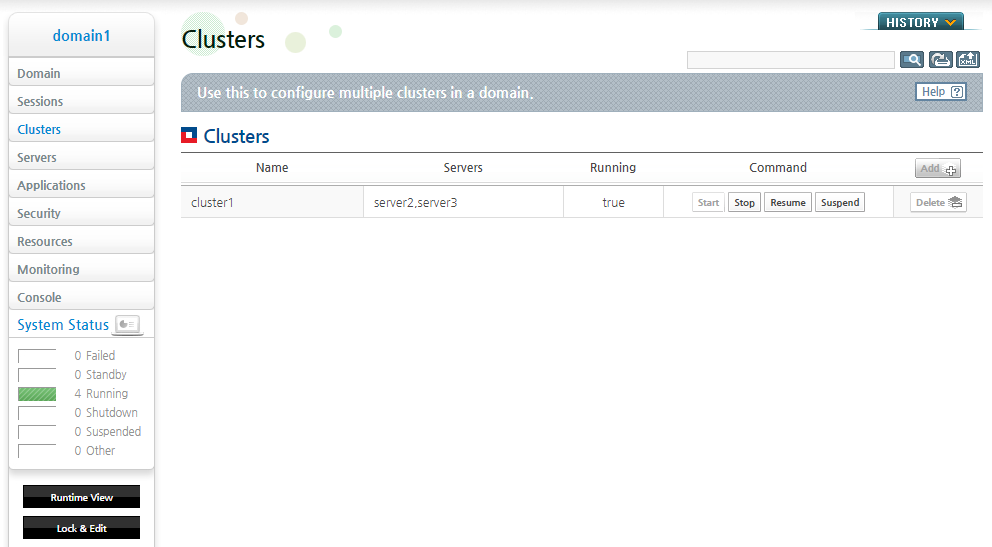
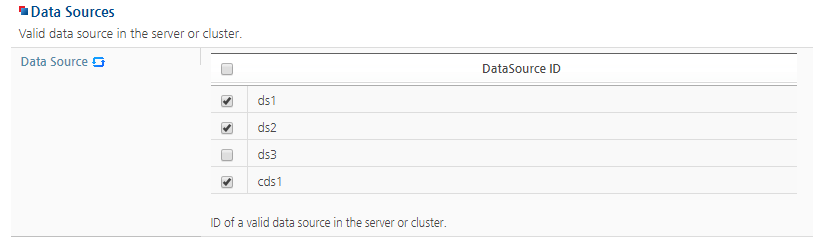
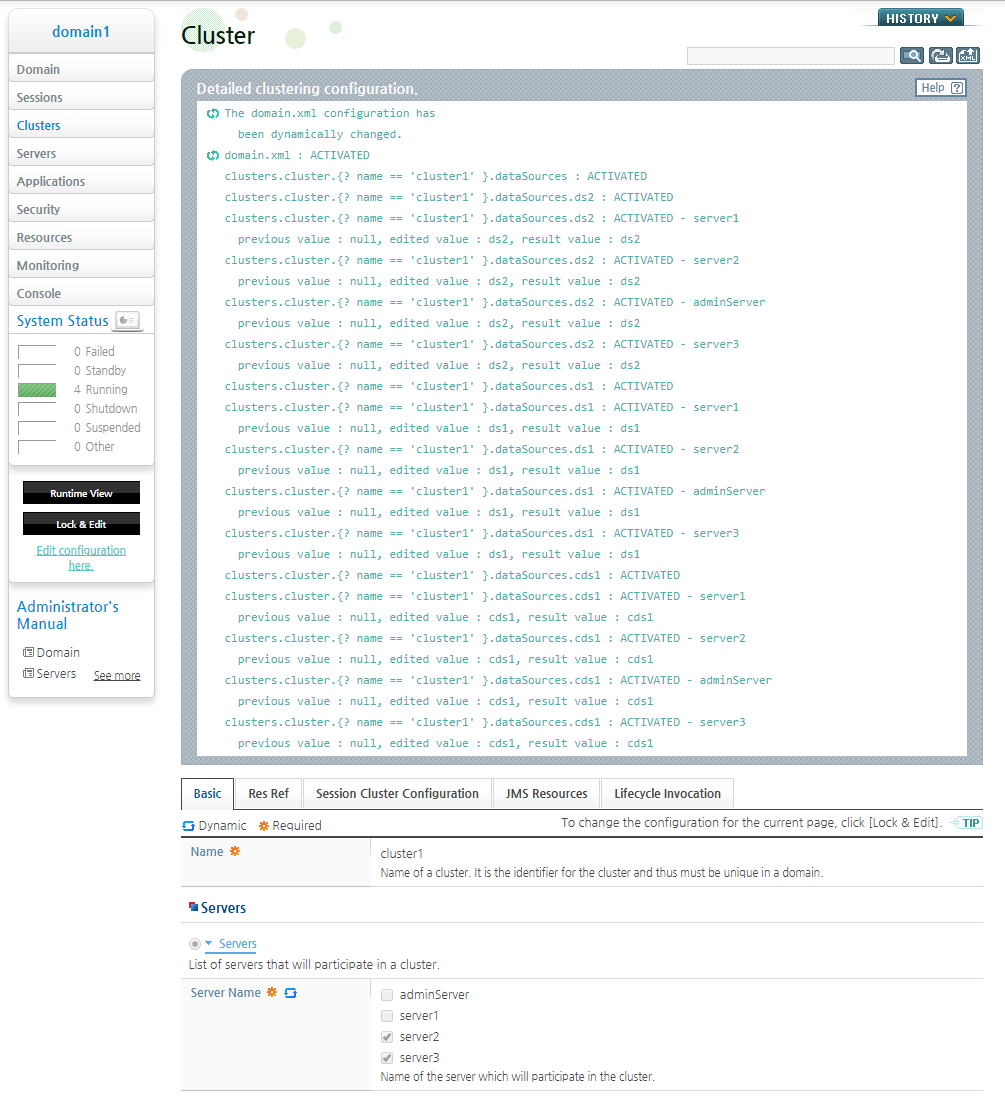
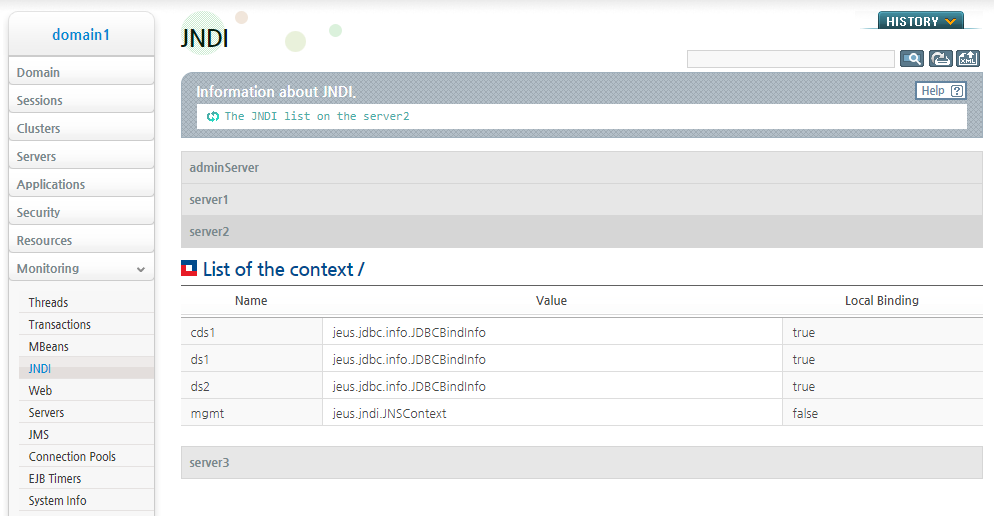
Using the Console Tool
The component data sources ds1 and ds2 of cds1 must also be registered to cluster1.
The following is an example of registering ds1, ds2, and cds1 to cluster1 by executing add-data-sources-to-cluster in the console tool. For more information about how to use add-data-sources-to-cluster, refer toJEUS Reference Book. "4.2.4.4. add-data-sources-to-cluster".
[DAS]domain1.adminServer>adddstocluster -cluster cluster1 -ids ds1,ds2,cds1
Successfully performed the ADD operation for data sources to the cluster [cluster1].
Check the results using "add-data-sources-to-cluster -cluster cluster1"
As shown in the previous result message, the result of registering ds1,ds2, and cds2 can be checked by executing 'add-data-sources-to-cluster -cluster cluster1'.
[DAS]domain1.adminServer>adddstocluster -cluster cluster1
Shows the current configuration.
The data sources registered in the cluster [cluster1].
==========================================================
+--------------+-----------------------------------------+
| data sources | ds1, ds2, cds1                          |
+--------------+-----------------------------------------+
==========================================================
Now that ds1, ds2, and cds1 are registered to cluster1, they can be used by server1 and server2 in cluster1.
Execute jndilist to verify that ds1, ds2, and cds1 are bound to the JNDI repository of server2.
[DAS]domain1.adminServer>jndilist -server server2
The JNDI list on the server2
List of the context /
================================================================================
+-------------+------------------------------------------------+---------------+
|     Name    |                      Value                     | Local Binding |
+-------------+------------------------------------------------+---------------+
| cds1        | jeus.jdbc.info.JDBCBindInfo                    | true          |
| ds1         | jeus.jdbc.info.JDBCBindInfo                    | true          |
| ds2         | jeus.jdbc.info.JDBCBindInfo                    | true          |
| JEUSMQ_DLQ  | jeus.jms.common.destination.JeusQueue          | false         |
| mgmt        | jeus.jndi.JNSContext                           | false         |
+-------------+------------------------------------------------+---------------+
================================================================================
Cluster data sources registered to a cluster can also be dynamically removed from the cluster like other data sources. When a cluster data source registered to a cluster is removed, all the servers in the cluster that were using it cannot use the cluster data source anymore. Therefore, when a cluster data source is removed from the cluster, the servers in the cluster unbind the cluster data source information from JNDI. However, as when cluster data sources are removed from the server, "connection pool destroy" does execute on the component data sources.
Using WebAdmin
The following describes how to remove a cluster data source from a cluster in WebAdmin.
-
Select [Clusters] from the left menu of WebAdmin to go to the Clusters page.
-
Click [Lock & Edit] to get the lock.
-
Select a cluster from the Clusters page to dynamically remove a data source. Uncheck the cds1 check box, and then click [OK] to remove the data source from cluster1 as follows:
-
Click [Apply Changes] to remove cds1 from cluster1.
-
Now that cluster data source cds1 is removed from cluster1, server2 and server3 in cluster1 can no longer use cds1. This means that cds1 is unbound from the JNDI repository of server2 and server3.
Check the JNDI repository of server2 to verify that cds1 is unbound from the JNDI repository of server2.
Even though cds1 is removed from cluster1, ds1 and ds2 are still registered on cluster1 and can function as independent data sources on server2 and server3 that are in cluster1. However, it is more intuitive from a data source management perspective to remove ds1 and ds2, the component data sources of cds1, when removing cds1 from the cluster because they were initially registered with cds1.
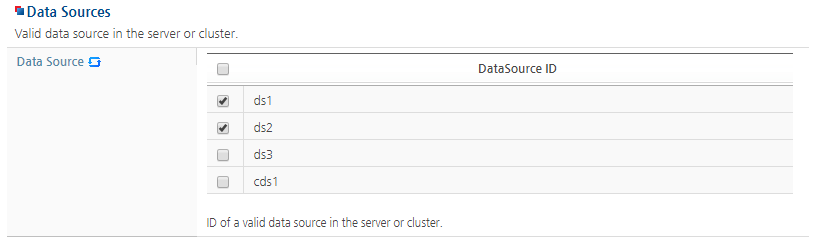

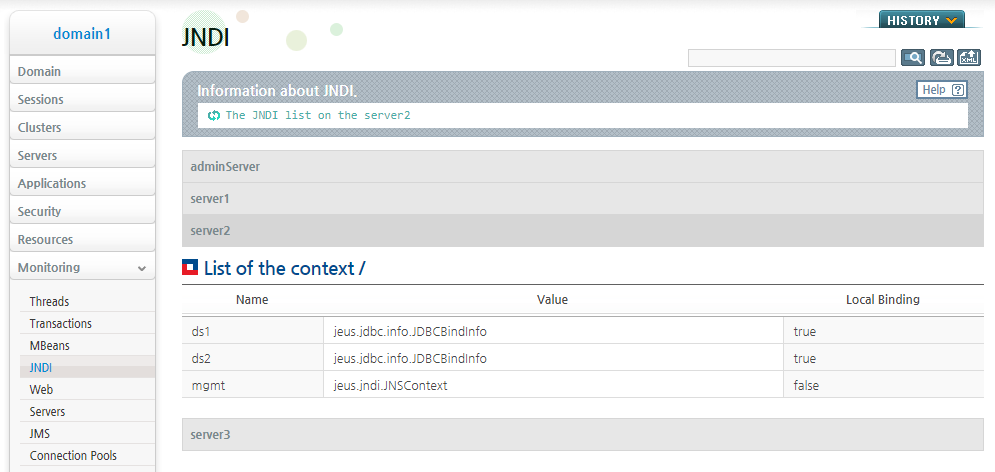
Using the Console Tool
The remove-data-sources-from-cluster command is used to dynamically remove a cluster data source from a cluster. For more information about how to use remove-data-sources-from-cluster, refer to JEUS Reference Book. "4.2.4.34. remove-data-sources-from-cluster".
The following is an example of removing cds1 from cluster1 by executing remove-data-sources-from-cluster.
[DAS]domain1.adminServer>rmdsfromcluster -cluster cluster1 -ids ds2
Successfully performed the REMOVE operation for data sources from the cluster [cluster1].
Check the results using "remove-data-sources-from-cluster -cluster cluster1"
As shown in the previous result message, the result of removing cds1 from cluster1 can be checked by executing 'remove-data-sources-from-cluster -cluster cluster1'. The result also shows that ds1 and ds2 still bound to cluster1.
[DAS]domain1.adminServer>rmdsfromcluster -cluster cluster1
Shows the current configuration.
The data sources registered in the cluster [cluster1].
=============================================================
+---------------------------------------------------+-------+
| data sources                                      | ds3   |
+---------------------------------------------------+-------+
=============================================================
Now that cluster data source cds1 is removed from cluster1, server2 and server3 in cluster1 can no longer use cds1. This means that cds1 is unbound from the JNDI repository of server2 and server3.
Execute jndilist to verify that cds1 has been unbound from the JNDI repository of server2.
[DAS]domain1.adminServer>jndilist -server server2
The JNDI list on the server2
List of the context /
================================================================================
+-------------+------------------------------------------------+---------------+
|     Name    |                      Value                     | Local Binding |
+-------------+------------------------------------------------+---------------+
| ds3         | jeus.jdbc.info.JDBCBindInfo                    | true          |
| JEUSMQ_DLQ  | jeus.jms.common.destination.JeusQueue          | false         |
| mgmt        | jeus.jndi.JNSContext                           | false         |
+-------------+------------------------------------------------+---------------+
================================================================================
When a server is dynamically added to a cluster, like with other data sources registered in the cluster, cluster data sources registered in the cluster are valid on the newly added server. Therefore, a server added to the cluster can use the cluster data source registered to the cluster as if the cluster data source is registered on the server.
Since the overall mechanism is similar to that described in "6.6.6. Adding a Server to a Cluster", description has been omitted in this section. For more information, refer to each applicable sections.
When a server is dynamically removed from a cluster, like with other data sources registered to the cluster, the cluster data sources registered to the cluster are no longer valid on the server. Hence, the server removed from the cluster unbinds all cluster data source information registered to the cluster.
Since the overall mechanism is similar to that described in "6.6.7. Removing a Server from a Cluster", description has been omitted in this section. For more information, refer to "6.6.7. Removing a Server from a Cluster".
When a cluster is dynamically removed from the domain, like with other cluster data sources registered to the cluster, the cluster data sources registered to the cluster are no longer valid on the servers in the cluster. Therefore, the servers that belonged to the removed cluster unbinds all cluster data source information registered to the cluster. Since the overall mechanism is similar to that described in "6.6.8. Removing a Cluster", description has been omitted in this section. For more information, refer to "6.6.8. Removing a Cluster".
Cluster data sources can be dynamically deleted from the domain like other data sources. When a cluster data source is deleted from the domain, it is no longer valid on the server and cluster that were using it. Hence, the servers that were using the deleted cluster data source unbind the cluster data source information from JNDI.
To check how the cluster data source registered on the server and cluster is processed when removing a cluster data source, cds1 is registered on server1 and cluster1. From here on, it is assumed that cds1 is registered on server1 and cluster1.
This section describes the process of removing cds1 from domain1.
Using WebAdmin
Since cds1 is registered on cluster1 and server2, to delete cds1 from a domain, go to the environment configuration menu of WebAdmin and check the Delete Reference check box. For information about using the environment configuration menu, refer to JEUS WebAdmin Guide. "2.3.1. Header".
The following describes how to remove the cluster data source cds1 from the domain in WebAdmin.
-
Select [Resources] >[DataSources] from the left menu of WebAdmin to go to the DataSources page.
-
Click [Lock & Edit] to get the lock.
-
Click [Delete] for ds1 to remove it.
-
Click [Apply Changes] to delete cds1 from the domain.
-
Now that cds1 is deleted from domain1, server1, where cds1 is registered and used, and server2 and server3, which were able to use cds1 that is registered to cluster1, cannot use cds1 anymore. This means that cds1 is unbound from the repository of server1, server2, and server3.
Check the JNDI repository of server1 to verify that cds1 is no longer JNDI bound.
When checking the JNDI repository of server2, it can be seen that cds1 is also unbound.
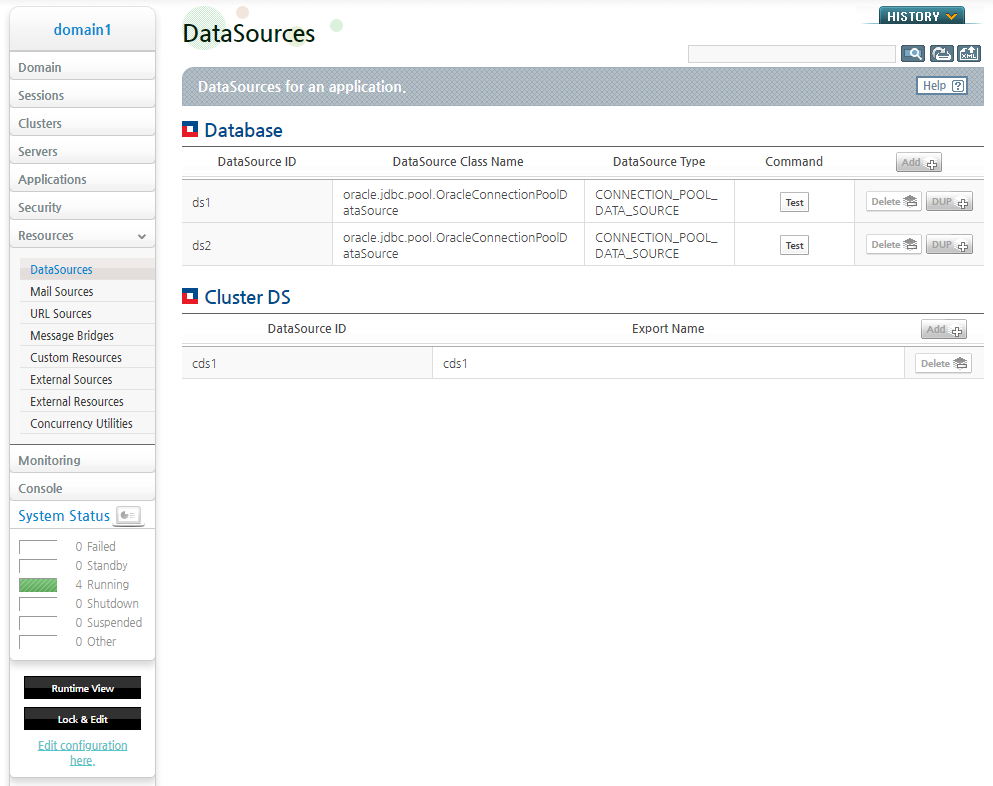
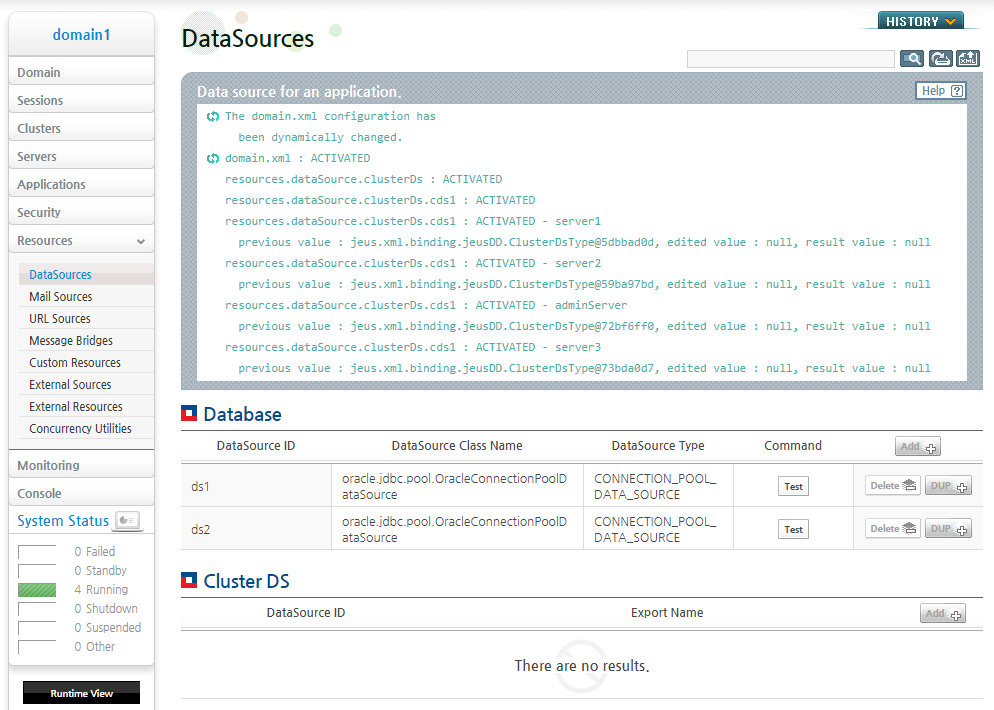
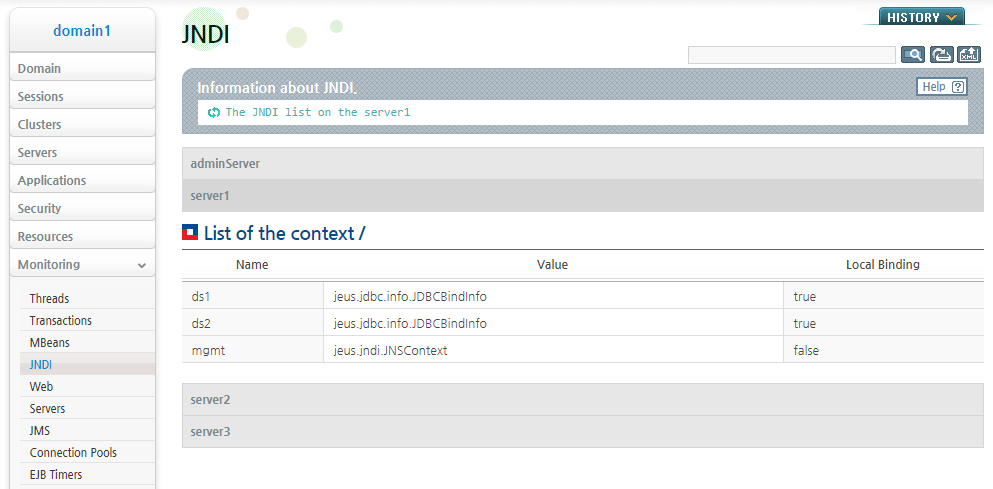

Using the Console Tool
The remove-cluster-data-source command is used to dynamically delete a cluster data source from the domain. For more information about remove-cluster-data-source, refer to JEUS Reference Book. "4.2.11.7. remove-cluster-data-source".
The following is an example of removing cds1 from domain1 by executing remove-cluster-data-source.
[DAS]domain1.adminServer>rmcds -id cds1
Successfully performed the REMOVE operation for cluster data source [cds1] from domain.
================================================================================
+---------------------------------------------------------+--------+-----------+
| resources.dataSource.clusterDs                          | MODIFY | ACTIVATED |
| servers.server.{? name == 'server1' }.dataSources       | MODIFY | ACTIVATED |
| clusters.cluster.{? name == 'cluster1' }.dataSources    | MODIFY | ACTIVATED |
+---------------------------------------------------------+--------+-----------+
================================================================================
Check the results using "remove-cluster-data-source"
As shown in the previous result message, removing cds1 by executing remove-cluster-data-source also affects server1 and cluster1 where cds1 is registered to. The result displays that when cds1 is removed from domain1, the cds1 information registered on server1 and cluster1 are also deleted.
When executing a dynamic configuration command, you can check for all other runtime configuration changes that occurred from it. For more information about how to use the dynamic configuration command, refer to JEUS Domain Guide. "Chapter 3. Changing Domain Settings".
As shown in the previous result message, execute remove-cluster-data-source to verify that cds1 has been removed.
[DAS]domain1.adminServer>rmcds
Shows the current configuration.
Data sources in domain
====================================================================
+------+-----------------------------------------------------------+
| ds1  | common data source                                        |
| ds2  | common data source                                        |
+------+-----------------------------------------------------------+
====================================================================
Now that cds1 is deleted from domain1, server1, where cds1 is registered and used, and server2 and server3, which were able to use cds1 that is registered to cluster1, cannot use cds1 anymore. This means that cds1 is unbound from the repository of server1, server2, and server3. Execute jndilist to verify that cd1 is unbound from the JNDI repository of server1.
[DAS]domain1.adminServer>jndilist -server server1
The JNDI list on the server1
List of the context /
================================================================================
+-------------+------------------------------------------------+---------------+
|     Name    |                      Value                     | Local Binding |
+-------------+------------------------------------------------+---------------+
| ds1         | jeus.jdbc.info.JDBCBindInfo                    | true          |
| ds2         | jeus.jdbc.info.JDBCBindInfo                    | true          |
| JEUSMQ_DLQ  | jeus.jms.common.destination.JeusQueue          | false         |
| mgmt        | jeus.jndi.JNSContext                           | false         |
+-------------+------------------------------------------------+---------------+
================================================================================
Execute jndilist to verify that cds is unbound from JNDI repository of server2.
[DAS]domain1.adminServer>jndilist -server server2
The JNDI list on the server2
List of the context /
================================================================================
+-------------+------------------------------------------------+---------------+
|     Name    |                      Value                     | Local Binding |
+-------------+------------------------------------------------+---------------+
| ds1         | jeus.jdbc.info.JDBCBindInfo                    | true          |
| ds2         | jeus.jdbc.info.JDBCBindInfo                    | true          |
| JEUSMQ_DLQ  | jeus.jms.common.destination.JeusQueue          | false         |
| mgmt        | jeus.jndi.JNSContext                           | false         |
+-------------+------------------------------------------------+---------------+
================================================================================
Up to this point, we examined how data sources are managed when cluster data sources, servers, and clusters are added/deleted. This section will show how to change the configuration of a cluster data source. It is possible to dynamically change the configurations of a cluster data source. We will look into an example of changing the component data source of a cluster data source.
Since currently there is no cluster data source in the domain, first add cds1 with ds1 and ds2 as the component data source1 to domain1 by executing add-cluster-data-source. From here on, it is assumed that cds1, which has ds1 and ds2 as its component data sources, has been added to domain1.
This section describes the process of removing ds2 from cds1.
Using WebAdmin
The following describes how to change the cluster data source configuration in WebAdmin.
-
Select [Resources] >[DataSources] from the left menu of WebAdmin to go to the DataSources page.
-
Click [Lock & Edit] to get the lock.
-
Select a data source from the Cluster DS list to dynamically configure the data source. Uncheck the check box for ds2 and click [OK] .
-
Click [Apply Changes] to delete ds2 from the component data source list of cds1.
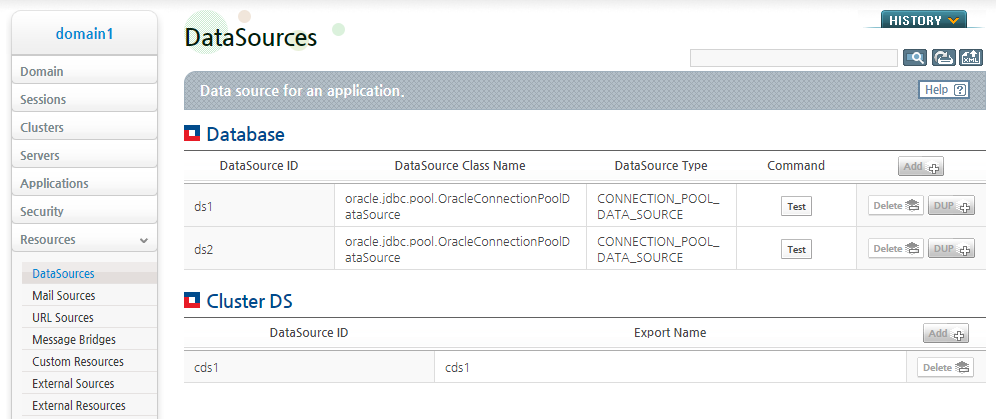

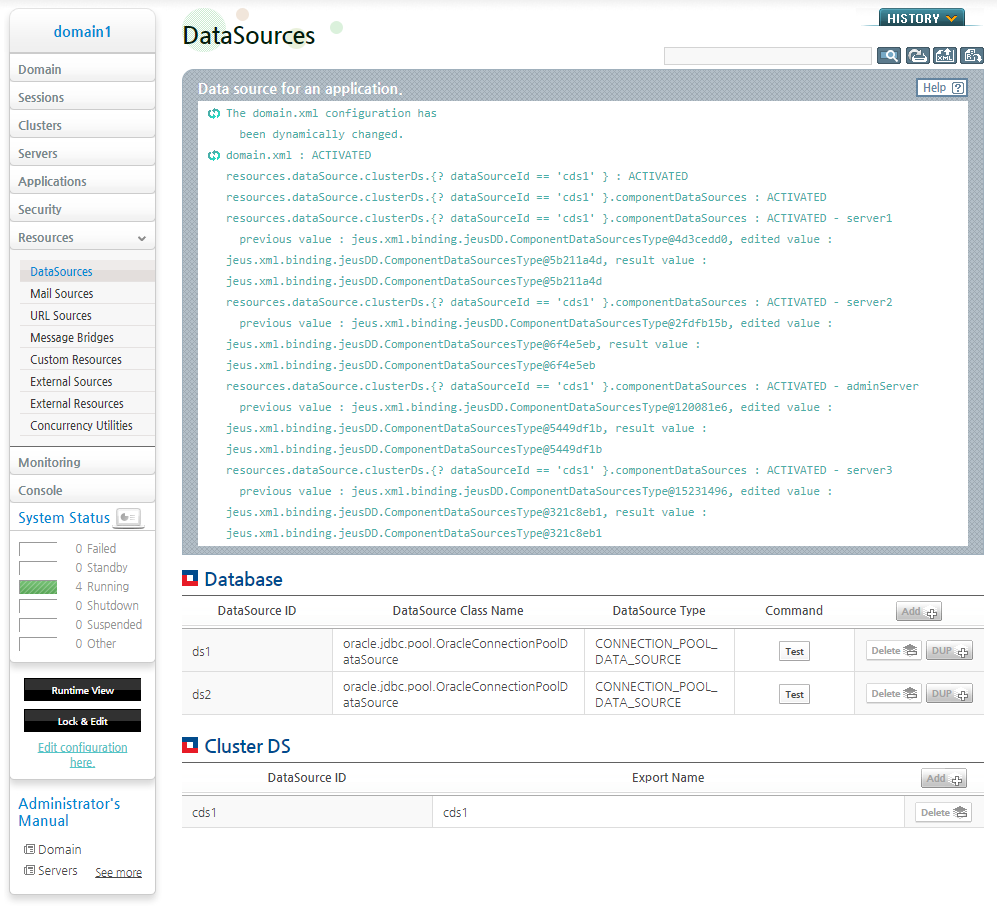
Using the Console Tool
The modify-cluster-data-source command is used to change the cluster data source configuration.
Use the 'help' command or refer to JEUS Reference Book. "4.2.11.5. modify-cluster-data-source" to look up all configurations that can be modified with the modify-cluster-data-source command by using the option name. Dynamic configurations and related options are tagged to show which ones are dynamic configurations.
The following is an example of removing ds2 from the component data source list of cds1 by executing modify-cluster-data-source.
[DAS]domain1.adminServer>modifycds -id cds1 -cds ds1
Successfully performed the MODIFY operation for configuration of the cluster data source [cds1].
Check the results using "modify-cluster-data-source -id cds1"
The result of removing ds2 from the cds1 component data source list can be verified by executing 'modify-cluster-data-source-id cds1' with other option values.
[DAS]domain1.adminServer>modifycds -id cds1
Shows the current configuration.
configuration of the cluster data source [cds1]
=====================================================================
+-----------------------------------------------------------+-------+
| id                                                        | cds1  |
| export-name                                               | cds1  |
| load-balance                                              | false |
| is-pre-conn                                               | false |
| use-failback                                              | true  |
| component-data-sources                                    | ds1   |
+-----------------------------------------------------------+-------+
=====================================================================
In JEUS 7 and later versions, it is not recommended to manually edit the configuration settings in the configuration file. To check the settings, it is recommended to use the data source configuration commands instead of directly accessing the configuration file.
The following section describes how to check the cluster data source configuration using WebAdmin.
Using WebAdmin
The following describes how to check the cluster data source configuration in WebAdmin.
-
Select [Resources] >[DataSources] from the left menu of WebAdmin to go to the DataSources page.
-
Click [Lock & Edit] to get the lock.
-
Select a data source from the Cluster DS list to check the data source settings. The following is an example of checking the configuration of cds1.
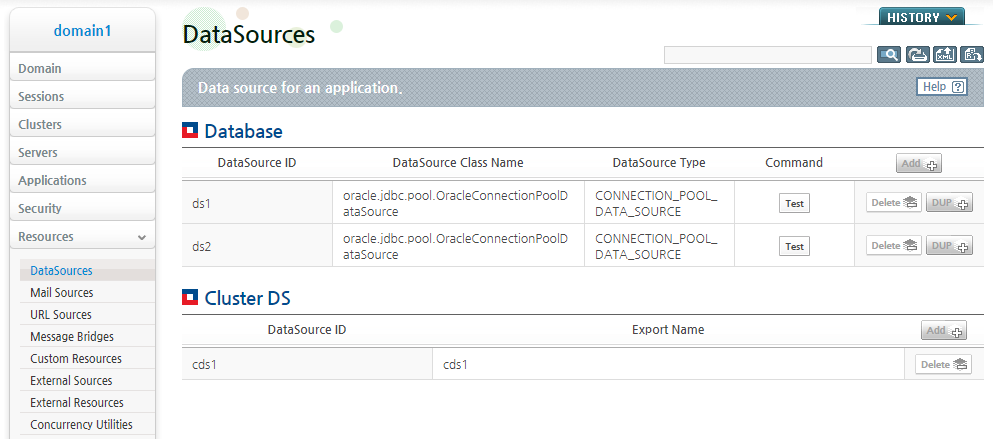
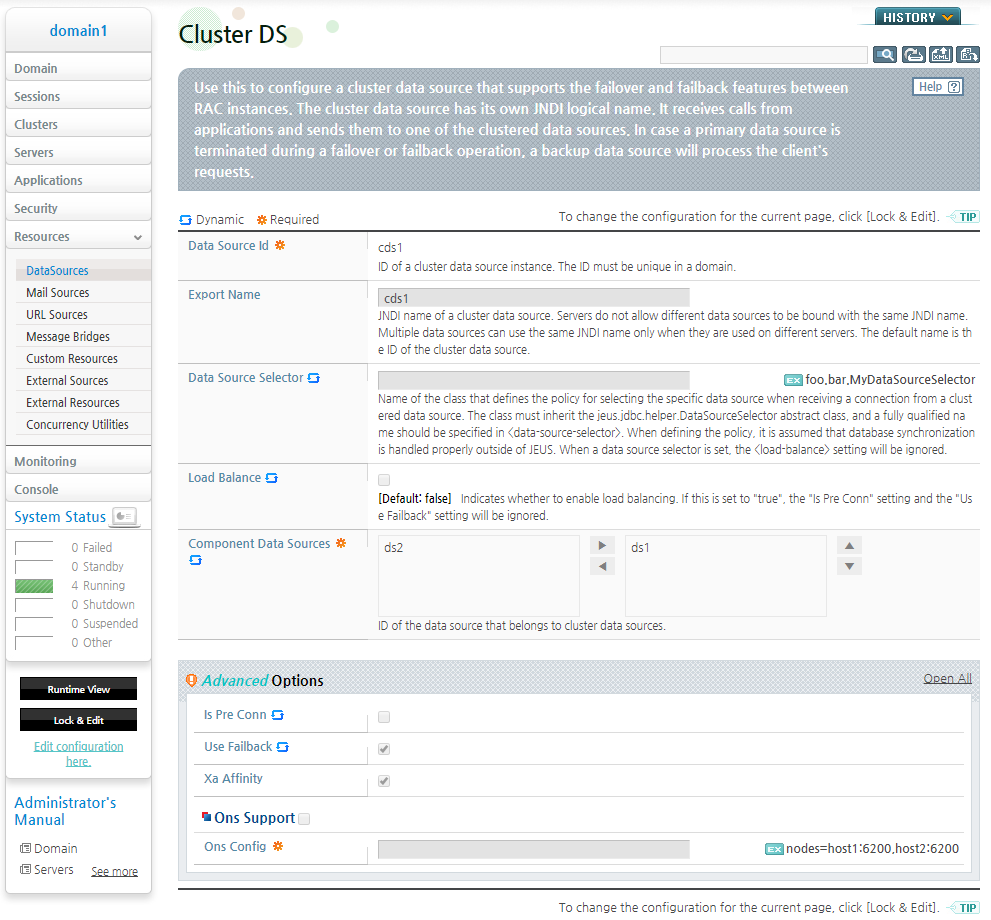
Using the Console Tool
The list-cluster-data-sources command is used to view the list of all cluster data sources in the domain.
The following is an example of checking the list of all cluster data sources in the domain by executing list-cluster-data-sources.
[DAS]domain1.adminServer>lscds
The list of cluster data sources
================================================================================
+--------------------+-----------------------+---------------------------------+
|   Data Source ID   |    JNDI Export Name   |      Component Data Sources     |
+--------------------+-----------------------+---------------------------------+
| cds1               | cds1                  | [ds1]                           |
+--------------------+-----------------------+---------------------------------+
================================================================================
If a cluster data source ID is given as an option, cluster data source configuration details are displayed. The following is an example of checking the configuration details of cds1 by executing list-cluster-data-sources.
[DAS]domain1.adminServer>lscds -id cds1
The configuration of cluster data source [cds1]
================================================================================
+------------------------------------------+-----------------------------------+
|            Configuration Name            |        Configuration Value        |
+------------------------------------------+-----------------------------------+
| id                                       | cds1                              |
| export-name                              | cds1                              |
| load-balance                             | false                             |
| is-pre-conn                              | false                             |
| use-failback                             | true                              |
| component-data-sources                   | [ds1]                             |
+------------------------------------------+-----------------------------------+
================================================================================
This section describes how to monitor connection pools on a server by using examples. For better understanding, knowledge about JEUS domain structure, and data source and connection pool management structure in the domain are required. For information about JEUS domain structure, refer to JEUS Domain Guide. "1.3. Components", and for information about the management structure of data sources and connection pool, refer to "6.3. Management of Data Sources and Connection Pools".
The JDBC connection pool can be monitored by using the console tool or WebAdmin. Both methods are described in this section. Abbreviated commands and option names are used for describing the console tool method. For information about abbreviated commands, option names, and command usage descriptions, execute 'help' with the command name as an argument, or refer to JEUS Reference Book. "4.2.12. Connection Pool Controlling and Monitoring Commands".
First perform some preparation tasks to help with the explanation. Create a domain named domain1 and a DAS named adminServer. After starting DAS, add two MSs named server1 and server2 to domain1 and start them. Then, add the data sources ds1 and ds2 to domain1. Register both ds1 and ds2 on server1, and only ds1 on server2. Lastly, create a connection pool for ds1 on both server1 and server2.
For information about domain and server related configurations, refer to JEUS Domain Guide. "Chapter 2. Creating a Domain" and "Chapter 2. JEUS Configuration", and for the data source related configurations, refer to "6.6. Dynamic Data Source Configuration". For description about how to create a connection pool, refer to "6.9. Controlling JDBC Connection Pool". From here on, it is assumed that the aforementioned preparation tasks have been completed.
Note
The server is the final target where data sources are registered on. The data sources registered to the cluster as well as directly on the server affect the server. A cluster is just a logical group of servers, and the server is the one that actually uses a data source to create and use a connection pool. For this reason, the server is the monitoring unit for the connection pool.
This section describes how to check the JDBC connection pool list by using the console tool and WebAdmin.
Using WebAdmin
The following is an example of checking the connection pool of server1 in WebAdmin.
-
Select [Monitoring] > [Connection Pools] from the left menu of WebAdmin and select a server to check the list of valid connection pools on the server.
Since both ds1 and ds2 are registered on server1, the connection pool information for both ds1 and ds2 exist. The connection pool for ds1 has already been created as a preparation task, but ds2 connection pool has not been created yet. The columns consist of the connection pool ID, minimum number of connections, maximum number of connections, active connection count, idle connection count, disposable connection count, total number of connections, whether to wait when there are no available connections, and whether the connection pool has been enabled.
-
The following is an example of checking a connection pool on server2.
Since only ds1 is registered on server2, only the connection pool for ds1 exists.
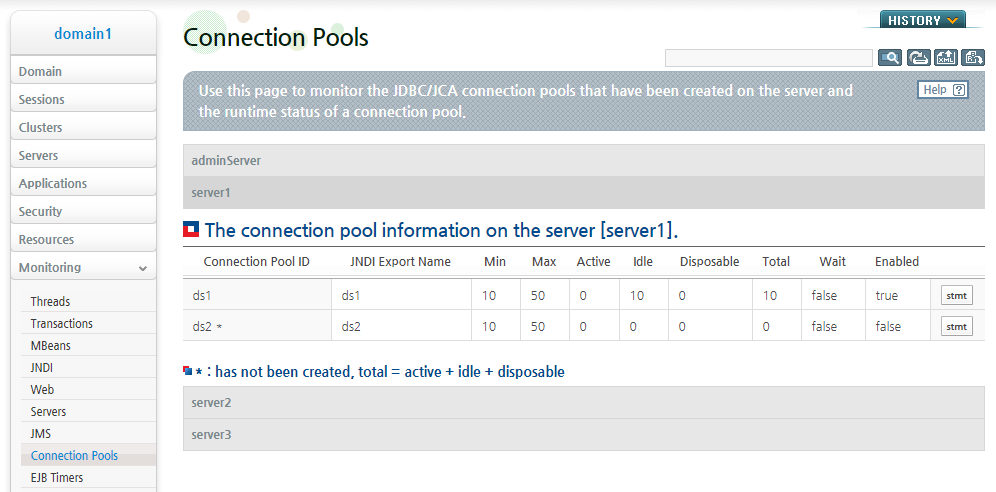
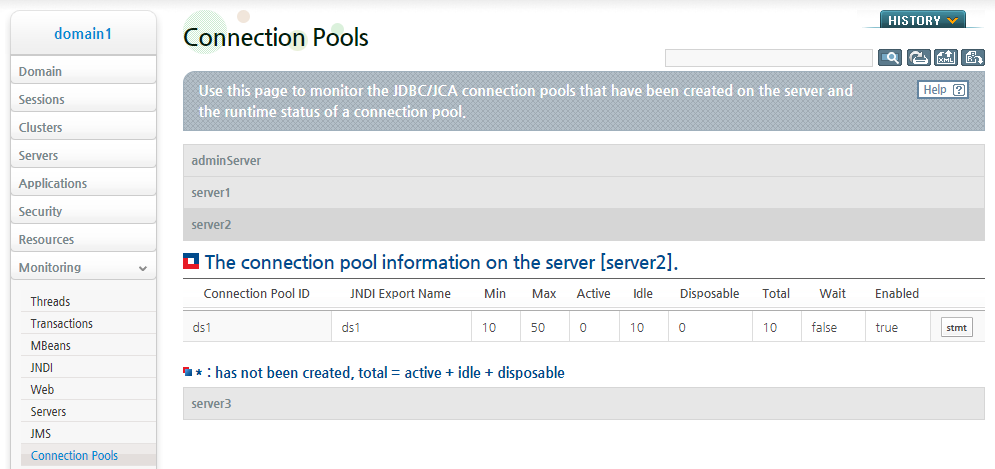
Using the Console Tool
The connection-pool-info command is used to check for the list of all connection pools on a server. Since the connection-pool-info command provides the same function for JDBC connection pools as well as JCA connection pools, the JDBC option must be provided when using a JDBC connection pool. For more information about using connection-pool-info, refer to JEUS Reference Book. "4.2.12.1. connection-pool-info". The method for creating a connection pool can be found in the reference.
The following is an example of checking the list of all JDBC connection pools on server1 by executing connection-pool-info.
[DAS]domain1.adminServer>cpinfo -server server1 -jdbc
The connection pool information on the server [server1].
================================================================================
+--------+-----+-----+--------+-----+--------+-----+--------+-----+-----+------+
| Connec | Min | Max | Active | Act | Active | Idle| Dispos | Tot | Wait| Enab |
|  tion  |     |     |   Max  | ive | Average|     |  able  | al  |     | led  |
|Pool ID |     |     |        |     |        |     |        |     |     |      |
+--------+-----+-----+--------+-----+--------+-----+--------+-----+-----+------+
| ds1    |   2 |  30 |      0 |   0 |    0.0 |   2 |      0 |   2 | fal | true |
|        |     |     |        |     |        |     |        |     |se   |      |
+--------+-----+-----+--------+-----+--------+-----+--------+-----+-----+------+
| ds2 *  |   2 |  30 |      0 |   0 |    0.0 |   0 |      0 |   0 | fal | false|
|        |     |     |        |     |        |     |        |     |se   |      |
+--------+-----+-----+--------+-----+--------+-----+--------+-----+-----+------+

* : has not been created, total = active + idle + disposable
================================================================================
Since both ds1 and ds2 are registered on server1, the connection pool information for both ds1 and ds2 exist. The connection pool for ds1 has already been created as a preparation task, but ds2 connection pool has not been created yet.
The columns consist of the connection pool ID, minimum number of connections, maximum number of connections, active connection count, idle connection count, disposable connection count, total number of connections, whether to wait when there are no available connections, and whether the connection pool has been enabled.
To only check for the currently created connection pools, use the 'active' option as in the following.
[DAS]domain1.adminServer>cpinfo -server server1 -active -jdbc
The connection pool information on the server [server1].
================================================================================
+--------+-----+-----+--------+-----+--------+-----+--------+-----+-----+------+
| Connec | Min | Max | Active | Act | Active | Idle| Dispos | Tot | Wait| Enab |
|  tion  |     |     |   Max  | ive | Average|     |  able  | al  |     | led  |
|Pool ID |     |     |        |     |        |     |        |     |     |      |
+--------+-----+-----+--------+-----+--------+-----+--------+-----+-----+------+
| ds1    |   2 |  30 |      0 |   0 |    0.0 |   2 |      0 |   2 | fal | true |
|        |     |     |        |     |        |     |        |     |se   |      |
+--------+-----+-----+--------+-----+--------+-----+--------+-----+-----+------+

* : has not been created, total = active + idle + disposable
================================================================================
Use the JNDI option to also display the JNDI name of the data source.
[DAS]domain1.adminServer>cpinfo -server server1 -jndi -jdbc
The connection pool information on the server [server1].
================================================================================
+------------+-----+-----+-----+-----+-----+-----+-----+-----+-----+-----+-----+
| Connection |JNDI | Min | Max | Act | Act | Act | Idle| Dis | Tot | Wait| Ena |
|   Pool ID  |Expo |     |     | ive | ive | ive |     |posa | al  |     |bled |
|            | rt  |     |     | Max |     |Aver |     | ble |     |     |     |
|            |Name |     |     |     |     | age |     |     |     |     |     |
+------------+-----+-----+-----+-----+-----+-----+-----+-----+-----+-----+-----+
| ds1        | ds1 |   2 |  30 |   0 |   0 | 0.0 |   2 |   0 |   2 | fal | true|
|            |     |     |     |     |     |     |     |     |     |se   |     |
+------------+-----+-----+-----+-----+-----+-----+-----+-----+-----+-----+-----+
| ds2 *      | ds2 |   2 |  30 |   0 |   0 | 0.0 |   0 |   0 |   0 | fal | fal |
|            |     |     |     |     |     |     |     |     |     |se   |se   |
+------------+-----+-----+-----+-----+-----+-----+-----+-----+-----+-----+-----+

* : has not been created, total = active + idle + disposable
================================================================================
The following shows the list of all connection pools that exist on server2.
[DAS]domain1.adminServer>cpinfo -server server2 -jdbc
The connection pool information on the server [server2].
================================================================================
+--------+-----+-----+--------+-----+--------+-----+--------+-----+-----+------+
| Connec | Min | Max | Active | Act | Active | Idle| Dispos | Tot | Wait| Enab |
|  tion  |     |     |   Max  | ive | Average|     |  able  | al  |     | led  |
|Pool ID |     |     |        |     |        |     |        |     |     |      |
+--------+-----+-----+--------+-----+--------+-----+--------+-----+-----+------+
| ds1    |   2 |  30 |      0 |   0 |    0.0 |   0 |      0 |   0 | fal | fal  |
|        |     |     |        |     |        |     |        |     |se   |se    |
+--------+-----+-----+--------+-----+--------+-----+--------+-----+-----+------+

* : has not been created, total = active + idle + disposable
================================================================================
Since only ds1 is registered on server2, only the connection pool for ds1 exists.
This section describes how to check detailed information of a specific JDBC connection pool by using the console tool and WebAdmin.
Using WebAdmin
The following describes how to check the details of a specific connection pool in WebAdmin.
-
On WebAdmin, from the left menu, select [Monitoring] > [Connection Pools] and then select a server to check the list of connection pools that are valid on the server. Click on a connection pool ID to display the connection pool details.
The following is an example of checking the detailed connection pool configurations of ds1.
-
It shows two unused connections that have been idle for about 40 seconds, and both are not disposable connections.
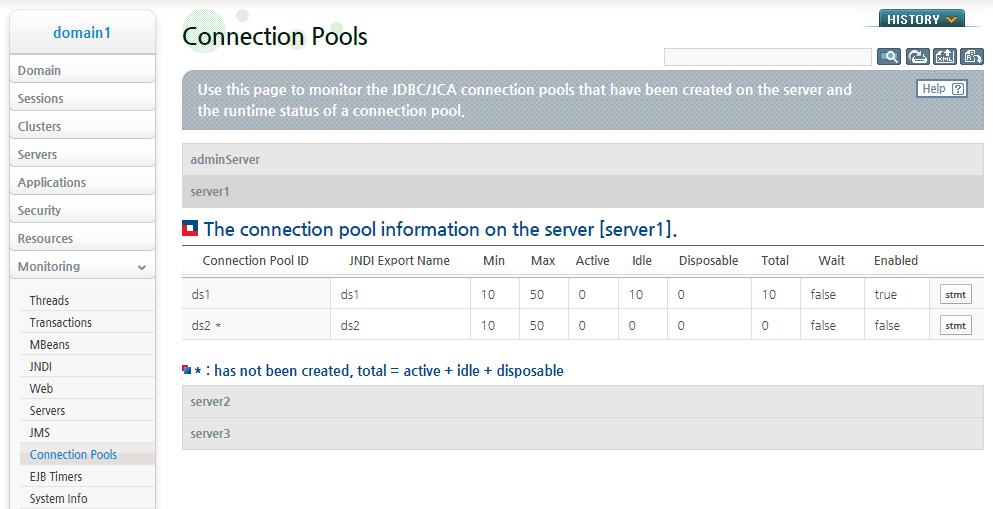
Using the Console Tool
The connection-pool-info command is used to check for the details of a connection pool on the server. Since the connection-pool-info command provides the same function for JDBC connection pools as well as JCA connection pools, the JDBC option must be provided when using a JDBC connection pool. For more information about using connection-pool-info, refer to JEUS Reference Book. "4.2.12.1. connection-pool-info".
The following is an example of checking details of connection pool for ds1 on server1 by executing connection-pool-info.
[DAS]domain1.adminServer>cpinfo -server server1 -id ds1 -jdbc
Information about connections in the server [server1]'s connection pool [ds1].
================================================================================
+------------------+-------+------------------------------+-----------+--------+
|   Connection ID  | State |       State Time(sec)        | Use Count |  Type  |
+------------------+-------+------------------------------+-----------+--------+
| ds1-1            | idle  |                      965.837 |         0 | pooled |
| ds1-2            | idle  |                      965.806 |         0 | pooled |
+------------------+-------+------------------------------+-----------+--------+
================================================================================
It shows two unused connections that have been idle for about 965 seconds, and both are not disposable connections.
Use the '-t' option as in the following example to check for the name of the thread that owns the connection.
[DAS]domain1.adminServer>cpinfo -server server1 -id ds1 -t -jdbc
Information about connections in the server [server1]'s connection pool [ds1].
================================================================================
+---------------+-------+-------------------+-----------+--------+-------------+
| Connection ID | State |  State Time(sec)  | Use Count |  Type  | Thread name |
+---------------+-------+-------------------+-----------+--------+-------------+
| ds1-1         | active|          1105.954 |         1 | pooled | http-w1     |
| ds1-2         | idle  |          1105.923 |         0 | pooled |             |
+---------------+-------+-------------------+-----------+--------+-------------+
================================================================================
This section describes how to control a connection pool on the server by using examples.
Knowledge about JEUS domain structure, and data source and connection pool management structure in the domain are needed for better understanding. For information about the JEUS domain structure, refer to JEUS Domain Guide. "1.3. Components". For information about the data source and connection pool management structure, refer to "6.3. Management of Data Sources and Connection Pools".
The JDBC connection pool can be controlled by using WebAdmin or the console tool. This section describes both methods.
First perform some preparation tasks to help with the explanation. Create a domain named domain1 and a DAS named adminServer. After starting DAS, add two MSs named server1 and server2 to domain1 and start them. Then, add the data sources ds1 and ds2 to domain1. Register both ds1 and ds2 on server1 and server2. For information about domain and server related configurations, refer to JEUS Domain Guide. "Chapter 2. Creating a Domain" and "Chapter 2. JEUS Configuration". For information about data source related configurations, refer to "6.6. Dynamic Data Source Configuration".
Note
For examples that show the result of controlling a connection pool, refer to "6.8. Monitoring JDBC Connection Pool".
This section describes the method for creating a connection pool by using the console tool and WebAdmin.
Using WebAdmin
The following describes how to create a connection pool in WebAdmin.
-
On WebAdmin, from the left menu, select [Monitoring] > [Connection Pools] and then select a server to create a valid connection pool on the server. Click ds1 to create a connection pool for ds2.
-
The connection pool list for ds1 is displayed. Click [create] to create a connection pool.
-
The connection pool for ds1 is created.

Using the Console Tool
The create-connection-pool command is used to create a connection pool for the data source on the server. For more information about using create-connection-pool, refer to JEUS Reference Book. "4.2.12.4. create-connection-pool".
The following is an example of creating connection pool for ds1 on server1 by executing create-connection-pool.
[DAS]domain1.adminServer>createcp -server server1 -id ds1
Servers that successfully created a connection pool : server1
Servers that failed to create a connection pool : none.
If the server option value is not provided, then a connection pool is created for all the servers where the data source is registered on.
The following is an example of executing create-connection-pool to create connection pool for ds1 on server1 and server2 where ds2 is registered on.
[DAS]domain1.adminServer>createcp -id ds2
Servers that successfully created a connection pool : server1, server2
Servers that failed to create a connection pool : none.
A JDBC connection pool can be created even if control-connection-pool is used. For more information about using control-connection-pool, refer to JEUS Reference Book. "4.2.12.2. control-connection-pool".
The following is an example of creating a connection pool for ds1 on server1 by executing control-connection-pool.
[DAS]domain1.adminServer>ctrlcp -server server1 -id ds1 -create
Servers that successfully created a connection pool : server1
Servers that failed to create a connection pool : none.
This section describes how to disable a connection pool by using the console tool and WebAdmin.
Using WebAdmin
The following describes how to disable a connection pool in WebAdmin.
-
Select [Monitoring] > [Connection Pools] from the left menu of WebAdmin and then select a server to disable the valid connection pool on the server. Click ds1 to disable the connection pool for ds1.
-
The list of connections for ds1 is displayed. Click [Disable].
-
It is shown that the connection pool for ds1 has been disabled.
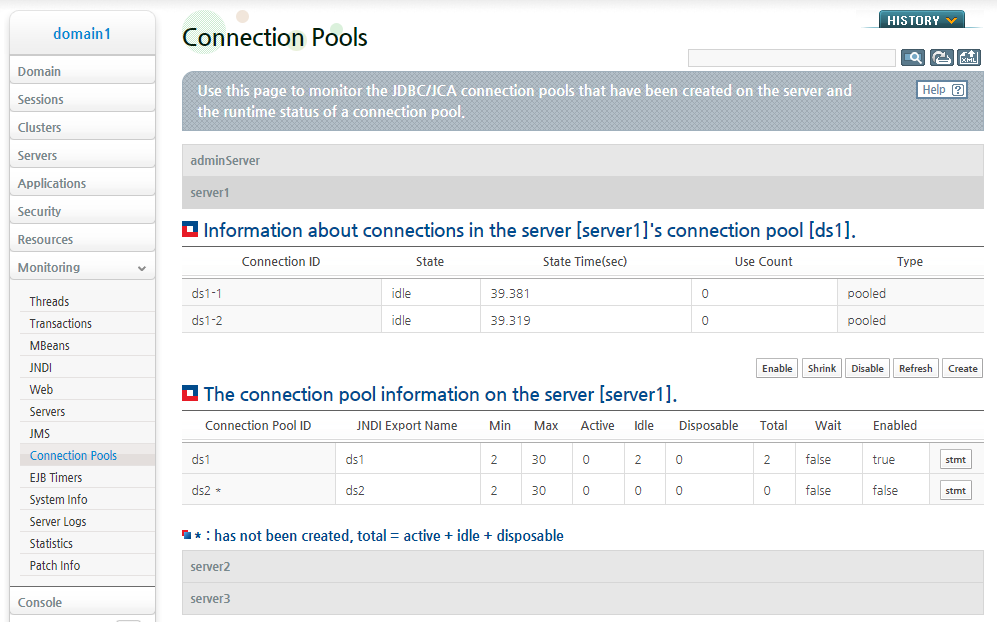
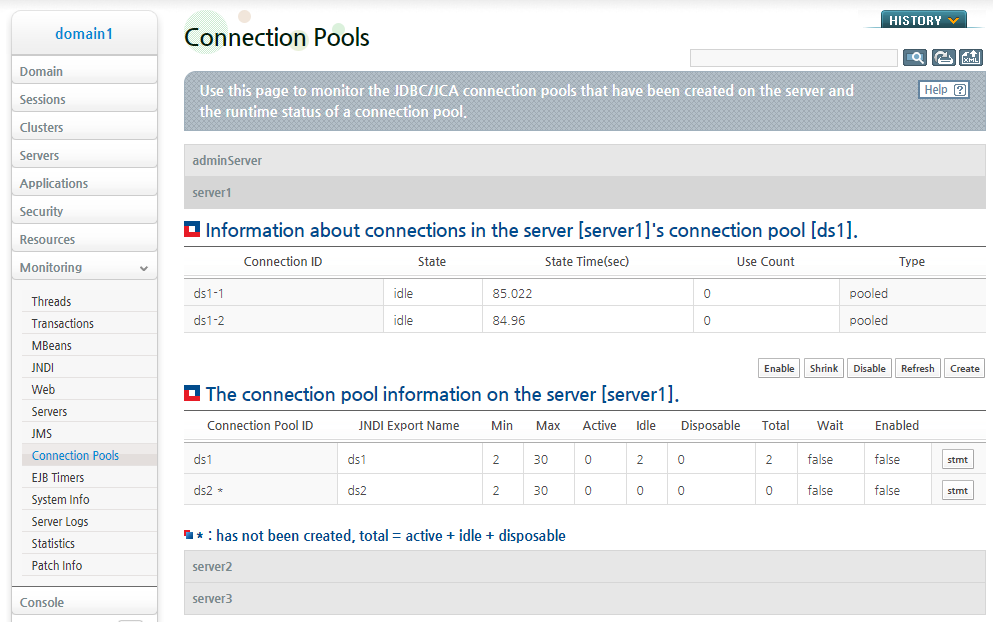
Using the Console Tool
The disable-connection-pool command is used to disable the connection pool on the server. For more information about how to use disable-connection-pool, refer to JEUS Reference Book. "4.2.12.6. disable-connection-pool".
The following is an example of disabling the connection pool for ds1 on server1 by executing disable-connection-pool.
[DAS]domain1.adminServer>disablecp -server server1 -id ds1
Servers that successfully disabled a connection pool : server1
Servers that failed to disable a connection pool : none.
If the server option is not provided, then the connection pool will be disabled for all servers where the data source is registered on.
The following is an example of disabling the connection pool for ds2 on server1 and server2 where ds2 is registered on by executing disable-connection-pool.
[DAS]domain1.adminServer>disablecp -id ds2
Servers that successfully disabled a connection pool : server1, server2
Servers that failed to disable a connection pool : none.
JDBC connection pool can also be disabled by executing control-connection-pool. For more information about using control-connection-pool, refer toJEUS Reference Book. "4.2.12.2. control-connection-pool".
The following is an example of disabling ds1 connection pool on server1 by executing control-connection-pool.
[DAS]domain1.adminServer>ctrlcp -server server1 -id ds1 -disable
Servers that successfully disabled a connection pool : server1
Servers that failed to disable a connection pool : none.
This section describes how to enable a connection pool by using the console tool and WebAdmin.
Using WebAdmin
The following describes how to enable a connection pool in WebAdmin.
-
Select [Monitoring] > [Connection Pools] from the left menu of WebAdmin and then select a server to enable a connection pool for.
-
The following is an example of enabling the connection pool for ds1. Select ds1 and then click [Enable].
-
The connection pool for ds1 is enabled.
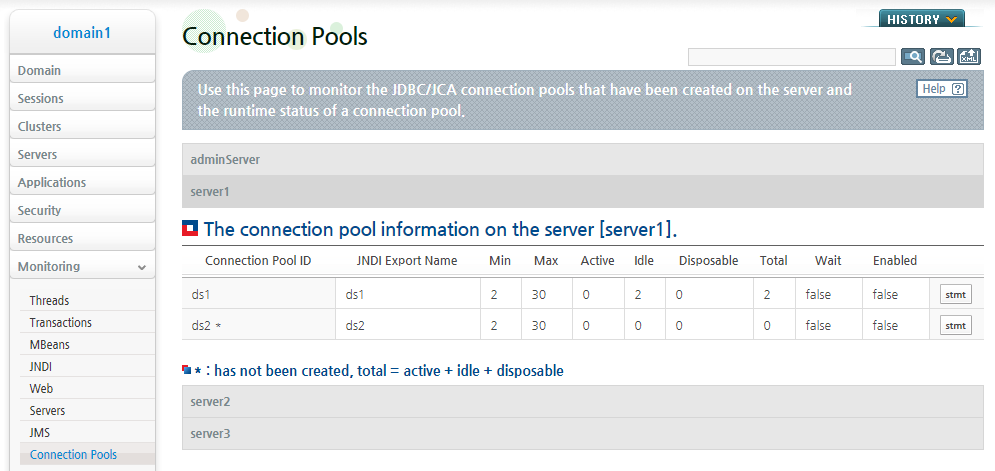
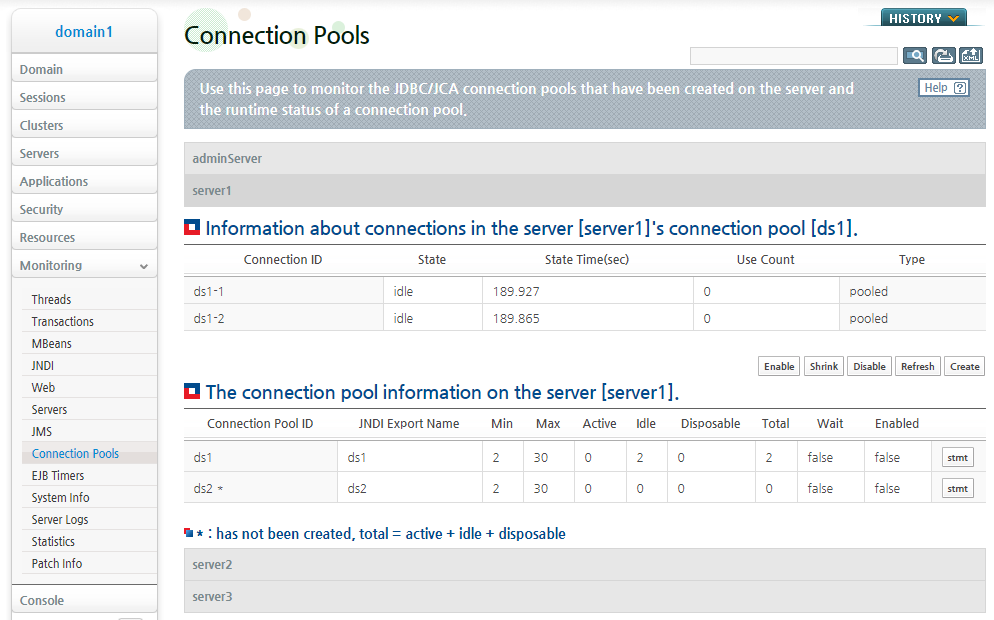
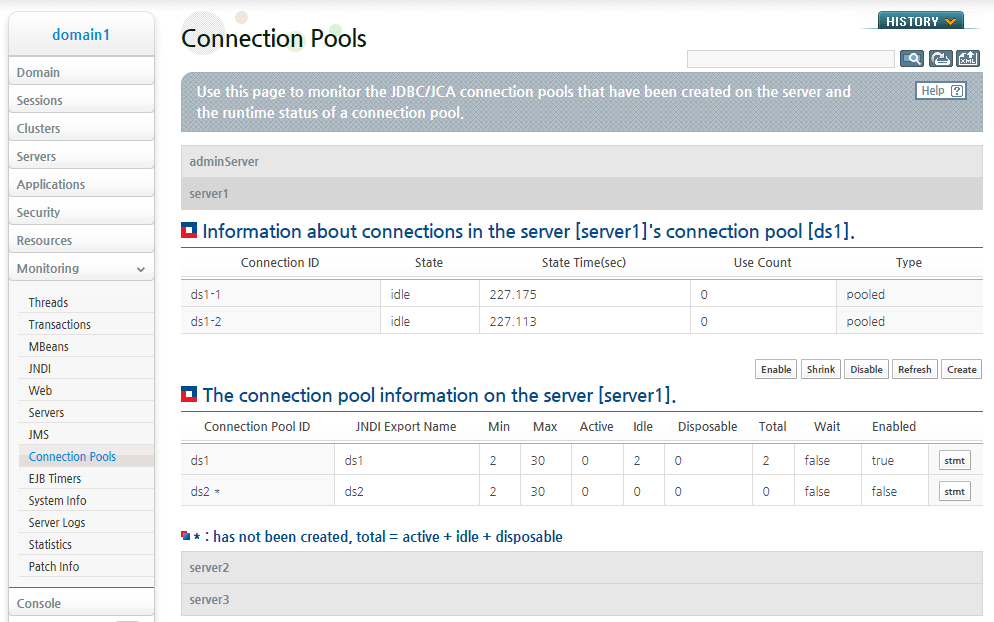
Using the Console Tool
The enable-connection-pool command is used to enable the connection pool on the server. For more information about using enable-connection-pool, refer to JEUS Reference Book. "4.2.12.7. enable-connection-pool".
The following is an example of enabling the connection pool for ds1 created on server1 by executing enable-connection-pool.
[DAS]domain1.adminServer>enablecp -server server1 -id ds1
Servers that successfully enabled a connection pool : server1
Servers that failed to enable a connection pool : none.
If the server option is not provided, then the connection pool will be disabled for all servers where the data source is registered on.
The following is an example of enabling the connection pool for ds2 on server1 and server2 where ds2 is registered on by executing enable-connection-pool.
[DAS]domain1.adminServer>enablecp -id ds2
Servers that successfully enabled a connection pool : server1, server2
Servers that failed to enable a connection pool : none.
The control-connection-pool command can also be used to enable a JDBC connection pool. For more information about using control-connection-pool, refer to JEUS Reference Book. "4.2.12.2. control-connection-pool".
The following is an example of enabling the ds1 connection pool created on server1 by executing control-connection-pool.
[DAS]domain1.adminServer>ctrlcp -server server1 -id ds1 -enable
Servers that successfully enabled a connection pool : server1
Servers that failed to enable a connection pool : none.
This section describes how to replace a connection of a connection pool by using the console tool and WebAdmin.
Using WebAdmin
The following describes how to replace a connection in a connection pool in WebAdmin.
-
Select [Monitoring] > [Connection Pools] from the left menu of WebAdmin and select a server to replace an invalid connection from the connection pool. In this example, click ds1 to replace it.
-
The list of connections in the connection pool for ds1 is displayed. Click [Refresh].
-
It is shown that the connection in the connection pool for ds1 has been replaced.
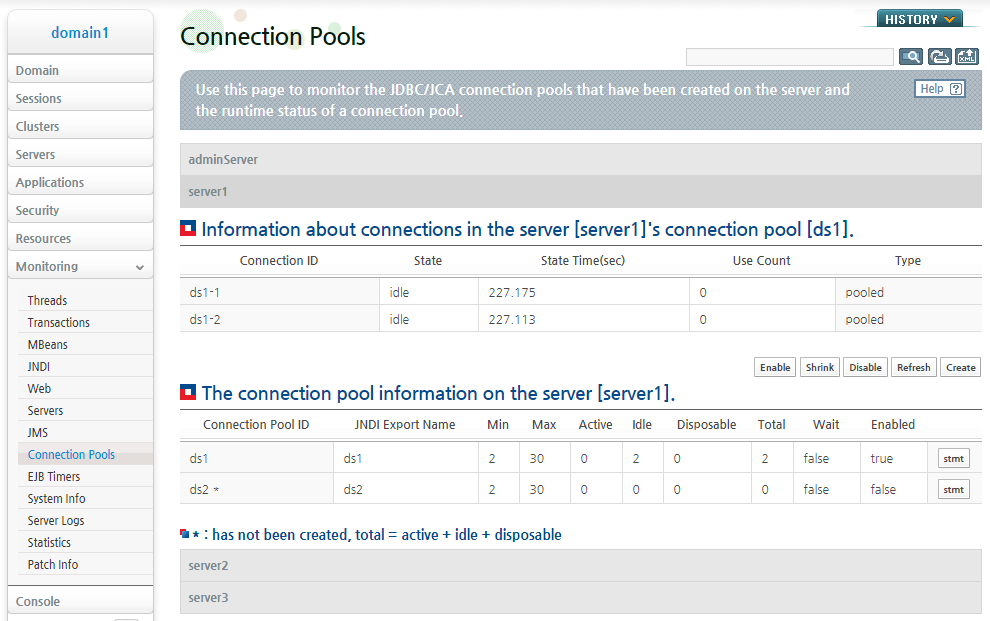
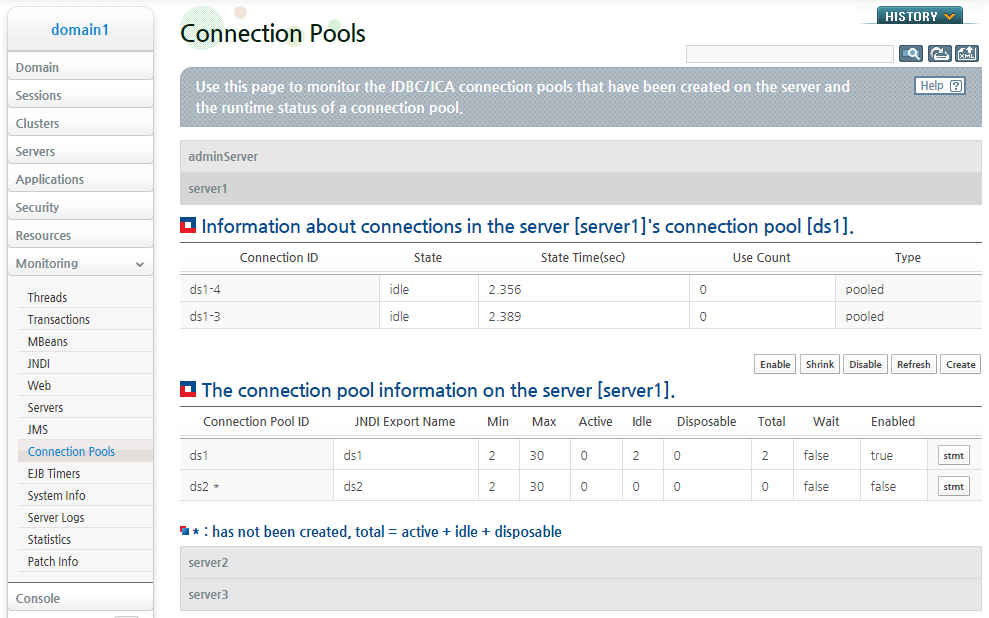
Using the Console Tool
The refresh-connection-pool command is used to replace the connections in the connection pool of the server with new connections. For more information about how to use refresh-connection-pool, refer to JEUS Reference Book. "4.2.12.8. refresh-connection-pool".
The following is an example of replacing the connections in the connection pool for ds1 on server1 with new connections by executing refresh-connection-pool.
[DAS]domain1.adminServer>refreshcp -server server1 -id ds1
Servers that successfully refreshed a connection pool : server1
Servers that failed to refresh a connection pool : none.
If the server option value is not provided, then a connection pool is created for all the servers where the data source is registered on.
The following is an example of refreshing the newly added connections in the connection pool on server1 and server2, where ds2 is registered, by executing refresh-connection-pool.
[DAS]domain1.adminServer>refreshcp -id ds2
Servers that successfully refreshed a connection pool : server1, server2
Servers that failed to refresh a connection pool : none.
JDBC connection pool's connections can also be refreshed by executing control-connection- pool. For more information about using control-connection-pool, refer toJEUS Reference Book. "4.2.12.2. control-connection-pool".
The following is an example of refreshing the connections in the connection pool for ds1 on server1 by executing control-connection-pool.
[DAS]domain1.adminServer>ctrlcp -server server1 -id ds1 -refresh
Servers that successfully refreshed a connection pool : server1
Servers that failed to refresh a connection pool : none.
This section describes how to minimize the number of connections in the connection pool by using the console tool and WebAdmin.
Using WebAdmin
The following describes how to minimize the number of connections in a connection pool in WebAdmin.
-
Select [Monitoring] > [Connection Pools] from the left menu of WebAdmin and then select a server to minimize the number of connections in the connection pool that is valid on the server. Click ds1 to minimize the number of connections in the connection pool for ds1.
-
The list of connections in the connection pool for ds1 is displayed. Change the number of connection pools, which is currently 7, to the minimum value of 2. Click [Shrink].
-
The number of connections in the connection pool for ds1 has been minimized.
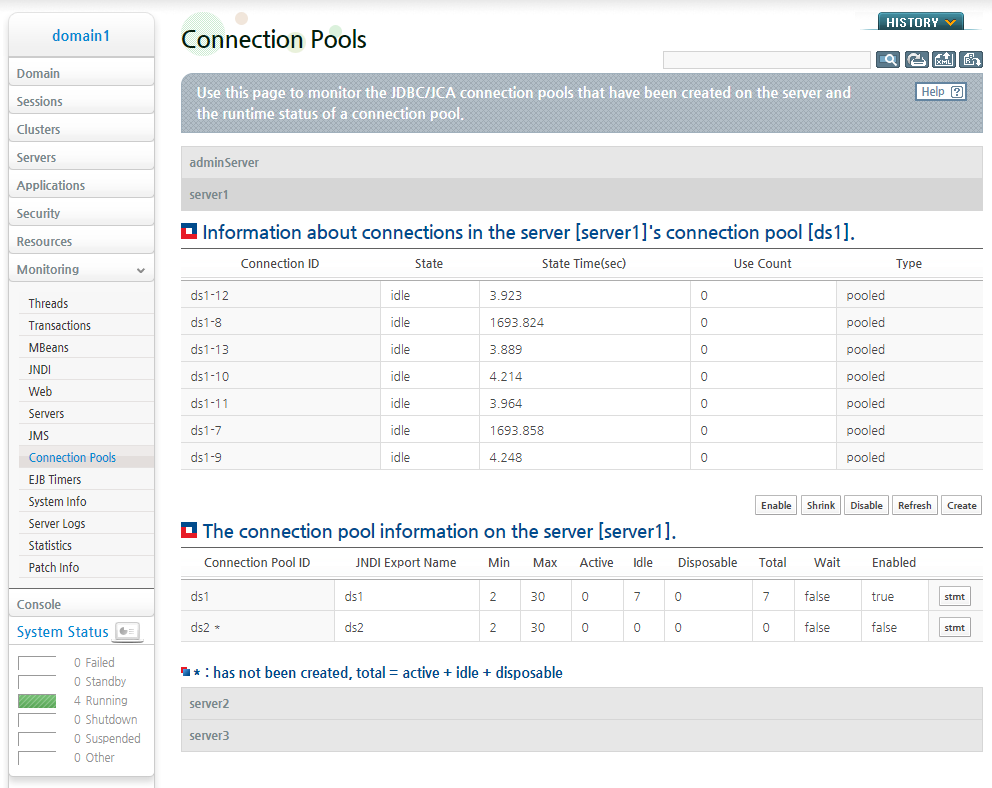

Using the Console Tool
The shrink-connection-pool command is used to adjust the number of connections in the connection pool on the server to the set minimum connection value. For more information about using shrink-connection-pool, refer to JEUS Reference Book. "4.2.12.10. shrink-connection-pool".
The following is an example of adjusting the number of connections in the connection pool for ds1 on server1 to the set minimum connection value by executing shrink-connection-pool.
[DAS]domain1.adminServer>shrinkcp -server server1 -id ds1
Servers that successfully shrank a connection pool : server1
Servers that failed to shrink a connection pool : none.
If the server option is not provided, then the connection pool will be disabled for all servers where the data source is registered on.
The following is an example of adjusting the number of connections in the connection pool for ds2 on server1 and server2, where ds2 is registered on, to the set minimum connection value by executing shrink-connection-pool.
[DAS]domain1.adminServer>shrinkcp -id ds2
Servers that successfully shrank a connection pool : server1, server2
Servers that failed to shrink a connection pool : none.
The number of connections in the JDBC connection pool can also be adjusted to the set minimum value by executing control-connection-pool. For more information about using control-connection-pool, refer to JEUS Reference Book. "4.2.12.2. control-connection-pool".
The following is an example of adjusting the number of connections in the connection pool for ds1 on server1 to the set minimum value by executing control-connection-pool.
[DAS]domain1.adminServer>ctrlcp -server server1 -id ds1 -shrink
Servers that successfully shrank a connection pool : server1
Servers that failed to shrink a connection pool : none.
This section describes how to use the console tool and WebAdmin to return connections to the connection pool.
If the application does not close the connection after making a getConnection request to a data source, the connection will remain active unless the data source is set to AutoClose. When such a connection leak occurs, you can return the connection to the connection pool by using the return connection function.
Using WebAdmin
The following is an example of returning a connection to the connection pool in WebAdmin.
-
Select [Monitoring] >[Connection Pools] from the left menu of WebAdmin and select a server to return an active connection to a connection pool of the server. Click on ds1 to fix the connection leak that occurred in the ds1 connection pool.
-
The page displays a list of connections of ds1.
Currently, the ds1-1 connection is in a leak state because the application has not closed it. In the active state, the [return] button of the connection is enabled in the Connection list. If you click [return], only the corresponding connection is returned to the connection pool. If you click the [return] button below the list, all selected connections are returned.
-
Click [return] for the ds1-1 connection to return it to the connection pool and change its state from active to idle as follows:
Using the Console Tool
The return-connection command is used to return an active connection to the server's connection pool. For more information about return-connection, refer to JEUS Reference Book. "4.2.12.9. return-connection".
The following is an example of using return-connection to return ds1-1 connection to the ds1 connection pool created in server1. You can use the connection-pool-info command to check whether the ds1-1 connection is currently in active state due to a leak, and use the return-connection command to return the connection.
[DAS]domain1.adminServer>cpinfo -server server1 -id ds1
Information about connections in the server [server1]'s connection pool [ds1].
================================================================================
+------------------+--------+---------------------------+-------------+--------+
|   Connection ID  |  State |      State Time(sec)      |  Use Count  |  Type  |
+------------------+--------+---------------------------+-------------+--------+
| ds1-2            | idle   |                    22.311 |           0 | pooled |
| ds1-1            | active |                    22.289 |           0 | pooled |
+------------------+--------+---------------------------+-------------+--------+
================================================================================
[DAS]domain1.adminServer>return-connection -server server1 -cid ds1-1
Successfully returned the connections to the connection pool.
You can use the cid option to return multiple connections (delimited by a comma) in the same connection pool. You can also use the cpid option to return all connections in the connection pool.
The following example uses return-connection to return all active connections in connection pool ds1 to the connection pool.
[DAS]domain1.adminServer>return-connection -server server1 -cpid ds1
Successfully returned the connections to the connection pool.
This section describes how to use the console tool and WebAdmin to forcibly destroy a connection in the connection pool.
If an application makes a getConnection request to the data source but there is a problem with the active connection, the connection can be forcibly destroyed by using the destroy-connection command. However, since this function forcibly destroys the physical connection, use with caution.
Using WebAdmin
The following describes how to use WebAdmin to forcibly destroy a connection in the connection pool.
-
Select [Monitoring] >[Connection Pools] from the left menu of WebAdmin and select a server to destroy an active connection in a connection pool of the server. Click on ds1 to destroy a problematic connection in the ds1 connection pool.
-
The page displays a list of connections of ds1.
Assume that the ds1-1 connection is a problematic connection currently in the active state. In the active state, the [destroy] button of the connection is enabled in the Connection list.
If you click the [destroy] button in the connection list, only the corresponding connection is forcibly destroyed. Click the [destroy] button at the bottom of the list to forcibly destroy selected connections from the Connection list.
-
Click [destroy] for the ds1-1 connection to destroy it from the connection pool and it is no longer in the connection list as follows:
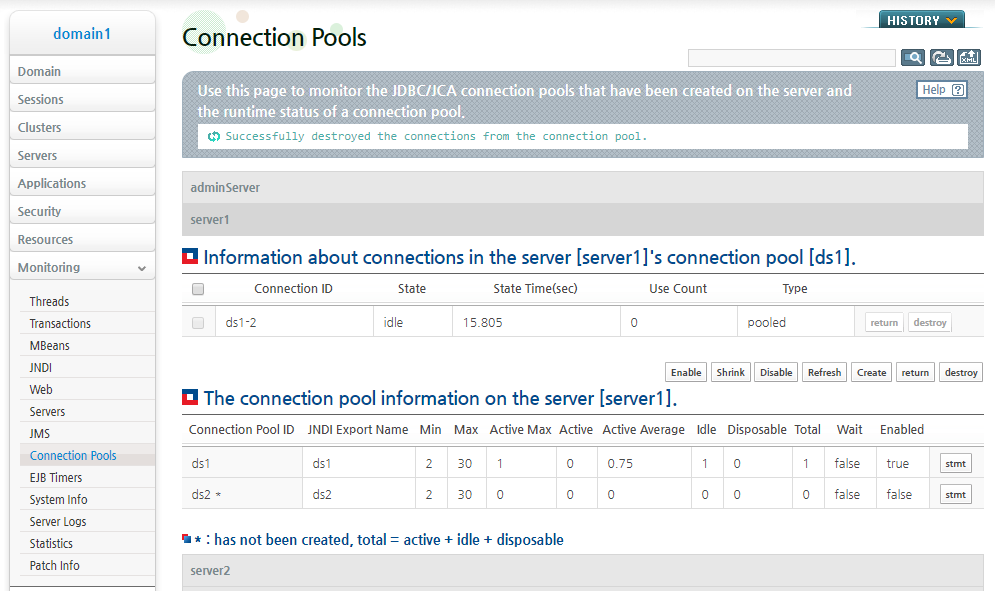
Using the Console Tool
The destroy-connection command is used to destroy an active connection in the server's connection pool. For more information about destroy-connection, refer toJEUS Reference Book. "4.2.12.5. destroy-connection".
The following is an example of using destroy-connection to destroy ds1-1 connection in the ds1 connection pool created in server1. You can use the connection-pool-info command to check whether the ds1-1 connection is currently in active state, and use the destroy-connection command to destroy the connection
[DAS]domain1.adminServer>cpinfo -server server1 -id ds1
Information about connections in the server [server1]'s connection pool [ds1].
================================================================================
+------------------+--------+---------------------------+-------------+--------+
|   Connection ID  |  State |      State Time(sec)      |  Use Count  |  Type  |
+------------------+--------+---------------------------+-------------+--------+
| ds1-2            | idle   |                    22.311 |           0 | pooled |
| ds1-1            | active |                    22.289 |           0 | pooled |
+------------------+--------+---------------------------+-------------+--------+
================================================================================
[DAS]domain1.adminServer>destroy-connection -server server1 -cid ds1-1
Successfully destroyed the connections from the connection pool.
You can use the cid option to destroy multiple connections (delimited by a comma) in the same connection pool. You can also use the cpid option to destroy all connections in the connection pool.
The following example uses destroy-connection to destroy all active connections in connection pool ds1 to the connection pool.
[DAS]domain1.adminServer>destroy-connection -server server1 -cpid ds1
Successfully destroyed the connections from the connection pool.
This section briefly describes the JDBC application programming rules.
The following code shows how to obtain a connection by using a data source.
Context ctx = new InitialContext();
DataSource ds = (DataSource) ctx.lookup("ds1");
Connection con = ds.getConnection();
Statement stmt = con.createStatement();
ResultSet rs = stmt.executeQuery("select * from test");
...
con.close();
Note
Be sure to always close the connection after use.
JEUS defines the standard procedure for transaction programming. All applications that use the UserTransaction interface must follow the standard procedure.
-
Start a transaction.
-
Retrieve a DB connection.
-
Code rest of the transaction.
Note
The user must obtain a new connection to process other transactions.
In JEUS, when a connection is passed to an application, a wrapper class is used to manage the connection state. However, since Oracle's CLOB, XMLType, etc. require direct access to the connection implementation instance of the JDBC driver, a ClassCastExeption occurs when class casting is attempted internally in the driver. This is a problem that can occur in most WAS products, not just in JEUS. Therefore, application developers cannot assume that connections from WAS is a connection implementation instance of the driver. However, there is a way to avoid this problem.
The application can obtain a connection implementation instance of the driver as in the following way.
import java.sql.Connection;
import java.sql.DatabaseMetaData;
...
Connection conn = datasource.getConnection();
DatabaseMetaData metaData = conn.getMetaData();
OracleConnection oraConn = (OracleConnection)metaData.getConnection();
A standalone client can look up a data source registered on JEUS, get the data source information from JEUS, and configure the connection pool on its own JVM. Here, the standalone client must add the clientcontainer.jar or jclient.jar to the classpath.
This method has the benefit of conveniently accessing a database in the standalone client by using the JNDI lookup method. However, in the viewpoint of the database, this allows more client accesses to the JDBC driver besides the Web application server. If the client doesn't particularly need to efficiently manage DB connections, then configuring the connection pool in the client can be a resource waste. Therefore, it is not recommended to use this method when implementing the actual service.
Note
Connections are not obtained from the connection pool configured on JEUS server. To do so, implement the logic for using the connection as an EJB, and deploy it on JEUS and use it by looking up the EJB.
In the JCA standard, Connection Sharing is defined to guarantee that only one connection is always used for each resource in a transaction. Most of the resources from the JDBC viewpoint are databases or data sources. Without additional configuration, by default JEUS provides connection sharing to connection pool data sources that use the XA data source and emulation functions.
In application frameworks like ProFrame, since multiple connection requests are made within the same transaction, it is preferable to use connection sharing. Otherwise, multiple number of connections can participate in the transaction by using a single data source. This puts a lot of burden on the DB in managing the transaction lock which can reduce the overall performance of the transaction.
When it is not desirable to use connection sharing, compose the Java EE component configuration file (web.xml, ejb-jar.xml, etc) that uses XA data source as in the following. For <res-ref-name>, enter the JNDI name of the data source.
<resource-ref>
   <res-ref-name>jdbc/xads</res-ref-name>
   <res-type>javax.sql.DataSource</res-type>
   <res-sharing-scope>Unshareable</res-sharing-scope>
</resource-ref>
If no configuration is made, then by default the <res-sharing-scope> element is set to shareable, and a servlet or EJB always uses connection sharing. However, since the connection pool data source that uses the XA emulation function must always share the connection, a java.sql.SQLException error occurs when it is configured to Unshareable.
JEUS has been only supporting connection pooling service for default users specified in the data source configuration. When connection was requested with a different user information, the connection was always handled as a disposable connection. Disposable connection is created whenever there is a connection request and it is removed from the connection pool after use. Hence, when there are a lot of requests for disposable connections, it can be a considerable burden on connection pooling.
For this reason, connection pooling service is supported for various users. This means that a single connection pool is transparently divided and managed per user, and the client can use the connection pooling service same as before without noticing any changes to the previous configuration. In the connection pool, the connections with different user information still all follow the overall configuration and policy of the connection pool. This way, even if multiple user-specific connections are used frequently, the connection pooling service can be used efficiently without having the burden of creating disposable connections.