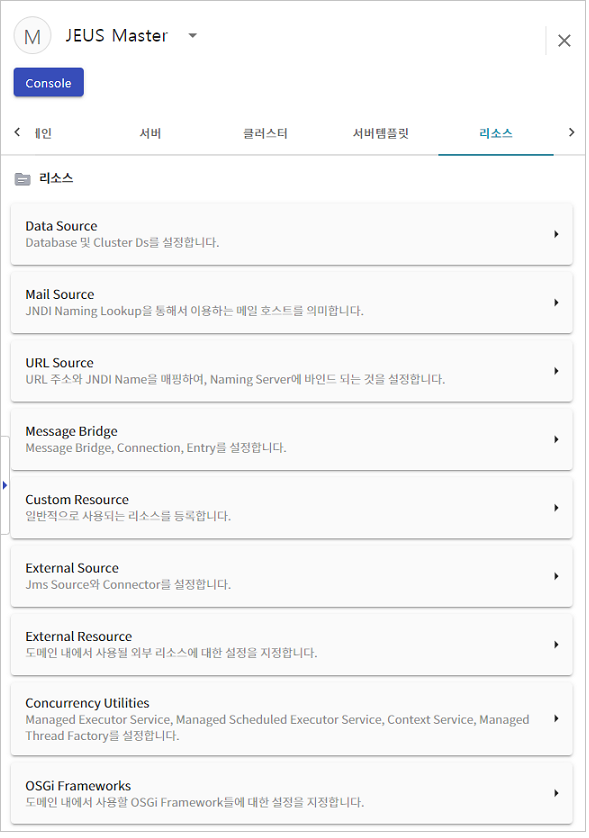
본 절에서는 각각의 리소스를 WebAdmin을 통해 설정하는 방법을 설명한다.
리소스는 도메인 범위에 설정하고, 서버가 부팅할 때 이 정보를 읽어 자신의 서버에 리소스를 등록한다.
WebAdmin 메인 화면에서 Master Server를 선택한 후 JEUS Master 화면 상단 메뉴에서 [리소스]를 선택하면 각 리소스를 조회할 수 있는 메뉴를 선택할 수 있다.
데이터소스는 DB 관련 설정을 다루게 된다. 이 내용은 “제6장 DB Connection Pool과 JDBC”에 기술되어 있으므로 해당 절을 참고한다.
JEUS에 클라이언트 애플리케이션에서 메일을 보낼 때 사용될 SMTP 호스트를 설정할 수 있다. WebAdmin을 통해서 각각의 SMTP 서버마다 각각의 이메일 호스트에 대한 정보를 설정한다. 이메일 호스트에 대한 정보는 Jakarta Mail 사양을 참고한다.
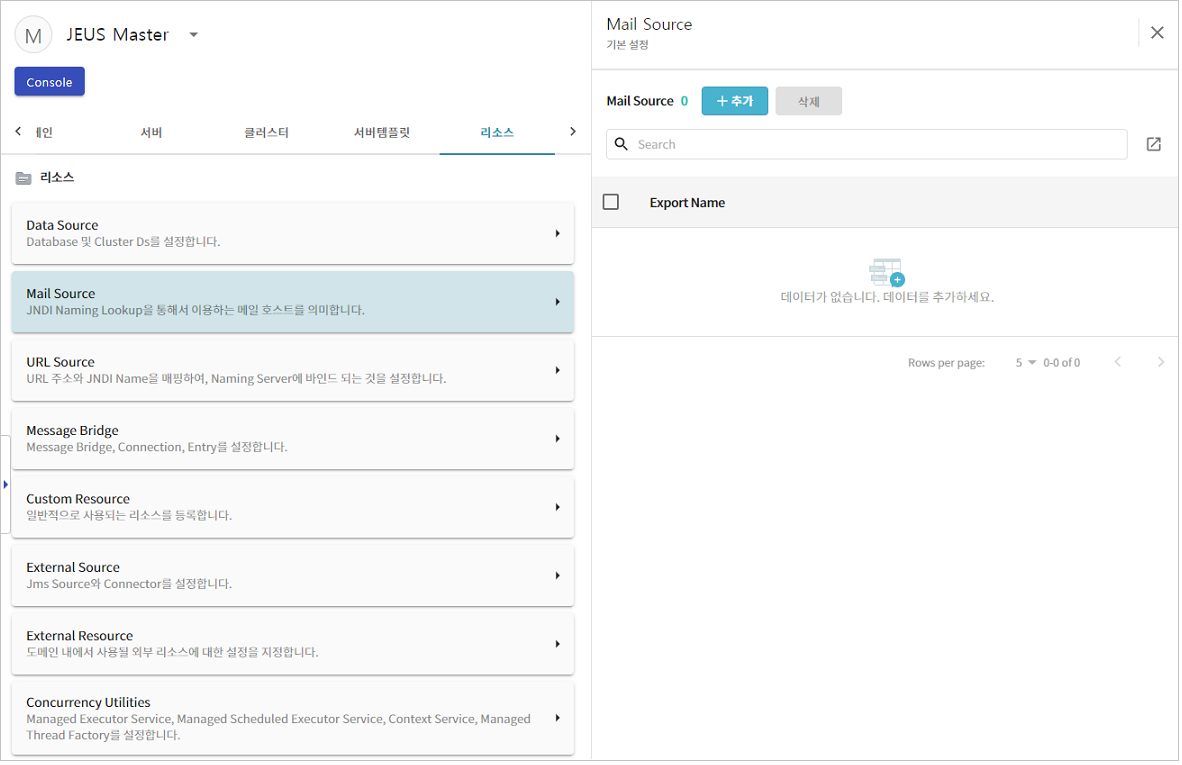
WebAdmin 메인 화면에서 Master Server를 선택한 후 JEUS Master 화면 상단 메뉴에서 [리소스]를 선택한 후 [Mail Source]를 선택하면 도메인에 등록된 메일 소스를 조회할 수 있다.
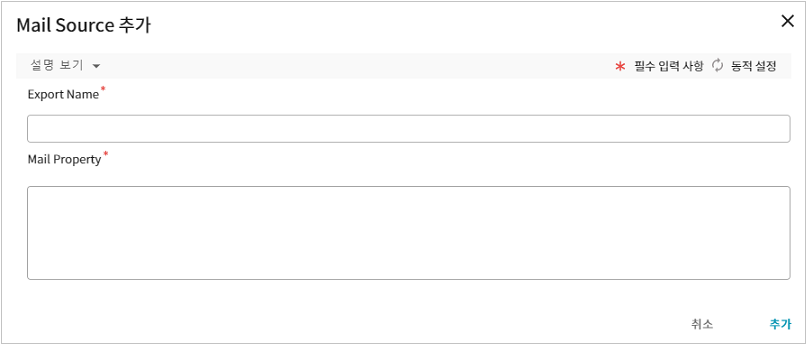
Mail Source 설정 화면에서 [추가] 버튼을 클릭하면 도메인에 메일 소스를 등록할 수 있다.
참고
'Main Property'에 설정하는 속성명은 Jakarta Mail 사양을 따르므로 해당 사양을 참고해서 지정한다.
다음은 JNDI 이름은 PRIMARY_URL과 SECONDARY_URL이고 각각에 bind되는 URL이다.
http://www.foo.com
http://www.bar.com
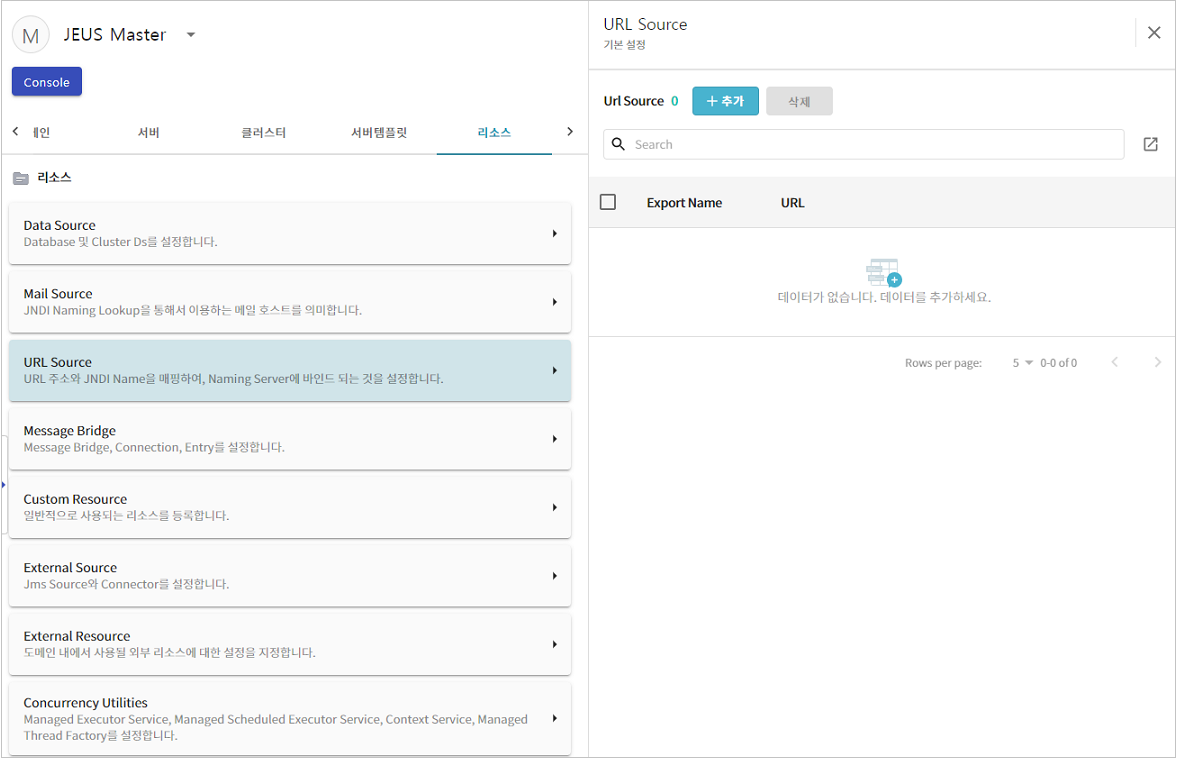
JEUS Master 설정 화면 상단 메뉴에서 [리소스]를 선택한 후 [URL Source]를 선택하면 URL 소스를 조회하고 추가, 변경, 삭제할 수 있는 설정 화면으로 이동한다.
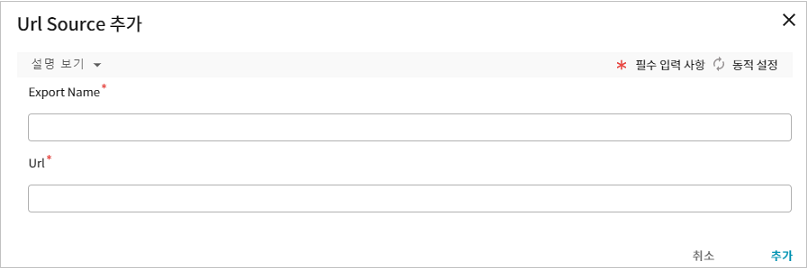
URL Source 설정 화면 상단의 [추가] 버튼을 클릭하면 도메인에 URL 소스를 등록할 수 있다.
Custom Resource는 Java Bean 형태의 리소스를 JNDI ObjectFactory를 통해 Lookup하여 사용할 수 있도록 하는 일반적인 리소스이다. 본 절에서는 Custom Resource 구현 방법과 등록 방법에 대해서 설명한다.
다음은 Java Bean 형태의 리소스 클래스와 리소스 인스턴스를 생성할 ObjectFactory 클래스에 대한 예제이다. 이 클래스는 SERVER_HOME/lib/application 또는 DOMAIN_HOME/lib/application에 있어야 한다.
[예 5.1] Custom Resource를 생성할 팩토리 클래스의 예제
package dog;

import java.util.Hashtable;
import javax.naming.Context;
import javax.naming.Name;
import javax.naming.spi.ObjectFactory;

public class DogFactory implements ObjectFactory {
    public DogFactory() {}

    public Object getObjectInstance(Object obj, Name name, Context nameCtx, Hashtable<?, ?> environment)
        throws Exception {
        Dog dog = Dog.getInstance();
        System.out.println("Creating a dog whose name is " + dog.getName() + ",
and age is " + dog.getAge());
        return dog;
    }
}
[예 5.2] Custom Resource 예제 클래스
package dog;

public class Dog implements java.io.Serializable {
    public static final String DOG_NAME = "wangwang";
    public static final int DOG_AGE = 1;

    private static Dog instance = new Dog();

    private int age = DOG_AGE;
    private String name = DOG_NAME;

    public Dog() {}

    public static Dog getInstance() {
        return instance;
    }

    public int getAge() {
        return age;
    }

    public void setAge(int age) {
        this.age = age;
    }

    public String getName() {
        return name;
    }

    public void setName(String name) {
        this.name = name;
    }

    public boolean equals(Object anObject) {
        if (this == anObject) {
           return true;
        }
        if (anObject instanceof Dog) {
           Dog anotherDog = (Dog) anObject;
           return (this.age == anotherDog.age && this.name.equals(anotherDog.name));
        }
        return false;
    }

}
참고
Custom Resource를 동적으로 추가하기 위해서는 이미 해당 클래스들이 서버의 클래스 로더에 클래스 패스로 잡혀있어야 가능하다. 만약 서버의 클래스 로더에서 이 클래스를 로딩할 수 없으면 동적 추가 명령은 pending 처리된다. 이럴 경우 Custom Resource 클래스를 SERVER_HOME/lib/application 또는 DOMAIN_HOME/lib/application에 추가하고 서버를 재기동해야 한다.
Custom Resource를 삭제하는 동작은 Graceful하게 수행되지 않는다. 즉, 진행 중인 요청이 있더라도 이를 완료하지 않기 때문에 사용자 애플리케이션에서는 에러가 발생할 수 있음을 유의한다.
WebAdmin 사용
다음은 WebAdmin에서 동적으로 Custom Resource를 등록하는 방법에 대해 알아본다.
-
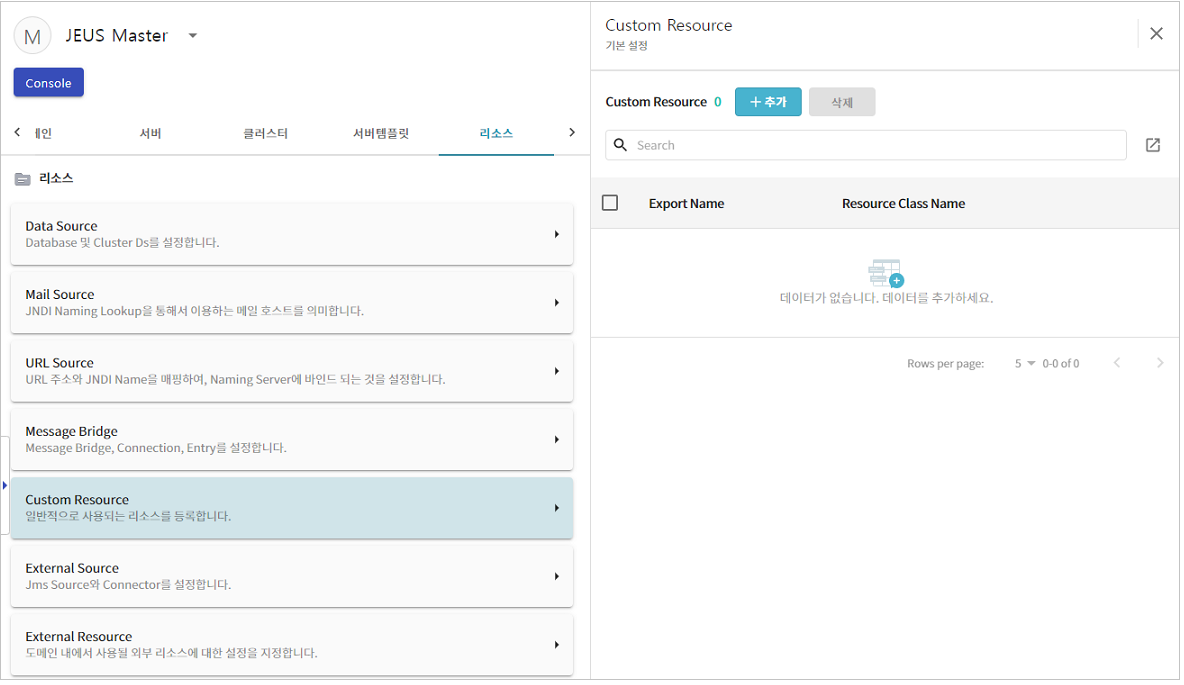
JEUS Master 설정 화면 상단 메뉴에서 [리소스]를 선택한 후 [Custom Resource]를 선택한다.
-
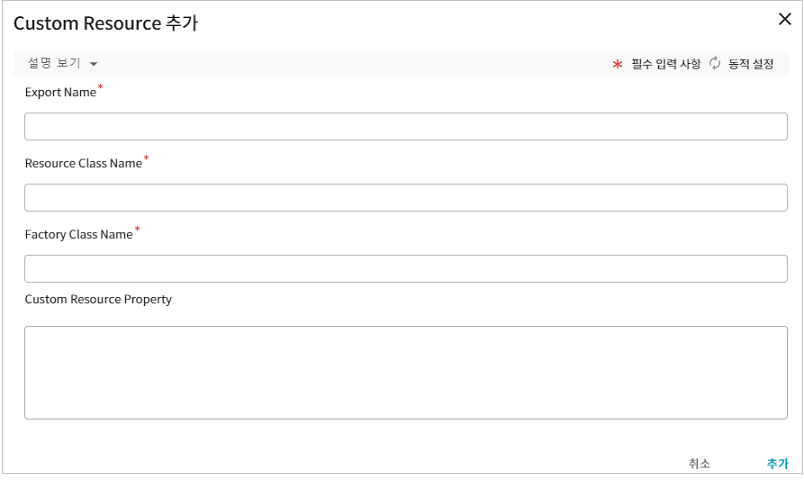
[추가] 버튼을 클릭하여 도메인에 등록하려고 하는 Custom Resource의 설정 정보를 입력하고 [추가] 버튼을 클릭한다.
-
[추가] 버튼을 클릭해서 저장을 하면 화면 상단에 저장 결과에 대한 메시지가 나타난다. 또한 Custom Resource 테이블에 추가한 리소스 정보가 나타난다.
-
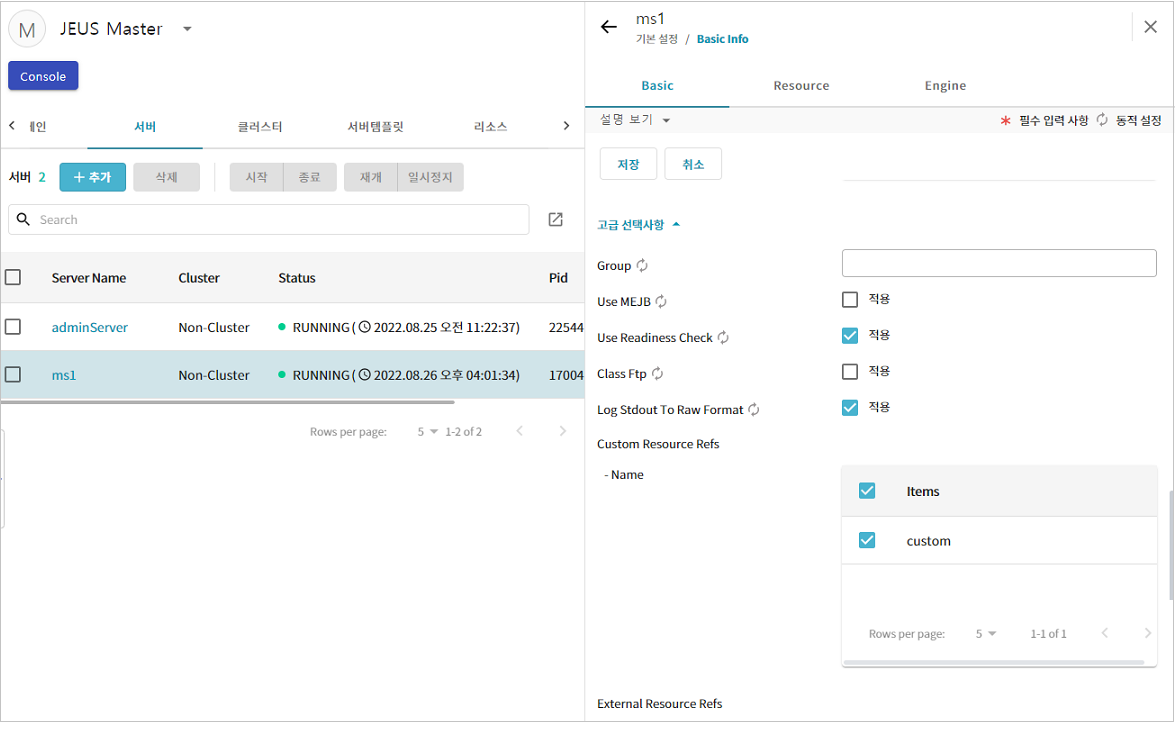
추가한 Custom Resource를 서버에서 사용할 수 있도록 서버 설정에 Custom Resource를 추가한다.
JEUS Master 설정 화면 상단 메뉴에서 [서버] 탭을 선택한 후 서버 목록에서 변경할 서버를 선택한다. 서버 설정 화면에서 [Basic] > [Basic Info] 탭을 선택한 후 [수정] 버튼을 클릭한다. 고급 선택사항에서 'Custom Resource Refs' 항목 목록에서 도메인에 추가한 Custom Resource를 선택하고 [저장] 버튼을 클릭한다.
-
[저장] 버튼을 클릭하면 설정이 저장되었다는 메시지를 확인할 수 있다. 해당 Custom Resource는 추가한 서버에서 바로 사용가능하다.
콘솔 툴 사용
Custom Resource는 콘솔 툴을 통해서 서버에 등록된 리소스에 대한 조회 명령이 가능하다. 또한 새로운 Custom Resource를 동적으로 추가, 삭제하는 것이 가능하다.
[MASTER]domain1.adminServer>add-custom-resource custom/dog -resource dog.Dog -factory dog.DogFactory
Successfully performed the ADD operation for A custom resource.
Check the results using "list-custom-resources or add-custom-resource"

[MASTER]domain1.adminServer>list-custom-resources
List of Custom Resources
================================================================================
+-------------+--------------------+--------------------------+----------------+
| Export Name |   Resource Class   |       Factory Class      |   Properties   |
+-------------+--------------------+--------------------------+----------------+
| custom/dog  | dog.Dog            | dog.DogFactory           | [test=1,       |
|             |                    |                          |test1=2]        |
+-------------+--------------------+--------------------------+----------------+
================================================================================

[MASTER]domain1.adminServer>add-custom-resource-to-servers custom/dog -servers server1
Successfully performed the ADD operation for A custom resource.
Check the results using "list-custom-resources"

[MASTER]domain1.adminServer>remove-custom-resource custom/dog
Successfully performed the REMOVE operation for A custom resource.
Check the results using "list-custom-resources or remove-custom-resource"

[MASTER]domain1.adminServer>list-custom-resources
List of Custom Resources
================================================================================
+-------------+--------------------+--------------------------+----------------+
| Export Name |   Resource Class   |       Factory Class      |   Properties   |
+-------------+--------------------+--------------------------+----------------+
(No data available)
================================================================================
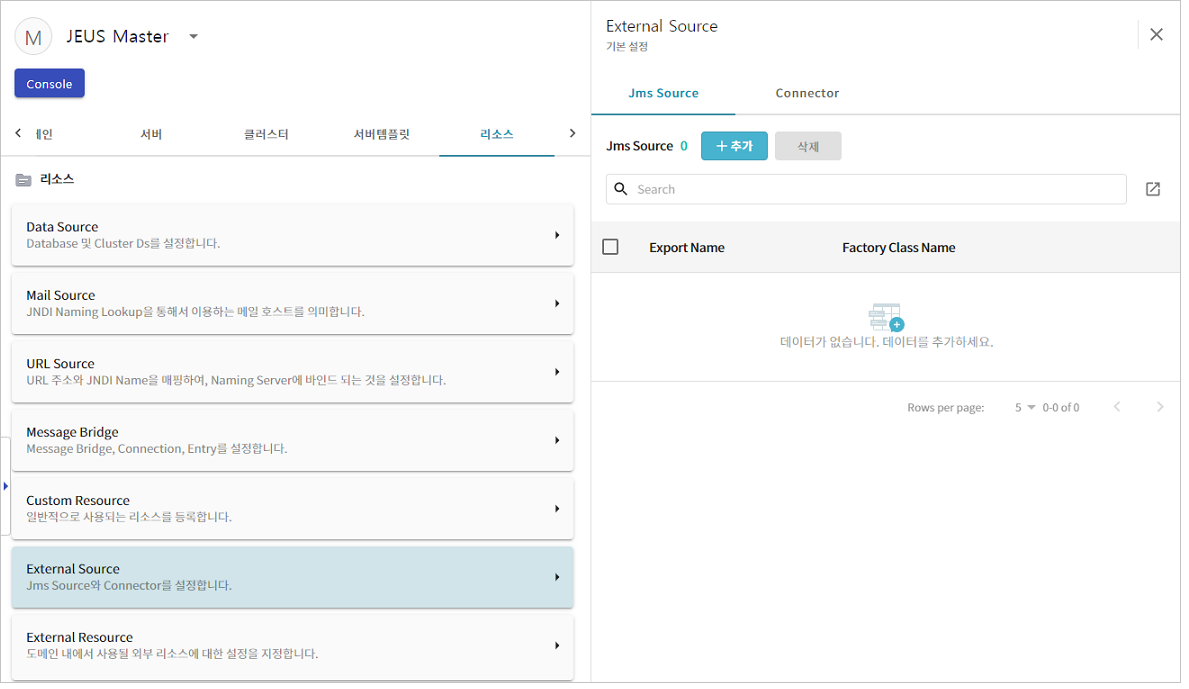
외부 소스는 크게 JMS 소스와 Connector로 나뉜다. JEUS Master 설정 화면 상단 메뉴에서 [리소스]를 선택한 후 [External Source]를 선택하면 나타나는 External Source 설정 화면에서 설정할 수 있다.
JMS Source
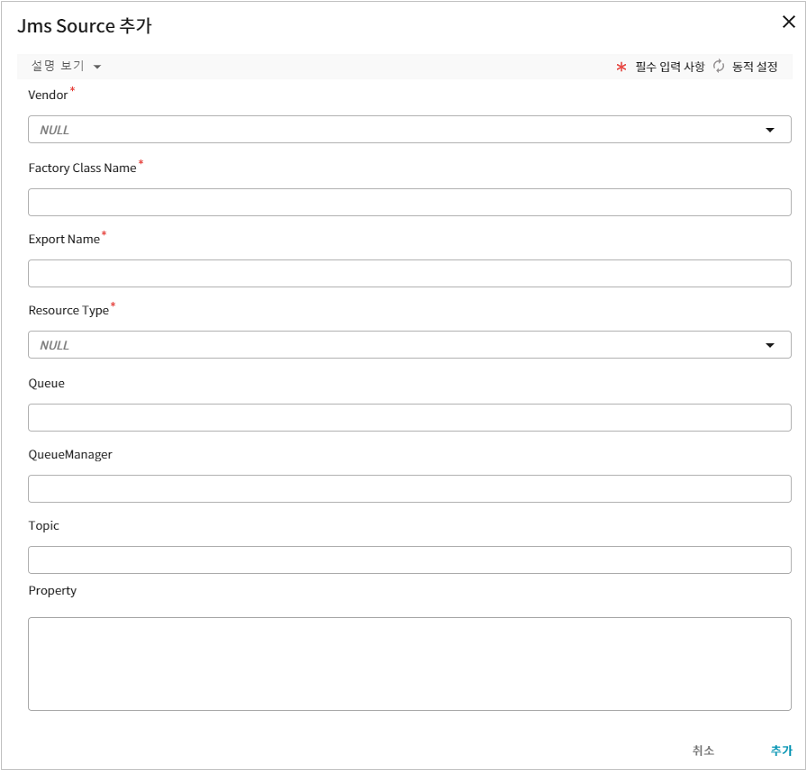
WebAdmin에서는 도메인에 설정된 JMS 소스를 조회하고, JMS 소스를 추가, 변경, 삭제할 수 있다. JMS 리소스를 추가하기 위해서 External Source 설정 화면에서 Jms Source 탭 하단의 [추가] 버튼을 클릭한다.
다음은 JMS 소스 설정 항목에 대한 설명이다.
| 항목 | 설명 |
|---|---|
Vendor | JMS 벤더를 설정한다. 다음의 값 중 하나를 설정한다.
|
Factory Class Name | 해당 JMS 리소스의 Factory Class의 이름을 지정한다. |
Resource Type | 해당하는 JMS의 타입을 결정한다. 다음의 8가지 값 중에 하나를 설정한다.
|
Export Name | JNDI에 바인딩될 이름을 지정한다. 사용자는 이 이름을 이용하여 JMS의 ConnectionFactory, Destination 등을 이용할 수 있다. |
Queue | 'Rresource Type'이 'Q'일 때만 사용한다. |
Queue Manager | 'Rresource Type'이 'Q'일 때만 사용한다. |
Topic | 'Rresource Type'이 'T'일 때만 사용한다. |
Property | JMS 리소스에 필요한 속성들을 기록한다. 이 설정은 name, type, value로 구성된다. |
참고
각 태그에 대한 자세한 내용은 자세한 것은 IBM MQ나 Sonic MQ의 매뉴얼을 참조한다.
Connector 추가
WebAdmin에서는 도메인에 설정된 Connector를 조회하고, 추가, 변경, 삭제할 수 있다. Connector에 대한 자세한 설명은 "JEUS JCA 안내서"를 참고한다.
JEUS에서는 Tmax나 InfiniCache와 같이 타 제품을 JEUS에서 연동하기 위해서 External Resource를 설정할 수 있다. Tmax와의 연동을 위해서는 JEUS에서 Tmax로 연결해서 Tmax의 트랜잭션 서비스를 사용하는 아웃바운드(Outbound)인 WebT와 Tmax에서 JEUS로 온 서비스 요청을 받아주는 인바운드(Inbound)인 JTmax를 설정할 수 있다. 자세한 내용은 관련된 Tmax 매뉴얼의 "JTmax Server Guide"를 참고한다.
본 절에서는 External Resource 구현 방법과 등록 방법에 대해서 설명한다.
다음은 jeus.external.ResourceBootstrapper 인터페이스이다. 이 인터페이스를 구현한 클래스는 SERVER_HOME/lib/application 또는 DOMAIN_HOME/lib/application에 있어야 한다.
[예 5.3] jeus.external.ResourceBootstrapper
package jeus.external;

import javax.naming.Context;
import java.util.Map;

/**
 * 외부 resource를 JEUS에서 사용할 수 있도록 하는 bootstrapper이다.
 */
public interface ResourceBootstrapper {
    /**
     *
     * @param propertyMap resource의 설정을 가진 Map
     */
    void setProperties(Map propertyMap) throws InvalidPropertyException;

    /**
     * resource를 bind한다.
     * @param context
     */
    void initResources(Context context);

    /**
     * 사용할 수 있는 property의 정보를 return한다.
     * @return
     */
    ResourcePropertyInfo[] getPropertyInfo();

    /**
     *
     * @param propertyMap 변경되는 property가 있는 Map
     */
    void modifyProperties(Map propertyMap) throws InvalidPropertyException;

    /**
     * resource를 다시 bind할때 호출된다.
     * @param context
     */
    void reconfigResources(Context context);

    /**
     * resource를 제거할때 사용한다.
     * @param context
     */
    void destroyResources(Context context);
}
참고
External Resource를 동적으로 추가하기 위해서는 이미 해당 클래스들이 서버의 클래스 로더에 클래스 패스로 잡혀있어야 가능하다. 만약 서버의 클래스 로더에서 이 클래스를 로딩할 수 없으면 동적 추가 명령은 pending 처리된다. 이럴 경우 External Resource 클래스를 SERVER_HOME/lib/application 또는 DOMAIN_HOME/lib/application에 추가하고 서버를 재기동해야 한다.
External Resource를 삭제하는 동작은 Graceful하게 수행되지 않는다. 즉, 진행 중인 요청이 있더라도 이를 완료하지 않기 때문에 사용자 애플리케이션에서는 에러가 발생할 수 있음을 유의한다.
WebAdmin 사용
다음은 WebAdmin에서 동적으로 External Resource를 등록하는 방법에 대해 알아본다.
-
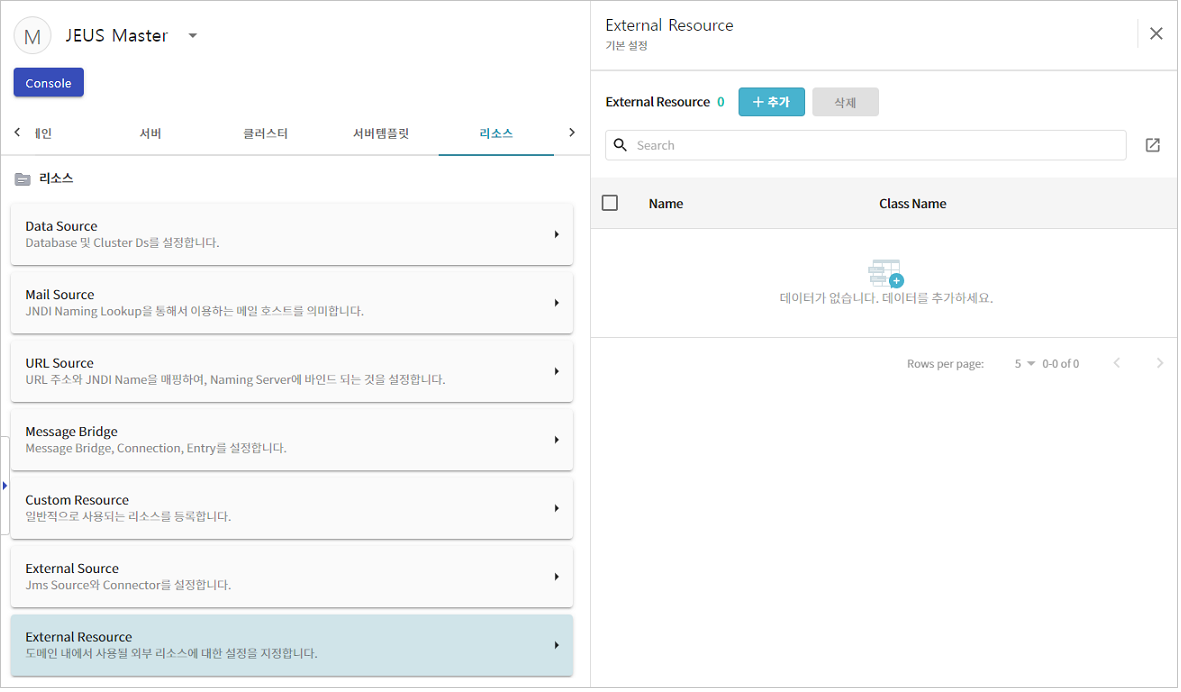
WebAdmin 메인 화면에서 Master Server를 선택한 후 JEUS Master 화면 상단 메뉴에서 [리소스]를 선택한 후[External Resource]를 선택한다.
-
External Resource 화면에서 [추가] 버튼을 클릭하여 JTmax와 WebT, InfiniCache를 위한 ResourceBootstrpper를 도메인에 등록한다.
-
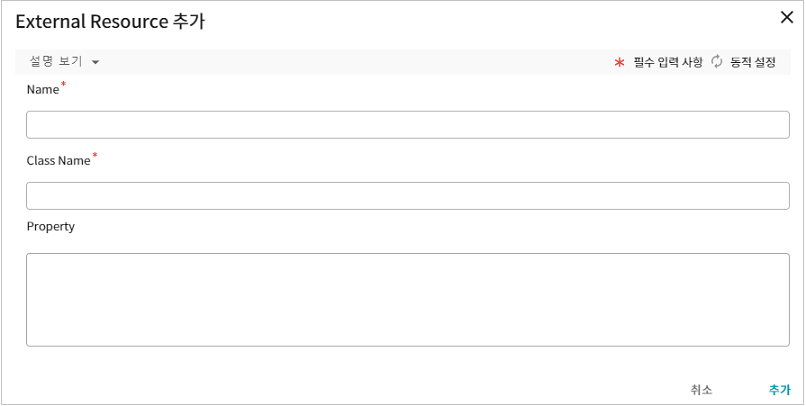
External Resource 추가 화면에서 등록할 External Resource의 설정 정보를 입력하고 [추가] 버튼을 클릭한다.
-
저장을 완료되면 화면 상단에 저장 결과에 대한 메시지가 나타난다. 또한 External Resource 테이블에 추가한 리소스 정보가 나타난다.
-
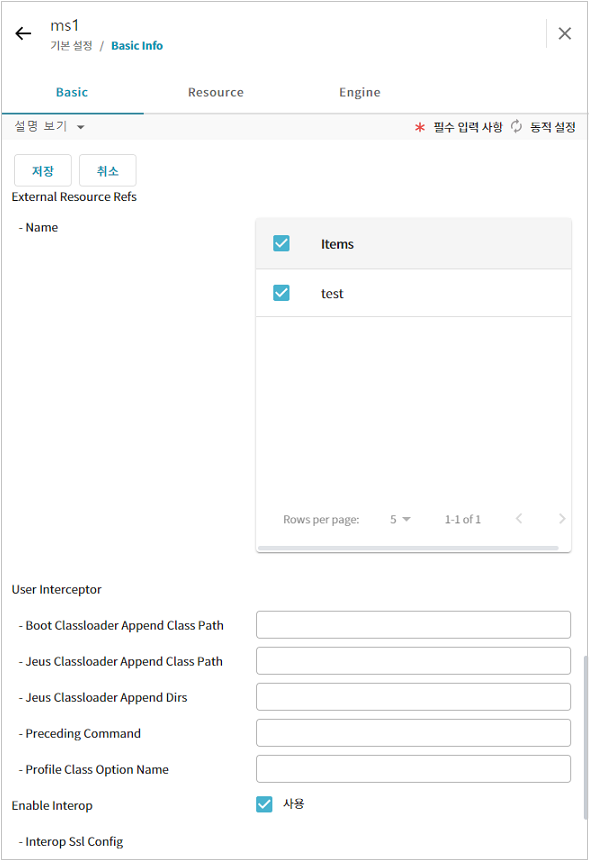
JEUS Master 화면 상단 메뉴에서 [서버]를 선택한 후 목록에서 서버를 선택한후 [Basic] > [Basic Info] 탭을 선택해서 추가한 External Resource를 서버에서 사용할 수 있도록 서버 설정에 External Resource를 추가한다.
Basic Info 화면에서 [수정] 버튼을 클릭한 후 고급 선택사항의 'External Resource Refs' 항목에 도메인에 추가한 External Resource를 선택하고 [저장] 버튼을 클릭한다.
-
[저장] 버튼을 클릭하면 설정이 저장되었다는 메시지를 확인할 수 있다. 해당 External Resource는 추가한 서버에서 바로 사용가능하다.
콘솔 툴 사용
External Resource는 콘솔 툴을 통해서 서버에 등록된 리소스에 대한 조회 명령이 가능하다. 또한 새로운 External Resource를 동적으로 추가, 삭제하는 것이 가능하다.
[MASTER]domain1.adminServer>add-external-resource test/ext -resource test.ext.TestResourceBootstrapper
Successfully performed the ADD operation for A external resource.
Check the results using "list-external-resources or add-external-resource"

[MASTER]domain1.adminServer>list-external-resources
List of External Resources
=============================================================================
+----------+---------------------------------------------------+------------+
| Name     |                   Resource Class                  | Properties |
+----------+---------------------------------------------------+------------+
| test/ext | test.ext.TestResourceBootstrapper                 | []         |
+----------+---------------------------------------------------+------------+
=============================================================================

[MASTER]domain1.adminServer>add-external-resource-to-servers test/ext -servers server1
Successfully performed the ADD operation for A external resource.
Check the results using "list-external-resources"

[MASTER]domain1.adminServer>remove-external-resource test/ext
Successfully performed the REMOVE operation for A external resource.
Check the results using "list-external-resources or remove-external-resource"

[MASTER]domain1.adminServer>list-external-resources
List of External Resources
=========================================================================
+------+---------------------------------------------------+------------+
| Name |                   Resource Class                  | Properties |
+------+---------------------------------------------------+------------+
(No data available)
=========================================================================
