Table of Contents
This chapter describes the tbMigrator 2.0 utility and its usage.
tbMigrator 2.0 is a migration utility provided by Tibero.
This utility helps to migrate all or part of other databases to Tibero
The following shows the functions which tbMigrator 2.0 utility supports.
-
Migrates data and application programs to Tibero.
-
Migrates schema objects (tables, indexes, views, synonyms, etc.) and the constraints defined in a table.
-
Migrates user privileges and roles.
-
Provides the information about the migration target database.
-
An option button is provided to allow users to migrate a database in a variety of ways.
-
Allows users to view the migration process in the progress check dialog.
Note
tbMigrator 2.0 is written in Java, and available for Java 6 and above. In the script, add the path of the JDBC driver file of the DB to the classpath configuration before executing the script.
The tbMigrator 2.0 screen consists of four layout components; the Main screen, Option screen, Progress screen, and Report screen.
The Main screen is explained in this section.
-
Source
-
Source Access Information
The following table includes the items that can be specified in the Source Access Information section.
Item Description Address IP address of the source database. Port Port number of the source database. SID SID of the source database. User ID User ID of the source database. Password Password of the source database. DB Type Type of the source database. Properties Additional access information about the source database.
-
Source Database View
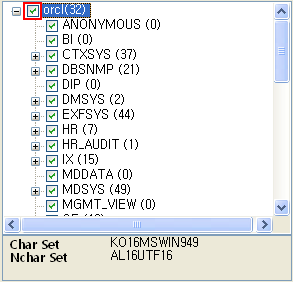
Source Database View allows users to select data and the character set of the database. Users can select data in the following three ways.
-
Full Mode
When a database name is selected, its subordinate schemas are all selected. When any of the schemas are unselected, the selection view is changed from Full Mode into Schema Mode.
-
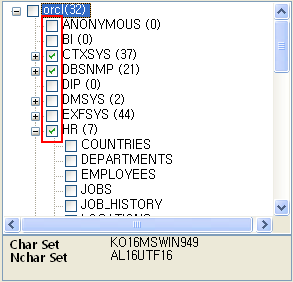
Schema Mode
When a schema name is selected, its subordinate tables are all selected. When any of the tables are unselected, the selection view is changed from Schema Mode into Table Mode.
-
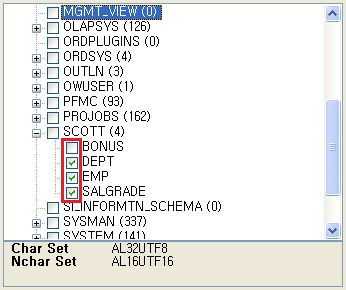
Table Mode
A table can be selected. This is the minimum unit of migrating data available in tbMigrator.
The following characters are representable in Tibero database character sets.
-
Char Set
-
NChar Set
-
-
-
Tibero
-
Tibero Access Information
The following information is set to access the Tibero database.
-
Tibero Database View
Shows the data search function and character sets available in Tibero
-
-
Button
The buttons that can be selected on the Main screen are shown in the table below:
Button Description [Connect] Access to the target database. [Option] Brings up the Option Dialog. [Run] Starts a migration. [Close] Closes tbMigrator.
Selecting a Source Database
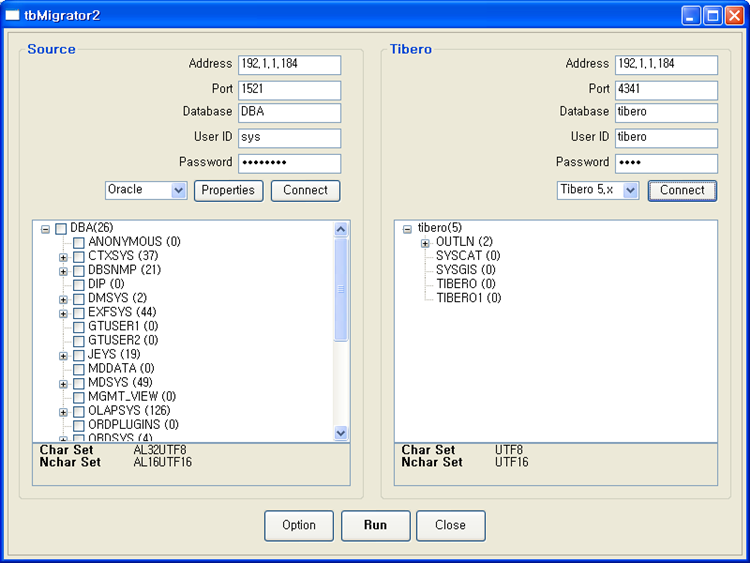
A source database can be specified in the Source Access Information section of the Main screen. The items that can be specified for each database are shown below:
-
Oracle
-
Source Access Information in the Main screen
Connect As must be specified. Click the [Properties] button to bring up a dialog that shows three options: NORMAL, SYSDBA, and SYSOPER. The default value is NORMAL.
Note
If SYSDBA or SYSOPER is selected, the Oracle configuration may prevent remote logins. In this situation, add the REMOTE_LOGIN_PASSWORDFILE=EXCLUSIVE configuration. For more information about the configuration, refer to relevant Oracle documentation.
-
Data Conversion Option in the Option screen
In the Option screen, the Type Conversion Table can be used to set the column type conversion options.
LONG and LONG RAW column are not recommended in Oracle 8.x (and later), but they are supported only for the compatibility with Oracle 7.x (and earlier). This option allows a user to select whether to change the column type into CLOB or BLOB (from LONG and LONG RWA), or maintain the original data type.
-
-
Tibero
When data migration is performed between Tibero databases, users can use the same JDBC drivers for source and target database connection. The JDBC driver included in tbMigrator must be compatible with both source and target database, and it is recommended that the latest version of JDBC is used.
-
Sybase Adaptive Server Enterprise
The following is a feature comparison between Sybase Adaptive Server Enterprise (ASE) 15 and Tibero.
Sybase ASE Tibero Migration Remarks User Schema ● Tibero database schema contains DB schema and DB user. Segment Segment ● ASE does not have tablespaces so each object is directly stored in a segment. To migrate tablespaces, users should create tablespaces corresponding to each segment and assign objects to each tablespace. ✖ Tablespace Role Role ● Table Table ● USER TABLEs are migrated. View View ● (partly) Views are migrated using DDLs that are created with sp_helptext. Provided in ASE. However, the syntax is not fully compatible. Index Index ● (partly) Table indexes are migrated except for the Function based Index. Rule Constraint ● Primary Key, Unique, Not Null, Check, and Referential constraints can be migrated. System Protect System Privilege ● (partly) System Protect and Privilege can be migrated only when they use the same name on a single item. Object Privilege Transaction SQL PSM ● (partly) Data is migrated using DDLs that are created with sp_helptext. Provided in ASE. However, the syntax is not fully compatible. SQL Procedure Scalar Function
-
Informix
-
Properties of Source Access Information in the Main screen
Enter the name of the Informix server. Clicking the [Properties] button will bring up the dialog box which allows user to enter the name of the Informix server.
-
This section describes the items that can be specified in the Options screen.
-
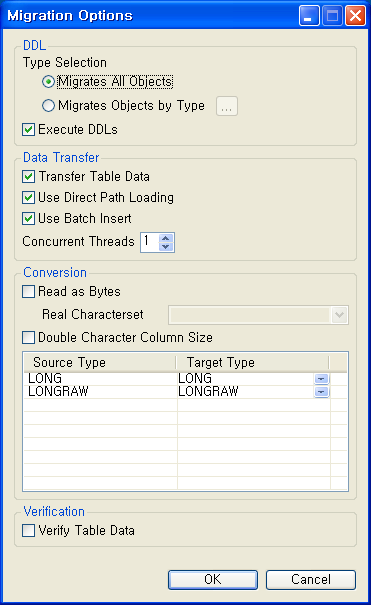
DDL
In the first migration step, DDL is used to create Tibero database objects. This step configures DDL related options such as the type of schema objects to have their DDL extracted and whether to execute the generated DDL statements.
-
Type Selection
Selects the schema object type to be migrated.
Item Description Migrates All Objects Extracts DDL statements in all supported types. Migrates Objects by Type Extracts DDL statements in only the selected object types. Click the [...] button to open the object selection dialog.
-
Execute DDLs
Determines whether to execute the extracted DDL statements on the target database. If the objects of tables to be migrated are already created, uncheck this option to skip the step of executing generated SQL statements.
-

-
Data Transfer
The data transfer methods that can be specified in the DDL Option dialog are shown in the table below.
Option Description Transfer Table Data Select if table data is migrated. Use Direct Path Load Data in the table is migrated using Direct Path Loading method.
If a DPL handle fails to be created, the data is migrated in CPL mode.
Use Batch Insert Data in the table is migrated using Batch Insert method. Concurrent Thread Specifies the number of threads used to migrate data in multiple tables at the same time.
-
Conversion
The data conversion options that can be specified in the DDL Option dialog are as shown in the table below.
Option Description Read as Bytes If the value entered in a column is not of CHAR, VARCHAR (the data type specified for this column), the character string may appear broken in the target database. To avoid this, data is migrated to Tibero database in binary format. Real Characterset This option allows a user to correct the characters sets improperly specified for any object, other than tables. To prevent these character sets from appearing broken in the target database after migration.
This option is valid only when Read as Bytes is enabled. The application objects are PSM DDL, comments on tables, and comments on columns.
Double Character Column Size If the character sets of the source database and the Tibero database are different, the length of the converted data string becomes different from that of the source data. If the length of the migrated data exceeds the limit on text size in the column, migration may fail. To avoid this, the option allows a user to change the data in the source database to twice the size.
Type Conversion Table Column types of the source database and the Tibero database may not match completely. This option ensures compatibility between the databases. The options vary depending on the source database type.
-
Verification
The data verification options that can be specified in the DDL Option dialog are as shown in the table below.
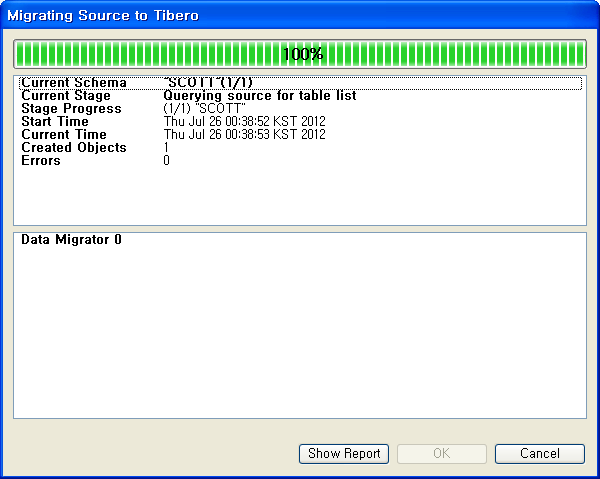
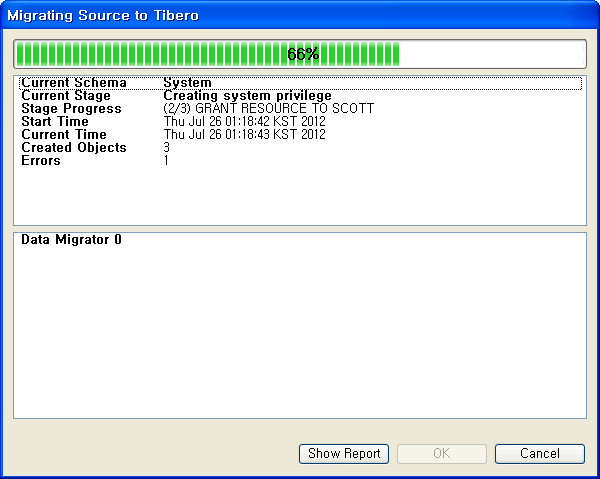
A Progress screen shows the progress of the migration.
 |
-
Search Information
Item Description Current Schema The information of the schema currently being migrated.
Displays the amount of the schema that has been migrated, out of the total to migrate.
Current Stage The current stage of the schema currently being migrated.
Shows the data type of the schema to migrate.
Stage Progress The information about the data currently being migrated.
Displays the amount of data that has been migrated, out of the total to migrate.
Created Objects The number of created objects. Errors The number of generated errors. Data Migrator # Information about the threads processing the table data. The name of the table being migrated and the progress rate of the table migration are shown. The thread count is determined by the value specified in Concurrent Threads option in the Option Screen. -
Button
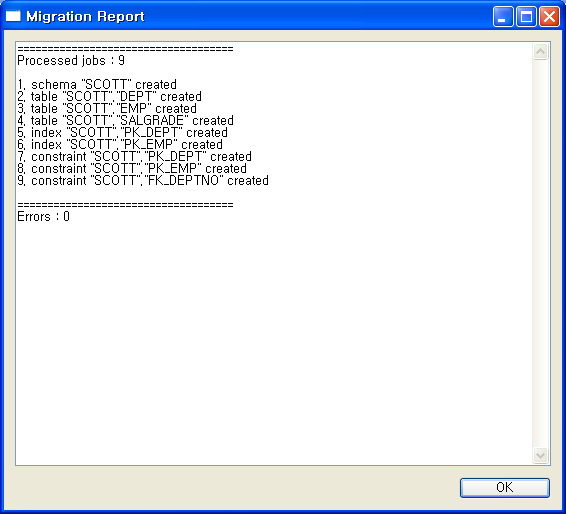
Item Description [Show Report] Shows the migration results. For more information, refer to “2.2.4. Report Screen”. [OK] This button is inactive while data is being migrated. When the migration has finished, the button will become activated. The entire migration process is completed when this button is clicked. [Cancel] Cancels the migration. When the migration has finished, the button will become inactivated.
The migration methods that tbMigrator 2.0 utility supports are Full Mode, Schema Mode, and Table Mode. Each mode supports different ranges to migrate objects.
-
Full Mode
When Full Mode is selected, all the objects within the database are migrated.
-
Schema Mode
When migrating only schemas, select Schema Mode. Selected schemas, objects of a schema, and related objects are migrated.
-
Table Mode
When Table Mode is selected, not only the table but also the objects associated with the table's related schema are also migrated.
The objects to be migrated in each mode are as shown in the table below.
| Item | Full Mode | Schema Mode | Table Mode |
|---|---|---|---|
| TABLESPACE | ● | ● | ✖ |
| ROLE | ● | ✖ | ✖ |
| SCHEMA | ● | ● | ● |
| SYSTEM PRIVILEGE | ● | ✖ | ✖ |
| PUBLIC SYNONYM | ● | ● | ● |
| SEQUENCE | ● | ● | ● |
| TABLE | ● | ● | ● |
| INDEX | ● | ● | ● |
| CONSTRAINT | ● | ● | ● |
| SYNONYM | ● | ● | ● |
| MATERIALIZED VIEW | ● | ● | ● |
| VIEW | ● | ● | ● |
| REFERENTIAL CONSTRAINT | ● | ● | ● |
| PSM | ● | ● | ● |
| OBJECT PRIVILEGE | ● | ● | ● |
The passwords of new users created in the target database are initialized, the default value is 'tibero'.
When index Organized Tables (IOT) exist in the source database, they are separately migrated as general tables and indexes. The grantor of the object privilege will be converted to the login user or the owner of the object.
# Login as a DBA
create user owuser identified by tibero;
grant resource, connect to owuser;
create user gtuser1 identified by tibero;
grant resource, connect to gtuser1;
create user gtuser2 identified by tibero;

# Login as owuser
create table grantest1 ( c1 varchar2(20) );
grant select on grantest1 to gtuser1  with grant option;

# Login as gtuser1
grant select on owuser.grantest1 to gtuser2;
When accessing the source and target databases, the user must have the permissions required for migration. It is recommended to login as a user with DBA permissions. Required permissions can differ depending on the database type and the object types selected from the Option screen.
For example, if migrating from Oracle in Full Mode, the user who accesses the source database must have the following permissions.
-
CONNECT
-
SELECT ANY TABLE
-
SELECT ANY DICTIONARY
-
ALTER SESSION
If the target database is Tiberothe user must have the following permissions.
-
CONNECT
-
SELECT ANY TABLE
-
RESOURCE
-
ALTER SESSION
This section describes the usage of tbMigrator 2.0.
-
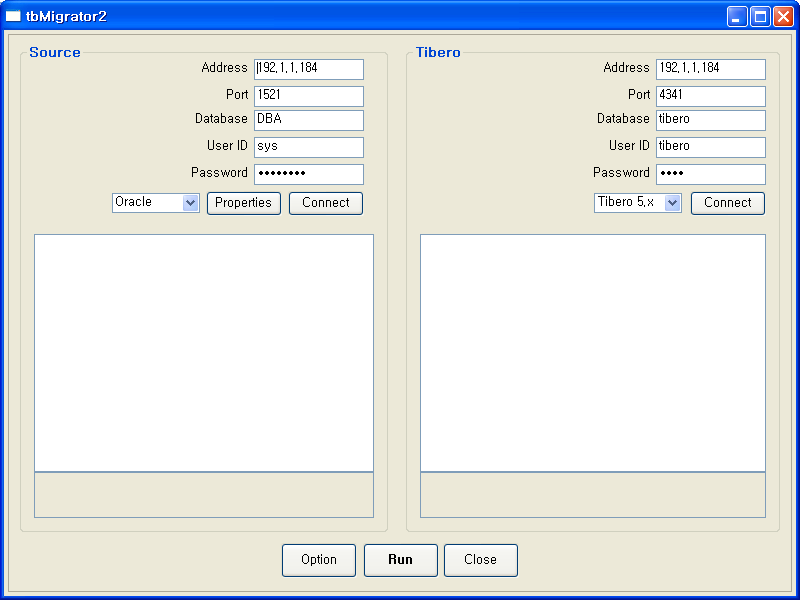
When you run the tbMigrator 2.0 utility, the main screen will appear as shown below.
-
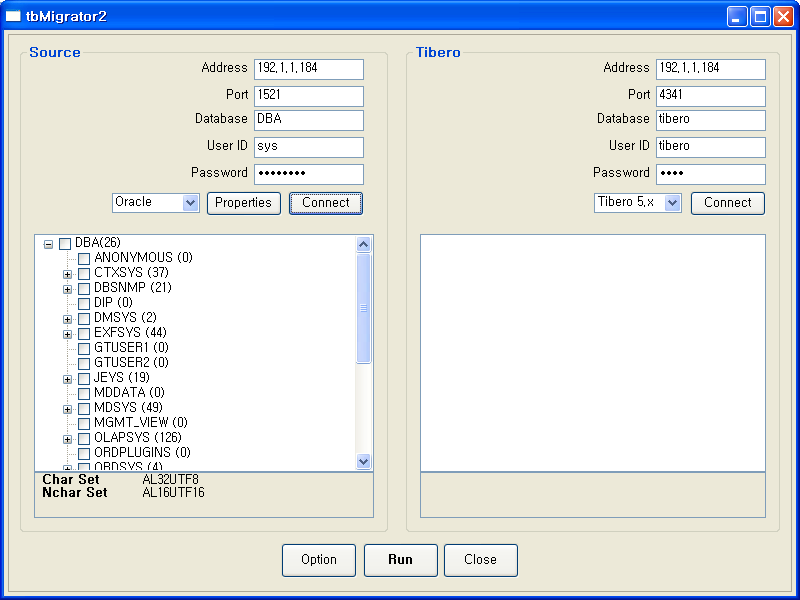
Enter the user ID and user password of the source database and click the [Connect] button.
-
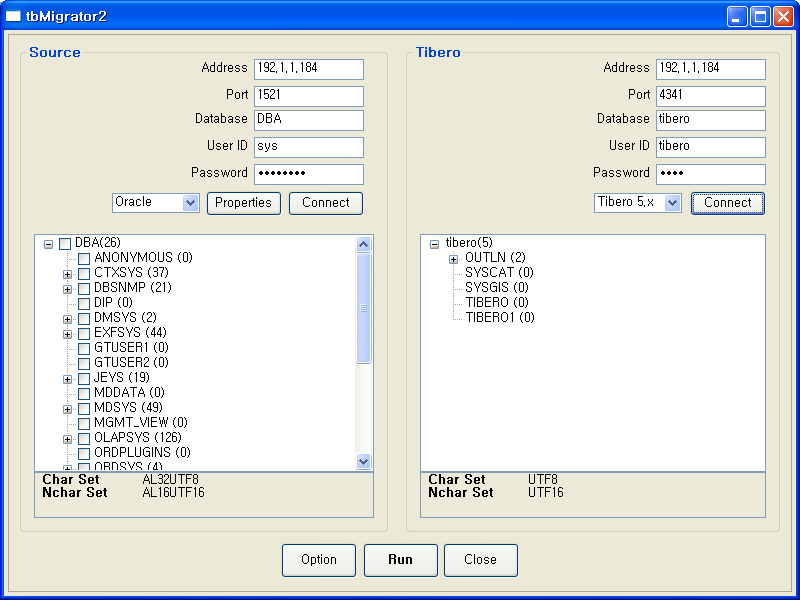
Enter the user ID and user password of the Tibero database and click the [Connect] button.
-
Click the [OPTION] button. When the Option Information settings have been entered, click the [OK] button.
-
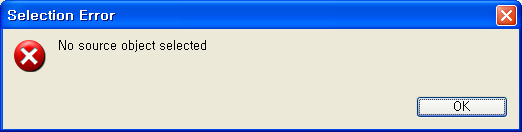
If no object is selected in the Source Data View of the Main Screen, when the [Run] button is clicked, a waring message will appear.
-
Once a target object is selected, click the [Run] button. The migration will be performed.
-
A Progress dialog will appear to show the progress of the migration. Users can check the progress logs in the progress log area at the bottom of the dialog.
-
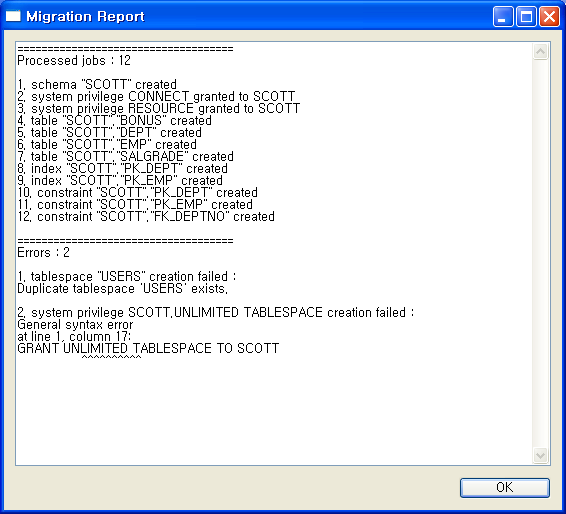
If the [Show Report] button is clicked during the migration or when the migration is completed, the Migration Report dialog will appear and show the migration details.
-
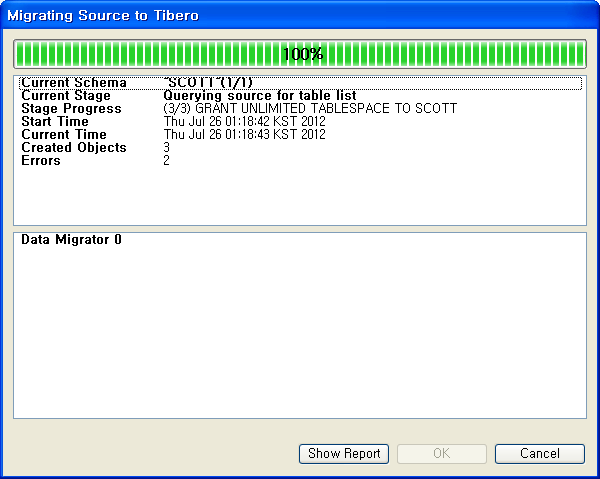
When the entire migration process is completed, the user will able to see the 'COMPLETE' message in the progress bar and can then click the [OK] button.
-
Once the migration has finished and the [OK] button is clicked, the Migration Complete dialog will appear. Click the [OK] button to continue.