This chapter describes methods to manage Tibero's files and data.
Tibero saves data with the following logical and physical structures. Because the logical and physical structures are separate, data can be physically divided without any effects on the logical structure.
-
Logical Structure
-
Stores a database's schema objects.
-
Has the following inclusion relations:
Database > Tablespace > Segment > Extent >
-
-
Physical Structure
-
Stores OS-related files.
-
Has the following inclusion relations:
Data file > Operating System's Data Block
-
A tablespace is used in both the logical storage area that saves all data in Tibero and the physical storage area that saves one or more data files. It is the unit that is associated with the logical storage area and the physical storage area.
A tablespace uses two different structures to store Tibero data.
Logical Structure of Tablespaces
The following figure shows the logical structure of a tablespace in a database:
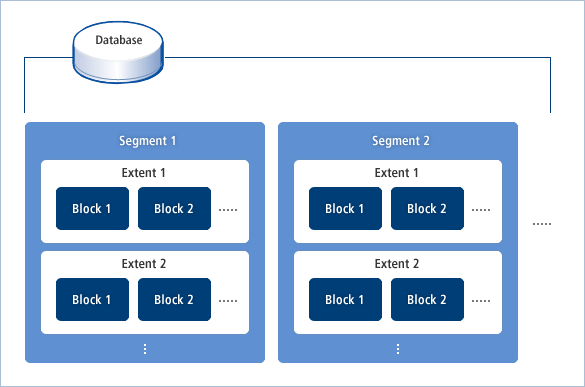
A tablespace is composed of segments, extents, and blocks, as shown in [Figure 3.1].
Note
For more details on how to manage the logical storage area, refer to “Chapter 4. Schema Object Management”.
Physical Structure of Tablespaces
The following figure shows the physical structure of a tablespace in a database:
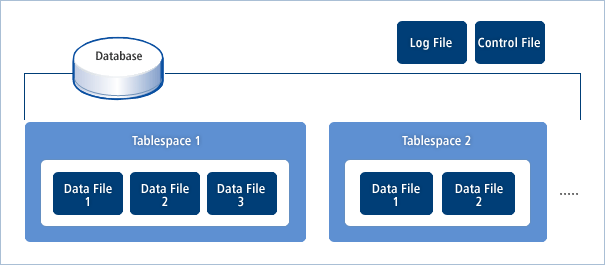
Physically, a tablespace consists of many data files as shown in [Figure 3.2]. Tibero stores data using the control file and the log file in addition to the data files.
Storing two frequently used tablespaces, such as a table and its index, on physically separate disks is recommended.. If two tablespaces are saved on the same disk, they cannot be accessed simultaneously as the disk's head is fixed on the currently accessed tablespace.
Therefore, saving frequently used tablespaces on separate disks improves a database's performance by allowing simultaneous access to both tablespaces.
Note
It is not possible to specify a specific data file to be used by a tablespace. In addition, the location of all data blocks in a tablespace is automatically determined by Tibero.
Depending on its creation type, a tablespace can be classified as a system tablespace or a non-system tablespace.
The system tablespace is the tablespace that is automatically created with the database, and a non-system tablespace is any tablespace that was created by a user.
This section describes how to create and delete non-system tablespaces.
Creating Tablespaces
To create a tablespace, use the statement CREATE TABLESPACE. The tablespace name, data file, data size, and extent size can be specified.
The following example shows how to create a new tablespace named my_space, which is contained in the data file my_file.dbf.
CREATE TABLESPACE my_space
    DATAFILE '/usr/tibero/dtf/my_file.dtf' SIZE 50M
    EXTENT MANAGEMENT LOCAL UNIFORM SIZE 256K;
The data file my_file.dbf is created when the SQL statement above is executed. If the name is already in use, an error will occur. The size of my_file.dbf is specified as 50 MB, which also specifies the total size of the tablespace as 50 MB.
Note
In Tibero, up to 2^22 data blocks can be managed for each data file. Therefore, the maximum size of a data file is the size of a data block X 2^22. For example, if the size of a data block is 8 KB, the maximum size of a data file is 32 GB.
Tibero keeps all extents within a tablespace in a fixed size. In the example above, one extent is 256 KB. If a data block is 4 KB, an extent will contain 64 data blocks.
Also, a tablespace can be composed of two or more data files.
An example of more than one data file is shown below:
CREATE TABLESPACE my_space2
    DATAFILE '/usr/tibero/dtf/my_file21.dtf' SIZE 20M,   ... (1) ...
             '/usr/tibero/dtf/my_file22.dtf' SIZE 30M    ... (2) ...
    EXTENT MANAGEMENT LOCAL UNIFORM SIZE 64K;            ... (3) ...
(1) Specifies a data file named my_file21.dbf with a size of 20 MB.
(2) Specifies a data file named my_file22.dbf with a size of 30 MB. The total size of the tablespace my_space2 is 50 MB.
(3) Specifies the size of an extent as 64 KB.
The number of data files included in a tablespace differs according to the environment of the database and the system. If a large amount of data is to be stored in a tablespace, the tablespace must be created with many data files.
However, the number of data files that can be processed at the same time is dependent on the OS. Consider this fact when specifying the number of files.
The size of data files is dependent on the database size. To prepare for the case where more space is needed than was specified when creating a tablespace, enable the size to be increased automatically.
The following example shows how to enable the data file size to increase by 1 MB each time it is needed using the AUTOEXTEND statement:
CREATE TABLESPACE my_space
    DATAFILE '/usr/tibero/dtf/my_file.dtf' SIZE 50M
    AUTOEXTEND ON NEXT 1M
    EXTENT MANAGEMENT LOCAL UNIFORM SIZE 256K;
Tibero stores data block assignment information in bitmap form within tablespaces. Thus, the maximum number of extents within a tablespace is less than the value of (tablespace size) / (extent size).
Deleting Tablespaces
To delete a tablespace, use the statement DROP TABLESPACE. If a tablespace is deleted, all its schema objects are also deleted. Take care when deleting a tablespace.
Deleting a tablespace is shown below:
DROP TABLESPACE my_space;
When this SQL statement is executed, the specified tablespace will be deleted, but its data files will remain. To delete the data files, add the INCLUDING clause to the DROP TABLESPACE statement.
DROP TABLESPACE my_space INCLUDING CONTENTS AND DATAFILES;
Note
When a tablespace is created or deleted, the information is immediately applied to the control files.
For more details about the CREATE TABLESPACE and DROP TABLESPACE statements, refer to "Tibero SQL Reference Guide".
If more storage space is needed for a tablespace, either enable data files to automatically expand when necessary, or add a new data file to the tablespace by appending the ADD DATAFILE clause to the ALTER DATABASE statement.
The following example adds a new data file called
my_file02.dbf to a tablespace called
my_space:
ALTER TABLESPACE my_space ADD DATAFILE 'my_file02.dtf' SIZE 20M;
If an absolute path is not specified when adding a data file as shown above, the data file is created in the default directory. More than one data file can be created in this process, and the size of each data file can be specified to automatically extend itself.
Note
If an absolute path is not set, the default directory where data files will be created is specified in the parameter DB_CREATE_FILE_DEST in the initialization parameter file $TB_HOME/config/$TB_SID.tip. If the parameter is not specified, the default directory is $TB_HOME/database/$TB_SID.
The size of data files can be changed using the ALTER DATABASE statement. The size can be either increased or decreased with ALTER DATABASE. However, when reducing the size, an error will occur if the total size of schema objects stored in the data file is greater than the desired size.
The following example changes the size of the data file my_file01.dbf:
ALTER DATABASE DATAFILE 'my_file01.dtf' RESIZE 100M;
To disallow all read and write access to a tablespace, specify the tablespace status to offline using the OFFLINE clause in the TABLESPACE statement.
A tablespace offline status supports the following two modes:
| Mode | Description |
|---|---|
| NORMAL | Performs a checkpoint and sets a tablespace status to offline. Media recovery is not necessary when the tablespace is brought back online. |
| IMMEDIATE | Does not perform a checkpoint and set a tablespace status to offline. Media recovery is necessary when the tablespace is brought back online. Therefore, this is only available in ARCHIVELOG mode. |
The following example specifies the status of the tablespace my_space as offline in NORMAL mode, and then specifies it as online again:
ALTER TABLESPACE my_space OFFLINE [NORMAL];
ALTER TABLESPACE my_space ONLINE;
Note
SYSTEM, UNDO, and TEMP tablespaces cannot be changed to offline status.
The following example specifies the status of the tablespace my_space as offline in IMMEDIATE mode, then specifies it as online again:
ALTER TABLESPACE my_space OFFLINE IMMEDIATE;
ALTER DATABASE RECOVER AUTOMATIC TABLESPACE my_space;
ALTER TABLESPACE my_space ONLINE;
Note
For more information on media recovery, refer to “6.3.3. Media Recovery”.
Tibero provides users with several views, including static views and dynamic views, to efficiently manage tablespaces.
The information includes the number and size of extents within a tablespace, the allocated server, the names, sizes, and types of the data file and segments.
| View | Description |
|---|---|
| DBA_TABLESPACES | Detailed information about all tablespace within Tibero. |
| USER_TABLESPACES | Current user's tablespace information. |
| V$TABLESPACE | Brief information about all tablespaces within Tibero. |
Note
For more information on static views and dynamic views, refer to "Tibero Reference Guide".
Log files save Redo logs. Redo logs contains all modifications that occur in a database, and are used to recover updated contents of committed transactions if an error occurs in the database.
The following figure shows the structure of a Redo log:
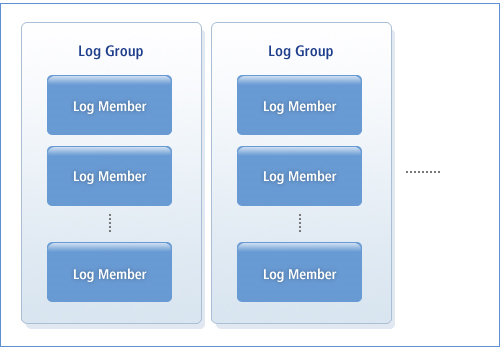
Redo Logs
Redo logs consist of two or more log groups as shown in [Figure 3.3]. In Tibero, the log groups are treated as a circular buffer.
For example, if a Redo log consists of three log groups, the logs are saved in log group 1 first. If log group 1 is full, the logs are saved in log group 2 and then log group 3. If the three log groups are full, the logs are saved in log group 1 again. This method of using log groups is called log switch. One or more log records are saved in a Redo log. Log records contain all modifications that occur in a database. They include both new data and old data.
Tibero uses only one log group at a time. The log group that is currently in use is called the activated log group.
A log group consists of one or more log members so that it can use multiplexing. Log groups in separate areas can usually have a different number of log members and different size log members, but to use multiplexing, all log members must have the same size, save the same data, and be updated simultaneously.
The reason a log group consists of multiple log members is so that it can use uncorrupted log members if a log member becomes corrupt. If a disk is highly reliable or some data loss is acceptable, multiplexing is not required.
ARCHIVELOG Mode Settings
Data from Redo logs can be semi-permanently saved on a third storage device. This process is called archiving. The purpose is to prevent a log file that is saved on a disk from being corrupted. A large capacity hard disk or a tape drive can be used as the third storage device.
In Tibero, Redo logs can be archived whether or not they are being used by a database.
To archive Redo logs while they are being used, specify the log archive mode as ARCHIVELOG. ARCHIVELOG mode can be specified by executing the following SQL statement while in MOUNT status:
SQL> ALTER DATABASE ARCHIVELOG;
In ARCHIVELOG mode, log groups that are not archived cannot be reused. For example, to use log group 2 after log group 1 is full, if the existing data in log group 2 has not been archived, the system will wait until it has been archived. All transactions except for read-only transactions are suspended. After log group 2 has been archived, it is immediately activated so that logs can be saved in the log groups. All suspended transactions resume. To prevent this situation, a DBA should allocate an appropriate number of log groups.
NOARCHIVELOG Mode Settings
Specify the log archive mode as NOARCHIVELOG to not archive Redo logs while they are being used. In NOARCHIVELOG mode, database performance is improved because the system never has to wait for a log group to be archived before the log group can be activated.
However, if a problem occurs in both a database and the Redo logs and they cannot be recovered, any data updated by a previously committed transaction will be lost. Therefore, when using NOARCHIVELOG mode and recovery is limited, backing up the entire database is recommended.
A log member is basically a single log file. When composing Redo logs, different log files must be allocated for each log member in each log group. Saving log files and data files on separate disks is recommended. If log files and data files are saved on the same disk, a database cannot be restored if an error occurs on the disk. If each log group consists of multiple log members, at least one log member must be stored on a disk where data files are not saved.
Log Member Multiplexing
To improve the performance of a database, log members in a log group should be saved on separate disks. All log members in the same log group must save the same log records. If all log members exist on separate disks, all log records can be saved at the same time.
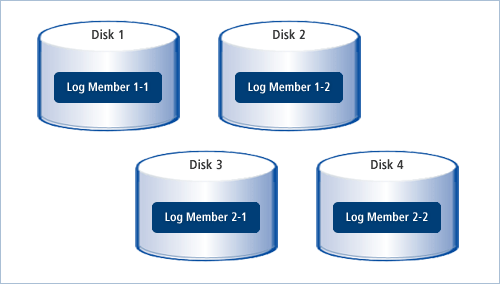
The following figure shows log members in the same log group that are located on separate disks:
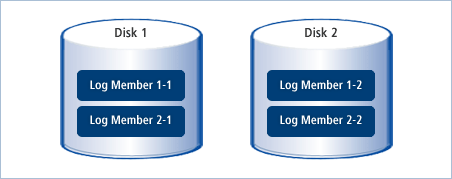
In [Figure 3.4], Log Member 1-1 is the first log member in log group 1. If more than one log member exists on a single disk, log records for each log member cannot be saved at the same time. This reduces the performance of a database system.
If log archive mode is specified as ARCHIVELOG, an inactivated log group is archived while logs are saved in an activated log group. If the inactivated log group and the activated log group are saved on the same disk, this also reduces the performance of a database. Therefore, to improve performance, each log file in a different log group should be saved on a separate disk.
Log Group Multiplexing
The following figure shows two log groups that consist of two log members that are located on separate disks:
In [Figure 3.5], Log Member 1-1 is the first log member in log group 1.
Archive jobs need to be considered when deciding the number and size of log groups. The size of a log group should be specified to be able to quickly transfer the log group to a third storage device and to efficiently use the storage space. The number of log groups should be set to not cause delays due to a log group being archived.
The number and size of log groups should be modified while a database is actually operating. That is, specify parameters that are optimized for the database and increase the number and size of log groups within a range that does not reduce the processing performance of the database.
Saving and Multiplexing an Archive Log
The LOG_ARCHIVE_DEST initialization parameter sets the archive log storage location. It is important to save archive logs because they are required for media recovery.
Archive logs can be stored in multiple places by using multiplexing. When multiplexing archive logs, use the initialization parameters LOG_ARCHIVE_DEST_1, LOG_ARCHIVE_DEST_2, ..., LOG_ARCHIVE_DEST_9. To set the location, set 'location=' in a parameter string. After setting the directory, choose 'mandatory' or 'optional' in case the multiplexed archive logs fail to save. (If 'mandatory' or 'optional' is not specified, 'optional' is used by default.)
If set to 'mandatory', multiplexed archive logs are saved to the specified location. If the logs fail to be saved, redo log group are not reused, which can result in shutting down the entire database. If set to optional and the archive logs fail to save, no reattempt to save is made so other jobs can be processed normally.
[Example 3.1] Archive Log Directory Configuration
LOG_ARCHIVE_DEST =   "/usr/tibero/log/archive"
LOG_ARCHIVE_DEST_1 = "location=/usr/tibero/archive1 mandatory"
LOG_ARCHIVE_DEST_2 = "location=/usr/tibero/archive2 mandatory"
LOG_ARCHIVE_DEST_3 = "location=/usr/tibero/archive3"
LOG_ARCHIVE_DEST_4 = "location=/usr/tibero/archive4 optional"
To create or delete a log group or log members within a log group, use the ALTER DATABASE statement. The system privilege is needed to use the ALTER DATABASE statement.
Creating Log Files
To create a new log group (log files), use the ADD LOGFILE clause to the ALTER DATABASE statement. When adding log files, it must be performed at the log group level.
The following example adds a log group which has two log members (log files).
The minimum size of a log member is 512KB, the maximum size is 2TB.
The size of the two log members is set to 512 KB, which must not be changed.
ALTER DATABASE ADD LOGFILE (
        '/usr/tibero/log/my_log21.log',
        '/usr/tibero/log/my_log22.log') SIZE 512K
In addition, each log group's number can be set by inserting the GROUP option at the end of the ADD LOGFILE clause. If the log group number is set, it can be used later to indicate the log group in order to add new log members.
The following example specifies the number for a log group:
ALTER DATABASE ADD LOGFILE GROUP 5 (
        '/usr/tibero/log/my_log21.log',
        '/usr/tibero/log/my_log22.log') SIZE 512K
To add a new log member to an existing log group, use the ADD LOGFILE MEMBER clause.
The following example adds a new log member to log group 5:
ALTER DATABASE ADD LOGFILE MEMBER
        '/usr/tibero/log/my_log25.log' TO GROUP 5
When adding a new log member, the log file's size is not specified because the log file will have the same size as other log members within the log group.
Deleting Log Files
To delete a log group, insert the DROP LOGFILE clause.
The following example deletes log group 5:
ALTER DATABASE DROP LOGFILE GROUP 5;
There are several things to consider before deleting any log group.
-
Are there two or more log groups left after the deletion?
Tibero must have at least two log groups. If only one log group is left after the deletion, an error will occur
-
Is the log group currently being used in an active state?
The active log group cannot be deleted.
-
Is the log group not yet archived in ARCHIVELOG mode?
An unarchived log group cannot be deleted.
To delete a log member within a log group, use the DROP LOGFILE MEMBER clause. The log group does not need to be specified in this clause.
The following example deletes a log member:
ALTER DATABASE DROP LOGFILE MEMBER '/usr/tibero/log/my_log25.log'
If no log members remain after the deletion, an error will occur. Log members in active or unarchived log groups will not be deleted.
Tibero provides dynamic views to help users manage the redo log. These views show information such as log files for each group, multiplexing information, and update dates. Both the DBA and general users can use these views.
| Dynamic View | Description |
|---|---|
| V$LOG | Information about log groups. |
| V$LOGFILE | Information about log files. |
Note
For more details about dynamic views, refer to "Tibero Reference Guide".
A control file is a binary file that saves metadata about the database. The first control file is created when Tibero is installed. Information about the control file is saved in the file $TB_SID.tip
A control file can only be created or updated by Tibero. A DBA cannot search or update contents in a control file.
A control file contains the following information:
| Information | Description |
|---|---|
| Database | Database names and the created or modified timestamps. |
| Tablespace | Data files that make up tablespaces and the created or modified timestamps. |
| Data file | Names and locations of data files and created or modified timestamps. |
| Redo log | Number of log groups, the names and locations of log members (log files) that make up each log group, and the created or modified timestamps. |
| Checkpoint | Timestamp of the most recent checkpoint. |
Tibero refers to a control file whenever a database restarts, in the following way:
-
Gets information about tablespaces and data files.
-
Gets information about the data dictionary and schema objects that are stored in a database.
-
Reads necessary data.
In Tibero, having multiple control files that have the same size and contents is recommended. The purpose is similar to the multiplexing of log members.
To maintain a database system's performance and stability, log members in the same log group are saved on separate disks. For the same reason, copies of a control file should also be saved on separate disks.
For example, if all copies of a control file exist on the same disk, the control file cannot be restored if an error occurs on the disk. Therefore, saving a control file in the same way as Redo logs is recommended.
Caution
A control file should not become corrupted as it is critical for database operation.
Multiplexing of Control Files
The following shows the multiplexing of control files.
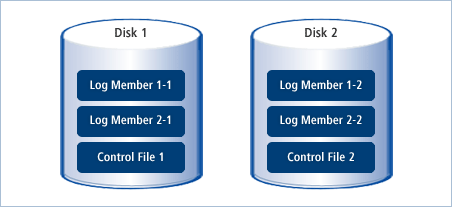
In the figure above, copies of a control file are located on separate disks along with log members for different log groups.
Tibero reads only one of the multiple copies of a control file when checking information in the control file. When a control file needs to be updated due to a change such as a tablespace modification, all copies of the control file are updated at the same time.
Only DDL statements cause a control file to be modified. One of the characteristics of DDL statements is that one statement becomes one transaction. Therefore, when a DDL statement is executed, it is immediately committed and the updated contents are immediately applied to disk.
The DBA can add or delete any copy of the control file. Because the control file contains metadata of the database, it is impossible to modify the control file while the database is in operation. Therefore, there are no statements to add or delete copies of the control file. To modify the control file, the database must be shut down.
There are no SQL statements to modify the control file; standard OS commands must be used to make any modifications. After that, the modified contents are applied to the $TB_SID.tip file.
The following example copies the control file via a UNIX command:
$ cp /usr1/tibero/control01.ctl /usr3/tibero/control03.ctlIn the example above, the usr1 and usr3 directories exist on different disks.
When Tibero restarts the database, it reads the $TB_SID.tip file and, depending on the modified contents, it will update the control file. Note that the control file's name in $TB_SID.tip must include its absolute path. Even when an error occurs to some control files due to disk error, if at least one control file works normally, Tibero also performs normally.
Backing up the control file is only done with the support of logical backup. Therefore, it is necessary to back up the SQL statement that creates the control file.
In particular, when tablespaces, data files, and the redo log are created, modified, or deleted, it is best in terms of database management to back up the control file immediately. When backing up the entire database, the control file itself must also be backed up. For more details, refer to “6.2.2. Performing a Backup”.
The following statement backs up the control file:
SQL> ALTER DATABASE BACKUP CONTROLFILE TO TRACE AS
          '/tibero6/backup/ctrlfile1.sql' REUSE NORESETLOGS;
As shown above, the absolute path must be specified because the copy of the control file to be backed up (ctrlfile1.sql) needs to be stored on a separate disk.
Tibero provides dynamic views to help users manage the control files. The information includes the database creation time and checkpoint. Both the DBA and general users can use these views.
| Dynamic View | Description |
|---|---|
| V$DATABASE | Information about checkpoints and whether ARCHIVELOG mode is used. |
| V$CONTROLFILE | Information about the names and status of control files. |
Note
For more details on dynamic views, refer to "Tibero Reference Guide".