Table of Contents
This chapter describes the requirements for creating a domain, how to create a domain using the tools provided by JEUS such as WebAdmin and jeusadmin, and the directory structure of a domain.
A domain directory is created when a domain is created. Scripts and basic configuration files that start and stop servers in the domain are created in this directory. The parent directory for each domain is DOMAIN_HOME and its path is:
JEUS_HOME/domains/<domain_name>
When a domain is created, it only contains DAS. Managed serves can be added through WebAdmin or jeusadmin. After an MS is added and started, it receives the domain information from DAS. In other words, DAS creates the domain directory when the domain is created, and managed servers create the domain directory through DAS when they start.
A domain can be created using Ant task or jeusadmin. The following are the requirements.
-
Network configuration
JEUS requires an IP address and port number because it shares domain server status using multicast. If servers exist outside of the local network and are not able to share information via multicast, TCP is used instead. This is called Virtual Multicast in JEUS, and it can be configured when a domain is created.
Since server information is shared using the default listener IP address and port number on the server, all servers in the domain that exist outside of the local network must specify a listener IP address and port number. They must also set the option to disable multicast.
-
Default DAS configuration
Each domain must contain a DAS. A default configuration is used and can be further configured by the user. Dynamic configuration items can be changed at any time, but static items must be configured when the domain is created.
Examples of static configuration items include the default listener IP address, port number, and JVM configuration.
This section describes how to create the default domain. When the default domain is created, Virtual Multicast is disabled.
The following are the command attributes for Ant task and jeusadmin.
| Attribute | Default Value |
|---|---|
| DAS name | adminServer |
| Listen IP address | 0.0.0.0 / 0:0:0:0:0:0:0:0 |
| Listen Port | 9736 |
| user name | administrator |
| Multicast IP address | 230.30.1.1 / FF01:0:0:0:0:0:0:1 |
| Multicast Port | 3030 |
-
Creating a domain with Ant
The default configuration values when using Ant are defined in JEUS_HOME/setup/domain-config-template.properties. The following is an example of configuring the attributes. The default value is used if an attribute is not configured.
JEUS_HOME/setup$ ant create-domain -Ddomain=jeus_domain
-Dservername=adminServer
-Djeus.address=0.0.0.0
-Djeus.port=9736
-Dheartbeataddress=230.30.1.1
-Dheartbeatport=3030
-
Creating a domain with jeusadmin
The default configuration values when using jeusadmin are defined in JEUS_HOME/setup/domain-config-template.properties. If jeus.password is set in domain-config-template.properties, use the configured value. Otherwise, enter the password as in the following example.
offline>create-domain -domain jeus_domain -das adminServer -ha 230.30.1.1 -hp 3030
Enter the password for [administrator]: **********
Confirm the password: **********
Do you want to encrypt the password? (y/n): y
================================================================================
The domain [jeus_domain] was created successfully.
+-------------------------+----------------------------------------------------+
|         Property        |                        Value                       |
+-------------------------+----------------------------------------------------+
| Domain name             | jeus_domain                                        |
| Das Name                | adminServer                                        |
| Das Base Listen Port    | 9736                                               |
| Das Base Listen Address | 0.0.0.0                                            |
| JMS Internal Port       | 9741                                               |
| HTTP Port               | 8088                                               |
| User Name               | administrator                                      |
| Node Name               | node1                                              |
| Password                | {AES:256}FsbsQ7EqS5BWr/JVk39X41281IXWU0jLCUTJIq8=  |
| JVM Option              | -Xmx256m -XX:MaxPermSize=128m                      |
| Production Mode         | true                                               |
| Heart beat address      | 230.30.1.1                                         |
| Heart beat port         | 3030                                               |
+-------------------------+----------------------------------------------------+
================================================================================
This section describes how to check if the environment supports the IP Multicast functionality, and how to create a domain that uses the Virtual Multicast functionality when the environment does not support the IP Multicast functionality or the domain goes beyond the subnet range.
To check if the environment supports IP Multicast, execute the two mcastSender and mcastReceiver test scripts. The two scripts are in JEUS_HOME/bin. Execute each one on a different machine as in the following.
JEUS_HOME/bin$ mcastReceiver -addr 224.0.0.1 -port 3030
Socket == 0.0.0.0/0.0.0.0 : 3030, bound to /fe80:0:0:0:2a37:37ff:fe1e:fc4%5
Socket == 0.0.0.0/0.0.0.0 : 3030, bound to /192.168.0.26
Socket == 0.0.0.0/0.0.0.0 : 3030, bound to /fe80:0:0:0:3e07:54ff:fe6f:95e%4
Socket == 0.0.0.0/0.0.0.0 : 3030, bound to /61.77.153.207
Socket == 0.0.0.0/0.0.0.0 : 3030, bound to /fe80:0:0:0:0:0:0:1%1
Socket == 0.0.0.0/0.0.0.0 : 3030, bound to /0:0:0:0:0:0:0:1
Socket == 0.0.0.0/0.0.0.0 : 3030, bound to /127.0.0.1
JEUS_HOME/bin$ mcastSender -addr 224.0.0.1 -port 3030
1 == 0.0.0.0/0.0.0.0 : 3030, bound to /fe80:0:0:0:2a37:37ff:fe1e:fc4%5
2 == 0.0.0.0/0.0.0.0 : 3030, bound to /192.168.0.26
3 == 0.0.0.0/0.0.0.0 : 3030, bound to /fe80:0:0:0:3e07:54ff:fe6f:95e%4
4 == 0.0.0.0/0.0.0.0 : 3030, bound to /61.77.153.207
5 == 0.0.0.0/0.0.0.0 : 3030, bound to /fe80:0:0:0:0:0:0:1%1
6 == 0.0.0.0/0.0.0.0 : 3030, bound to /0:0:0:0:0:0:0:1
7 == 0.0.0.0/0.0.0.0 : 3030, bound to /127.0.0.1
This test attempts to send and receive IP Multicast packets through all network interfaces. The addresses at the top are for all network interfaces.
At the prompt that appears on the Sender side, enter a message that is sent to the Receiver. If the Receiver cannot receive the message, it means that IP Multicast is not working properly. In such a case, set the following Virtual Multicast configuration. The following is the execution of a test message for the mcastSender example above.
> test
>
test [sender = 192.168.0.26 : 5555], [bind_addr=/127.0.0.1]
test [sender = 192.168.0.26 : 5555], [bind_addr=/61.77.153.207]
test [sender = 192.168.0.26 : 5555], [bind_addr=/fe80:0:0:0:3e07:54ff:fe6f:95e%4]
test [sender = 192.168.0.26 : 5555], [bind_addr=/fe80:0:0:0:3e07:54ff:fe6f:95e%4]
test [sender = 192.168.0.26 : 5555], [bind_addr=/fe80:0:0:0:2a37:37ff:fe1e:fc4%5]
test [sender = 192.168.0.26 : 5555], [bind_addr=/61.77.153.207]
test [sender = 192.168.0.26 : 5555], [bind_addr=/192.168.0.26]
test [sender = 192.168.0.26 : 5555], [bind_addr=/192.168.0.26]
test [sender = 192.168.0.26 : 5555], [bind_addr=/fe80:0:0:0:3e07:54ff:fe6f:95e%4]
test [sender = 192.168.0.26 : 5555], [bind_addr=/61.77.153.207]
test [sender = 192.168.0.26 : 5555], [bind_addr=/fe80:0:0:0:2a37:37ff:fe1e:fc4%5]
test [sender = 192.168.0.26 : 5555], [bind_addr=/61.77.153.207]
test [sender = 192.168.0.26 : 5555], [bind_addr=/61.77.153.207]
test [sender = 192.168.0.26 : 5555], [bind_addr=/fe80:0:0:0:2a37:37ff:fe1e:fc4%5]
test [sender = 192.168.0.26 : 5555], [bind_addr=/61.77.153.207]
test [sender = 192.168.0.26 : 5555], [bind_addr=/fe80:0:0:0:3e07:54ff:fe6f:95e%4]
test [sender = 192.168.0.26 : 5555], [bind_addr=/192.168.0.26]
test [sender = 192.168.0.26 : 5555], [bind_addr=/fe80:0:0:0:3e07:54ff:fe6f:95e%4]
test [sender = 192.168.0.26 : 5555], [bind_addr=/fe80:0:0:0:3e07:54ff:fe6f:95e%4]
test [sender = 192.168.0.26 : 5555], [bind_addr=/192.168.0.26]
test [sender = 192.168.0.26 : 5555], [bind_addr=/fe80:0:0:0:3e07:54ff:fe6f:95e%4]
test [sender = 192.168.0.26 : 5555], [bind_addr=/192.168.0.26]
test [sender = 192.168.0.26 : 5555], [bind_addr=/61.77.153.207]
test [sender = 192.168.0.26 : 5555], [bind_addr=/fe80:0:0:0:2a37:37ff:fe1e:fc4%5]
test [sender = 192.168.0.26 : 5555], [bind_addr=/192.168.0.26]
test [sender = 192.168.0.26 : 5555], [bind_addr=/fe80:0:0:0:2a37:37ff:fe1e:fc4%5]
test [sender = 192.168.0.26 : 5555], [bind_addr=/192.168.0.26]
test [sender = 192.168.0.26 : 5555], [bind_addr=/fe80:0:0:0:2a37:37ff:fe1e:fc4%5]
test [sender = 192.168.0.26 : 5555], [bind_addr=/fe80:0:0:0:2a37:37ff:fe1e:fc4%5]
Since the same message is sent/received through all network interfaces of the machine, duplicate messages can be transmitted.
To quit the test, enter 'quit' or 'exit' at the Sender's prompt. At the Receiver's end, press <Ctrl> + C to quit.
To see help, enter '-help' as a parameter or do not include a parameter.
The following describes how to set Virtual Multicast. The default attribute values are the same as those in "2.1.1. Creating a Default Domain". The multicast IP address and port number are ignored when using Virtual Multicast.
-
Creating a domain with Ant
JEUS_HOME/setup$ ant create-domain
-Ddomain=jeus_domain
-Djeus.address=192.168.34.1
-Dusevirtualmulticast=true
-
Creating a domain with jeusadmin
offline>create-domain  -domain jeus_domain -baseaddress 192.168.34.1 -uvm
Enter the password for [administrator]: **********
Confirm the password: **********
Do you want to encrypt the password? (y/n): y
================================================================================
The domain [jeus_domain] was created successfully.
+-------------------------+----------------------------------------------------+
|         Property        |                        Value                       |
+-------------------------+----------------------------------------------------+
| Domain name             | jeus_domain                                        |
| Das Name                | adminServer                                        |
| Das Base Listen Port    | 9736                                               |
| Das Base Listen Address | 192.168.34.1                                       |
| JMS Internal Port       | 9741                                               |
| HTTP Port               | 8088                                               |
| User Name               | administrator                                      |
| Node Name               | node1                                              |
| Password                | {AES:256}r2qfvDR/5DvZHmuPBEjbXCvKyR+F2dJ8tFaA/+k=  |
| JVM Option              | -Xmx256m -XX:MaxPermSize=128m                      |
| Production Mode         | true                                               |
| Use virtual multicast   | true                                               |
+-------------------------+----------------------------------------------------+
================================================================================
This section describes how to change the composition of a domain by adding servers and clusters to the domain created in "2.1. Creating a Domain".
The DAS must be started to add servers and clusters which changes the configuration. Refer to "Chapter 3. Changing Domain Settings" for detailed information about changing the configuration.
DOMAIN_HOME/bin$ startDomainAdminServer -u administrator -p 1111111
Use the following order when adding a cluster and servers in WebAdmin:
Adding a Node
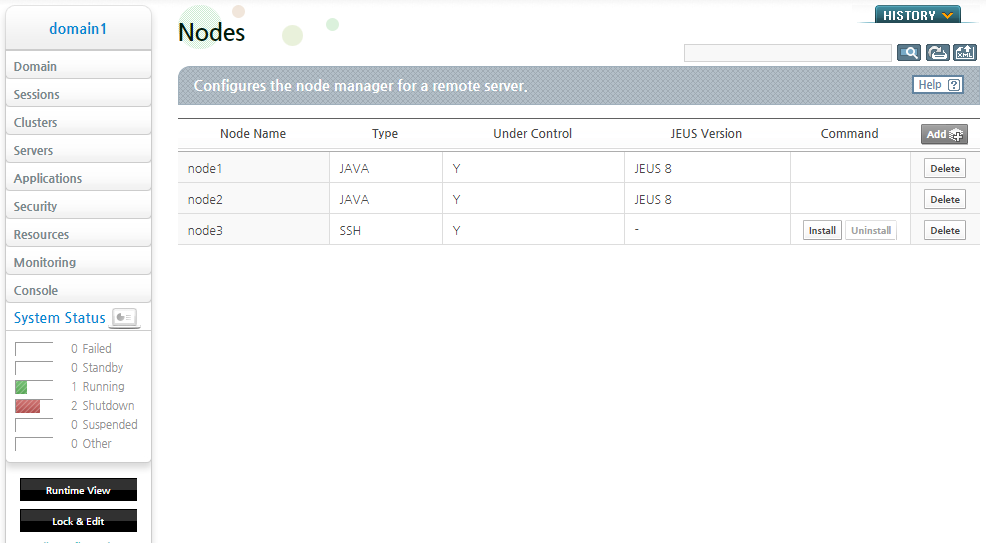
A node is an installed instance of JEUS. Configure the node in order to start a server on the node through DAS. For UNIX-based OSs, SSH nodes are supported. The host address, JEUS installation directory, SSH user name, SSH file route, and SSH port number can be specified. A node that is created when JEUS is installed can be configured and used. Refer to "JEUS Node Manager Guide" for detailed information about node management.
The following are the steps for adding a new node.
-
Click [Node Configuration] from the right menu in WebAdmin.
-
Click [Add] on the Nodes screen.
-
On the SSH Node configuration screen, configure the node and click [OK]. When the changes are applied, the results including the node name, type, control function availability, JEUS version, and other information are displayed on the screen.
Changing to Configuration Mode
To add or change a server or cluster, change to configuration mode. Click [Lock & Edit] from the left menu in WebAdmin.
Note
Refer to JEUS WebAdmin Guide. "2.3.2. Menu" for detailed information about WebAdmin's configuration mode. Changes to a node's configuration can affect other domains, but changes to a server or cluster configuration only affect one domain.
Adding a Managed Server (MS)
Managed Server configuration cannot be changed dynamically. Similar to the default configuration of DAS, when the domain described in "2.1. Creating a Domain" is created, default configuration set when adding an MS is not applied dynamically.
Choose a unique IP address and port number that do not conflict with other servers, and configure the JVM options.
If a domain does not exist on the local network, specify an IP address to use instead of the default value of 0:0:0:0. Since server names in a domain must be unique, verify that there are no conflicts.
Since the servers in the example are in the same cluster, settings that exist at the cluster level do not need to be configured separately for each server.
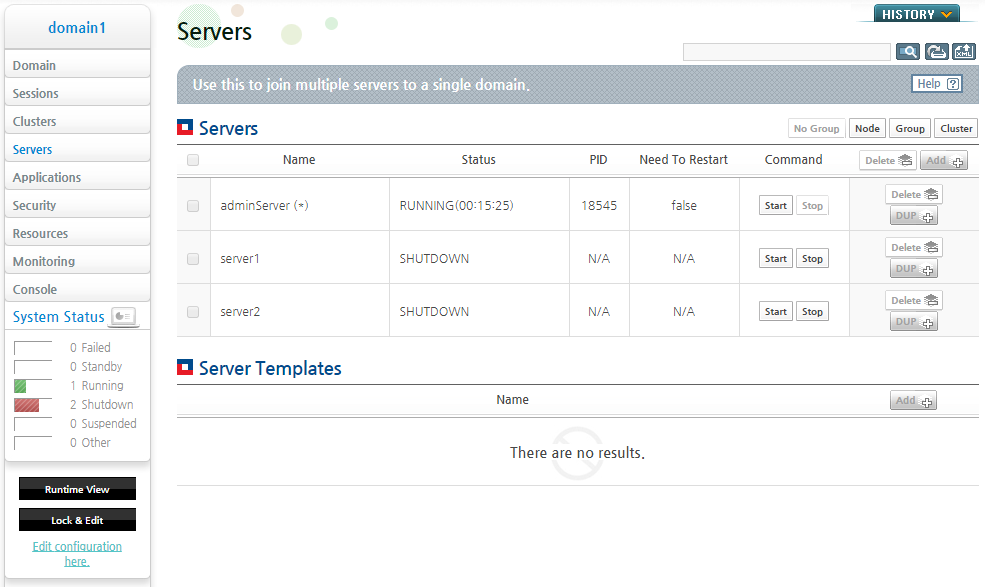
The following are the steps for adding an MS in WebAdmin.
-
Click [Servers] from the left menu in WebAdmin to go to the Servers screen.
-
Click [Lock & Edit] to change to the configuration mode.
-
Click [Add] on the Servers screen, and then click [Basic] > [Basic Info]. Configure the server information and click [OK].
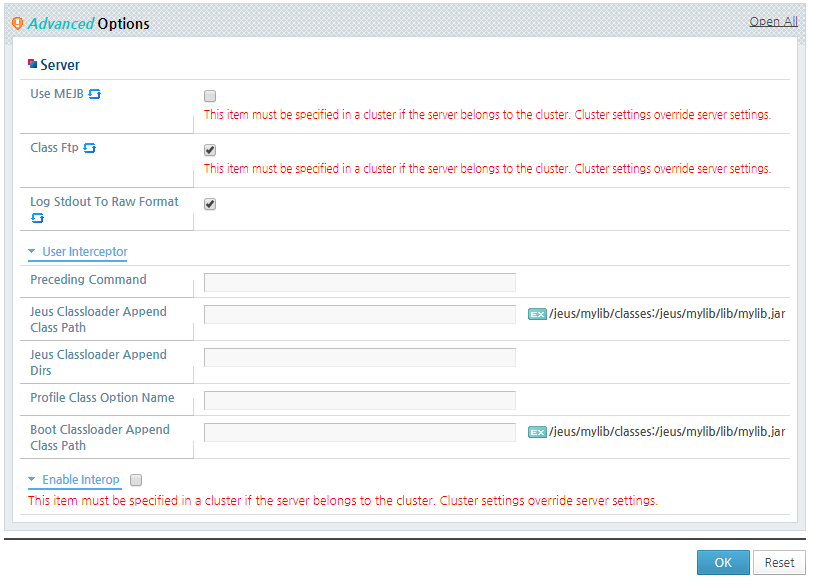
The following shows the advanced options of the Server configuration screen.
The configuration items in 'Data Sources' include the statement "This item must be specified in the cluster if the server belongs to a cluster. Cluster settings override the server settings." These items must have the same value for each server in the cluster. Therefore, if a server is part of a cluster, the items should be configured at the cluster level.
When changing the configuration of a server in the cluster, the items that need to be applied commonly across the cluster include the statement, "This item must be specified in the cluster if the server belongs to the cluster. Cluster settings overrides the server settings."
-
To add a listener, click [Resources] > [Listeners]. Click [Add] from the Listener section of the Listeners screen.
-
Configure the items and click [OK].
-
After the listener is added, set the 'Base' field to the listener name that was added in step 5, and click [OK]. This sets the default listener.
-
Click [Apply Changes] to apply the changes.
-
Once the server is created, it appears in the server list.
Adding a Cluster
When adding a cluster, load balancing, failover, and the servers in the cluster must all be configured. Refer to "5.5. Configuring a Cluster" for detailed information about configuring a cluster.
The following are the steps for adding a cluster in WebAdmin.
-
Click [Clusters] from the left menu in WebAdmin to go to the following screen.
-
Click [Lock & Edit] to change to the configuration mode.
-
Click [Add] from the Clusters screen, and go to the [Basic] tab.
Configure specific settings for the cluster. A cluster can have either general servers or dynamic servers, and only one type of servers is allowed for a cluster. For more information about configuring a cluster, refer to "5.5. Configuring a Cluster".
-
Specify the existing servers to add to a new cluster. The servers can be added to and removed from the cluster as desired. In the Cluster screen, select the desired servers to be added to the cluster from the list of servers in 'Servers' and then click [OK].
-
Use a server template to create servers to add to a cluster. Create a specified number of servers in batches by using the settings specified in the server template. The settings cannot be changed only for a specific server. Changes can only made to all servers by modifying the server template or clustering settings.
To configure dynamic servers, click 'Dynamic Servers' in the Cluster screen. Set the number of servers to be created in 'Server Count' and set the server configuration information in 'Server Template Name'. Set the nodes where each server will be located in 'Node Names' and then click [OK].
-
-
The result message is displayed.
-
Click [Apply Changes] to apply the changes.
-
When the cluster is added, the results are displayed on the screen.
-
Click [Clusters] from the left menu to go to the cluster list screen. Choose a cluster from the list and click [Start] to start the servers in the cluster.
Creating a domain with jeusadmin, the JEUS console tool, is similar to using WebAdmin, except that it is not necessary to change to the configuration mode.
The following describes how to create a domain using jeusadmin.
-
Add a node, node1, using the add-ssh-node command. Add node2 in the same way. Refer to JEUS Reference Book. "4.2.15.2. add-ssh-node" for detailed instructions about using the add-ssh-node command.
[DAS]domain1.adminServer>add-ssh-node node1 -host 192.168.34.1 -dir /home/sshUser/jeus -user sshUser The node [node1] was successfully added. -
Add an MS, server1, using the add-server command. Add server2 in the same way. Refer to JEUS Reference Book. "4.2.4.7. add-server" for detailed instructions about using the add-server command.
[DAS]domain1.adminServer>add-server server1 -node node1 -addr 192.168.34.1 -port 9836 Successfully performed the ADD operation for server (server1). Check the results using "list-servers or add-server" -
Add a cluster, cluster1, that consists of server1 and server2 using the add-cluster command. Refer to JEUS Reference Book. "4.2.4.1. add-cluster" for detailed instructions about using the add-cluster command.
[DAS]domain1.adminServer> add-cluster cluster1 -servers server1,server2 Successfully performed the ADD operation for cluster (cluster1). Check the results using "list-clusters or add-cluster" -
After adding all items up to the cluster, use the serverinfo command to verify the result.
[DAS]domain1.adminServer>serverinfo

Information about Domain (domain1)
 ===============================================================================================
 +--------+---------+-----+-------+-----+----------------+---------+-------------+-------------+
 | Server |  Status | Node|  PID  | Clus|  Latest Start  | Need to | Listen Ports| Running     |
 |        |         |Name |       | ter |Time / Shutdown | Restart |             | Engines     |
 |        |         |     |       |     |     Time       |         |             |             |
 +--------+---------+-----+-------+-----+----------------+---------+-------------+-------------+
 | adminSe| RUNNING | N/A | 5360  | N/A | 2016-08-23     | false   | base-192.168| jms,        |
 |rver(*) |(00:01:11|     |       |     |(Thu) PM        |         |.34.3:9736   | ejb, web    |
 |        |)        |     |       |     |03:53:28 KST    |         | http-server-|             |
 |        |         |     |       |     |                |         |0.0.0.0:8088 |             |
 |        |         |     |       |     |                |         |jms-internal-|             |
 |        |         |     |       |     |                |         |0.0.0.0:9741 |             |
 +--------+---------+-----+-------+-----+----------------+---------+-------------+-------------+
 | server1| RUNNING |node1| 6424  | clus| 2016-08-23     | false   | base-192.168| jms,        |
 |        |(00:00:03|     |       |ter1 |(Thu) PM         |         |.34.1:9836   | ejb, web    |
 |        |)        |     |       |     |03:54:37 KST    |         |             |             |
 +--------+---------+-----+-------+-----+----------------+---------+-------------+-------------+
 | server2| RUNNING |node2| 3012  | clus| 2016-08-23     | false   | base-192.168| jms,        |
 |        |(00:00:03|     |       |ter1 |(Thu) PM        |         |.34.2:9936   | ejb, web    |
 |        |)        |     |       |     |03:54:36 KST    |         |             |             |
 +--------+---------+-----+-------+-----+----------------+---------+-------------+-------------+
 ===============================================================================================
When JEUS is installed, JEUS_HOME directory and jeus_domain, which is the sub directory of JEUS_HOME, are created.
This section describes the directory structure with the assumption that the path of the user home is '/home/user1' and the domain is called 'domain1'.
The JEUS directory structure is as follows. JEUS_HOME is the top-level directory of JEUS. The actual directory name and location can be configured during the installation.
/home/jeus/JEUS_HOME
The following is the directory structure of JEUS_HOME.
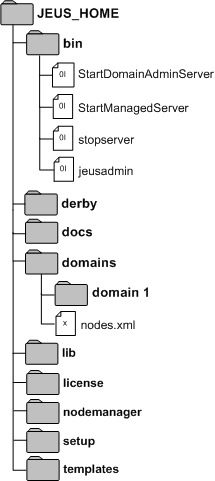
- bin
-
Contains executable files, including startDomainAdminServer, startManagedServer, and stopServer, which are scripts that start and stop servers. It also contains jeusadmin, JEUS console tool.
- derby
-
Contains Apache Derby so that sample applications and tests can be easily used.
- docs
-
Contains Javadoc documents for the API provided by JEUS.
- domains
-
Contains a DOMAIN_HOME subdirectory for each domain, and the nodes.xml that contains node information.
- lib
-
Contains the libraries that are needed to run JEUS. A users does not need to access other directories except the shared directory.
Subdirectory Description shared Contains libraries that are used by applications. To use the libraries, add the information about the libraries to libraries.xml. Also, the reference information of the libraries must be configured in the JEUS Deployment Descriptor(DD) of the application that will reference them.
Refer to JEUS Applications & Deployment Guide. "3.3.2. Shared Library" for detailed information about shared libraries.
- license
-
Contains JEUS license files that are required to run JEUS.
- nodemanager
-
Contains the configuration file for using Java Node Manager. Log files that are created by the Node Manager are saved in this directory.
- setup
-
Contains the files that are required for implementing JEUS environment.
- templates
-
Contains template files for various configurations and environments.
'JEUS_HOME/domains/domain1' is the DOMAIN_HOME directory for domain1.
The following is the directory structure of domain1.
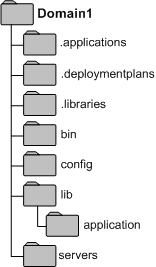
- .applications
-
Contains application files managed by the domain. This directory has restricted access. Files can only be added or deleted using the install-application or uninstall-application commands. Refer to JEUS Reference Book. "4.2.6.7. install-application", JEUS Reference Book. "4.2.6.16. uninstall-application" for detailed descriptions of each command.
- .deploymentplans
-
Contains deployment plans managed by the domain. This directory has restricted access. Files can only be added or deleted using the install-deployment-plan and uninstall-deployment-plan commands. Refer to JEUS Reference Book. "4.2.6.8. install-deployment-plan" and JEUS Reference Book. "4.2.6.17. uninstall-deployment-plan" for detailed information about each command.
- .libraries
-
Contains the library files installed in the domain. User access is limited to the directory that JEUS uses.
The install-library and uninstall-library can be used to add and delete libraries. For more information about each command, refer to JEUS Reference Book. "4.2.6.19. install-library" and JEUS Reference Book. "4.2.6.22. uninstall-library".
- bin
-
Contains the DAS and MS start and stop scripts. These have the same function as the startDomainAdminServer, startManagedServer, and stopServer scripts in 'JEUS_HOME/bin' except that they do not need to specify the name of the domain.
- config
-
Contains the backup copies of the domain.xml file. Refer to "Chapter 3. Changing Domain Settings" for detailed information about configuring the domain.
-
security
Item Description SYSTEM_DOMAIN Directory that contains the accounts.xml and policies.xml domain security files. These files contain settings that can be changed dynamically using WebAdmin or jeusadmin.
Refer to JEUS Security Guide. "2.2. Configuring the Security System Domain" for a detailed description of domain security settings.
security.key File that contains the encryption keys that is created when JEUS_HOME/bin/encryption is created.
Refer to JEUS Security Guide. "2.5.4. Configuring Password Security" for a detailed description of the security.key file.
policy Java permissions configuration file. This is unrelated to the JEUS security system; it is used by the Java SE Security Manager. -
servlet
Item Description webcommon.xml The common configuration file which applies to all web modules on the web engine of a server in the domain. Refer to JEUS Web Engine Guide. "1.5. Directory Structure" for a detailed description of this configuration.
-
- lib/application
-
Contains application libraries that are applied to the entire domain. If there is a duplicate copy of the library in the SERVER_HOME folder, the copy in the SERVER_HOME/lib/application folder has priority, and a warning message is also displayed.
Refer to JEUS Applications & Deployment Guide. "3.3.1. The lib/application Directory" for a detailed description of the lib/application directory.
- servers
-
The SERVER_HOME directory is a subdirectory that uses the server name.
Refer to JEUS Server Guide. "1.5. Directory Structure" for a detailed description of the directory structure of SERVER_HOME.