본 장에서는 예제를 통해서 Servlet, JSP, JSTL, JSF 애플리케이션의 배치와 WAR(Web Application ARchive) 모듈의 패키징과 배치에 대해서 설명한다.
본 절에서는 웹 애플리케이션의 간단한 예제 코드를 작성하고, 해당 소스의 컴파일과 배치 과정을 설명한다.
참고
자세한 내용은 "JEUS Server 안내서", "JEUS Web Engine 안내서", "JEUS Web Service 안내서"를 참고한다.
다음의 HelloWorldServlet.java는 웹 브라우저에 간단히 "Hello World!"라는 메시지를 출력하는 예제 서블릿이다.
[예 9.1] <<HelloWorldServlet.java>>
import java.io.*;

import javax.servlet.*;
import javax.servlet.http.*;

public class HelloWorldServlet extends HttpServlet
{
   public void doGet(HttpServletRequest req, HttpServletResponse res)
              throws IOException, ServletException
   {
      res.setContentType("text/html");

      PrintWriter out = res.getWriter();
      out.println("<HTML>");
      out.println("<HEAD>");
      out.println("<TITLE>Hello World Sample</TITLE>");
      out.println("</HEAD>");
      out.println("<BODY>");
      out.println("<CENTER><H1>Hello World!</H1></CENTER>");
      out.println("</BODY>");
      out.println("</HTML>");
      out.close();
   }
}
예제는 다음 위치의 디렉터리에서 찾을 수 있다.
JEUS_HOME/samples/getting_started/helloservlet/src/java
다음의 snoop.jsp는 요청을 받았을 때 Request에 대한 몇 가지 정보를 보여주는 snoop.jsp라는 샘플 JSP 프로그램이다.
[예 9.2] <<snoop.jsp>>
<html>

<body bgcolor="white">

<h2> Request Information </h2>
<font size="4">
JSP Request Method: <%= request.getMethod() %>
<br>
Request URI: <%= request.getRequestURI() %>
<br>
Request Protocol: <%= request.getProtocol() %>
<br>
Servlet path: <%= request.getServletPath() %>
<br>
Path info: <%= request.getPathInfo() %>
<br>
Path translated: <%= request.getPathTranslated() %>
<br>
Query string: <%= request.getQueryString() %>
<br>
Content length: <%= request.getContentLength() %>
<br>
Content type: <%= request.getContentType() %>
<br>
Server name: <%= request.getServerName() %>
<br>
Server port: <%= request.getServerPort() %>
<br>
Remote user: <%= request.getRemoteUser() %>
<br>
Remote address: <%= request.getRemoteAddr() %>
<br>
Remote host: <%= request.getRemoteHost() %>
<br>
Authorization scheme: <%= request.getAuthType() %>
<hr>
The browser you are using is <%= request.getHeader("User-Agent") %>
<hr>
</font>
</body>
</html>
예제는 다음 위치의 디렉터리에서 찾을 수 있다.
JEUS_HOME/samples/getting_started/helloservlet/web
다음은 snoop.jsp와 똑같은 일을 하지만 JSTL과 JSF를 사용한 snoop-jstl.jsp라는 샘플 JSP 프로그램이다.
[예 9.3] <<snoop-jstl.jsp>>
<%@ taglib uri="http://java.sun.com/jsp/jstl/core" prefix="c" %>
<%@ taglib uri="http://java.sun.com/jsf/html" prefix="h" %>
<%@ taglib uri="http://java.sun.com/jsf/core" prefix="f" %>
<html>
<body>
<h2> Request Information </h2>
<font size="4">
    <c:set var="req" value="${pageContext.request}"/>
    JSP Request Method: <c:out value="${req.method}"/>
    <br/>
    Request Protocol: <c:out value="${req.protocol}"/>
    <br/>
    Servlet path: <c:out value="${req.servletPath}"/>
    <br/>
    Path info: <c:out value="${req.pathInfo}"/>
    <br/>
    Path translated: <c:out value="${req.pathTranslated}"/>
    <br/>
    Query string: <c:out value="${req.queryString}"/>
    <br/>
    Content length: <c:out value="${req.contentLength}"/>
    <br/>
    Content type: <c:out value="${req.contentType}"/>
    <br/>
    Server name: <c:out value="${req.serverName}"/>
    <br/>
    Server port: <c:out value="${req.serverPort}"/>
    <br/>
    Remote user: <c:out value="${req.remoteUser}"/>
    <br/>
    Remote address: <c:out value="${req.remoteAddr}"/>
    <br/>
    Remote host: <c:out value="${req.remoteHost}"/>
    <br/>
    Authorization scheme: <c:out value="${req.authType}"/>
    <hr/>
    <f:view>
    The browser you are using is <h:outputText value=
    "#{header['User-Agent']}"/>
    </f:view>
    <hr/>
</font>
</body>
</html>
이 예제는 JSP이므로 사용자가 컴파일할 필요없이 서블릿 엔진이 자동으로 컴파일한다.
작성된 예제는 jant를 이용하여 다음과 같이 빌드할 수 있다.
%JEUS_HOME%/samples/getting_started/helloservlet>jant build
빌드가 정상적으로 완료되면 dist 폴더 아래에 hello-servlet.war 애플리케이션 WAR 파일이 생성된다.
패키징된 WAR 모듈은 WebAdmin이나 콘솔을 사용해서 deploy한다.
WebAdmin을 사용한 WAR 모듈의 Deploy
JEUS 7에서는 애플리케이션의 배포 과정이 install과 deploy 과정에 대한 설명이다.
참고
Deploy에 대한 자세한 내용은 자세한 내용은 "JEUS Application & Deployment 안내서"를 참고한다.
본 절에서는 이전에 사용한 방법과 동일하게 WAR 모듈을 deploy하는 예제를 설명한다.
-
웹 브라우저로 접속해서 WebAdmin에 로그인한다.
-
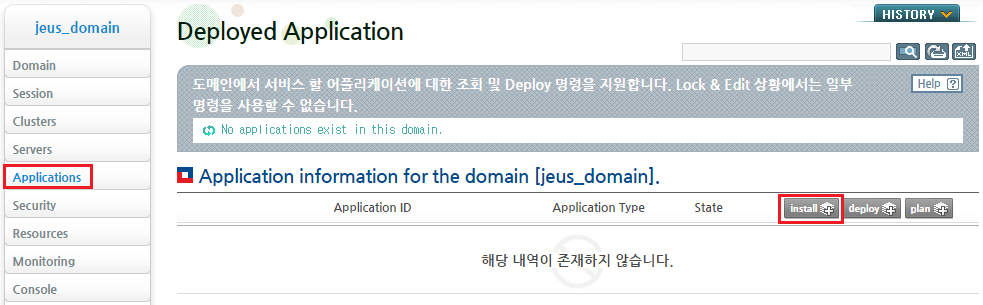
WebAdmin 왼쪽 메뉴의 [Applications]를 선택하면 애플리케이션 목록 조회 화면으로 이동한다. 다음과 같이 Deployed Applications 화면에서 [Install] 버튼을 클릭한다.
-
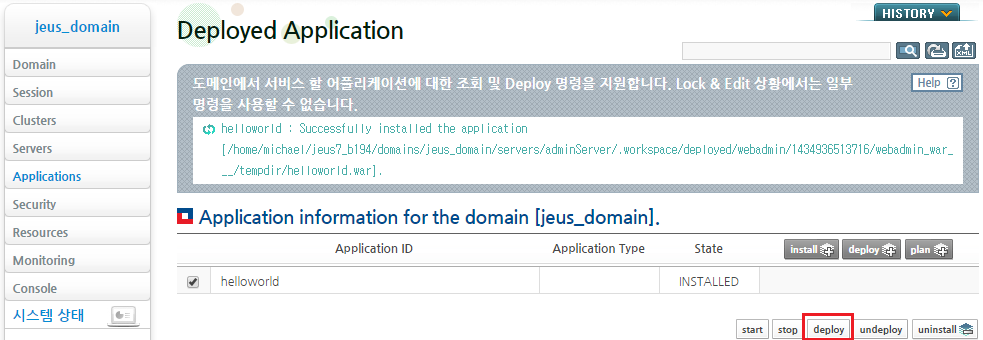
Install 화면에서 'Id' 항목에 사용할 ID 값을 입력한다. 'Path' 항목의 [찾아보기] 버튼을 클릭해서 생성된 애플리케이션을 선택한 뒤 [확인] 버튼을 클릭한다. 생성된 애플리케이션은 'JEUS_HOME/samples/getting_started/helloservlet/dis/'에 존재한다.
-
애플리케이션 목록 조회 화면으로 이동하고, DAS에 install된 애플리케이션이 조회된다. 이때 MS에 배포하기 위해 해당 애플리케이션의 [deploy] 버튼을 클릭한다.
-
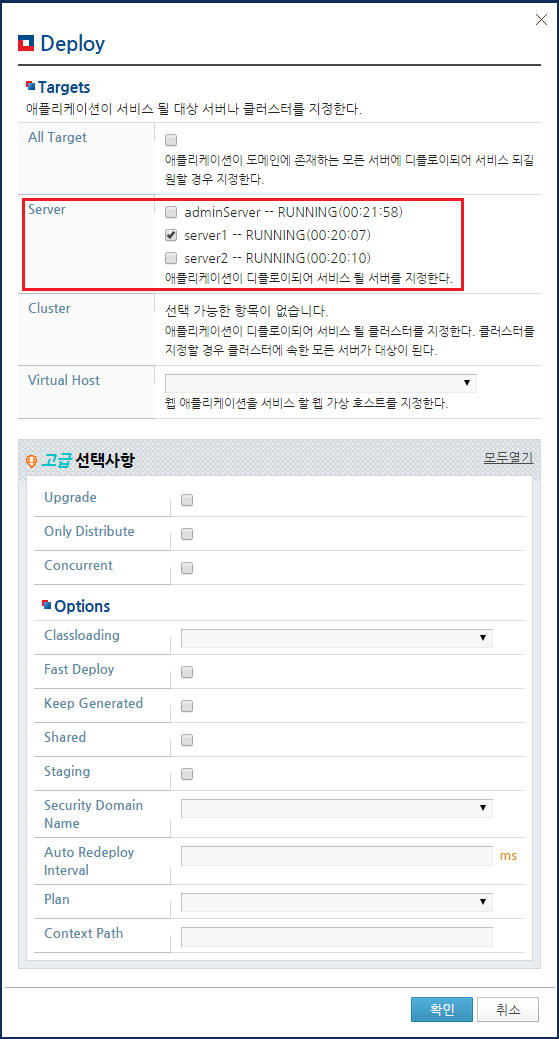
'Server' 항목에서 deploy할 서버를 선택하고 [확인] 버튼을 클릭한다. DAS를 선택할 수도 있지만 MS에 deploy하여 애플리케이션을 서비스하는 것을 권장한다.
-
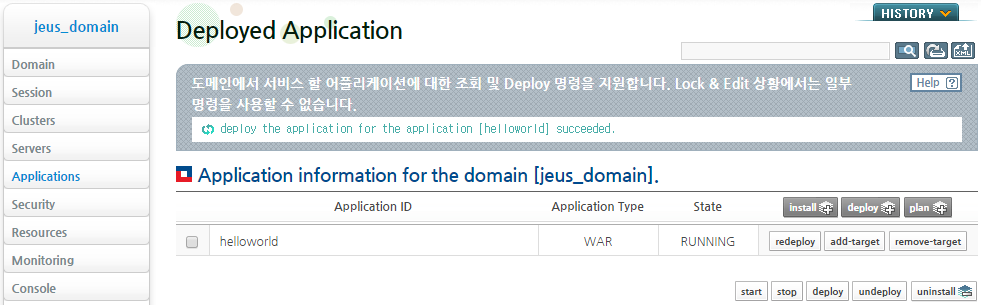
deploy가 성공적으로 완료되면 다음과 같이 결과 메시지가 출력된다.

콘솔 툴을 사용한 WAR 모듈의 Deploy
콘솔 툴(jeusadmin)을 사용하여 웹 모듈을 deploy하는 방법은 다음과 같다.
-
jeusadmin으로 JEUS에 접속한다.
jeusadmin –u administrator –p <password> -
애플리케이션을 다음과 같이 DAS에 install한다.
[DAS]jeus_domain.adminServer>install-application -id helloworld C:\TmaxSoft\JEUS7.0\samples\getting_started\helloservlet\dist\hello-servlet.war
Successfully installed application[helloworld].
-
애플리케이션을 다음과 같이 MS(server1)에 deploy한다.
[DAS]jeus_domain.adminServer>deploy helloworld -servers server1
Succeeded to deploy the application : helloworld
-
모듈이 정상적으로 deploy되었는지 확인한다.
본 절에서는 deploy된 JSP와 서블릿을 사용하는 방법을 설명한다.
Deploy된 JSP 사용 방법
deploy된 JSP를 사용하는 방법은 다음과 같다.
-
snoop.jsp 페이지 호출
snoop.jsp 페이지를 호출하려면 다음의 주소를 웹 브라우저 주소 창을 통해 호출한다(JSP의 경우 최초로 호출할 때 서블릿 엔진이 자동으로 컴파일을 수행하므로 약간 늦게 실행된다).
http://localhost:8088/helloworld/faces/snoop.jsp
-
snoop-jstl.jsp 페이지 호출
snoop-jstl.jsp 페이지를 호출하려면 다음 주소를 주소 창을 통해 호출한다. 화면 결과는 snoop.jsp의 호출 결과와 동일하다.
http://localhost:8088/helloworld/snoop-jstl.jsf

Deploy된 서블릿 사용 방법
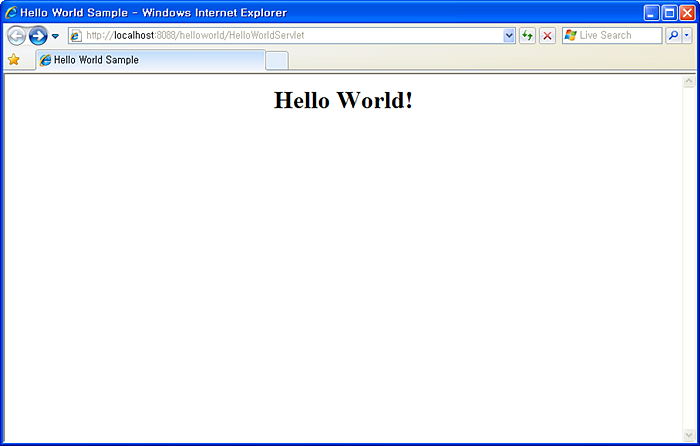
'helloworld' 서블릿을 호출하기 위해서는 브라우저의 주소 창에 다음과 같이 입력한다.
http://localhost:8088/helloworld/HelloWorldServlet
| 항목 | 설명 |
|---|---|
| http | JEUS에 접속할 때 사용하는 HTTP 프로토콜을 의미한다. |
| localhost | 서비스를 제공하는 서버가 브라우저와 동일한 자신의 주소에 있음을 의미한다. |
| 8088 | MS 내에 생성한 HTTP 리스너의 포트 번호이다. |
| helloworld | 웹 애플리케이션의 컨텍스트용 Request path이다. 이 Request path는 jeus-web-dd.xml의 <context-path> element에 설정되며, 이 값을 지정하지 않을 경우 WAR 모듈 파일의 이름과 동일하다. |
| HelloWorldServlet | 서블릿에 정의된 URL 패턴이다. |
서블릿 엔진이 정상적으로 기동된 상태이고, Hello World 서블릿이 정상적으로 deploy되었다면 다음과 같은 화면이 나타난다.