내용 목차
본 장에서는 UNIX 환경에서 JEUS를 설치하고 제거하는 과정에 대해서 설명한다.
UNIX 환경에서 JEUS 설치/제거는 GUI 모드나 콘솔 모드의 선택이 가능하다.
JEUS 설치는 다음의 과정으로 진행된다.
-
JDK 7 설치
-
JEUS 설치(파일 복사)
-
설치 확인
-
기동 확인
-
환경변수 설정과 검증
-
본 절에서는 GUI 모드와 콘솔 모드에서 설치하는 과정에 대해서 설명한다.
UNIX 환경에서 GUI 모드에서 JEUS 설치하는 과정에 대해서 설명한다. GUI 설치가 가능하지 않다면 “5.2.2. 콘솔 모드에서 설치”를 참고한다.
참고
Linux, Solaris, HP, AIX에서의 JEUS 설치 과정은 동일하며, 설치할 때 화면 구성은 Windows 설치할 때와 유사하다. 그러나 UNIX에서 GUI 설치 툴을 사용하기 위해서는 Java 기반의 GUI 환경을 지원하는 콘솔 또는 터미널이 설치되어 있어야 한다.
GUI 모드에서 JEUS 설치 과정은 다음과 같다.
-
CD를 CD-ROM 장치에 넣고 마운트(mount)한다. CD의 jeus8_unix_generic.bin 파일이 위치한 디렉터리로 이동한다.
-
다른 위치에 있는 Installer가 실행이 가능하도록 하려면 jeus8_unix_generic.bin 파일의 실행 권한을 다음과 같이 부여한다.
chmod u+x jeus8_unix_generic.bin
명령 라인에서 다음을 입력한 후에 <ENTER> 키를 누른다.
jeus8_unix_generic.bin –i GUI
-
JEUS 설치 툴의 초기 화면이 나타난다. 진행 상태가 100%가 될 때까지 기다린다.
-
다음과 같은 Introduction 화면이 표시된다.
-
JEUS 소개 내용을 읽고 [Next] 버튼을 클릭한다. 설치를 종료 하려면 [Cancel] 버튼을 클릭한다.
-
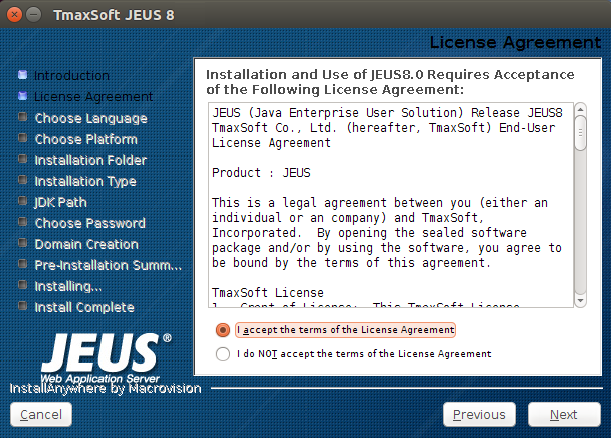
License Agreement 화면에서 라이선스 준수 내용을 읽고 "I accept the terms of …"를 선택한 후 [Next] 버튼을 클릭한다.
-
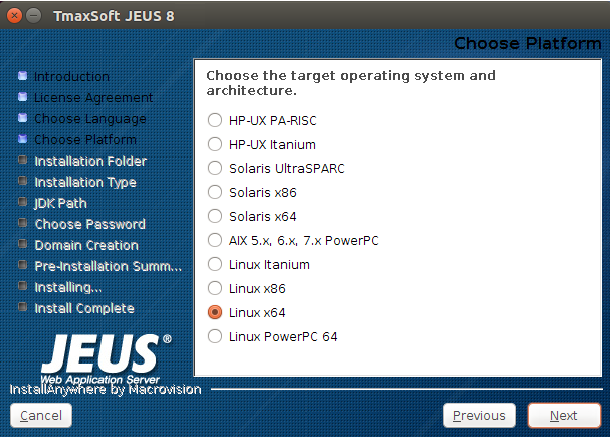
플랫폼 목록에서 설치할 플랫폼을 선택한다.
-
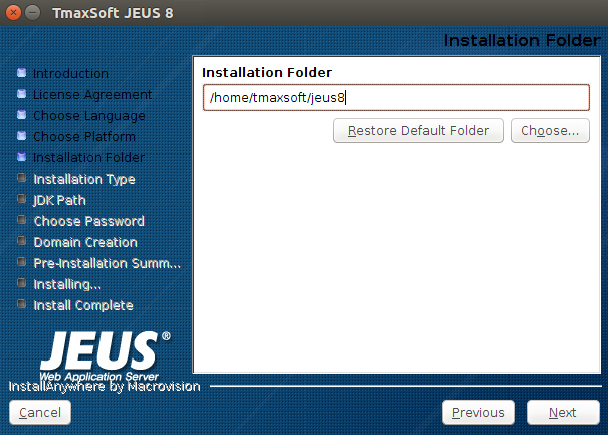
Installation Folder 화면이 나타난다. JEUS 바이너리와 기타 다른 파일들은 설정한 경로의 디렉터리의 하위에 설치된다.
[Choose…]를 클릭하면 다른 설치 폴더를 선택할 수 있고 [Restore Default Folder]를 클릭하면 초기 기본 폴더로 복귀한다. 가능하면 기본 폴더를 그대로 사용하길 권장한다(예: “/home/tmaxsoft/jeus8”). 설치할 디렉터리를 선택하고 [Next] 버튼을 클릭한다.
-
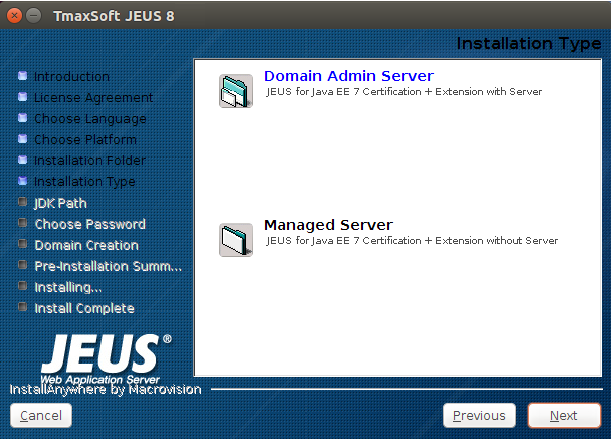
Installation Type 화면이 나타난다. 설치 옵션에서 Domain Admin Server와 Managed Server 중 하나를 선택하고 [Next] 버튼을 클릭한다(기본: Domain Admin Server).
다음은 설치 옵션에 대한 설명이다.
항목 설명 Domain Admin Server Domain Admin Server(DAS)와 Managed Server(MS)를 설치한다. Domain Admin Server는 Managed Server를 관리하기 위한 서버이다. Managed Server Managed Server를 설치한다. -
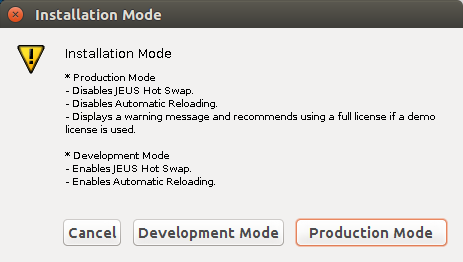
Domain Admin Server를 선택한 경우 Installation Mode를 선택한다.
다음은 설치 옵션에 대한 설명이다.
항목 설명 Production Mode 설치할 때 Production Mode로 설치한다. JEUS Hot Swap, Automatic Reloading을 사용하지 않는다. demo license가 사용되면 경고 메시지가 출력된다. Development Mode 설치할 때 Development Mode로 설치한다. JEUS Hot Swap, Automatic Reloading을 사용한다. -
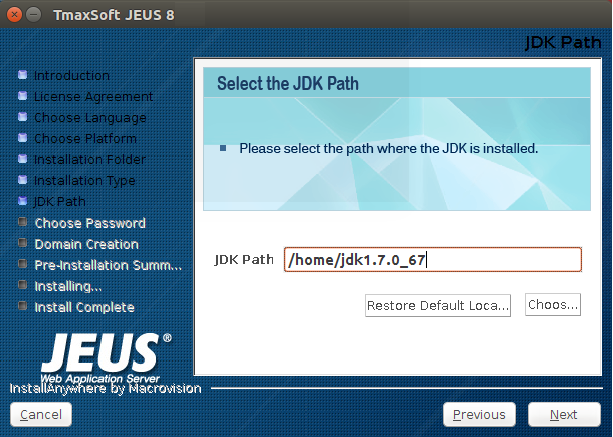
Choose JAVA Folder 화면에서 초기에 설치된 JDK 전체 경로(예: “/usr/jdk1.7”)를 설정한다.
설치 프로그램은 설치된 JDK 경로를 제안하지만 [Choose…]를 클릭하면 다른 설치 폴더를 선택할 수 있고, [Restore Default Folder]를 클릭하면 초기 기본 폴더로 복귀한다.
참고
JEUS 설치 후에 JDK를 설치하려면 JDK 설치 경로를 포함하는 JAVA_HOME 환경변수를 수정해야 한다. 그러므로 JDK를 설치한 후 JEUS 설치를 권장한다.
-
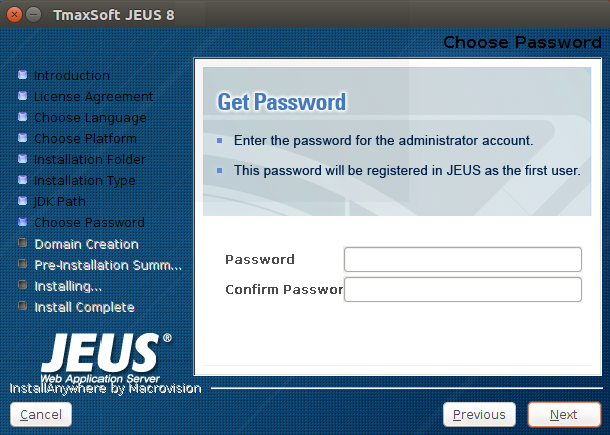
PanelPassword 화면에서 JEUS 관리자의 패스워드를 입력하고 [Next] 버튼을 클릭한다. 패스워드는 "administrator" 관리자 계정으로 할당된다.
-
JEUS에서 사용할 도메인의 이름을 입력하고, [Next] 버튼을 클릭한다.
-
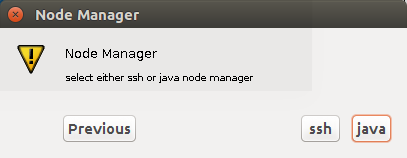
Domain Admin Server를 선택한 경우 사용할 노드 매니저를 선택한다. 기본적으로는 Java 타입의 노드 매니저가 설정된다.
다음은 각 설치 항목에 대한 설명이다.
항목 설명 java Java로 구현된 노드 매니저이다. Java 타입의 노드 매니저에 대한 자세한 내용은 “JEUS Node Manager 안내서”의 “제2장 Java 타입 노드 매니저”를 참고한다. ssh OS에서 제공하는 SSH를 사용하는 노드 매니저이다. SSH 타입의 노드 매니저에 대한 자세한 내용은 “JEUS Node Manager 안내서”의 “제3장 SSH 타입 노드 매니저”를 참고한다. -
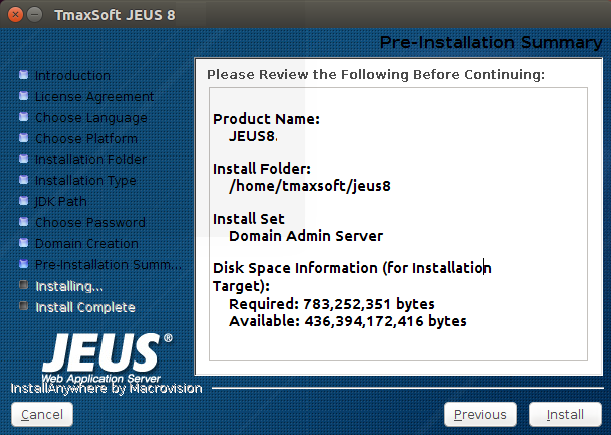
지금까지 설정한 설치 정보가 조회된다. 설치 정보를 확인한 후 [Install] 버튼을 클릭해서 설치를 시작한다.
-
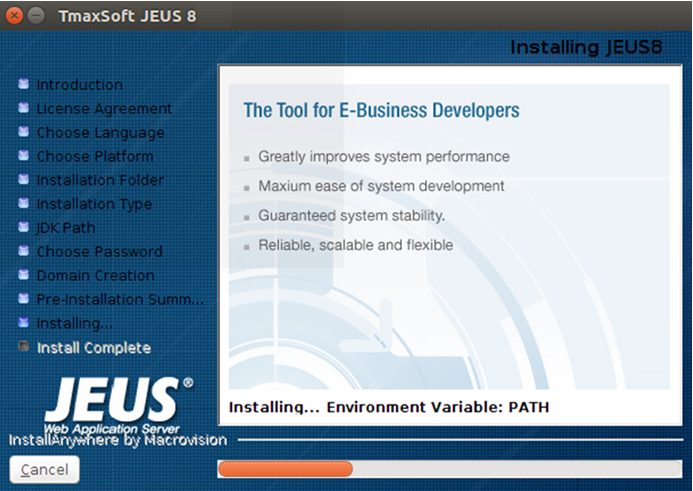
설치가 진행되는 것을 확인할 수 있다.
-
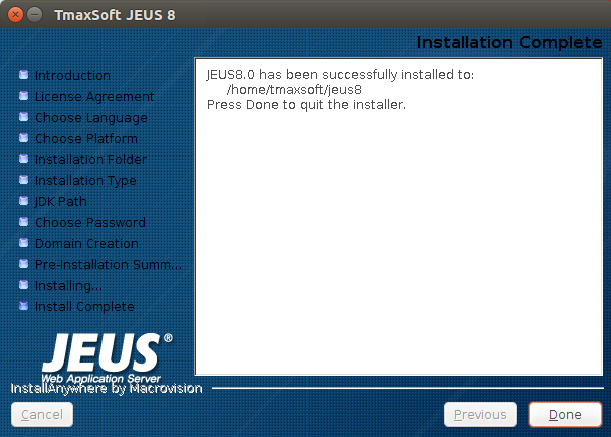
설치가 완료된 것을 확인하고 [Done] 버튼을 클릭하면 설치가 종료된다.


본 절에서는 콘솔 모드(명령 라인) UNIX/Linux 환경에서 JEUS를 설치하는 방법에 대해서 설명한다. 콘솔 모드에서 설치하기 위해서 Console Installer를 실행해야 한다.
참고
Console Installer는 설치 과정에서 값을 입력받을 때 기본값을 제시한다. 셸은 이전 단계로 돌아가는 것이 기본적으로 불가능하므로 설치가 완료된 후에 값을 변경하면 된다.
다음은 텍스트 기반 셸을 실행하는 과정에 대한 설명이다.
-
JEUS 설치 CD를 넣고 마운트(mount)한다. CD의 jeus8_unix_generic.bin 파일이 위치한 디렉터리로 이동한다.
-
다른 곳에 있는 설치 Console Installer가 실행이 가능하도록 하려면 jeus8_unix_generic.bin 파일의 실행 권한을 다음과 같이 부여한다.
chmod u+x jeus8_unix_generic.bin -
콘솔에서 jeus80_unix_generic.bin 파일을 실행하기 위해 './jeus80_unix_generic.bin'을 입력한 후 <ENTER> 키를 누른다.
[jeususer@matrix jeus]$ ./jeus8_unix_generic.bin Preparing to install... Extracting the installation resources from the installer archive... Configuring the installer for this system's environment... Launching installer... Preparing CONSOLE Mode Installation... -
JEUS 라이선스 준수 화면이 나타난다.
=============================================================================== License Agreement ----------------- Installation and Use of JEUS8 Requires Acceptance of the Following License Agreement: JEUS (Java Enterprise User Solution) Release JEUS8 TmaxSoft Co., Ltd. (hereafter, TmaxSoft) End-User License Agreement Product : JEUS This is a legal agreement between you (either an individual or an company) and TmaxSoft, Incorporated. By opening the sealed software package and/or by using the software, you agree to be bound by the terms of this agreement. TmaxSoft License 1. Grant of License: This TmaxSoft License Agreement ("License") permits you to use one copy of the TmaxSoft product JEUS, on any single computer, provided the software is in use on only one computer at any one time. If this package is a license pack, you may make and use additional copies of the software up to the number of licensed copies authorized. If you have multiple licenses for the software, then at any time you may have as many copies of the software in use as you have licenses. The software is "in use" on a computer when it is loaded into the temporary memory (i.e., RAM) or installed into the permanent memory (e.g., hard disk, CD-ROM, or other storage devices) of that computer, except that a copy installed on a network server for the sole purpose of distribution to other computers is not "in use". If the anticipated number of users of the software will exceed the number of applicable licenses, then you must have a reasonable -
JEUS 라이선스 준수에 대한 다음 정보를 보기 위해 <ENTER> 키를 누른다.
PRESS <ENTER> TO CONTINUE:

mechanism or process in place to ensure that the number of persons using the
software concurrently does not exceed the number of licenses.

2.  Copyright:  The software (including any images, "applets," photographs,
animations, video, audio, music and text incorporated into the software) is
owned by TmaxSoft or its suppliers and international treaty provisions.
Therefore, you must treat the software like any other copyrighted materials
(e.g., a book or musical recording) except that you may either (a) make one
copy of the software solely for backup or archival purposes, or (b) transfer
the software to a single hard disk provided you keep the original solely for
backup or archival purposes.  You may not copy the printed materials
accompanying the software, nor print copies of any user documentation provided
in "online" or electronic form.

3.  Other restrictions: This license is your proof of license to exercise the
rights granted herein and must be retained by you. You may not rent, lease, or
transfer your rights under this license on a permanent basis provided you
transfer this license, the software, and all accompanying printed materials,
retain no copies, and the recipient agrees to the terms of this license. You
may not reverse engine, decompile, or disassemble the software, except to the
extent that the foregoing restriction is expressly prohibited by applicable
law.
-
라이선스 동의 여부를 결정한다.
동의를 하면 ‘y’를 입력한 후 <ENTER> 키를 누르고, 아니면 ‘n’을 입력한 후 <ENTER> 키를 누른다.
PRESS <ENTER> TO CONTINUE:

DO YOU ACCEPT THE TERMS OF THIS LICENSE AGREEMENT? (Y/N): y
-
플랫폼 목록 중 설치할 플랫폼을 결정하여 입력한다.
===============================================================================
Choose Platform
---------------

Choose the operating system and architecture :
1)HP-UX PA-RISC
2)HP-UX Itanium
3)Solaris UltraSPARC
4)Solaris x86
5)Solaris x64
6)AIX 5.x, 6.x, 7.x PowerPC
7)Linux Itanium
8)Linux x86
9)Linux x64
10)Linux PowerPC 64
Quit) Quit Installer

Choose Current System (DEFAULT: 8):
-
설치 디렉터리를 선택한다.
기본적으로 제공되는 값을 사용하려면 <ENTER> 키를 누르고, 디렉터리 변경을 원하면 설치 경로를 입력한다.
=========================================================== Installation Folder ------------------- Enter the installation folder. Default Install Folder: /home/jeus8 ENTER AN ABSOLUTE PATH, OR PRESS <ENTER> TO ACCEPT THE DEFAULT : -
Domain Admin Server(DAS)와 Managed Server(MS) 중 설치할 서버를 선택한다. 기본적으로는 Domain Admin Server가 설정된다.
===============================================================================
Installation type
-----------------

Please choose the Install Set to be installed by this installer.

  ->1- Domain Admin Server
    2- Managed Server

ENTER THE NUMBER FOR THE INSTALL SET, OR PRESS <ENTER> TO ACCEPT THE DEFAULT
   :
다음은 각 설치 항목에 대한 설명이다.
항목 설명 Domain Admin Server Domain Admin Server(DAS)와 Managed Server(MS)를 설치한다. Domain Admin Server는 Managed Server를 관리하기 위한 서버이다. Managed Server Managed Server를 설치한다. -
Domain Admin Server를 선택한 경우 Installation Mode를 선택한다. 기본적으로는 Production Mode가 설정된다.
==========================================================
Installation Mode
-----------------

* Production Mode
- Disables JEUS Hot Swap.
- Disables Automatic Reloading.
- Displays a warning message and recommends using a full license if a demo
license is used.

* Development Mode
- Enables JEUS Hot Swap.
- Enables Automatic Reloading.

  ->1- Production Mode
    2- Development Mode
    3- Cancel

ENTER THE NUMBER OF THE DESIRED CHOICE, OR PRESS <ENTER> TO ACCEPT THE
   DEFAULT:
다음은 각 설치 항목에 대한 설명이다.
항목 설명 Production Mode 설치할 때 Production Mode로 설치한다. JEUS Hot Swap, Automatic Reloading을 사용하지 않는다. demo license가 사용되면 경고 메시지가 출력된다. Development Mode 설치할 때 Development Mode로 설치한다. JEUS Hot Swap, Automatic Reloading을 사용한다. -
JDK의 위치를 입력한다. <ENTER> 키를 누르면 자동으로 인식한 JDK의 위치를 사용한다. 디렉터리를 변경하려면 설치 경로를 입력한다.
==========================================================
Enter the JDK path.
-------------------

Enter the JDK path:

Enter the JDK path (DEFAULT: /usr/jdk1.7):
-
Domain Admin Server를 선택한 경우 JEUS 관리자의 패스워드를 입력한다. 이 패스워드는 "administrator" ID로 할당된다.
===============================================================================
Password Input
--------------

Enter the Password for the administrator account.

Input Password::
참고
패스워드는 JEUS를 기동하는 필수적인 요소이다. 입력한 패스워드는 기억장치에 기록되며, 주의 깊게 입력해야 한다.
-
Domain Admin Server를 선택한 경우 Domain Admin Server에 사용할 도메인 이름을 입력한다.
===============================================================================
User Domain name
----------------

Enter the Domain name

Enter the domain name (DEFAULT: jeus_domain):
-
Domain Admin Server를 선택한 경우 사용할 노드 매니저를 선택한다. 기본적으로는 Java 타입의 노드 매니저가 설정된다.
===============================================================================
Node Manager
------------

select either ssh or java node manager

  ->1- java
    2- ssh
    3- Cancel

ENTER THE NUMBER OF THE DESIRED CHOICE, OR PRESS <ENTER> TO ACCEPT THE
   DEFAULT:
다음은 각 설치 항목에 대한 설명이다.
항목 설명 java Java로 구현된 노드 매니저이다. Java 타입의 노드 매니저에 대한 자세한 내용은 “JEUS Node Manager 안내서”의 “제2장 Java 타입 노드 매니저”를 참고한다. ssh OS에서 제공하는 SSH를 사용하는 노드 매니저이다. SSH 타입의 노드 매니저에 대한 자세한 내용은 “JEUS Node Manager 안내서”의 “제3장 SSH 타입 노드 매니저”를 참고한다. -
다음 화면은 설치에 관련한 요약정보를 보여준다. <ENTER> 키를 누르면 설치가 진행된다.
=============================================================================== Pre-Installation Summary ------------------------ Review the Following Before Continuing: Product Name: JEUS8 Install Folder: /home/jeus8 Install Set Domain Admin Server Disk Space Information (for Installation Target): Required: 441,732,614 bytes Available: 156,301,557,760 bytes PRESS <ENTER> TO CONTINUE: -
진행 바와 함께 설치가 진행된다.
===========================================================
Installing...
-------------

[===============|===============|===============|===============]
[---------------|---------------|---------------|---------------]
-
설치가 완료된다.
===============================================================================
Installation Complete
---------------------

JEUS8 has been successfully installed to:

     /home/jeus8

PRESS <ENTER> TO EXIT THE INSTALLER:
GUI 모드나 콘솔 모드를 사용해서 JEUS를 설치한 후 사용에 필요한 환경변수를 설정해야 한다. 환경변수를 설정하고 JEUS를 기동해서 설치가 정상적으로 이루어졌는지 확인한다. 환경변수를 설정하기 전에 JEUS가 설치된 경로에 디텍터리 구조를 확인한다.
다음은 JEUS를 설치했을 때의 전체 디렉터리 구조이다.
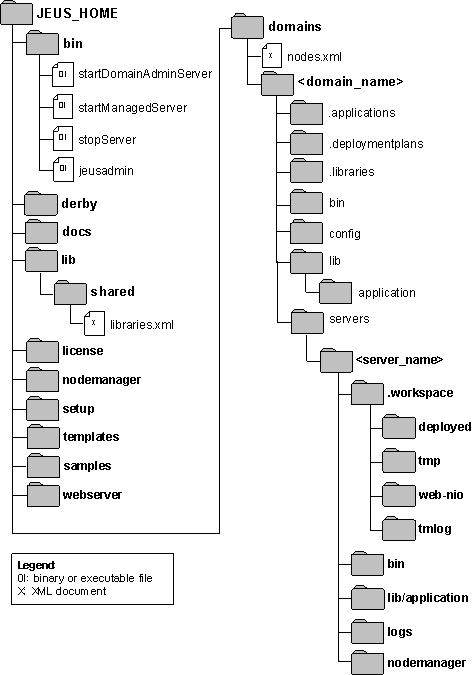
다음은 디렉터리와 파일의 설명이다.
- {JEUS_HOME}
-
JEUS의 최상위 디렉터리로 실제 디렉터리 이름과 위치는 설치할 때 결정된다.
- bin
-
서버의 시작 및 종료 스크립트인 startDomainAdminServer, startManagedServer, stopServer와 JEUS 콘솔 툴(jeusadmin)과 같은 실행 파일들이 위치한다.
- derby
-
샘플 애플리케이션이나 테스트에서 쉽게 사용할 수 있도록 Apache Derby를 포함시킨다.
- docs
-
JEUS에서 제공하는 API에 대한 Javadoc이 존재한다.
- lib
-
JEUS가 기동하는 데 필요한 라이브러리가 존재한다. shared 디렉터리를 제외한 나머지 디렉터리들은 사용자가 접근할 필요가 없다.
디렉터리 설명 shared shared 디렉터리에는 애플리케이션에서 사용하는 라이브러리가 존재한다.
shared 디렉터리의 라이브러리를 사용하려면 libraries.xml에 라이브러리의 정보를 추가해야 한다. 그리고 해당 라이브러리를 사용할 애플리케이션의 JEUS Deployment Descriptor(DD)에서 해당 라이브러리에 대한 레퍼런스 정보를 지정해야 한다. shared 라이브러리에 대한 자세한 설명은 “JEUS Applications & Deployment 안내서”의 “3.3.2. 공유 라이브러리(Shared Library)”를 참고한다.
- license
-
JEUS 라이선스 파일이 위치한다. 라이선스 파일은 JEUS가 실행되기 위해서 반드시 필요한 파일이다.
- nodemanager
-
JEUS 노드 매니저를 위한 설정 파일인 jeusnm.xml 파일이 위치한다.
- setup
-
JEUS 설치 후 사용할 수 있도록 환경을 구축하기 위해 필요한 파일들이 위치한다.
- templates
-
각종 설정과 환경 등의 template 파일이 위치한다.
- samples
-
JEUS의 예제 파일들이 위치한다.
- webserver
-
JEUS가 설치될 때 JEUS 웹 서버가 설치되는 디렉터리이다. 자세한 내용은 "JEUS Web Engine 안내서"를 참조한다.
- domains
-
하위에 도메인별로 DOMAIN_HOME과 JEUS_HOME에서 사용하는 노드 정보가 포함된 nodes.xml이 존재한다.
다음의 디렉터리 및 파일들은 DOMAIN_HOME 아래에 위치한다.
-
해당 도메인에서 관리하는 애플리케이션 파일이 존재한다.
install-application, uninstall-application 명령을 통해서만 추가 및 삭제가 가능한다. JEUS가 사용하는 디렉터리로 사용자의 접근을 제한한다. 각 명령어에 대한 설명은 “JEUS Reference Book”의 “4.2.6.7. install-application”, “JEUS Reference Book”의 “4.2.6.16. uninstall-application”을 참고한다.
-
해당 도메인에서 관리하는 Deployment Plan 파일이 존재한다.
install-deployment-plan, uninstall-deployment-plan 명령을 통해서만 추가 및 삭제가 가능한다. JEUS가 사용하는 디렉터리로 사용자의 접근을 제한한다. 각 명령어에 대한 설명은 “JEUS Reference Book”의 “4.2.6.8. install-deployment-plan”, “JEUS Reference Book”의 “4.2.6.17. uninstall-deployment-plan”을 참고한다.
-
해당 도메인에서 관리하는 라이브러리 파일이 존재한다.
install-application, uninstall-application 명령을 통해서만 추가 및 삭제가 가능한다. JEUS가 사용하는 디렉터리로 사용자의 접근을 제한한다. 각 명령어에 대한 설명은 “JEUS Reference Book”의 “4.2.6.7. install-application”, “JEUS Reference Book”의 “4.2.6.16. uninstall-application”을 참고한다.
-
해당 도메인에 속한 DAS와 MS의 시작 및 종료 스크립트가 위치한다. JEUS_HOME/bin의 startDomainAdminServer, startManagedServer, stopServer와 동일한 기능을 수행하지만 도메인 이름을 설정할 필요가 없다.
-
도메인의 설정 파일인 domain.xml이 변경된 경우 이전 이력을 위해 존재하는 백업 파일들이 위치한다. 도메인 설정에 대한 자세한 설명은 “JEUS Domain 안내서”의 “제3장 도메인 설정변경”을 참고한다.
구분 설명 security -
SYSTEM_DOMAIN : 도메인 단위로 적용되는 보안 도메인 파일인 accounts.xml, policies.xml이 존재하며, 각 XML 파일은 WebAdmin과 jeusadmin을 통해 동적 설정 변경이 가능하다. 보안 도메인 설정에 대한 자세한 설명은 “JEUS Security 안내서”의 “2.2. 보안 도메인 정의”를 참고한다.
-
security.key : 대칭키 암호화 알고리즘에 대한 Key를 저장하는 파일로 JEUS_HOME/bin/encryption을 수행하면 생성된다. security.key 파일에 대한 자세한 설명은 “JEUS Security 안내서”의 “2.5.4. 패스워드 보안 설정”을 참고한다.
-
policy : Java permission 설정 파일이다. JEUS의 보안 시스템과는 별도로 Java SE Security Manager에서 사용된다.
servlet -
web.xml : web.xml을 개별적으로 가지고 있지 않은 경우 웹 엔진이 사용할 웹 모듈의 web.xml이다. 기본값은 빈 XML 파일이다.
-
webcommon.xml : 도메인 내 서버의 웹 엔진의 모든 웹 모듈에 적용되는 공통 설정 파일이다. 설정에 대한 자세한 설명은 “JEUS Web Engine 안내서”의 “1.5. 디렉터리 구조”를 참고한다.
-
-
도메인 전체에 적용하고 싶은 애플리케이션 라이브러리를 위치시키는 디렉터리다.
SERVER_HOME에 존재하는 애플리케이션 라이브러리와 충돌이 발생할 경우 SERVER_HOME/lib/application이 우선되고 경고 메시지가 남는다. lib/application 디렉터리에 대한 자세한 설명은 “JEUS Applications & Deployment 안내서”의 “3.3.1. lib/application 디렉터리”를 참고한다.
-
이 디렉터리 하위에 SERVER_HOME 디렉터리가 서버 이름으로 생성된다. SERVER_HOME 디렉터리 구조에 대한 자세한 설명은 “JEUS Server 안내서”의 “1.5. 서버 디렉터리 구조”를 참고한다.
디렉터리 설명 .workspace JEUS가 사용하는 서버별 공간으로 사용자가 변경해서는 안 된다. bin 서버의 시작/종료 스크립트를 포함하고 있다. JEUS_HOME/bin의 스크립트와 동일한 기능을 수행하지만 도메인 이름과 서버 이름을 설정할 필요가 없다.
-
DAS일 경우 : startDomainAdminServer/stopServer가 존재한다.
-
MS일 경우 : startManagedServer/stopserver가 존재한다.
lib/application 서버에 적용하고 싶은 애플리케이션 라이브러리가 존재한다. 도메인 범위의 라이브러리(DOMAIN_HOME/lib/application)보다 우선순위가 높다. 라이브러리가 충돌할 경우 이 디렉터리에 존재하는 파일이 적용되며 경고 메시지가 남는다.
lib/application에 대한 자세한 설명은 “JEUS Applications & Deployment 안내서”의 “3.3.1. lib/application 디렉터리”를 참고한다.
logs 서버의 Launcher 로그, 서버 로그, 엑세스 로그 파일이 남는다. 자세한 내용은 “JEUS Server 안내서”의 “제8장 Logging”을 참고한다. nodemanager 노드 매니저가 재기동할 때 관리하고 있던 서버였는지를 판단하기 위한 정보를 저장하는 디렉터리이다. JEUS가 사용하는 디렉터리로 사용자의 접근을 제한한다. -
-
JEUS를 사용하기 위해서는 환경변수가 필요하다. 설치 과정에서 일부 환경변수를 설정하지만 경우에 따라서는 수정해서 사용한다. 해당 변수들은 설치할 때 환경변수 PATH는 .profile/.cshrc에 적용되고, 그 외 환경변수는 $JEUS_HOME/bin/jeus.properties 파일에 설정된다.
다음은 주요 환경변수에 대한 설명이다.
| 환경변수 | 의미 |
|---|---|
| PATH | 시스템 경로를 설정한다. 다음을 포함하고 있어야 한다.
|
| JEUS_HOME | JEUS 설치 디렉터리를 설정한다. (예: /home/jeus) |
| JEUS_LIBPATH | JEUS 라이브러리 파일 경로를 설정한다. (예: /home/jeus/lib/system) |
| VM_TYPE | Java HotSpot JVM 사용 유무를 설정한다. (예: hotspot or old) |
| USERNAME | Administrator 계정의 ID를 설정한다. |
| PASSWORD | Administrator 패스워드를 설정한다. |
| JAVA_HOME | JDK 설치 디렉터리 경로를 설정한다. (예: /usr/jdk1.7) |
| JAVA_ARGS | JDK 파라미터를 설정한다. |
| JAVA_VENDOR | JDK 벤더를 설정한다. (예: Sun, IBM, HP) |
환경변수를 설정할 때 C 셸이라면 JEUS_HOME 변수를 설정하기 위해서는 ‘setenv’를 사용한다.
setenv JEUS_HOME “/home/jeus”
다음은 시스템 PATH 설정하는 예이다.
setenv PATH “${PATH}:/home/jeus/bin:
/home/jeus/lib/system”
참고
Java의 실행 디렉터리(/usr/jdk1.7/bin)는 JEUS에서 사용하게 되므로 환경변수에 추가할 때는 앞 쪽에 추가하도록 한다.
위의 사항을 검증한 후에 로그오프하고 그 다음에 환경을 적용하기 위하여 다시 로그인한다.
JEUS 설치가 정상적으로 완료되었는지 확인하기 위해 다음 단계를 진행해서 JEUS를 기동한다.
-
콘솔 프롬프트에 startDomainAdminServer를 입력하면 다음 메시지를 출력한다. -p 뒤에는 설치할 때 입력한 패스워드를 입력한다.
[was@localhost ~]$ startDomainAdminServer -u administrator -p <password>
[was@localhost ~]$ startDomainAdminServer -u administrator -p 1111111
***************************************************************
  - JEUS Home         : /home/was/jeus8
  - Java Vendor       : Sun
  - Added Java Option :
***************************************************************
+ /usr/java/jdk1.7.0_80/bin/java -server -Xmx512m -Xbootclasspath/p:/home/was/jeus8/lib/system/extension.jar -classpath /home/was/jeus8/lib/system/bootstrap.jar
-Dsun.rmi.dgc.client.gcInterval=3600000
-Dsun.rmi.dgc.server.gcInterval=3600000
-Djava.library.path=/home/was/jeus8/lib/system
-Djava.endorsed.dirs=/home/was/jeus8/lib/endorsed
-Djava.naming.factory.initial=jeus.jndi.JNSContextFactory
-Djava.naming.factory.url.pkgs=jeus.jndi.jns.url
-Djava.net.preferIPv4Stack=true
-Djava.util.logging.manager=jeus.util.logging.JeusLogManager
-Djava.util.logging.config.file=/home/was/jeus8/bin/logging.properties
-Djeus.home=/home/was/jeus8 -Djeus.jvm.version=hotspot
-Djeus.tm.checkReg=true
-Djeus.properties.replicate=jeus,sun.rmi,java.util,java.net jeus.server.LauncherBootstrapper -u administrator -p <password>


================ JEUS LICENSE INFORMATION ================
=== VERSION : JEUS 8 (8.0.0.0-b83)
=== EDITION: Enterprise (Trial License)
=== NOTICE: This license restricts the number of allowed clients.
=== Max. Number of Clients: 5
==========================================================

This license is not appropriate for product runtime mode. Replace the license with an appropriate one.
[2016.12.28 13:51:50][2] [launcher-1] [Launcher-0012] Starting the server [adminServer] with the command
/usr/java/jdk1.7.0_80/bin/java
-DadminServer -Xmx1024m -XX:MaxPermSize=128m -server -Xbootclasspath/p:/home/was/jeus8/lib/system/extension.jar -classpath /home/was/jeus8/lib/system/bootstrap.jar
-Djava.security.policy=/home/was/jeus8/domains/jeus_domain/config/security/policy
-Djava.library.path=/home/was/jeus8/lib/system
-Djava.endorsed.dirs=/home/was/jeus8/lib/endorsed
-Djeus.properties.replicate=jeus,sun.rmi,java.util,java.net
-Djeus.jvm.version=hotspot -Djava.util.logging.config.file=/home/was/jeus8/bin/logging.properties
-Dsun.rmi.dgc.server.gcInterval=3600000
-Djava.util.logging.manager=jeus.util.logging.JeusLogManager
-Djeus.home=/home/was/jeus8 -Djava.net.preferIPv4Stack=true
-Djeus.tm.checkReg=true -Dsun.rmi.dgc.client.gcInterval=3600000
-Djeus.domain.name=jeus_domain
-Djava.naming.factory.initial=jeus.jndi.JNSContextFactory
-Djava.naming.factory.url.pkgs=jeus.jndi.jns.url
-Djeus.server.protectmode=false -XX:+UnlockDiagnosticVMOptions -XX:+LogVMOutput -XX:LogFile=/home/was/jeus8/domains/jeus_domain/servers/adminServer/logs/jvm.log
 jeus.server.admin.DomainAdminServerBootstrapper -u administrator -domain jeus_domain -server adminServer .
[2016.12.28 13:51:50][2] [launcher-1] [Launcher-0014] The server[adminServer] is being started ...
[2016.12.28 13:51:59][0] [adminServer-1] [SERVER-0000] Version information - JEUS 8 (8.0.0.0-b83).

... 중략

[2016.12.28 13:52:07][2] [adminServer-1] [SERVER-0248] The JEUS server is STANDBY.
[2016.12.28 13:52:07][2] [adminServer-1] [SERVER-0248] The JEUS server is STARTING.
[2016.12.28 13:52:07][2] [adminServer-1] [WEB-3413] The web engine is ready to receive requests.
[2016.12.28 13:52:07][2] [adminServer-1] [UNIFY-0100] Listener information
        BASE (plain, 0.0.0.0 : 9736) - VIRTUAL
                                         - JMXConnectionServer/JEUSMP_adminServer
                                         - JNDI
                                         - JMXConnectionServer/JeusMBeanServer
                                         - ClassFTP
                                         - FileTransfer
                                         - TransactionManager
                                         - SecurityServer
                                         - BootTimeFileTransfer
                                     - HTTP
 http-server (plain, 0.0.0.0 : 8808) - HTTP
jms-internal (plain, 0.0.0.0 : 9941) - VIRTUAL
                                         - JMSServiceChannel-internal

[2016.12.28 13:52:07][2] [launcher-10] [Launcher-0034] The server[adminServer] initialization completed successfully[pid : 24542].
[2016.12.28 13:52:07][0] [launcher-1] [Launcher-0040] Successfully started the server. The server state is now RUNNING.
위 출력은 JEUS DAS가 정상적으로 부트되는 과정을 보여주며 기동이 완료되면 "Successfully started the server. The server state is now RUNNING."라는 메시지가 출력된다.
참고
1. “Invalid License” 메시지가 나타나면 라이선스가 잘못된 것이다. TmaxSoft로부터 라이선스를 취득하여 $JEUS_HOME/license 디렉터리에 복사한다.
2. 모든 단계들의 진행과 환경변수가 정확히 설정되어 있는지 확인한다. 특히, /jeus/bin 디렉터리가 시스템 경로(startDomainAdminServer 스크립트가 실행될 수 있도록)에 있는 것을 확인한다.
-
콘솔 프롬프트에 startManagedServer를 입력하면 다음 메시지를 출력한다. -p 뒤에는 설치할 때 입력한 패스워드를 입력한다.
[was@localhost ~]$ startManagedServer -domain jeus_domain -server server1 -u administrator -p <password>
***************************************************************
  - JEUS Home         : /home/was/jeus8
  - JEUS Base Port    :
  - Java Vendor       : Sun
  - Added Java Option :
***************************************************************
+ /usr/java/jdk1.7.0_80/bin/java -server -Xmx512m -Xbootclasspath/p:/home/was/jeus8/lib/system/extension.jar -classpath /home/was/jeus8/lib/system/bootstrap.jar
 -Dsun.rmi.dgc.client.gcInterval=3600000
-Dsun.rmi.dgc.server.gcInterval=3600000
-Djava.library.path=/home/was/jeus8/lib/system
-Djava.endorsed.dirs=/home/was/jeus8/lib/endorsed
-Djava.naming.factory.initial=jeus.jndi.JNSContextFactory
-Djava.naming.factory.url.pkgs=jeus.jndi.jns.url
-Djava.net.preferIPv4Stack=true -Djava.util.logging.manager=jeus.util.logging.JeusLogManager
-Djava.util.logging.config.file=/home/was/jeus8/bin/logging.properties
-Djeus.home=/home/was/jeus8 -Djeus.jvm.version=hotspot
-Djeus.tm.checkReg=true -Djeus.properties.replicate=jeus,sun.rmi,java.util,java.net jeus.server.ManagedServerLauncherBootstrapper -domain jeus_domain -server server1 -u administrator -p <password>

================ JEUS LICENSE INFORMATION ================
=== VERSION : JEUS 8 (8.0.0.0-b83)
=== EDITION: Enterprise (Trial License)
=== NOTICE: This license restricts the number of allowed clients.
=== Max. Number of Clients: 5
==========================================================
This license is not appropriate for product runtime mode. Replace the license with an appropriate one.
[2016.12.28 14:11:33][0] [launcher-1] [Launcher-0054] Starting the server using the local configuration.
[2016.12.28 14:11:33][2] [launcher-1] [Launcher-0012] Starting the server [server1] with the command
/usr/java/jdk1.7.0_80/bin/java -Dserver1 -Xmx1024m -XX:MaxPermSize=128m -server -Xbootclasspath/p:/home/was/jeus8/lib/system/extension.jar -classpath /home/was/jeus8/lib/system/bootstrap.jar
-Djava.security.policy=/home/was/jeus8/domains/jeus_domain/config/security/policy
-Djava.library.path=/home/was/jeus8/lib/system
-Djava.endorsed.dirs=/home/was/jeus8/lib/endorsed
-Djeus.properties.replicate=jeus,sun.rmi,java.util,java.net
-Djeus.jvm.version=hotspot
-Djava.util.logging.config.file=/home/was/jeus8/bin/logging.properties
-Dsun.rmi.dgc.server.gcInterval=3600000
-Djava.util.logging.manager=jeus.util.logging.JeusLogManager
-Djeus.home=/home/was/jeus8
-Djava.net.preferIPv4Stack=true
-Djeus.tm.checkReg=true
-Dsun.rmi.dgc.client.gcInterval=3600000
-Djeus.domain.name=jeus_domain
-Djava.naming.factory.initial=jeus.jndi.JNSContextFactory
-Djava.naming.factory.url.pkgs=jeus.jndi.jns.url
-Djeus.server.protectmode=false -XX:+UnlockDiagnosticVMOptions -XX:+LogVMOutput -XX:LogFile=/home/was/jeus8/domains/jeus_domain/servers/server1/logs/jvm.log
jeus.server.ServerBootstrapper -domain jeus_domain -server server1 -u administrator -independent .
[2016.12.28 14:11:33][2] [launcher-1] [Launcher-0014] The server[server1] is being started ...
[2016.12.28 14:11:37][0] [server1-1] [SERVER-0000] Version information - JEUS 8 (8.0.0.0-b83).


... 중략

[2016.12.28 14:11:49][2] [server1-1] [WEB-3484] ServletContext[name=examples#welcome, path=/, ctime=Wed Dec 28 14:11:46 KST 2016] started successfully.
[2016.12.28 14:11:49][2] [server1-1] [Deploy-0404] Successfully started the module [welcome.war] in the EAR [examples].
[2016.12.28 14:11:49][2] [server1-1] [Deploy-0099] Successfully started the application[examples].
[2016.12.28 14:11:49][2] [launcher-10] [Launcher-0034] The server[server1] initialization completed successfully[pid : 25468].
[2016.12.28 14:11:49][0] [launcher-1] [Launcher-0040] Successfully started the server. The server state is now RUNNING.
위 출력은 JEUS MS가 정상적으로 부트되는 과정을 보여주며 기동이 완료되면 "Successfully started the server. The server state is now RUNNING."라는 메시지가 출력된다.
참고
JEUS MS가 정상적으로 부트되면 examples가 deploy되는데 이를 확인하기 위해서는 웹 브라우저에서 "http://localhost:8088/examples/"을 호출한다.
-
다른 콘솔 창에서 다음의 명령어를 실행한다. -p 다음에는 설치할 때 입력한 패스워드를 입력한다. 일반적으로 관리자의 계정은 'administrator'이고 패스워드는 JEUS를 설치할 때 입력한 값이다.
[was@localhost ~]$ jeusadmin -u administrator -p <password> Attempting to connect to 127.0.0.1:9736. The connection has been established to Domain Administration Server adminServer in the domain jeus_domain. JEUS8 Administration Tool To view help, use the 'help' command. [DAS]jeus_domain.adminServer> -
잠시 후 프롬프트가 다시 뜨면 JEUS가 제대로 기동되었고, 다시 명령어를 받을 수 있는 상태가 되었다는 것을 나타낸다.
-
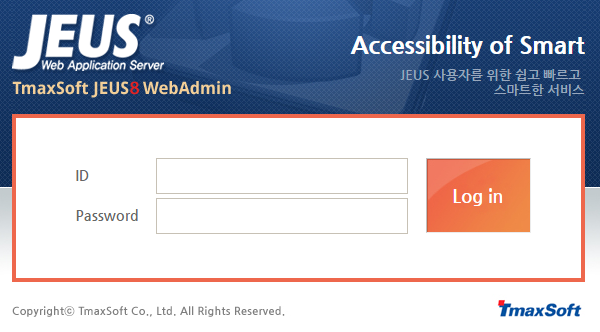
웹 브라우저를 열어서 주소 창에 다음의 주소를 입력한다.
http://localhost:9736/webadmin -
JEUS 관리자의 계정과 패스워드를 입력하고 [Login] 버튼을 클릭한다. 일반적으로 관리자의 계정은 'administrator'이고 패스워드는 JEUS를 설치할 때 입력한 값이다.
-
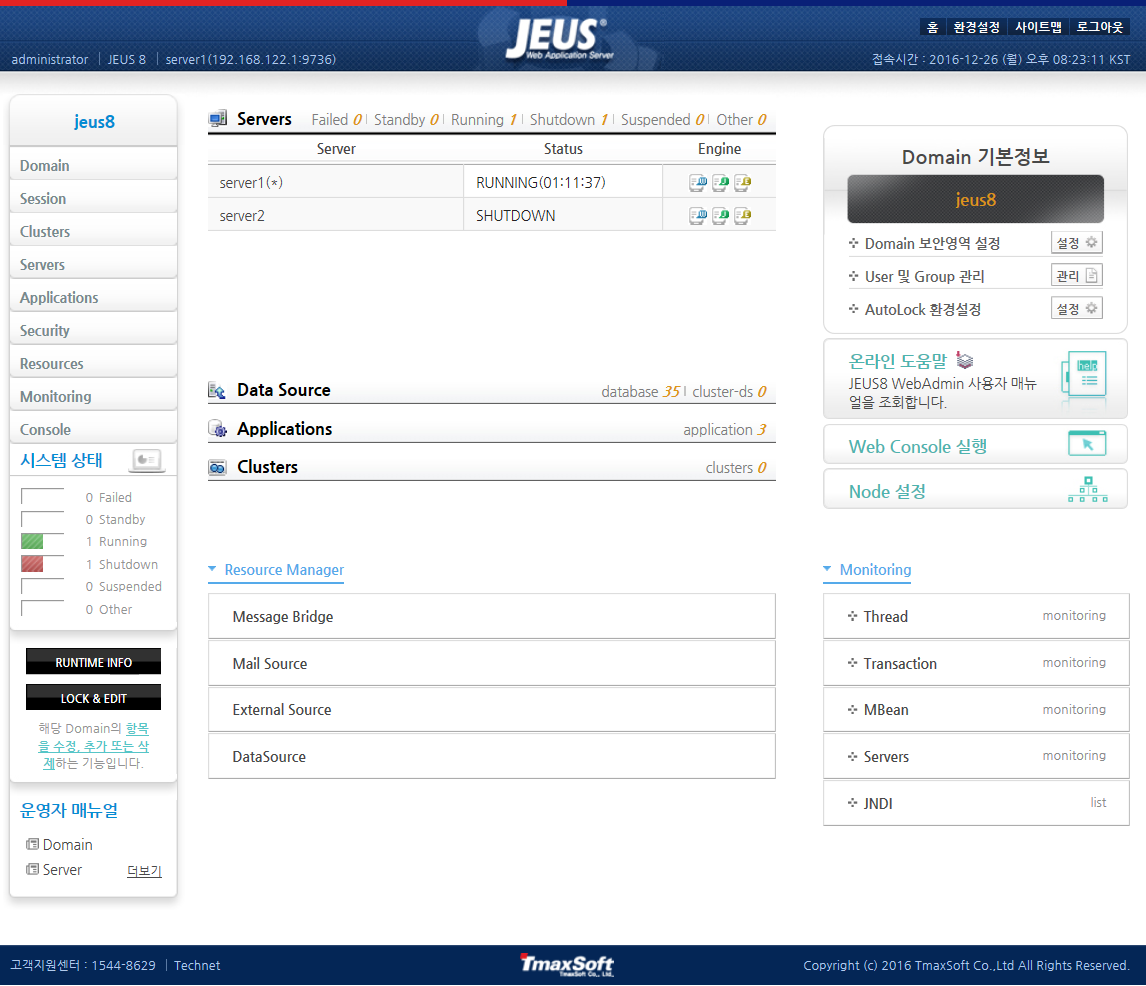
WebAdmin을 통해서 JEUS를 관리할 수 있다.
-
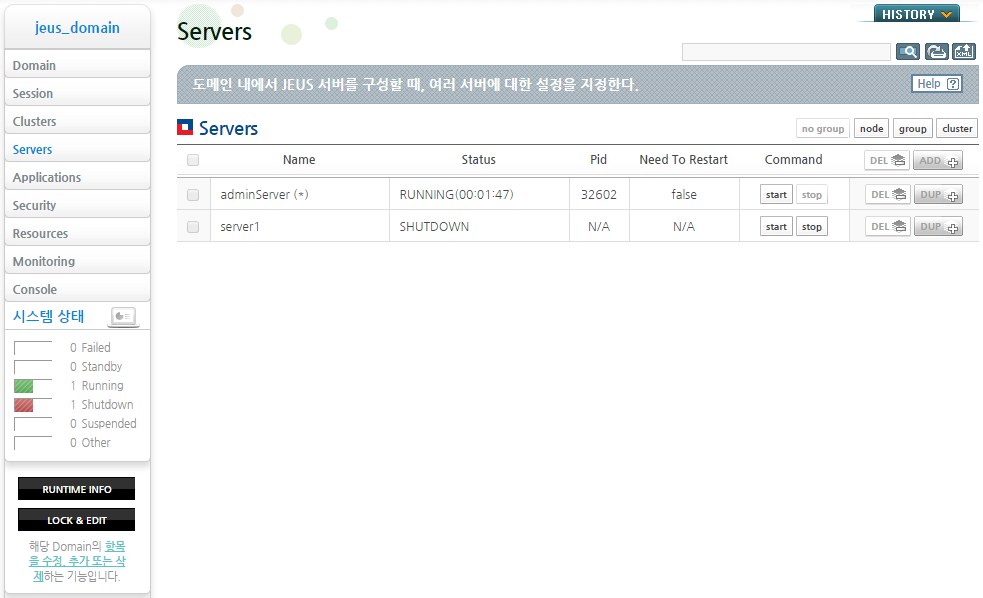
JEUS Managed Server를 기동하거나 중지하려면 왼쪽 메뉴에서 [Servers]를 선택하면, Servers 화면에서 서버 목록이 조회된다. 서버 목록에서 [start] 또는 [stop] 버튼을 클릭하면 해당 서버를 기동하거나 중지시킬 수 있다. 이때 서버에는 노드 매니저가 실행되어 있거나 SSH 설정이 되어 있어야 하며, UNIX/Linux 계열의 장비에서만 사용이 가능하다. 자세한 내용은 "JEUS Node Manager 안내서"를 참고한다.
-
jeusadmin 툴에 로그인을 한 후에 local-start-server와 local-shutdown 명령으로 JEUS 서버를 제어할 수 있다.
JEUS 서버를 다운시키려면 local-shutdown 명령을 실행한다.
[DAS]jeus_domain.adminServer>local-shutdown The server [adminServer] has been shut down successfully. -
jeusadmin을 종료하기 위해서 exit 명령을 실행한다.
exit
본 절에서는 GUI 모드와 콘솔 모드에서 제거하는 과정에 대해서 설명한다.
다음은 GUI 모드에서 JEUS를 삭제하는 과정에 대한 설명이다. GUI 모드로 삭제가 가능하지 않다면 “5.4.2. 콘솔 모드에서 제거”를 참고한다. UNIX에서 GUI 설치 툴을 이용하기 위해서는 Java 기반의 GUI 환경을 지원하는 콘솔 또는 터미널이 설치되어 있어야 한다.
-
‘jeus’ 스크립트와 WebAdmin 등의 모든 JEUS 프로그램을 종료한다.
-
JEUS가 설치된 경로에서 $JEUS_HOME/UninstallerData/Uninstall -i GUI 명령을 실행한다.
[jeususer@matrix UninstallerData]$./Uninstall -i GUI -
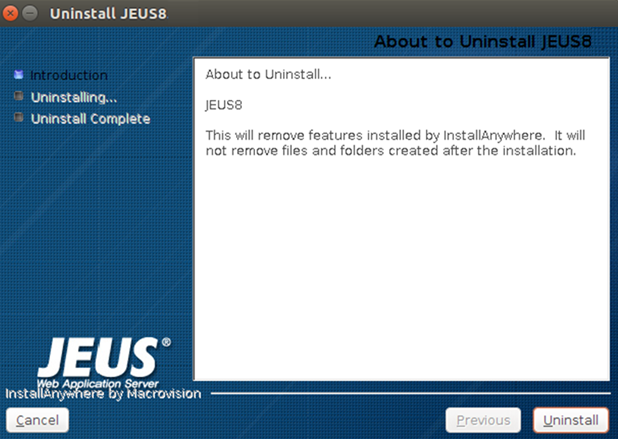
다음과 같은 설치제거 초기 화면이 나타난다.
-
제거 화면의 메시지를 읽고 JEUS 제거 준비가 되었다면 [Uninstall] 버튼을 클릭한다. JEUS를 제거하지 않고 프로그램을 종료하려면 [Cancel] 버튼을 클릭한다.
참고
제거 프로그램으로 제거하여도 JEUS 설치 후에 생성된 파일들은 제거되지 않는다. 이 파일들은 수동으로 제거해야 한다.
-
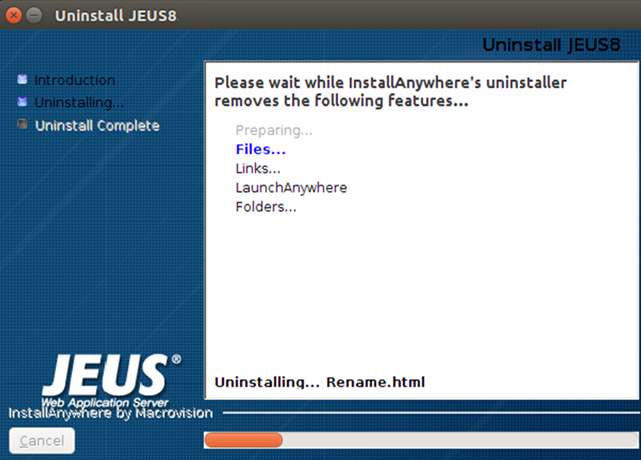
JEUS 제거가 진행되는 것을 확인한다.
-
JEUS 제거 종료를 확인하고 [Done] 버튼을 클릭하여 JEUS 제거를 완료한다.

다음은 콘솔 모드에서 JEUS를 삭제하는 과정에 대한 설명이다.
-
JEUS가 설치된 경로에서 $JEUS_HOME/UninstallerData/Uninstall을 실행하여 JEUS Core와 JEUS 설치 디렉터리를 삭제한다.
[was@localhost ~ UninstallerData]$./Uninstall -
삭제 과정이 진행된다. 제거가 완료되면 제거가 완료되었다는 메시지가 표시된다.
Preparing CONSOLE Mode Installation...

===============================================================================
JEUS8                           (created with InstallAnywhere by Macrovision)
-------------------------------------------------------------------------------

===============================================================================
Uninstall JEUS8
-----------------

About to uninstall...

JEUS8

This will remove features installed by InstallAnywhere.  It will not remove
files and folders created after the installation.

PRESS <ENTER> TO CONTINUE:

===============================================================================
Uninstalling...
---------------
...*
*
*************************
*************************
*************************
************************
...*
*
*************************
*************************
*************************
************************

...

===============================================================================
Uninstallation Complete
------------------

All items were successfully uninstalled.