Table of Contents
- 4.1. Application Implementation
- 4.2. Deployment Commands
- 4.3. Controlling and Monitoring Applications with WebAdmin
- 4.3.1. Installing Applications on a Domain
- 4.3.2. Uninstalling Applications From a Domain
- 4.3.3. Deploying Applications
- 4.3.4. Redeploying Applications
- 4.3.5. Undeploying Applications
- 4.3.6. Starting Applications
- 4.3.7. Suspending Applications
- 4.3.8. Adding a Server as a Target of Running Applications
- 4.3.9. Removing a Target Server of Running Applications
- 4.3.10. Checking for Information about Applications
- 4.4. Stage Mode Deployment
- 4.5. Application Deployment by Using a Deployment Plan
- 4.5.1. Configuring a Deployment Plan and Operation Methods
- 4.5.2. Installing a Deployment Plan
- 4.5.3. Verifying an Installed Deployment Plan
- 4.5.4. Deployment Using a Deployment Plan
- 4.5.5. Verifying an Application-Applied Deployment Plan
- 4.5.6. Uninstalling a Deployment Plan
- 4.5.7. Redeploying a Deployment Plan
This chapter describes how to write Java EE application files (EAR files) and deploy them on JEUS. It also explains how to deploy applications and handle related jobs by using tools provided by JEUS.
This section describes how to write a JAVA EE application, which includes the already created modules from the previous sections, using the 'jar' utility.
Before writing an EAR file, create modules that need to be included in the file. The modules can be EJB modules (JAR files), web application modules (war files), application client modules (JAR files), or resource adapter modules (rar files). For information about how to create each module, refer to their relevant guides.
Descriptions of myApp.ear, the application shown in this section, are as follows:
-
myApp.ear is an EAR file which includes the EJB module ejb.jar, the web application module web.war, and the application client module appclient.jar.
-
myApp.ear should be installed on DAS adminServer, and then deployed on the server named server1.
The following is the process of creating an application:
-
Create JAR, WAR, and RAR files to be included in the EAR file.
-
Create the META-INF directory, where the directory, which includes JAR, WAR, and RAR files, resides.
-
Create application.xml file, which includes the modules of the EAR file and copy it to the META-INF directory.
[Example 4.1] <<application.xml>>
<?xml version="1.0" encoding="UTF-8"?>
<application version="7"
    xmlns="http://xmlns.jcp.org/xml/ns/javaee"
    xmlns:xsi="http://www.w3.org/2001/XMLSchema-instance"
    xsi:schemaLocation="http://xmlns.jcp.org/xml/ns/javaee
        http://xmlns.jcp.org/xml/ns/javaee/application_7.xsd">
    <description>Application description</description>
    <display-name>Sample application</display-name>
    <module>
        <ejb>ejb.jar</ejb>
    </module>
    <module>
        <web>
            <web-uri>web.war</web-uri>
            <context-root>hello</context-root>
        </web>
    </module>
    <module>
        <java>appclient.jar</java>
    </module>
</application>
-
Run the following command using the jar utility to create the myApp.ear file.
> jar cf myApp.ear ejb.jar web.war appclient.jar META-INF
WebAdmin and the console tool support the following deployment jobs.
JEUS supports the following deployment-related tasks using WebAdmin and console tool:
This chapter describes how to control and manage applications using WebAdmin and a console tool.
WebAdmin is a web-based management tool used to manage JEUS.
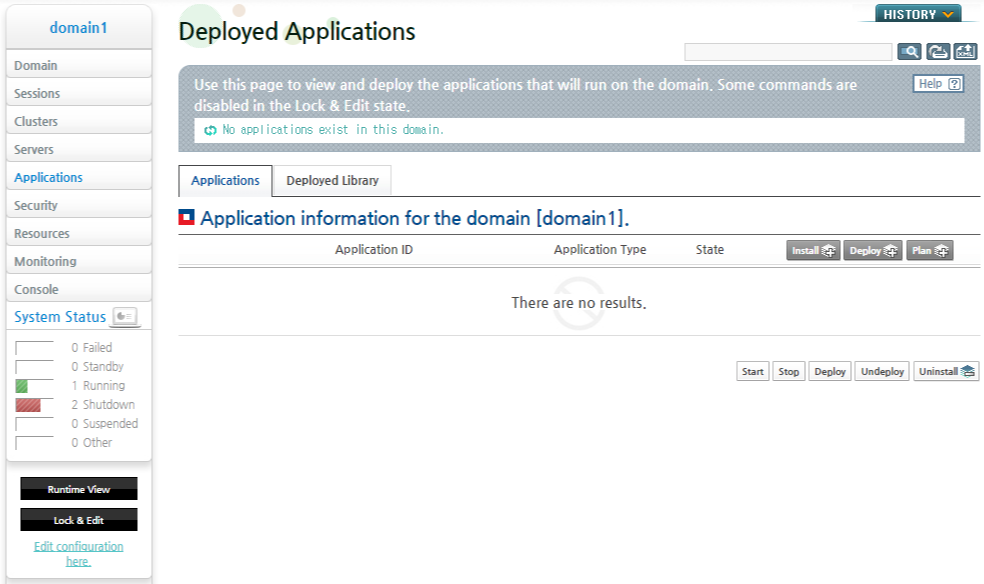
To view the Deployed Application screen, where the applications on a domain can be managed, select [Applications] from the left menu in WebAdmin. Start from this screen to deploy an application, to install a new application on the domain, or to search for application information.
The following describes how to use WebAdmin to install, deploy, and search myApp.ear, which was described in the previous chapter.
Note
Jobs, to control the applications, such as deployment, distribution, undeployment, starting, and stopping, can be handled, only when the lock to modify settings has not been applied to the domain. If the lock has been applied to the domain with [Lock & Edit], apply all modified settings by clicking [Apply Changes], or cancel the modified settings by clicking [Undo ALL changes], and then proceed to process the application control jobs.
The following is the process of installing an application on a domain:
-
To view the Deployed Application screen, select [Applications] from the left menu in WebAdmin. On this screen, you can check the information about applications, which exist on the corresponding domain. Click [install] above the list of applications, to go to the screen to install a new application on the domain.
-
Enter information, such as application ID and the file path, about the application to be installed, and then click [OK].
Descriptions for each item are as follows:
Item Description Id ID, which is assigned to an application to be installed. If this option is not specified, an ID is created using the application name. However, for management purposes, it is recommended to specify an ID. Path Path of application files to be installed. The application files can be selected clicking on [Browse...]. Force Option to overwrite an application with an ID, which is the same as the ID of the application to be installed. When an already deployed application is modified, this option can be used to update the application files. Upgrade Option to specify whether to change to the JEUS DD for JEUS 7.x, if currently using the DD for JEUS 6.x or earlier version. -
When installation is completed, the result is displayed on the top. If the installing job is successfully completed, the application will be displayed in the application list. The status of the application is in the INSTALLED state.
An application can be removed from a domain, if the application is no longer being used. Applications, in the INSTALLED or DEPLOYED states, can be uninstalled.
The following is the process of uninstalling an application from a domain:
-
To view the Deployed Application screen, select [Applications] from the left menu in WebAdmin. Choose an application to delete and click [uninstall] at the bottom of the application list.
-
When [uninstall] is clicked, the following message screen will appear. To execute the uninstall job, click the [OK] button. If the [Cancel] button is clicked, the job will be cancelled, and the application state remains in the INSTALLED state.
-
When uninstallation is completed, the result is displayed on the top. If the uninstalling job is completed successfully, the application will no longer be displayed in the application list.
An installed application can be run using the deploy command. There are three ways to deploy applications.
The following is assumed in describing how to execute runtime deployment using a console tool:
-
MyApp.ear described in "4.1. Application Implementation" is used.
-
JEUS domain name is 'domain1,' and the name of the server where the application will be deployed is 'server1.'
Note
For detailed information about options for the deploy-application command, refer to JEUS Reference Book. "4.2.6.4. deploy-application".
JEUS provides three methods for runtime deployment through the console tool, according to the location where an application resides. Each method deploys an application in this order: deploy, stop, start, redeploy, and undeploy commands. After executing each command, applist is executed to check the status of the application in each step.
JEUS console tool can be used to connect to DAS to manage servers and clusters and deploy applications.
The following are console tool commands that are related to application deployment.
Note
For detailed information about console tool commands, refer to JEUS Reference Book. "4.2. jeusadmin".
Using WebAdmin
The following is the process of deploying an application on a domain:
-
To view the Deployed Application screen, select [Applications] from the left menu in WebAdmin. Choose an application to deploy from the application list, and then click [deploy].
-
Select a server where the application will be deployed, for the 'Server' field, and then click [OK].
To distribute the application, without deploying it, select the 'Only Distribute' check box and then click [OK]. In this case, a start job is additionally required to run the application.
-
When deployment is completed, the result is displayed on the top. If the deployment completes successfully, the application displayed in the application list will be in the RUNNING state. If only the distributing job is executed, the application will be in the DISTRIBUTED state.
Using the Console Tool
To install an application, use the install-application command, which places the application in the INSTALL_HOME (DOMAIN_HOME/.applications) directory.
When installing an application, the application ID can be assigned with an option. When an ID is not assigned, 'myApp_ear' becomes the application ID. After an application has been installed, it can be deployed on the target servers using the deploy-application command.
----------------------------------------------------------------
 using deploy command for application with install application
----------------------------------------------------------------
[DAS]domain1.adminServer>install-application -id myApp /usr/apphome/myApp.ear
Successfully installed the application [myApp].

[DAS]domain1.adminServer>application-info
Application information for the domain [domain1].
================================================================================
+----------+-----------+-------+----------+-----------+------------------------+
| Applicati|Application| State |  Server  |  Cluster  |    Application Path    |
|  on ID   |   Type    |       | Targets  |  Targets  |                        |
+----------+-----------+-------+----------+-----------+------------------------+
| myApp    |           | INSTAL|          |           | ${INSTALL_HOME}/myApp/m|
|          |           |LED    |          |           |yApp.ear                |
+----------+-----------+-------+----------+-----------+------------------------+
================================================================================

[DAS]domain1.adminServer>deploy myApp -servers server1
deploy the application for the application [myApp] succeeded.

[DAS]domain1.adminServer>application-info
Application information for the domain [domain1].
================================================================================
+----------+------------+---------+----------+-----------+---------------------+
| Applicati| Application|  State  |  Server  |  Cluster  |   Application Path  |
|  on ID   |    Type    |         | Targets  |  Targets  |                     |
+----------+------------+---------+----------+-----------+---------------------+
| myApp    | EAR        | RUNNING | server1  |           | ${INSTALL_HOME}/myAp|
|          |            |         |          |           |p/myApp.ear          |
+----------+------------+---------+----------+-----------+---------------------+
================================================================================

[DAS]domain1.adminServer>stop-application myApp
stop the application for the application [myApp] succeeded.

[DAS]domain1.adminServer>application-info
Application information for the domain [domain1].
================================================================================
+----------+-----------+--------+----------+----------+------------------------+
| Applicati|Application|  State |  Server  |  Cluster |    Application Path    |
|  on ID   |   Type    |        | Targets  | Targets  |                        |
+----------+-----------+--------+----------+----------+------------------------+
| myApp    | EAR       | DISTRIB| server1  |          | ${INSTALL_HOME}/myApp/m|
|          |           |UTED    |          |          |yApp.ear                |
+----------+-----------+--------+----------+----------+------------------------+
================================================================================

[DAS]domain1.adminServer>start-application myApp
start the application for the application [myApp] succeeded.

[DAS]domain1.adminServer>application-info
Application information for the domain [domain1].
================================================================================
+----------+------------+---------+----------+-----------+---------------------+
| Applicati| Application|  State  |  Server  |  Cluster  |   Application Path  |
|  on ID   |    Type    |         | Targets  |  Targets  |                     |
+----------+------------+---------+----------+-----------+---------------------+
| myApp    | EAR        | RUNNING | server1  |           | ${INSTALL_HOME}/myAp|
|          |            |         |          |           |p/myApp.ear          |
+----------+------------+---------+----------+-----------+---------------------+
================================================================================

[DAS]domain1.adminServer>redeploy-application myApp
redeploy application on das for the application [myApp] succeeded.

[DAS]domain1.adminServer>application-info
Application information for the domain [domain1].
================================================================================
+----------+------------+---------+----------+-----------+---------------------+
| Applicati| Application|  State  |  Server  |  Cluster  |   Application Path  |
|  on ID   |    Type    |         | Targets  |  Targets  |                     |
+----------+------------+---------+----------+-----------+---------------------+
| myApp    | EAR        | RUNNING | server1  |           | ${INSTALL_HOME}/myAp|
|          |            |         |          |           |p/myApp.ear          |
+----------+------------+---------+----------+-----------+---------------------+
================================================================================

[DAS]domain1.adminServer>undeploy myApp
Undeploying [myApp] (This may take time due to graceful undeployment) ..........
undeploy the application for the application [myApp] succeeded.
successfully undeployed (elapsed = 415ms)

[DAS]domain1.adminServer>application-info
Application information for the domain [domain1].
================================================================================
+----------+-----------+-------+----------+-----------+------------------------+
| Applicati|Application| State |  Server  |  Cluster  |    Application Path    |
|  on ID   |   Type    |       | Targets  |  Targets  |                        |
+----------+-----------+-------+----------+-----------+------------------------+
| myApp    | EAR       | INSTAL|          |           | ${INSTALL_HOME}/myApp/m|
|          |           |LED    |          |           |yApp.ear                |
+----------+-----------+-------+----------+-----------+------------------------+
================================================================================

[DAS]domain1.adminServer>uninstall-application myApp
uninstall the application for the application [myApp] succeeded. : Successfully deleted [myApp].

[DAS]domain1.adminServer>application-info
No applications exist in this domain.
Application information for the domain [domain1].
================================================================================
+------------+---------------+-------+------------+-------------+--------------+
| Application|  Application  | State |   Server   |   Cluster   |  Application |
|     ID     |     Type      |       |  Targets   |   Targets   |     Path     |
+------------+---------------+-------+------------+-------------+--------------+
(No data available)
================================================================================
After adding an application repository, users should deploy the applications in the repository. For information about how to add and delete application repositories, see "1.5.1. Adding, Deleting, and Searching Application Repositories".
Using WebAdmin
Deploy the applications in the same way as deploying applications which are installed on a domain. When deploying is completed, the result is displayed on the top. If the deployment completes successfully, the application displayed in the application list should be in the RUNNING state.
Using the Console Tool
The following is the process of deploying applications from an application repository using the console tool:
[DAS]domain1.adminServer>add-application-repository /home/user1/apps
Successfully performed the ADD operation for An application repository.
Check the results using "add-application-repository or list-application-repositories"

[DAS]domain1.suok>list-application-repositories
Application Repositories
================================================================================
+------------------------------------------------------------------------------+
|                        Path to Application Repository                        |
+------------------------------------------------------------------------------+
| /home/user1/apps                                                             |
+------------------------------------------------------------------------------+
================================================================================

[DAS]domain1.adminServer>application-info
Application information for the domain [domain1].
================================================================================
+----------+-----------+-------+----------+-----------+------------------------+
| Applicati|Application| State |  Server  |  Cluster  |    Application Path    |
|  on ID   |   Type    |       | Targets  |  Targets  |                        |
+----------+-----------+-------+----------+-----------+------------------------+
| exploded |           | INSTAL|          |           | /home/user1/apps/explod|
|          |           |LED    |          |           |ed                      |
+----------+-----------+-------+----------+-----------+------------------------+
================================================================================

[DAS]domain1.adminServer>deploy exploded -servers server1
deploy the application for the application [exploded.war] succeeded.

[DAS]domain1.adminServer>application-info
Application information for the domain [domain1].
================================================================================
+----------+------------+---------+----------+-----------+---------------------+
| Applicati| Application|  State  |  Server  |  Cluster  |   Application Path  |
|  on ID   |    Type    |         | Targets  |  Targets  |                     |
+----------+------------+---------+----------+-----------+---------------------+
| exploded | WAR        | RUNNING | server1  |           | /home/user1/apps/exp|
|          |            |         |          |           |loded                |
+----------+------------+---------+----------+-----------+---------------------+
================================================================================
When a parent directory cannot be added as an application repository using the console tool, the application can be deployed by specifying the path. For information about how to deploy an application, in a machine where DAS exists, using an absolute path, see "1.6. Application Deployment by Specifying a Path".
Using WebAdmin
The following is the process of deploying an application on a domain:
-
To view the Deployed Application screen, select [Applications] from the left menu in WebAdmin. Choose an application to deploy from the application list, and then click [deploy] to go to the deployment page.
-
Specify the absolute path to the application to deploy in the 'Path' field. Click [Enter] to select the path to the application in on DAS. Select 'server1' from the 'Server' list to deploy the application to, and then click [OK] to start deployment. If necessary, you can specify deployment options in Advanced Options.
-
When deployment is completed, the result is displayed on the top. If the deployment completes successfully, the application displayed in the application list will be in the RUNNING state.
Using the Console Tool
The following is the process of deploying an application using the console.
[DAS]domain1.adminServer>deploy -path /home/user1/apps/myApp.ear -servers server1
deploy the application for the application [/home/user1/apps/myApp.ear] succeeded.

[DAS]domain1.adminServer>application-info
Application information for the domain [domain1].
================================================================================
+-----------+------------+---------+-----------+-----------+-------------------+
| Applicati |Application |  State  |   Target  |   Target  |  Application Path |
|   on ID   |    Type    |         |  Servers  | Clusters  |                   |
+-----------+------------+---------+-----------+-----------+-------------------+
| myApp.ear | EAR        | RUNNING | server1   |           | /home/user1/apps/ |
|           |            |         |           |           |myApp.ear          |
+-----------+------------+---------+-----------+-----------+-------------------+
================================================================================
After an application is modified, the updated application can run, after being redeployed with the redeploy command. For detailed information, see "2.2. Graceful Redeployment".
The following is the process of redeploying an application:
-
To view the Deployed Application screen, select [Applications] from the left menu in WebAdmin. Choose an application to redeploy from the application list, and then click [redeploy].
-
When the [redeploy] button is clicked, the following screen appears. Timeout for graceful redeployment can be specified in the 'Timeout' field. Configure other necessary items, and then click [OK].
-
When redeployment is completed, the result is displayed on the top.
To stop an application which is running on a domain, undeploy the application using the undeploy command. The following is the process of undeploying an application:
-
To view the Deployed Application screen, select [Applications] from the left menu in WebAdmin. Choose an application to undeploy from the application list, and then click [undeploy].
-
The 'Timeout' option can be used to ensure graceful undeployment. If the option is not specified, undeployment will wait for all requests in progress to complete for a 5 minute time period.
The following screen shows setting the timeout period for graceful undeployment to 5 minutes (300 seconds). If [OK] is clicked, the undeployment process starts. For detailed information about graceful undeployment, see "2.1. Graceful Undeployment".
-
When the undeployment of the application is completed, the result is displayed on the top. If the undeployment is successfully completed, the application displayed in the application list will be in the INSTALLED status.
Start an application to run the application, which is in the DISTRIBUTED status. An application can be in the DISTRIBUTED state, when it is deployed with the 'Only Distribute' option. A running application goes into the DISTRIBUTED state, after it's stopped by using the stop command.
The following is the process to start an application:
-
To view the Deployed Application screen, select [Applications] from the left menu in WebAdmin. Choose an application that is in the DISTRIBUTED state from the application list, and then click [start].
-
After starting the application, the result is displayed on the top. If the starting job is completed successfully, the application displayed in the application list will be in the RUNNING state.
To suspend a running application, stop the application using the stop command.
The following is the process of suspending an application:
-
To view the Deployed Application screen, select [Applications] from the left menu in WebAdmin. Choose an application from the application list, and then click [stop].
-
The following message will appear. To execute the stopping job, click [OK]. If [Cancel] is clicked, the job will be cancelled.
-
When suspending the application is completed, the result is displayed on the top. If the stopping job is completed successfully, the application displayed in the application list will be in the DISTRIBUTED state, and requests are no longer handled.
A server or cluster can be added as a target of currently running applications. Because an application, which already exists in a domain cannot be deployed on a specific server, JEUS supports the add-target command to add a server as a target. The command can be used when the application is in the RUNNING or DISTRIBUTED state.
Note
To add a server as a target, the server needs to exist. For information about how to add a server, refer to JEUS Server Guide. "2.2. Adding Servers".
The following is the process of adding a server as a target of the running applications:
-
To view the Deployed Application screen, select [Applications] from the left menu in WebAdmin. To add a server than runs application services, select an application from the application list and click [add-target] next to the list.
-
Select a server to add from the 'Server' options, and then click [OK].
-
After adding the target, the result is displayed on the top.
-
If the server is added successfully, you can verify the result in 'Server' and 'Running Servers' fields by selecting the corresponding application.
A server or cluster can be removed from targets of currently running applications. Because an application, which already exists in a domain, cannot be undeployed on a specific server, JEUS supports the remove-target command to remove a server from the targets of the application. The command can be used when the application is in the RUNNING or the DISTRIBUTED state.
The following is the process to remove a server from targets of running applications:
-
To view the Deployed Application screen, select [Applications] from the left menu in WebAdmin. Select an application to suspend from the application list and click [remove-target].
-
Select a server to remove from the 'Server' options, and then click [OK].
-
After removing the target, the result is displayed on the top.
-
If the target server is removed successfully, you can verify the result in the 'Servers' and 'Running Servers' fields by selecting the corresponding application.
This chapter describes how to view application information using WebAdmin and a console tool.
The following application information can be checked using WebAdmin:
-
How is the application deployed?
-
What does the application consist of?
Checking Information about Deployment of an Application
You can check to see on which servers and with what attributes the application is deployed.
The following is the process of checking the application's deployment information:
-
To view the Deployed Application screen, select [Applications] from the left menu in WebAdmin. Select an application ID (myApp) from the application list to check for application information.
-
Information about the application, such as the application ID, the application's path in DAS, application type, and option settings specified at deployment, can be checked. For detailed information about the deployment options, see descriptions for each item in WebAdmin or refer to JEUS Reference Book. "4.2.6.4. deploy-application".
Checking for Information about Components of an Application
Users can check the components that make up the application.
If an application is EAR, a list of modules that make up the EAR application can be viewed. Select a module to check for detailed information about the module. But note that the information can be retrieved only for EJB or web modules.
For an EJB module, a list of EJB Beans is displayed. For a web module, a list of servlets are displayed.
To view the Deployed Application screen, select [Applications] from the left menu in WebAdmin. Click on an application ID from the application list to check the basic information about the application such as path and format, deployment time, and deployment target server.

To view an application configuration information from the
application deployment information screen, click a server from the
list of 'Running Servers'.

If an application is an EAR application, you can check for information about the list of modules as well as the EJB and WEB modules, that make up the application.
Note
Module information can be checked only for the EJB or WEB modules. Information about client and resource modules cannot be checked.
-
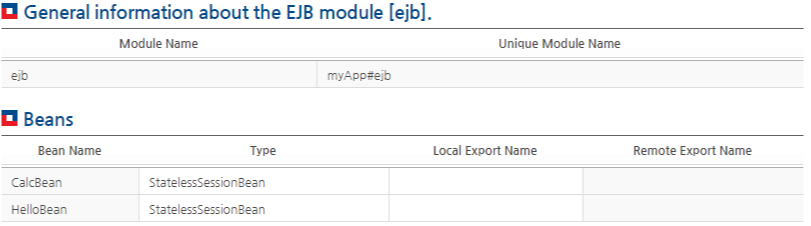
Checking EJB Module Information
The following is the process for checking information about EJB module, ejb, included in the EAR application, myApp:
-
Select 'ejb' from the module list for myApp. When 'ejb' is selected, a list of Beans included in the EJB module appears.
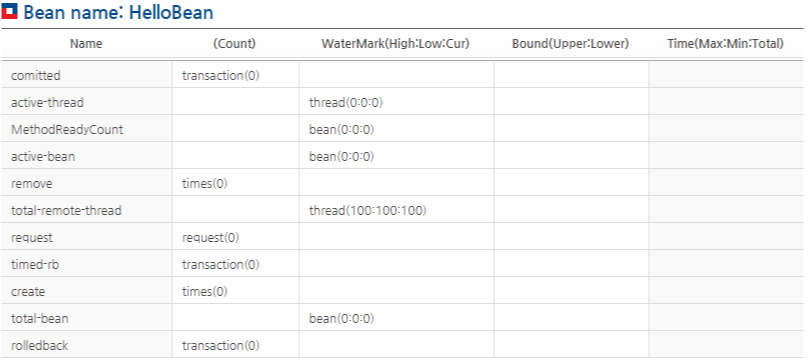
-
Select 'HelloBean' from the Bean list. When 'HelloBean' is selected, information about the Bean appears.
-
-
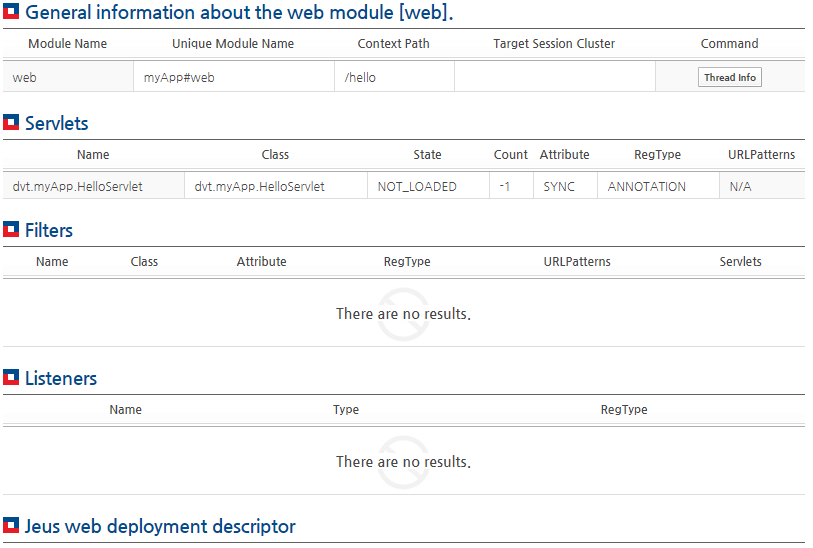
Checking WEB Module Information
The following is the process of checking for information about the WEB module, 'web,' included in the EAR application, myApp:
-
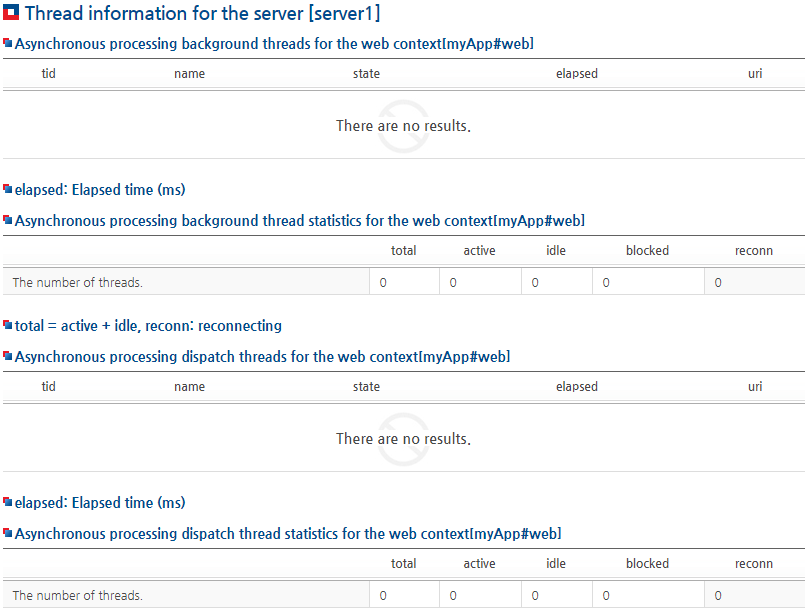
Select 'web' from the module list for myApp. When 'web' is selected, a list of servlets included in the WEB module can be displayed.
-
If [thread-info] is selected in the 'Command' column, the Web module's request thread information can be checked.
-
Information about myApp.ear application can be checked by using the application-info command of the console tool.
The following example checks for application information by using a console tool. For detailed information about each option, refer to JEUS Reference Book. "4.2.6.3. application-info".
[DAS]domain1.adminServer> application-info
Application information for the domain [domain1].
================================================================================
+----------+------------+---------+----------+-----------+---------------------+
| Applicati| Application|  State  |  Server  |  Cluster  |   Application Path  |
|  on ID   |    Type    |         | Targets  |  Targets  |                     |
+----------+------------+---------+----------+-----------+---------------------+
| myApp    | EAR        | RUNNING | server1  |           | ${INSTALL_HOME}/myAp|
|          |            |         |          |           |p/myApp.ear          |
+----------+------------+---------+----------+-----------+---------------------+
================================================================================

[DAS]domain1.adminServer>application-info -id myApp -server server1
Application information for the server [server1] in the domain [domain1].
================================================================================
+------------+-----------------+-------------+------+------------+-------------+
| Application| Application Name| Application | State|   Server   |   Cluster   |
|     ID     |                 |    Type     |      |  Targets   |   Targets   |
+------------+-----------------+-------------+------+------------+-------------+
| myApp      | myApp           | ear         | RUNNI| server1    |             |
|            |                 |             |NG    |            |             |
+------------+-----------------+-------------+------+------------+-------------+
================================================================================

[DAS]domain1.adminServer>application-info -id myApp -server server1 -detail
Application name : myApp
Application [myApp]
===============================================================
+-------------+---------------------------------+-------------+
| Module Name |        Unique Module Name       | Module Type |
+-------------+---------------------------------+-------------+
| ejb         | myApp#ejb                       | EJB         |
| appclient   | myApp#appclient                 | CAR         |
| web         | myApp#web                       | WAR         |
+-------------+---------------------------------+-------------+

To view detailed information about EJBs or web modules in an EAR, use the "-module" or "-type" option.
===============================================================

[DAS]domain1.adminServer>application-info -id myApp -server server1 -detail -module ejb
Application name : myApp
General information about the EJB module [ejb].
==============================================================
+-------------+----------------------------------------------+
| Module Name |              Unique Module Name              |
+-------------+----------------------------------------------+
| ejb         | myApp#ejb                                    |
+-------------+----------------------------------------------+
==============================================================

Beans
================================================================================
+-----------+-------------------------+-------------------+--------------------+
| Bean Name |           Type          | Local Export Name | Remote Export Name |
+-----------+-------------------------+-------------------+--------------------+
| HelloBean | StatelessSessionBean    |                   |                    |
+-----------+-------------------------+-------------------+--------------------+
================================================================================

[DAS]domain1.adminServer>application-info -id myApp -server server1 -detail -type war
Application name : myApp
There are no EJBs in this module.
General information about the web module [web].
===============================================================
+-------------+--------------------------------+--------------+
| Module Name |       Unique Module Name       | Context Path |
+-------------+--------------------------------+--------------+
| web         | myApp#web                      | /hello       |
+-------------+--------------------------------+--------------+
===============================================================

Servlets
================================================================================
+---------+------------------+-------+-------+-----------+---------+-----------+
|   Name  |       Class      | State | Count | Attribute | RegType |URLPatterns|
+---------+------------------+-------+-------+-----------+---------+-----------+
| HelloSer| dvt.deployment.se| READY |     0 | SYNC      | WEB_XML | /HelloServ|
|vlet     |rvlet.HelloServlet|       |       |           |         |let        |
+---------+------------------+-------+-------+-----------+---------+-----------+
================================================================================

Filters
================================================================================
+------+-------+--------------+-----------+----------------------+-------------+
| Name | Class |   Attribute  |  RegType  |      URLPatterns     |   Servlets  |
+------+-------+--------------+-----------+----------------------+-------------+
(No data available)
================================================================================

Listeners
================================================
+------+------+--------------------------------+
| Name | Type |             RegType            |
+------+------+--------------------------------+
(No data available)
================================================

EJBs
================================================================================
+-----------+------+-------------------------+---------------------------------+
| Bean Name | Type |    Local Export Name    |        Remote Export Name       |
+-----------+------+-------------------------+---------------------------------+
(No data available)
================================================================================

[DAS]domain1.suok>application-info -id myApp -server server1 -detail -module ejb -bean HelloBean
bean HelloBean
Application name : myApp
Module name : ejb
Bean name: HelloBean
================================================================================
+---------------+-----------+-------------------+--------------+---------------+
|      Name     |  (Count)  | WaterMark(High:Low| Bound(Upper:L| Time(Max:Min:T|
|               |           |       :Cur)       |    ower)     |     otal)     |
+---------------+-----------+-------------------+--------------+---------------+
| create        | times(0)  |                   |              |               |
+---------------+-----------+-------------------+--------------+---------------+
| remove        | times(0)  |                   |              |               |
+---------------+-----------+-------------------+--------------+---------------+
| timed-rb      | transactio|                   |              |               |
|               |n(0)       |                   |              |               |
+---------------+-----------+-------------------+--------------+---------------+
| request       | request(0)|                   |              |               |
+---------------+-----------+-------------------+--------------+---------------+
| active-bean   |           | bean(0:0:0)       |              |               |
+---------------+-----------+-------------------+--------------+---------------+
| rolledback    | transactio|                   |              |               |
|               |n(0)       |                   |              |               |
+---------------+-----------+-------------------+--------------+---------------+
| total-bean    |           | bean(0:0:0)       |              |               |
+---------------+-----------+-------------------+--------------+---------------+
| comitted      | transactio|                   |              |               |
|               |n(0)       |                   |              |               |
+---------------+-----------+-------------------+--------------+---------------+
| MethodReadyCou|           | bean(0:0:0)       |              |               |
|nt             |           |                   |              |               |
+---------------+-----------+-------------------+--------------+---------------+
| active-thread |           | thread(0:0:0)     |              |               |
+---------------+-----------+-------------------+--------------+---------------+
| total-remote-t|           |thread(100:100:100)|              |               |
|hread          |           |                   |              |               |
+---------------+-----------+-------------------+--------------+---------------+
================================================================================
Running the application-info command displays the following information about all the applications in a domain:
| Item | Description |
|---|---|
| Application ID | Application ID. This value must be unique in a domain. |
| Applicatio Type | Application type. This value is one of the following:
|
| state | Status of an application in a domain. The value is one of the following:
For detailed information about each state, see "1.1.3. Application Status". |
| Server Target | Target server where the applications are deployed. |
| Cluster Target | Target cluster where the applications are deployed. |
| Application Path | Path where the applications are installed and managed. |
An application in the exploded module format can be deployed to MSs on other machines by compressing the file. This is called a deployment staging mode. To deploy, place the application file in an application repository, or specify an absolute path to the file on the machine where DAS resides. For detailed information about deployment in staging mode, see "1.7. Deployment Staging Mode".
Using WebAdmin
The following is the process of deploying an application by specifying a path using WebAdmin:
-
To view the Deployed Application screen, select [Applications] from the left menu in WebAdmin. Choose an exploded application that is in the INSTALLED state, and then click [deploy] below the application list or above the application list. Enter a value for the 'Path' field.
-
Select a server where the application will be deployed in the 'Server' field.
-
Check the 'Staging' field in the Advanced Options section of the deployment information input screen. Click [OK] to deploy the application.
-
When deployment is completed, the result is displayed on the top. If the deploying job is completed successfully, the application displayed in the application list will be in the RUNNING state.
-
In the server1 log, verify that the application has been successfully deployed in the stage mode.
...
[2016.08.09 23:17:48][2] [server1-40] [WEB-1032] Distributed the web context [exploded] information
- Virtual host    : DEFAULT_HOST
- Context path    : /exploded
- Document base   : /home/user1/jeus/domains/domain1/servers/server1/.workspace/deployed/exploded/exploded_war___
...

Using the Console Tool
The following is the process of deploying an application in the Staging mode using the console tool:
[DAS]domain1.adminServer>deploy exploded -servers server1 -staging
deploy the application for the application [exploded] succeeded.

[DAS]domain1.adminServer>application-info
Application information for the domain [domain1].
================================================================================
+----------+------------+---------+----------+-----------+---------------------+
| Applicati| Application|  State  |  Server  |  Cluster  |   Application Path  |
|  on ID   |    Type    |         | Targets  |  Targets  |                     |
+----------+------------+---------+----------+-----------+---------------------+
| exploded | WAR        | RUNNING | server1  |           | /home/user1/apps/exp|
|          |            |         |          |           |loded                |
+----------+------------+---------+----------+-----------+---------------------+
| myApp    | EAR        | RUNNING | server1  |           | ${INSTALL_HOME}/myAp|
|          |            |         |          |           |p/myApp.ear          |
+----------+------------+---------+----------+-----------+---------------------+
================================================================================
A deployment plan is an external configuration file of an application that can be used to modify the application DD at the time of deployment.
JEUS defines deployment plan in XML format, and it can be applied to an EJB, web application, EAR standard DD, and JEUS DD. When deploying applications, if you specify to use a deployment plan, the deployment plan configurations and DD will be merged at deployment time to determine the final application configuration settings before starting deployment.
This section describes about deployment plan configurations and operation methods. This section also describes how to deploy applications using a deployment plan through WebAdmin or console tool.
This section describes how to configure a deployment plan and its operation methods through an example.
Deployment Plan Configurations
The following example shows how to implement a deployment plan:
<?xml version="1.0" encoding="UTF-8"?>
<jeus-deployment-plan xmlns="http://www.tmaxsoft.com/xml/ns/jeus"
                      xmlns:jeus="http://www.tmaxsoft.com/xml/ns/jeus"
                      xmlns:javaee="http://xmlns.jcp.org/xml/ns/javaee"
                      xmlns:j2ee="http://java.sun.com/xml/ns/j2ee">
    <descriptors>
        <!-- For standalone EJB -->
        <descriptor>
            <uri>META-INF/ejb-jar.xml</uri>
            <configurations>
                <configuration>
                    <action>REPLACE</action>
                    <xpath>//j2ee:ejb-name[.='ByeBean']</xpath>
                    <value>
                        <![CDATA[<ejb-name>HiBean</ejb-name>]]>
                    </value>
                </configuration>
                <configuration>
                    <action>DELETE</action>
                    <xpath>/child::j2ee:ejb-jar/child::j2ee:enterprise-beans/
child::j2ee:session/child::j2ee:local-home[.='HelloHomeLocal']</xpath>
                </configuration>
                <configuration>
                    <action>APPEND_CHILD</action>
                    <xpath>/child::j2ee:ejb-jar/descendant::j2ee:session[2]</xpath>
                    <value>
                        <![CDATA[<transaction-type>Bean</transaction-type>]]>
                    </value>
                </configuration>
                <configuration>
                    <action>INSERT_BEFORE</action>
                    <xpath>/j2ee:ejb-jar/j2ee:enterprise-beans/j2ee:session/
j2ee:ejb-name[.='HelloBean']/../j2ee:transaction-type</xpath>
                    <value>
                        <![CDATA[<session-type>Stateless</session-type>]]>
                    </value>
                </configuration>
            </configurations>
        </descriptor>
        <descriptor>
            <uri>META-INF/jeus-ejb-dd.xml</uri>
            <configurations>
                <configuration>
                    <action>REPLACE</action>
                    <xpath>/jeus:jeus-ejb-dd/jeus:beanlist/jeus:jeus-bean/
jeus:export-name[.='ByeBean']</xpath>
                    <value>
                        <![CDATA[<export-name>HiBean</export-name>]]>
                    </value>
                </configuration>
                <configuration>
                    <action>DELETE</action>
                    <xpath>/jeus:jeus-ejb-dd/jeus:beanlist/jeus:jeus-bean/
jeus:local-export-name[.='HelloBeanLocal']</xpath>
                </configuration>
                <configuration>
                    <action>APPEND_CHILD</action>
                    <xpath>/jeus:jeus-ejb-dd/jeus:beanlist/jeus:jeus-bean</xpath>
                    <value>
                        <![CDATA[<jeus-rmi>false</jeus-rmi>]]>
                    </value>
                </configuration>
                <configuration>
                    <action>INSERT_BEFORE</action>
                    <xpath>/jeus:jeus-ejb-dd/jeus:beanlist/jeus:jeus-bean/
jeus:ejb-name[.='HiBean']/../jeus:jeus-rmi</xpath>
                    <value>
                        <![CDATA[<thread-max>100</thread-max>]]>
                    </value>
                </configuration>
            </configurations>
        </descriptor>
        <!-- For standalone web application -->
        <descriptor>
            <uri>WEB-INF/web.xml</uri>
            <configurations>
                <configuration>
                    <action>REPLACE</action>
                    <xpath>/child::javaee:web-app/child::javaee:servlet-mapping/
child::javaee:servlet-name[.='HiServlet']</xpath>
                    <value>
                        <![CDATA[<servlet-name>HelloServlet</servlet-name>]]>
                    </value>
                </configuration>
                <configuration>
                    <action>DELETE</action>
                    <xpath>//javaee:load-on-startup</xpath>
                </configuration>
                <configuration>
                    <action>APPEND_CHILD</action>
                    <xpath>/javaee:web-app/descendant::javaee:login-config</xpath>
                    <value>
                        <![CDATA[<auth-method>BASIC</auth-method>]]>
                    </value>
                </configuration>
                <configuration>
                    <action>INSERT_BEFORE</action>
                    <xpath>/javaee:web-app/javaee:env-entry/
javaee:env-entry-value[.='value1']</xpath>
                    <value>
                        <![CDATA[<env-entry-type>java.lang.String</env-entry-type>]]>
                    </value>
                </configuration>
            </configurations>
        </descriptor>
        <descriptor>
            <uri>WEB-INF/jeus-web-dd.xml</uri>
            <configurations>
                <configuration>
                    <action>REPLACE</action>
                    <xpath>//jeus:enable-jsp</xpath>
                    <value>
                        <![CDATA[<enable-jsp>true</enable-jsp>]]>
                    </value>
                </configuration>
                <configuration>
                    <action>DELETE</action>
                    <xpath>/jeus:jeus-web-dd/child::jeus:max-instance-pool-size</xpath>
                </configuration>
                <configuration>
                    <action>INSERT_BEFORE</action>
                    <xpath>/jeus:jeus-web-dd/descendant::jeus:enable-jsp</xpath>
                    <value>
                        <![CDATA[<context-path>/hello</context-path>]]>
                    </value>
                </configuration>
                <configuration>
                    <action>APPEND_CHILD</action>
                    <xpath>//jeus:jeus-web-dd</xpath>
                    <value>
                        <![CDATA[<webinf-first></enabled>false</enabled></webinf-first>]]>
                    </value>
                </configuration>
            </configurations>
        </descriptor>
        <!-- For EAR -->
        <descriptor>
            <uri>META-INF/application.xml</uri>
            <configurations>
                <configuration>
                    <action>REPLACE</action>
                    <xpath>/javaee:application/javaee:library-directory</xpath>
                    <value>
                        <![CDATA[<library-directory>mylib</library-directory>]]>
                    </value>
                </configuration>
            </configurations>
        </descriptor>
        <descriptor>
            <uri>ejb.jar/META-INF/ejb-jar.xml</uri>
            <configurations>
                <configuration>
                    <action>REPLACE</action>
                    <xpath>/javaee:ejb-jar/javaee:enterprise-beans/
javaee:session/javaee:ejb-class</xpath>
                    <value>
                        <![CDATA[<ejb-class>HelloBean</ejb-class>]]>
                    </value>
                </configuration>
            </configurations>
        </descriptor>
            <descriptor>
            <uri>web.war/WEB-INF/web.xml</uri>
            <configurations>
                <configuration>
                    <action>REPLACE</action>
                    <xpath>/javaee:web-app/javaee:servlet-mapping/
javaee:servlet-name</xpath>
                    <value>
                        <![CDATA[<servlet-name>HelloServlet</servlet-name>]]>
                    </value>
                </configuration>
            </configurations>
        </descriptor>
    </descriptors>
</jeus-deployment-plan>
The following describes the child tags of <descriptor>:
-
The <descriptor> tag consists of multiple <configurations> child tags.
-
The <configuration> tag is a unit of configuration that applies to target DD. It consists of <action>, <xpath>, and <value> child tags.
-
Deployment Plan Operation Methods
This section describes deployment plan operations by tags with the previous example.
-
<descriptor>
A deployment plan consists of multiple <descriptor> tags.
Use the <uri> tag to specify the target DD, which becomes a target in units of <descriptor> tag. Using the application file as the root, specify <uri> value as a relative path to DD to determine the target DD.
-
For example, the standard DD of a standalone EJB module is always placed in META-INF/ejb-jar.xml and JEUS DD in META-INF/jeus-ejb-dd.xml from the application root. Therefore the first <descriptor> tag of the previous deployment plan is for the standard DD of a standalone EJB module obtained from the <uri> value. The second <descriptor> tag is for JEUS DD of a standalone EJB module obtained from the <uri> value. The same rule applies to standalone web applications or EAR.
-
If the <uri> value is 'ejb.jar/META-INF/ejb-jar.xml', the <descriptor> value is an EJB module (file name is ejb.jar), which belongs to EAR. If the <uri> value is 'web.war/WEB-INF/web.xml', the <descriptor> value is a WEB module (file name is web.war), which belongs to EAR.
-
One deployment plan can be used to deploy various applications. Only the <descriptor>'s, which match the <uri> value of application DD, are selected for deployment. Thus, other <descriptor>'s have absolutely no effect on deployment.
-
-
<configuration>
The following example uses the first <descriptor> configuration to describe how DD is changed according to the <descriptor> configuration.
-
As explained earlier, the first <descriptor> tag configures the standard DD of a standalone EJB module. The first action performed is replacing a specific tag and is expressed in the first <configuration> tag. It shows that the <ejb-name> tag with the value, 'ByeBean', is replaced with the <ejb-name> tag with the value, 'HiBean'.
-
The second <configuration> expresses the action of deleting a <local-home> tag with the value, 'HelloHomeLocal'.
-
The third <configuration> expresses the action of adding a <transaction> tag as the last child of the second <session> tag.
-
The fourth <configuration> expresses the action of adding a <session-type> tag as a previous sibling of a <session> tag, whose <ejb-name> tag value is 'HelloBean'.
-
Before deploying applications using deployment plan, the deployment plan should be installed on a domain. Only the deployment plans that are installed on a domain can be deployed like applications. When installing deployment plan, the identifier of the deployment plan can be set on a domain.
A deployment plan can be installed using WebAdmin or the console tool.
Using WebAdmin
The following is the process of installing deployment plan using WebAdmin:
-
To view the Deployed Application screen, select [Applications] from the left menu in WebAdmin. If [plan] is clicked, the Deployment Plan screen will appear.
-
On the Deployment Plan screen, click [install] to specify the path to the deployment plan, which will be installed. Enter a name in Name, and then click [OK].
-
Click on the deployment plan to check the deployment details.
Using the Console Tool
In the console tool, execute the install-deployment-plan command to install the deployment plan.
[DAS]domain1.adminServer>installdp -path /home/user1/plans/jeus-deployment-plan.xml -name plan1
Installing the deployment plan [plan1] was successful.
Note
For more information about using the install-deployment-plan command, refer to JEUS Reference Book. "4.2.6.8. install-deployment-plan".
Users can check the installed deployment plan by using WebAdmin or a console tool. Each deployment plan is distinguished by the deployment plan identifier that is assigned during the installation. You can also display the list of applications by deployment plan that is applied to the application, as well as the actual deployment file content.
Using WebAdmin
The following is the process of checking for the installed deployment plan using WebAdmin:
-
To view the Deployed Application screen, select [Applications] from the left menu in WebAdmin. If [plan] is clicked, the Deployment Plan screen will appear.
-
The deployment plan list is displayed on the Deployment Plan screen as follows:
-
If a specific deployment plan name is selected from the list, its details are displayed.
Using the Console Tool
By using the deployment-plan-info command in the console tool, users can obtain the list of applications, to which deployment plans installed on a domain apply to. If a particular deployment plan is selected, its details are displayed.
-
Checking the deployment plan list
[DAS]domain1.adminServer>dpinfo The list of deployment plans installed in the domain and the applications to which each deployment plan applies =========================================================== +------------------------------------------+--------------+ | Deployment plan | Applications | +------------------------------------------+--------------+ | plan1 | | +------------------------------------------+--------------+ =========================================================== -
Checking the details of a deployment plan
[DAS]domain1.adminServer>dpinfo -name plan1
<?xml version="1.0" encoding="UTF-8"?>
<jeus-deployment-plan xmlns="http://www.tmaxsoft.com/xml/ns/jeus">
   ...
</jeus-deployment-plan>
Note
For more information about the deployment-plan-info command, refer to JEUS Reference Book. "4.2.6.5. deployment-plan-info".
Applications can be deployed using an installed deployment plan through WebAdmin or console tool.
Using WebAdmin
The following is the process of deploying an application with a deployment plan through WebAdmin:
-
To view the Deployed Application screen, select [Applications] from the left menu in WebAdmin. Choose an application to deploy, and then click [deploy].
-
Enter a plan name in the 'plan' field on the deployment configuration pop-up window, and then click [OK].
-
When deployment of the application is complete, the result is displayed at the top showing that the application is in the RUNNING state.
Using the Console Tool
In a console tool, applications can be deployed using a deployment plan by executing the deploy-application command.
[DAS]domain1.adminServer>deploy webapp -all -plan plan1
deploy the application for the application [webapp] succeeded.
Users can verify the deployment plan that was applied to an application using WebAdmin or console tool.
Using WebAdmin
The following is the process of verifying the deployment plan, which was applied to an application, using WebAdmin:
-
To view the Deployed Application screen, select [Applications] from the left menu in WebAdmin. If an application ID is selected on the screen, the details will be displayed.
-
Detailed information related to the application ID includes information about the applied deployment plan.
Using the Console Tool
In the console tool, a deployment plan that has been applied to an application can be checked by executing the application-info command.
[DAS]domain1.adminServer>appinfo -id webapp -detail
Application information for the domain [domain1].
================================================================================
+------+-------+-----+------+-------+--------------+----------+----------+-----+
| Appli| Applic|State|Server|Cluster|    Running   | Applicati| Applicati| Plan|
|cation| ation |     |Target|Targets|   Servers    | on Path  | on Time  |Name |
|  ID  | Type  |     |  s   |       |              |          |          |     |
+------+-------+-----+------+-------+--------------+----------+----------+-----+
|webapp| WAR   | RUNN| ALL  | ALL   | server1,serve| ${INSTALL| Tue May  |plan1|
|      |       |ING  |      |       |r2,server3,adm|_HOME}/web|28        |     |
|      |       |     |      |       |inServer      |app/deploy|22:45:13  |     |
|      |       |     |      |       |              |ment_plan_|KST 2013  |     |
|      |       |     |      |       |              |web.war   |          |     |
+------+-------+-----+------+-------+--------------+----------+----------+-----+
================================================================================
Users can uninstall a deployment plan on a domain by using WebAdmin or the console tool. If the deployment plan is uninstalled, it is no longer valid and thus cannot be used for deployment.
Using WebAdmin
The following is the process of uninstalling a deployment plan using WebAdmin:
-
To view the Deployed Application screen, select [Applications] from the left menu in WebAdmin. If the [plan] button is clicked, the Deployment Plan page will appear.
-
The list of installed deployment plans is displayed on the Deployment Plan page. Click the [uninstall] button for a deployment plan that needs to be deleted.
-
The message that says the deployment plan was successfully uninstalled is displayed at the top.
Using the Console Tool
In the console tool, deployment plans can be uninstalled by executing the uninstall-deployment-plan command.
[DAS]domain1.adminServer>uninstalldp plan1
Uninstalling the deployment plan was successful.
Note
For more information about the uninstall-deployment-plan command, refer to JEUS Reference Book. "4.2.6.17. uninstall-deployment-plan".