Table of Contents
This chapter describes the process of configuring a domain using WebAdmin and jeusadmin console tool.
The domain configuration is found in the config directory (DOMAIN_HOME/config) of each domain. The configuration file, domain.xml, contains the configuration for servers and clusters as well as resources and services in the domain. The file also contains information about the deployed applications.
Applying dynamic settings refers to making changes in real-time to a running server without restarting the server. Since changes are verified by DAS and then distributed to the MSs, the changes that are made manually to the XML file are not applied dynamically. Only changes made through WebAdmin and jeusadmin are applied dynamically.
Caution
Once a lock is obtained to modify the configuration, control commands for MS such as start and stop cannot be executed.
To change a dynamic configuration item, the user must have permission for the resource name jeus.domain.<domain-name> and the DynamicConfiguration resource action. When changing security configuration, users cannot delete their own permission to edit the configuration. This is to allow the users to be able to always undo their actions.
Note
Refer to JEUS Security Guide. "2.6. Configuring Security System Policies" for information about how to give resource permissions to a user.
The configuration that is required to operate a server is inside a file in the domain to which the server belongs. The configuration file is managed by DAS, distributed to each server, and stored in a local read-only cache for better performance. JEUS supports dynamic configuration through DAS.
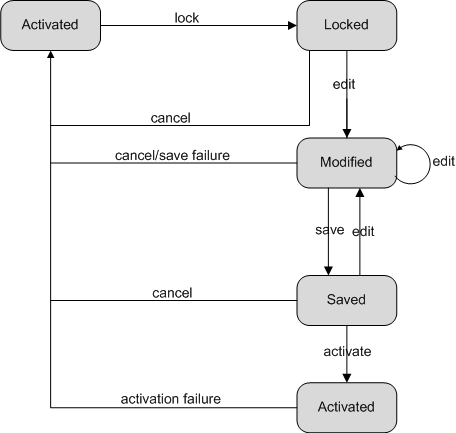
The following is the process of changing the settings dynamically.
-
Click Lock to prevent other users from changing the configuration simultaneously.
A user requests a lock from DAS. DAS determines if the user has permission to change the configuration, checks if other users are currently editing the configuration, and then gives the lock to the user.
-
The user receives the lock from DAS and changes the configuration.
-
Click Save to send the changes to DAS, which means that the modified information is sent to the memory in DAS from the client's memory and that the changes have been verified but has not been saved to a file. If DAS stops before Activate is clicked, the changes are lost.
Even if the WebAdmin browser window is closed, saved changes still exist in DAS. Access WebAdmin again to continue making changes. When a single username is used to modify the settings from multiple browsers, the changes can be checked and to prevent from losing any changes execute Save at an appropriate time.
-
To apply the changes to the server, click Activate.
Check the most recently saved changes, and apply them to each server and save them to a file. Return the lock so that other users can edit the configuration.
-
To cancel the pending changes, click Cancel. This will delete all the changes that are saved in DAS and return the lock.
Once the configuration has been modified, the changes are applied to the servers. Some settings can be applied dynamically, and some settings require restarting the server.
Settings that can be applied dynamically are applied to the servers without restarting.
Using WebAdmin
When using WebAdmin, items that can be applied dynamically have
the  icon. Items without the icon are applied after a
server restart.
icon. Items without the icon are applied after a
server restart.
Click Lock & Edit to acquire the lock
and then modify items with the icon. Click [OK] to save
the changes, and then click [Apply Changes] from
the left menu to immediately apply the changes.
 |
Using the Console Tool
In jeusadmin, dynamically applied command parameters have the word [Dynamic] in their description.
Jeusadmin commands automatically perform Lock, Save, and Apply Changes, and the changes for items that are labeled as [Dynamic] are applied immediately.
[DAS]domain1.adminServer>help modify-server
...
OPTIONS
<server-name>
   the name of server you want to modify configuration of

[-removelogdir,--removeLogHomeDirectory]
   remove the log directory which has all the log files created by this
   server

[-node,--nodeName <node-name>]
   name of the node this server is located

[-jvm,--jvmOptions <jvm-options>]
   jvm configurations applied to this server jvm

[-logdir,--logHomeDirectory <server-log-home-directory>]
   the log directory which has all the log files created by this server

[-a,--actionOnResourceLeak <action-on-resource-leak>]
   strategy when resource leak is detected. it must be one of
   AutoClose, NoAction, Warning

[-l,--logStdoutToRawFormat <print-stdout-to-raw-format>]
   [Dynamic] whether stdout is printed in row format or in JEUS Logger
   format.

[-m,--mejb <enable-MEJB>]
   [Dynamic] whether using MEJB or not .true, false

[-c,--classFtp <enable-class-ftp-service>]
   [Dynamic] whether using class ftp service or not .true, false

[-f,--force]
    Acquires the configuration lock forcibly.

[-detail]
    show detail results
Note
Refer to JEUS Reference Book. "4.2. jeusadmin" for more information about dynamic changes.
If both dynamic and static settings are changed, only the dynamic settings are applied immediately. The static changes will be applied when the server restarts. This section describes how to use WebAdmin and the console tool to identify the modified settings that have not been applied.
Using WebAdmin
Click [Servers] from the left menu to check the server list and status information on the screen. Servers with true in the 'Need to Restart' column need to be restarted to apply the changes.
Using the console tool
Run the server-info command in the console tool (jeusadmin) to show the following server list and status information. Servers with 'true' in the 'Need to Restart' column must be restarted to apply the changes.
[DAS]domain1.adminServer>server-info

Information about Domain (domain1)
==============================================================================================
+--------+---------+-----+-------+-----+---------------+---------+-------------+-------------+
| Server |  Status | Node|  PID  | Clus|  Latest Start | Need to | Listen Ports| Running     |
|        |         |Name |       | ter |Time / Shutdown| Restart |             | Engines     |
|        |         |     |       |     |     Time      |         |             |             |
+--------+---------+-----+-------+-----+---------------+---------+-------------+-------------+
| adminSe| RUNNING | N/A | 5360  | N/A | Fri Mar 22    | false   | base-192.168| jms,        |
|rver(*) |(259 sec)|     |       |     |10:41:25 KST   |         |.34.3:9736   | ejb, web    |
|        |         |     |       |     |2013           |         | http-server-|             |
|        |         |     |       |     |               |         |0.0.0.0:8088 |             |
|        |         |     |       |     |               |         |jms-internal-|             |
|        |         |     |       |     |               |         |0.0.0.0:9741 |             |
+--------+---------+-----+-------+-----+---------------+---------+-------------+-------------+
| server1| RUNNING |node1| 6424  | N/A | Fri Mar 22    | true    | base-192.168| jms,        |
|        |(207 sec)|     |       |     |10:42:17 KST   |         |.34.1:9836   | ejb, web    |
|        |         |     |       |     |2013           |         |             |             |
+--------+---------+-----+-------+-----+---------------+---------+-------------+-------------+
| server2| RUNNING |node2| 3012  | N/A | Fri Mar 22    | true    | base-192.168| jms,        |
|        |(178 sec)|     |       |     |10:42:39 KST   |         |.34.2:9936   | ejb, web    |
|        |         |     |       |     |2013           |         |             |             |
+--------+---------+-----+-------+-----+---------------+---------+-------------+-------------+
==============================================================================================
When settings are changed, the original settings are backed up. This is called settings rotation.
The current settings are always in the following files.
DOMAIN_HOME/config/domain.xml
DOMAIN_HOME/config/security/SECURITY_DOMAIN_NAME/policies.xml
DOMAIN_HOME/config/security/SECURITY_DOMAIN_NAME/accounts.xml
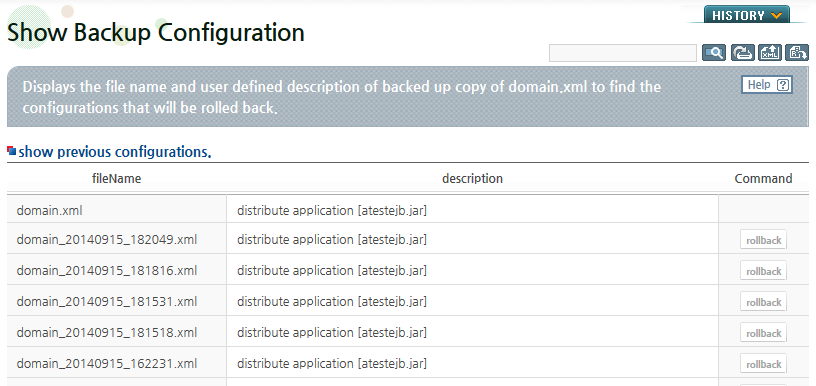
When there are any changes in the domain.xml file, whether they are dynamic or not, the previous domain.xml file is backed up as a file named domain_yyyymmdd_hhmmss.xml in the DOMAIN_HOME/config/.history folder. The number of backed up files can be specified using the jeus.server.configfile.backup.size option. (Default value : 50)
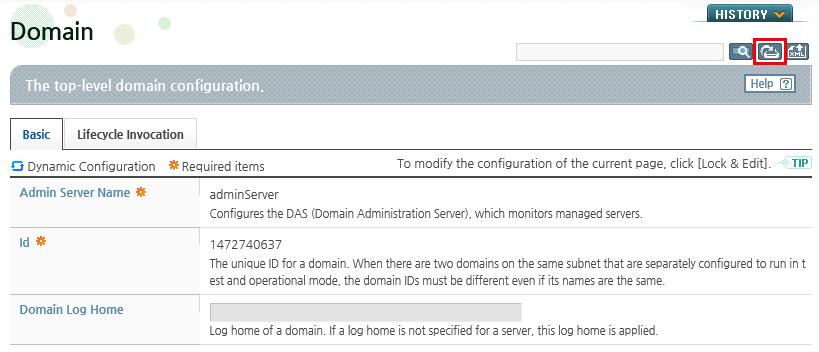
The following shows how to check domain.xml through WebAdmin.
-
Click [Domain] from the left menu of WebAdmin.
-
Click
 and the list of backed up domain settings is
diplayed.
and the list of backed up domain settings is
diplayed. -
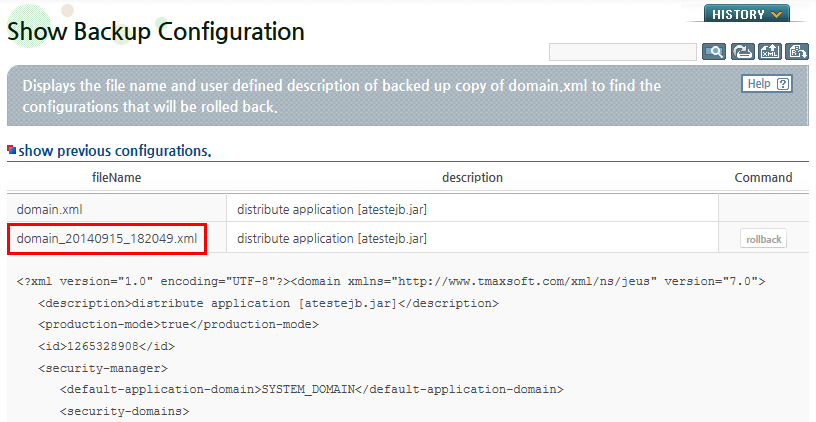
Click a specific XML file from the 'fileName' column to check its details.
Note
When [Lock & Edit] from the left menu is clicked, the rollback icon is enabled under the Command column as shown in the previous figure. Settings can be rolled back using a desired backup file, and dynamic settings are applied to the system using the selected backup file.
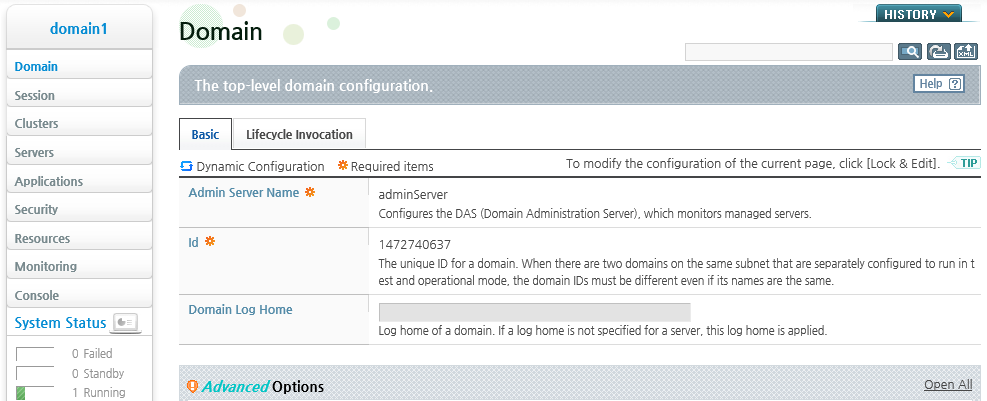
The following are the steps for changing the domain settings in WebAdmin.
-
Click [Domain] from the left menu.
-
Click [Lock & Edit] to change to the configuration mode.
Refer to JEUS WebAdmin Guide. "2.3.2. Menu" for detailed descriptions of the WebAdmin configuration modes.
-
Modify the desired settings and click [OK].
The following describes each item.
Item Description Admin Server Name DAS ID. This cannot be changed after the domain is created. Id Domain ID. This cannot be changed after the domain is created. DomainLog Home Folder name to be shared by servers within a domain. It cannot be changed after a domain is configured. ProductionMode Actual production mode. Auto-reload or hot-swap function is not available. Enable Webadmin Option to use WebAdmin. This is true by default. It can be selectively enabled/disabled. Enable Json Command Option to use Json Command. This is off by default. This can be selectively enabled/disabled. Enable To Resynchronize Applications Option for MS to synchronize applications with DAS when MS is changed from the INDEPENDENT mode to the DEPENDENT mode.
(Default: false, do not synchronize)
Application Repositories Location of the Applications. This can be changed dynamically. Refer to JEUS Applications and Deployment Guide. "1.5.1. Adding, Deleting, and Searching Application Repositories" for detailed information. Group Communication Info Network information used to check internal communications between servers within a domain. The domain must be restarted if this changes.
JEUS allows servers to share their states through multicast. Refer to "2.1. Creating a Domain"for detailed information.
-
'heartbeat-address' and 'heartbeat-port' specify an address and a port to be used in multicast.
-
If a domain configuration is ouside the subnet range, 'use-virtual-multicast' must be set to 'true'.
GMS JEUS Group Management Service (GMS).
This service manages the status of MSs that exist in a domain. It allows DAS to promptly recognize the status of each MS when the status is changed.
The following items are not required. However, they should be properly adjustsed according to the size of a domain.
-
'failure-detection-tries' : Number of times to try to reconnect when a server failure is detected.
-
'failure-detection-timeout' : Time required to detect a server failure.
-
'failure-verification-timeout' : Time required to verify a server failure.
-
'discovery-timeout' : Time required for a starting server to find a group of servers that have already been running.
Note
All settings except for 'Enable Webadmin', 'Enable Json Command', 'Enable To Resynchronize Application', 'Application Repositories', and 'Domain Backup' require the restart of the entire domain to apply the settings. Unlike individual server settings, since domain settings affect the domain configuration, 'Admin Server Name', 'Id', and Group Communication Info should be configured with care when a domain is created.
-
-
Click [Apply Changes] to apply the changes. To cancel pending changes, click [Undo All Changes].
-
After the new settings have been applied, the result is displayed on the screen.
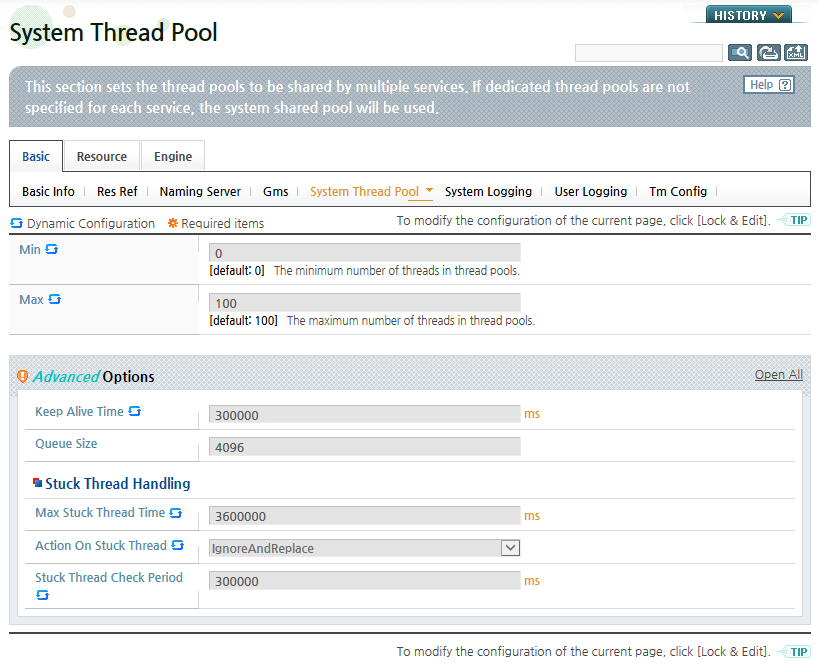
This section describes how to change the system thread pool count and JVM settings of the server by using WebAdmin and the console tool.
This section describes how to change the system thread pool count by using WebAdmin and the console tool (jeusadmin).
Using WebAdmin
The following are the steps for changing the system thread pool count in WebAdmin.
-
Click [Servers] from the left menu to go to the list of servers. Click on a server from the list.
-
Click [Lock & Edit] to change to the configuration mode. Refer to JEUS WebAdmin Guide. "2.3.2. Menu" for detailed information on the Lock configuration mode in WebAdmin.
-
Go to [Basic] > [System Thread Pool]. Change Max from 100 to 120 and then click [OK].
-
Click [Apply Changes] to apply the changes. To cancel the pending changes, click [Undo ALL Changes].
-
After the new settings have been applied, the result is displayed on the screen. Check that for the System Thread Pool, Max has been changed to 120.
Using the Console Tool
Most settings can also be changed using jeusadmin. Unlike WebAdmin, lock is not necessary. Jeusadmin can only change one setting at a time by using an appropriate command, while WebAdmin can change all settings of a domain at once.
Running the modify-system-thread-pool command as in the following example has the same effect as changing the setting using WebAdmin. Refer to JEUS Reference Book. "4.2.5.3. modify-system-thread-pool" for detailed information about the modify-system-thread-pool command.
[DAS]domain1.adminServer>modify-system-thread-pool server1 -max 120
Successfully performed the MODIFY operation for The system thread pool of the server (server1)..
Check the results using "modify-system-thread-pool server1 or show-system-thread
-pool server1"
This section describes how to change a server's JVM settings using WebAdmin and the console tool (jeusadmin).
Using WebAdmin
The following are the steps for changing the server's JVM settings using WebAdmin.
-
Click [Servers] from the left menu to go to the list of servers. Click a server on the list, and then go to [Basic] > [Basic Info].
-
Click [Lock & Edit] to change to the configuration mode. Refer to JEUS WebAdmin Guide. "2.3.2. Menu" for detailed information about configuration mode in WebAdmin.
-
Change the Jvm Option under Jvm Config and click [OK].
-
Click [Apply Changes] to apply the changes.
-
After the new settings have been applied, the result is displayed on the screen. Check that the Jvm Option has been changed.
Using the console tool
To add the server's JVM settings using the console tool (jeusadmin), run the add-jvm-option command as in the following example. The add-jvm-option command compares the user-entered settings to those in the jvm-option list and add the settings that are not in the list already.
[DAS]domain1.adminServer>add-jvm-option -server server1 -opt "-Xmx256m
-XX:MaxPermSize=128m"
Successfully performed the ADD operation for JVM configuration for the server
(sever1)., but all changes were non-dynamic. They will be applied after restarting.
Check the results using "list-jvm-options or add-jvm-option"
To change the server's JVM settings using the console tool (jeusadmin), run the modify-jvm-option command as in the following example. The modify-jvm-option command compares user-entered options with the jvm-option list and modifies the corresponding items.
[DAS]domain1.adminServer>modify-jvm-option -server server1 -old "-Xmx256m
-XX:MaxPermSize=128m" -new "-Xmx512m -XX:MaxPermSize=128m"
Successfully performed the MODIFY operation for JVM configuration for the server
(server1)., but all changes were non-dynamic. They will be applied after restarting.
Check the results using "list-jvm-options or modify-jvm-option"
To delete the server's JVM settings using the console tool (jeusadmin), run the remove-jvm-option command as in the following example. The remove-jvm-option command compares user-entered options with the jvm-option list and deletes the corresponding items.
[DAS]domain1.adminServer>remove-jvm-option -server server1 -opt "-Xmx256m
-XX:MaxPermSize=128m"
Successfully performed the REMOVE operation for JVM configuration for the server
(server1)., but all changes were non-dynamic. They will be applied after restarting.
Check the results using "list-jvm-options or remove-jvm-option"
Note
It is recommended to add one option item at a time to the jvm-option list, and to modify or delete an option by using the list-jvm-option command.