Table of Contents
This chapter describes main features of the [APPLICATION LIST] menu in the project detailed mode.
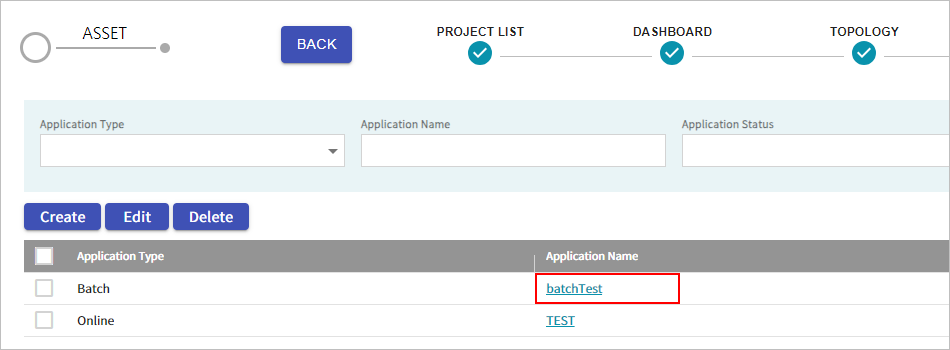
Displays the list of registered applications.
-
In the project detailed mode, go to the [APPLICATION LIST] menu.

-
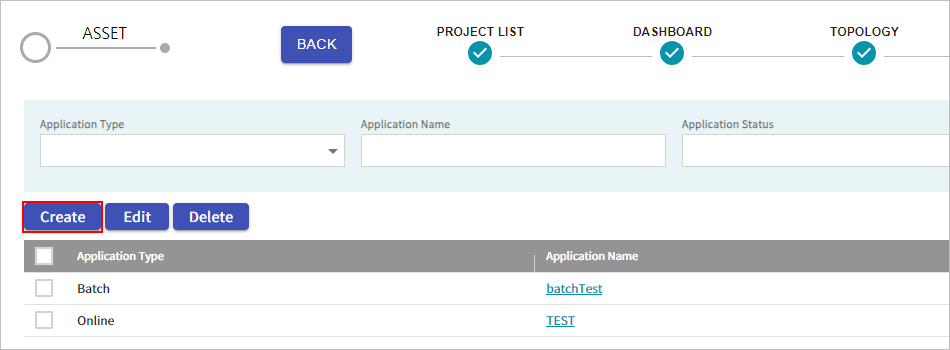
The application list opens, displaying the list of registered applications.

The following describes each section.
-
① Search Conditions
Set the search conditions for the application list. After setting the conditions, click the [Search] button to view the results that meet the conditions in the list. Clicking [Reset] button will reset all the set search conditions.
Descriptions for each item in the list are as follows:
Item Description Application Type
Select the type of application.
Application Name
Enter the name of the application.
Application Status
Select the status of the application.
-
② Application List
Displays the list of applications.
The following describes each item.
Item Description Application Type
Type of the application.
-
Online: Online application
-
Batch: Batch application
-
Map: Online screen application
Application Name
Name of the application. Clicking this name displays details about the applications.
Status
Status of application creation.
Created At
Date and time when the application was created.
-
-
You can add a logical application to the project.
Note
When an application is added, the application directory is added to the following location.
/home/oflab/tup/migrator/{project name}/{application type}/{application name}
-
In the project detailed mode, go to the [APPLICATION LIST] menu.
-
When the application list appears, click the [Create] button.
-
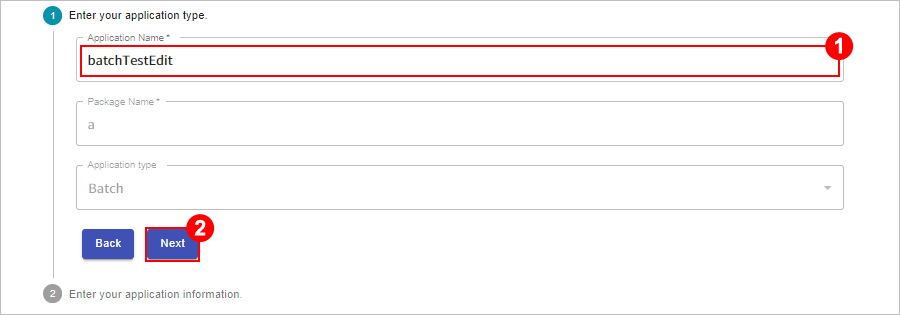
In the first step of the application creation, set the basic information of the application, and then click the [Next] button.
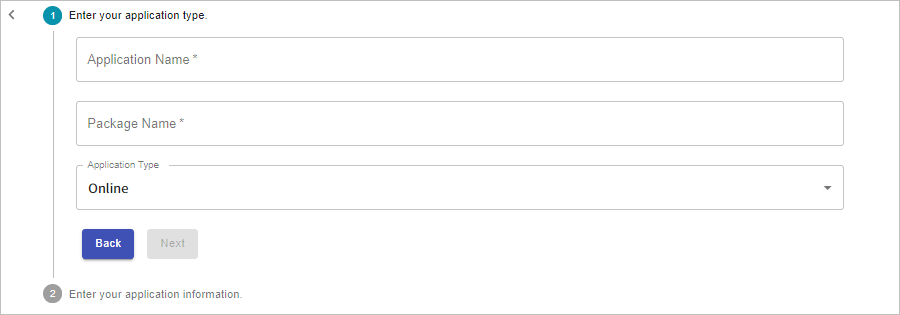
The following describes each item. (* indicates a required field.)
Item Description Application Name *
Enter the application name to be configured in the application configuration file and the physical path.
Package Name *
Enter the package name of the application.
Application Type
Select the type of application that can be created.
-
Online: Online application
-
Batch: Batch application
-
Map: Online screen application
-
-
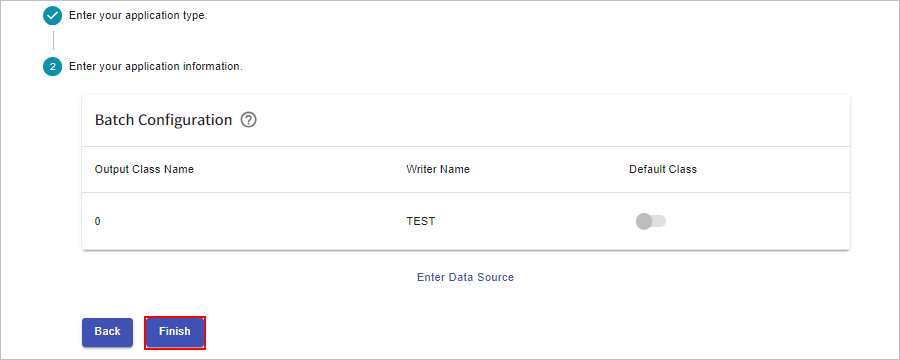
In the second step of the application creation, set the detailed information of the application, and then click the [Finish] button.
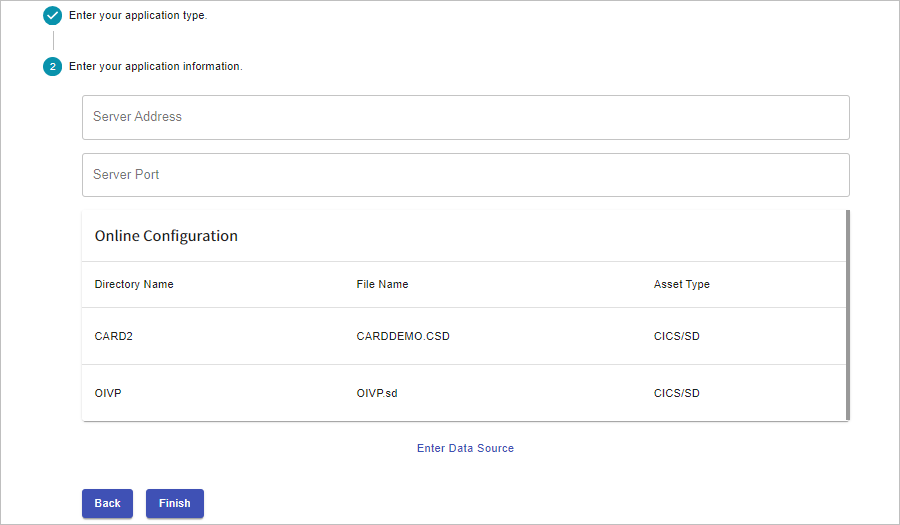
The following describes each item. (* indicates a required field)
Item Description Server Address
Enter the IP address of the server for running the application.
[Note] Applicable only to 'Online' type.
Server Port
Enter the port number of the server for running the application.
[Note] Applicable only to 'Online' type.
Target Application Name
Enter the name of the target online application.
[Note] Applicable only to 'Map' type.
Target Application Address
Enter the IP address of the target online application.
[Note] Applicable only to 'Map' type.
Target Application Port
Enter the port number of the target online application.
[Note] Applicable only to 'Map' type.
Online Configuration
Select one of the assets (ADL or SD) containing the online configuration information.
[Note] Applicable only to 'Online' or 'Map' type.
Batch Configuration
Displays the list of output classes for batch applications.
You can edit output class information in the 'Batch Configuration' section of the [MIGRATOR DASHBOARD] menu. For more information about how to modify output class information, refer to "11.2. Editing Output Class for Batch Application".
[Note] Applicable only to 'Batch' type.
Enter Data Source
Configure the target database settings that will be used by the application in the runtime environment.
-
Name: Enter the data source name of the target database.
-
Driver: Select the driver type of the target database.
-
Host: Enter the IP address of the target database
-
Port: Enter the port number of the target database.
-
Database: Enter the name of the target database.
-
User: Enter the user name of the target database.
-
Password: Enter the password of the target database.
[Note] Applicable only to 'Online' or 'Batch' type.
-
You can modify the name of the added application.
-
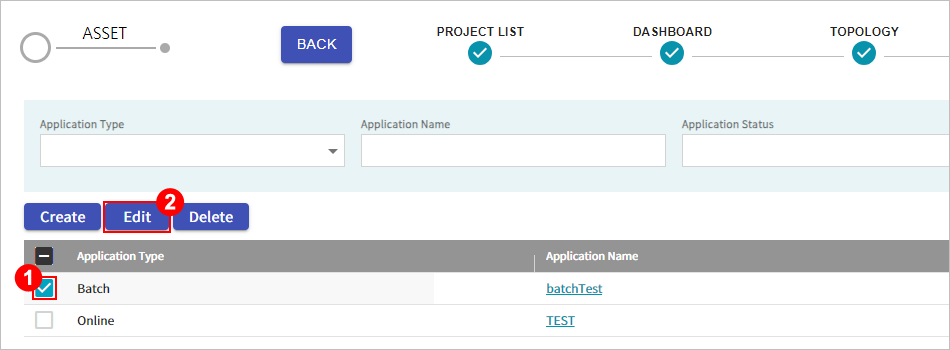
In the project detailed mode, go to the [APPLICATION LIST] menu.
-
When the application list is displayed, you can select the checkbox next to the application you want to edit, and then click the [Edit] button. In this case, only one application can be selected.
-
In the first step of the application modification, enter the new name in the 'Application Name' field and click the [Next] button.
-
In the second step of the application modification, click the [Finish] button.
You can view detailed information about the application.
-
In the project detailed mode, go to the [APPLICATION LIST] menu.
-
When the application list opens, click the name of the application for which you want to check details.
-
The application details screen is displayed.
The following describes each section.
-
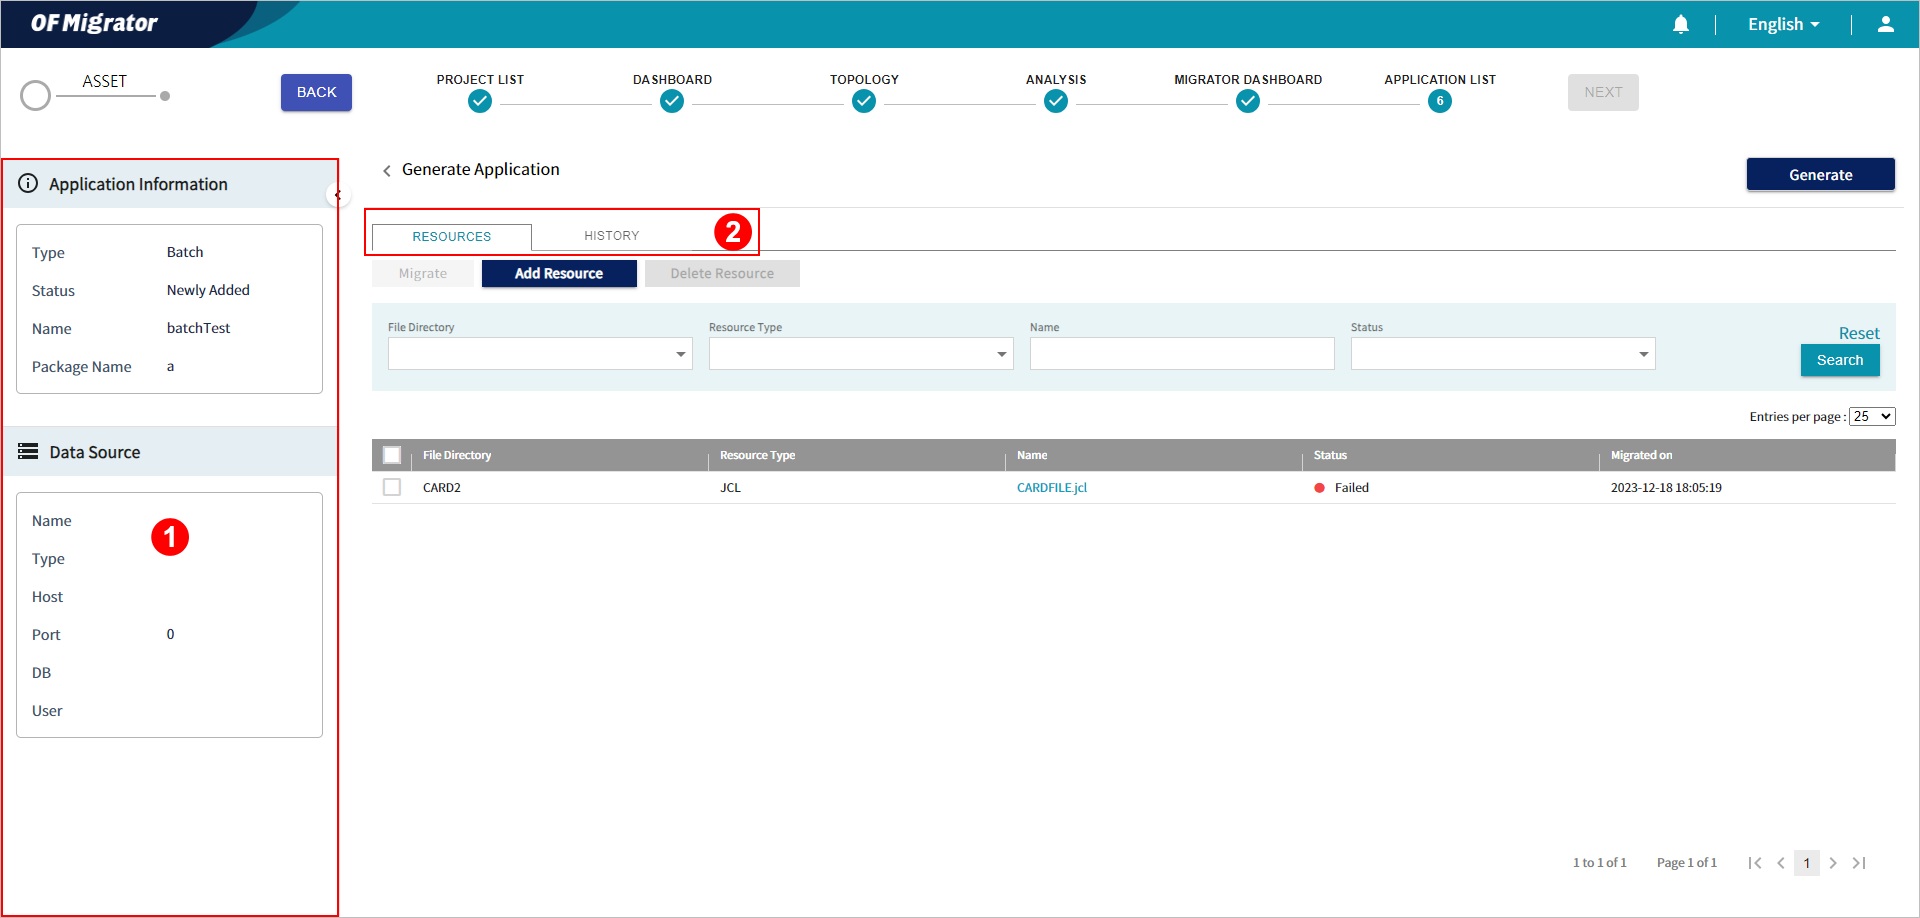
① Basic Information
Displays basic information such as type and name of the application.
The following describes each item.
Category Item Description Application Information
Type
Type of the application.
Status
Status of application creation and migration.
Name
Name of the application.
Package Name
Package name of the application.
Configuration
File Name
Name of the configuration file (asset) designated for online configuration.
Server Address
IP address of the server to run the application.
Server Port
Port Number of the server to run the application.
Target Application Name
Name of the target online application.
Target Application Address
IP address of the target online application.
Target Application Port
Port number of the target online application.
Data Source
Name
Data source name of the target database.
Type
Driver type of the target database.
Host
IP address of the target database.
Port
Port number of the target database.
DB
Name of the target database.
User
User name of the target database.
Note
The information provided may vary depending on the application type.
-
② Detailed Information Tabs
Provides more details about applications.
The following describes each tab.
-
[RESOURCES] Tab
In the [RESOURCES] tab, you can view the list of assets added to the application. You can also add or delete assets and migrate the added assets.
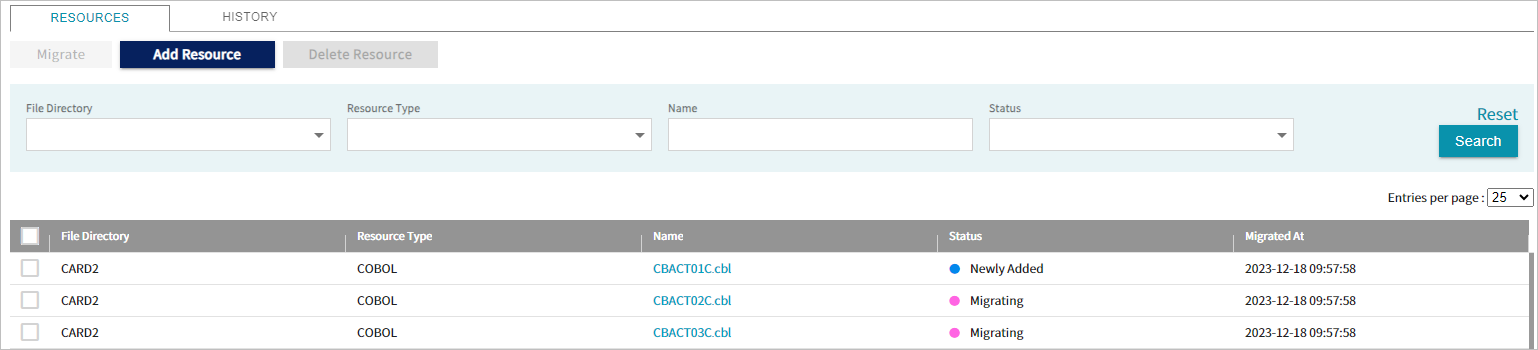
The following describes each item.
| Item | Description |
|---|---|
File Directory | Directory of the asset file. |
Resource Type | Type of the asset file. |
Name | Name of the asset file. |
Status | Result of the asset file migration. |
Migrated At | Date and time on which the asset file was migrated. |
[RESULT] Tab
The [RESULT] tab provides a file tree of the application structure. You can check the content of that file (source code) by clicking the file in the result.
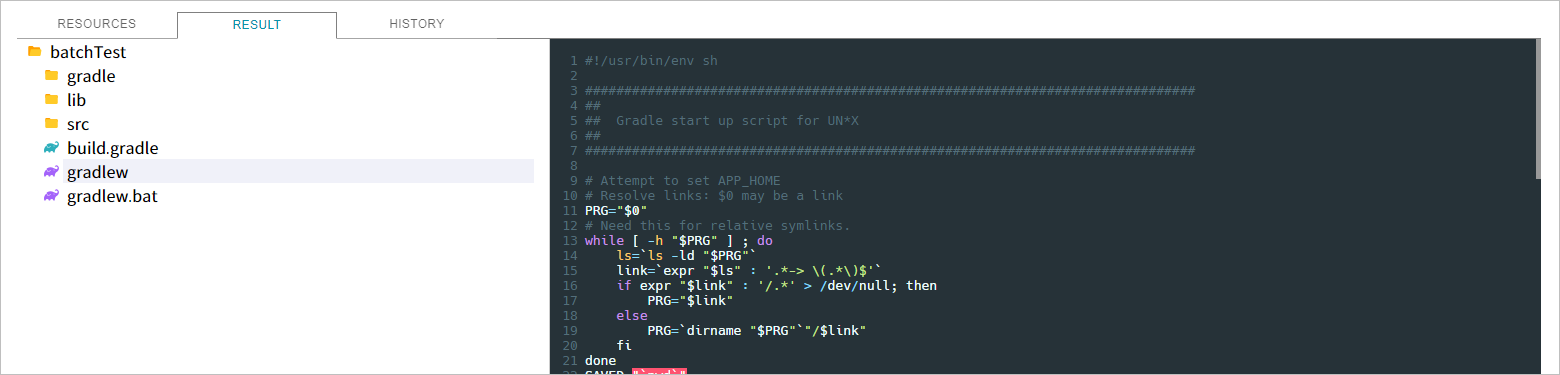
Note
The [RESULT] tab is activated only when an application has been successfully generated.
[HISTORY] Tab
The [HISTORY] tab displays the history of the events raised by the application.

The following describes each item.
| Item | Description |
|---|---|
Application Status | Status of the application at each specific time. |
Message | Message for each application status. |
Date | Time information when the event occurred. |
You can add assets to configure the application.
Note
The types of assets that can be added by application type are as follows:
-
Online: COBOL
-
Batch: JCL, COBOL, PROCEDURE
-
Map: BMS, MFS, PSAM, PANEL
-
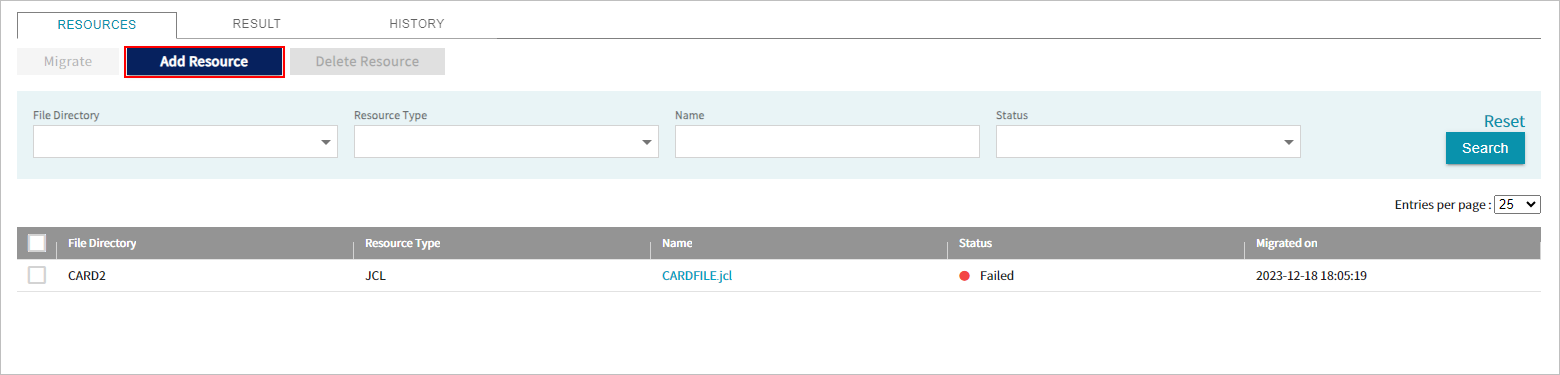
In the application details screen, select the [RESOURCES] tab.
-
Click the [Add Resource] button.
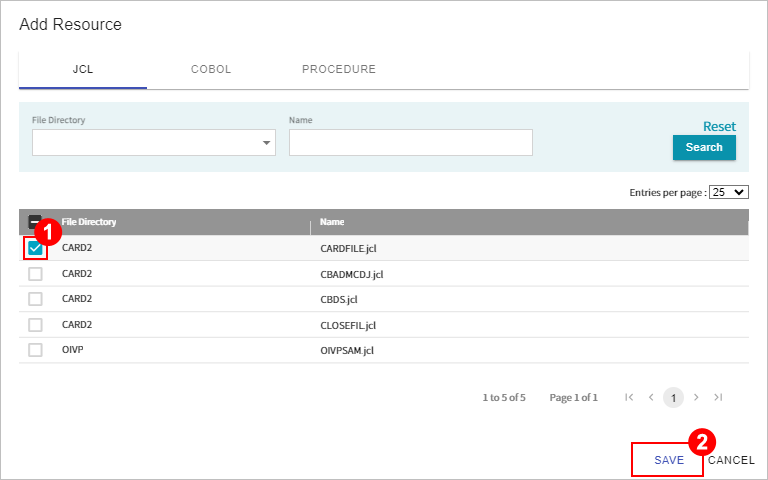
-
When the Add Resource dialog box opens, select the checkbox next to the asset to be added, and then click [Save] button.
You can migrate assets for each application type.
Note
The paths of migrated files for each asset type are as follows:
-
COBOL (Migration results are different for batch and online type in COBOL.)
/home/oflab/tup/migrator/{project name}/{application type}/{application name}/CobolToJava/{file name} -
JCL
/home/oflab/tup/migrator/{project name}/{application type}/{application name}/JclToXml/{file name} -
JCL Utility
/home/oflab/tup/migrator/{project name}/{application type}/{application name}/UtilityToJava/{JCL name}/{utility name} -
Front
/home/oflab/tup/migrator/{project name}/{application type}/{application name}/FrontToReact/{file name}
-
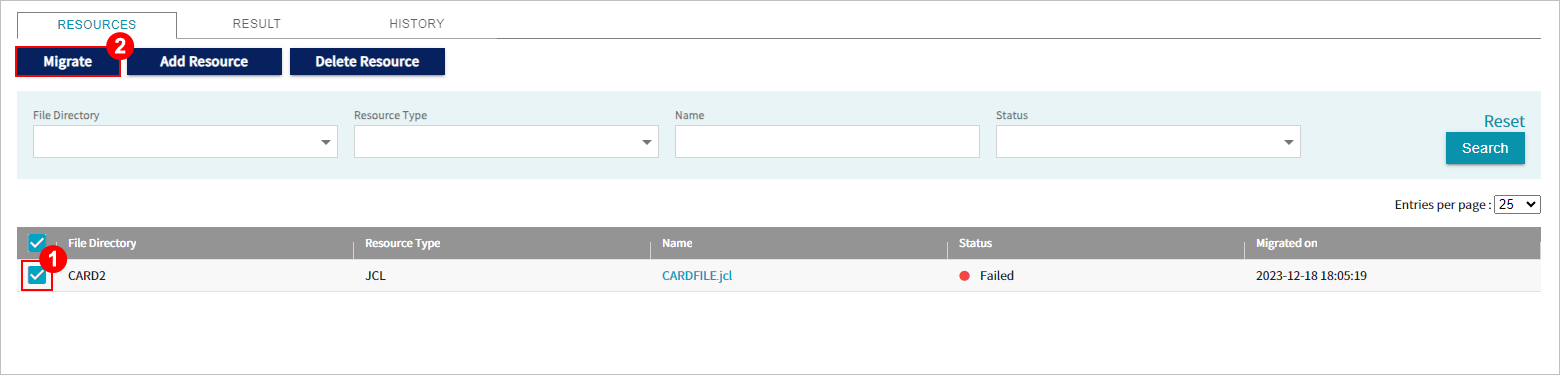
In the application details screen, select the [RESOURCES] tab.
-
Select the checkbox of the asset to be migrated, and then click [Migrate] button.
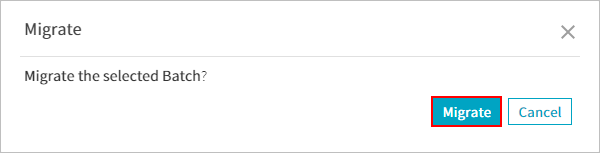
-
When the Migrate dialog box opens, click the [Migrate] button.
-
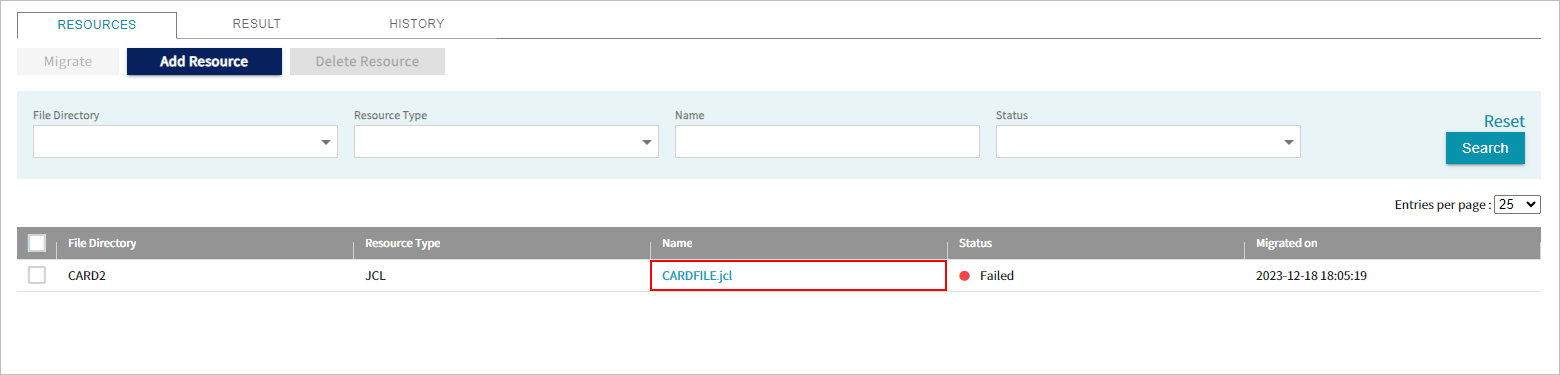
The migration for the selected asset starts. After the migration is completed, you can check the result in the 'Status' column in the table.

The following describes each status.
Status Description Newly Added
Assets newly added to the application.
Succeeded
The asset has been successfully migrated without errors.
Warning
Errors occurred during the migration process, but some assets were successfully migrated.
Failed
The migration has failed due to errors.
You can view detailed information of the asset files added to the application, including basic information of the asset files and migration results.
-
In the application details screen, select the [RESOURCES] tab.
-
In the asset list of the [RESOURCES] tab, click the 'Name' of the asset file for which you want to check details.
-
When the details screen opens, you can check the basic information such as name and status at the top of the screen.
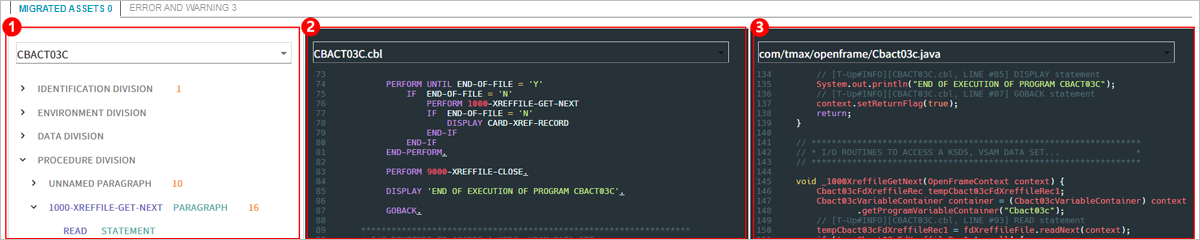
Additionally, the [MIGRATED ASSETS] tab provides the analysis information and the source code of the migrated assets, while the [ERROR AND WARNING] tab displays the detailed messages for errors occurred during the migration.
The following are descriptions about information provided in the [MIGRATED ASSETS] tab.
-
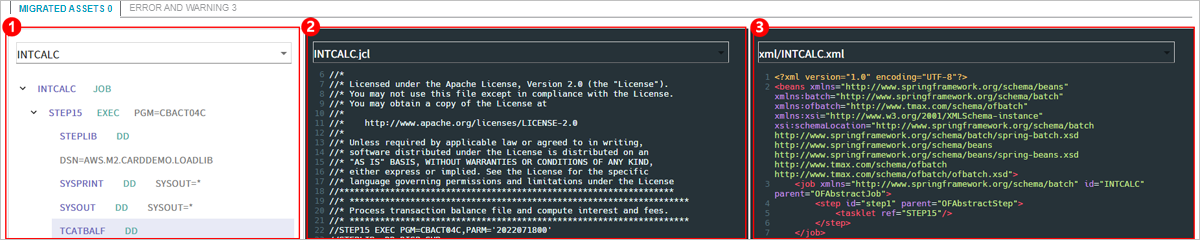
① Provides asset analysis information, original source code mapped to the analysis information, and highlighting of migrated code lines.
② Displays the original source code.
③ Displays the migrated asset source code. You can view the source code for all migrated assets in this section. (CobolToJava)
-
① Provides asset analysis information and highlighting of original source code mapped to the analysis information.
② Displays the original source code.
③ Displays the migrated asset source code. You can view the source code for all migrated assets in this section. (JclToXml, UtilityToJava)
-
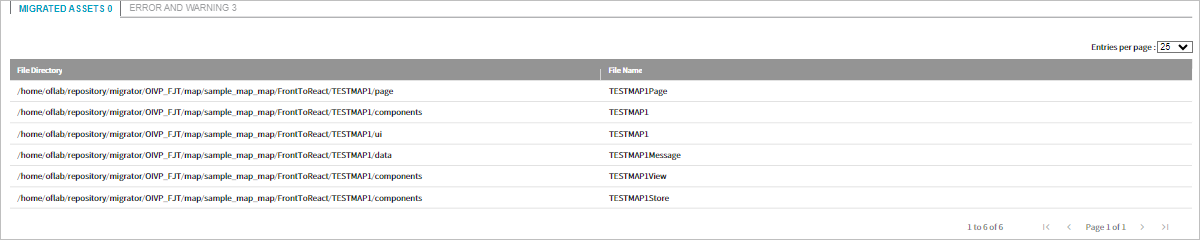
Provides information on the directories and file names for the migrated outputs. (FrontToReact)
-
You can delete the assets added to the application. Deleting added assets will also remove all migrated files.
-
In the application details screen, select the [RESOURCES] tab.
-
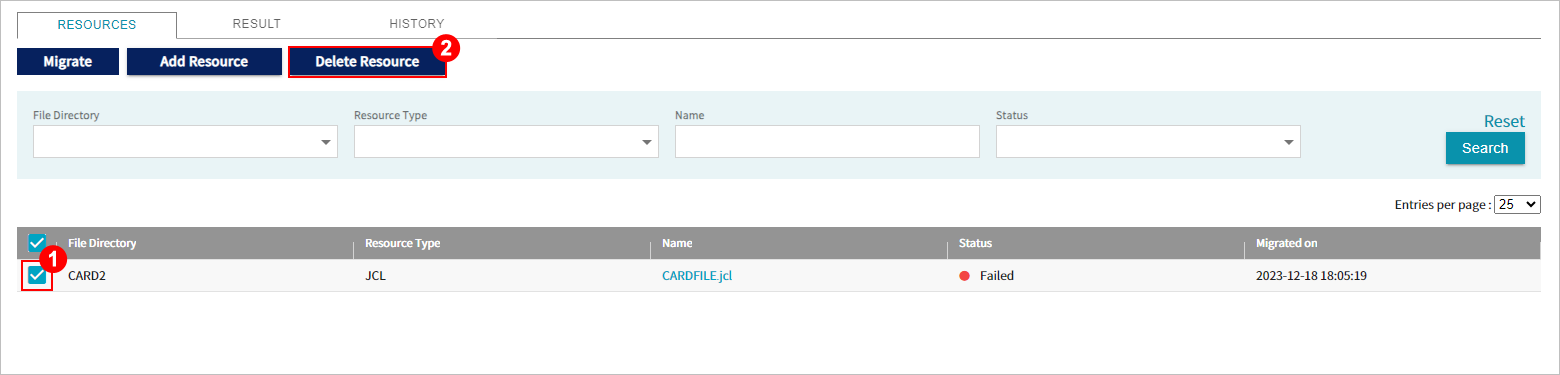
Select the checkbox next to the asset you want to delete from the asset list, and then click [Delete Resource] button.
-
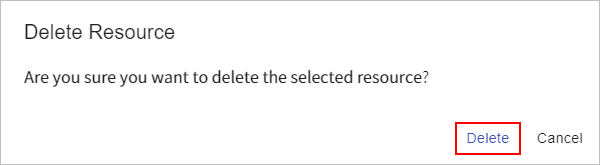
When the Delete Resource dialog box opens, click the [Delete] button.
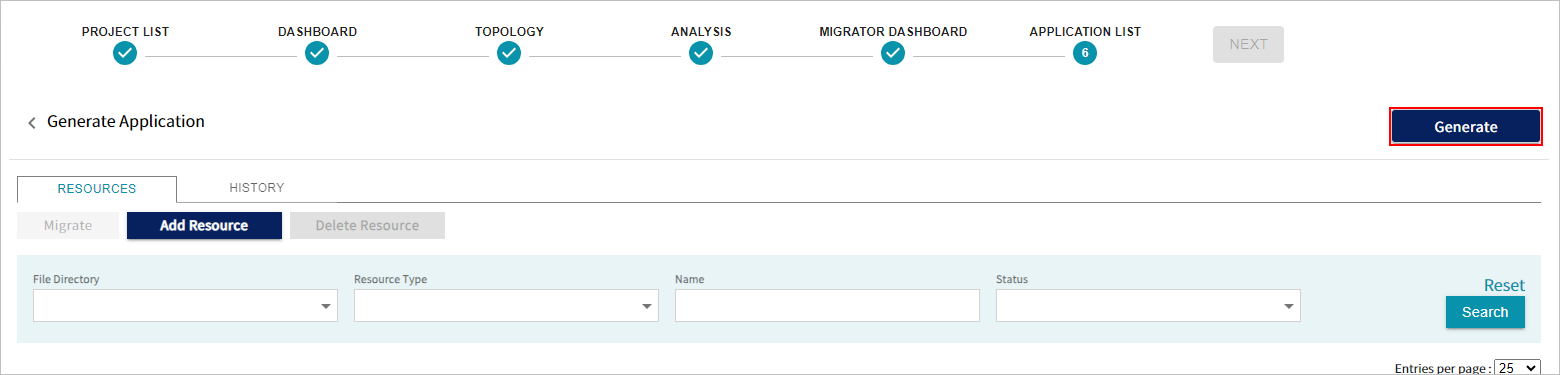
You can generate a buildable project using the migrated files.
-
Click the [Generate] button at the top right of the application details screen.
-
When the application has been successfully generated, its status turns into 'Succeeded', and the [RESULT] tab is activated.
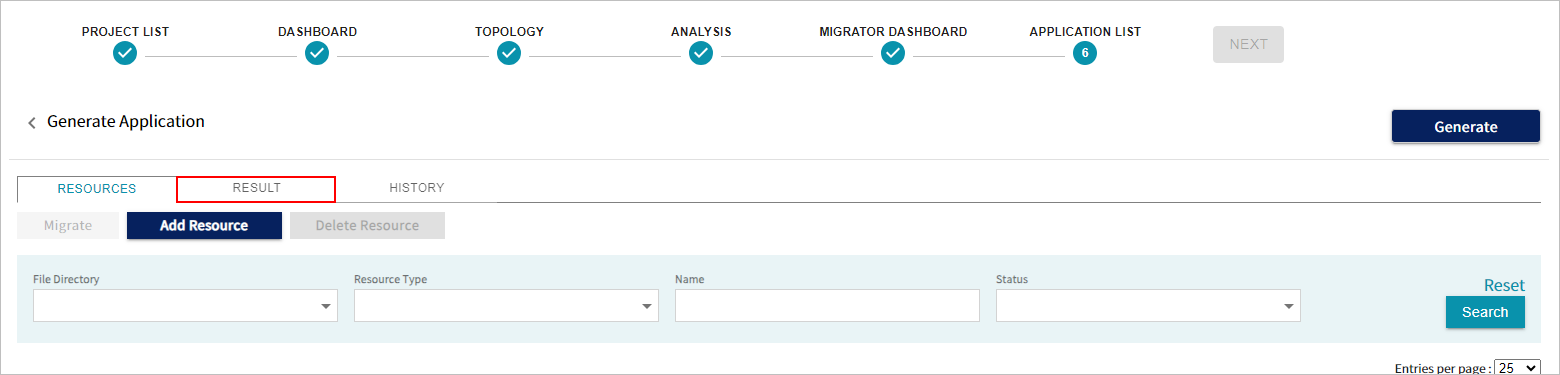
Note
For more information provided in the [RESULT] tab, refer to "RESULT Tab".
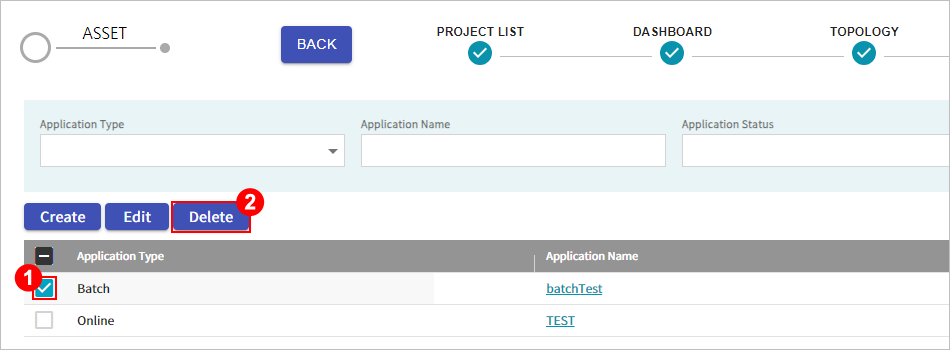
You can delete applications added to the project. Deleting an application will also remove the path of the corresponding application.
-
In the project detailed mode, go to the [APPLICATION LIST] menu.
-
When the application list appears, select the checkbox next to the application to be deleted and click the [Delete] button.
-
When the 'Delete Application' dialog box opens, click the [Delete] button.