Table of Contents
This chapter explains basic concepts of tbAdmin, how to start and close the program, and the environment settings.
tbAdmin is an easy-to-use GUI tool for developing and managing databases.
tbAdmin allows users to execute not only SQL queries, but also the data definition language(DDL), and transaction related SQL statements.
In addition, users can create or execute tbPSM programs, and create or save various SQL statements and tbPSM programs as one file and call them when required.
DBAs can manage and monitor Tibero and execute commands through tbAdmin.
The main functions that tbAdmin provides are as shown below .
-
The environment setting of tbAdmin
-
Inputting, editing, executing, and saving general SQL statements or tbPSM programs
-
Configuring and terminating a transaction
-
Managing schema objects
-
Executing external utilities and programs
-
Managing a database as a DBA
This chapter explains prerequisites for tbAdmin installation. tbAdmin is started up by simply executing a binary executable file, thus this chapter does not contain the installation process.
-
tbAdmin Directory
Users should check whether or not a tbAdmin directory already exists. If it exists, delete the tbAdmin directory.
-
JRE(Java Runtime Environment)
Before starting up tbAdmin, JRE 1.5 version or above should be installed.
JRE 1.5 version can be downloaded from the following location.
http://www.oracle.com/technetwork/java/javase/downloads/index.html
tbAdmin
-
Unzip tbAdmin file in the desired directory.
-
When the file is unzipped, the directory structure will be displayed as shown below.
tbAdmin
    +- linux.gtk.x86
    |   |
    |   +- tbAdmin
    |
    +- linux.gtk.x86_64
    |   |
    |   +- tbAdmin
    |
    +- win32.win32.x86
    |   |
    |   +- tbAdmin
    |
    +- win32.win32.x86_64
        |
        +- tbAdmin
The zip file contains binary executable files that can execute tbAdmin on each platform. Binary executable files exist in tbAdmin, which is a subdirectory of each platform directory.
- linux.gtk.x86
-
Directory which contains tbAdmin executable file which can run on the 32-bit UNIX (including LINUX) platform.
- linux.gtk.x86_64
-
Directory which contains tbAdmin executable file which can run on the 64-bit UNIX platform.
- win32.win32.x86
-
Directory which contains tbAdmin executable file which can run on Windows.
- win32.win32.x86_64
-
Directory which contains tbAdmin which can run on the 64-bit Windows platform.
-
Execute the tbAdmin binary executable file in the directory appropriate for the platform.
If a tbAdmin binary executable file is executed, the Log-in & Connection Config dialog box for configuring information necessary for accessing the database server, will appear.
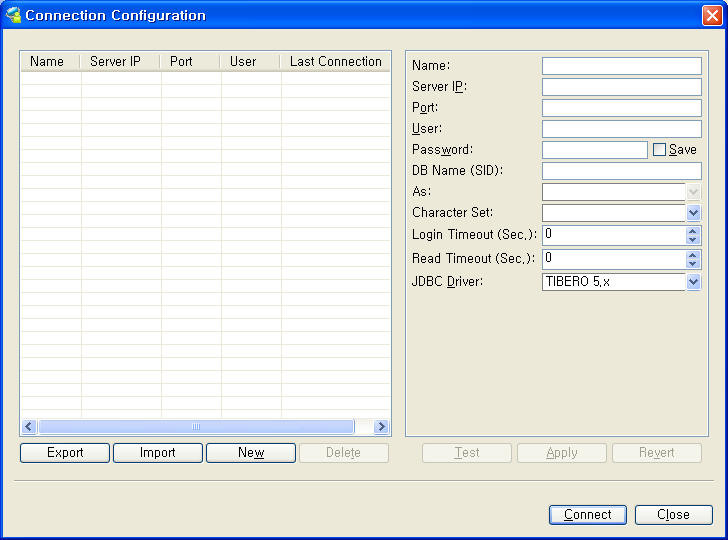
The table below explains each field of the Login & Connection Config dialog.
The table below describes each button used in the Log-in & Connection Config dialog box.
How to access the database server through tbAdmin is shown below.
-
Enter log-in information of the database server in each field of the Log-in & Connection Config dialog box.
-
To check if the entered login information is correct, click the [Test] button. To register the log-in information without testing it, click the [Apply] button.
-
When the login information has been entered correctly, click the [Connect] button. Then, the user will be given access to the database.
When a user successfully accesses the database server, after completing each field of the Login & Connection Config dialog box and clicking the [Connect] button, the start-up screen will appear as shown below.

Note
Detailed explanation about the start-up screen is given in “Chapter 2. Screen Layout”.
Server access information used in tbAdmincan be exported or imported.
-
Export : Click the [Export] button to open a pop-up window. In the window, specify the name and location of the file to save the access information. However, the password is not saved.
-
Import: Click the [Import] button and specify the XML file to import the existing access information.
After starting up tbAdmin, the first step is to set up the environment.
When selecting [Window] -> [Preferences...], the Preferences dialog box which allows users to configure the environment appears, as shown below.
The Preferences dialog displays a hierarchical list of configuration items arranged as a physical tree on the left side of the screen, and the details of the items selected from the tree are displayed on the right side of the screen.
The following table shows the common icons and buttons in the Preferences dialogs.
-
Icon
Icon Description 
Moves to the previous page. 
Moves to the next page. 
Displays the list of environment settings. -
Button
Button Description 
Restores default settings. 
Applies the current changes. 
Applies the environment settings and closes the window. 
Does not apply the environment settings and closes the window.
Note
The configuration items other than Editor Options and Home Directory are eclipse features, so they are not explained in this guide.
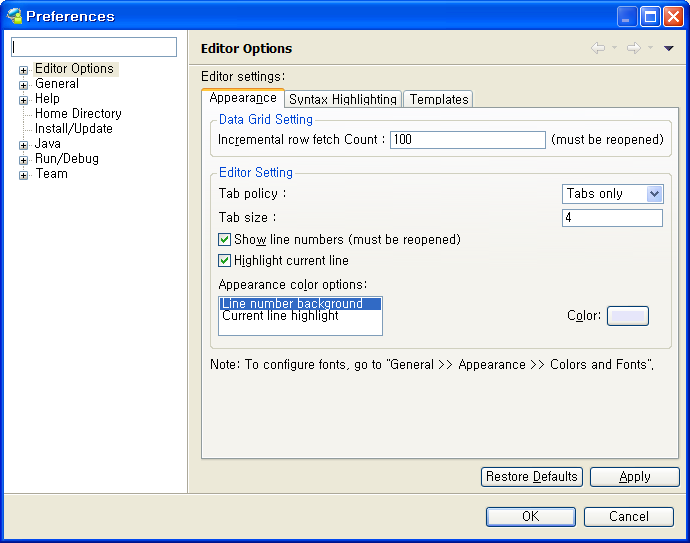
Users can change the environment settings for the editor. Editor Options consists of the [Appearance], [Syntax Highlighting], and [Template] tabs.
[Appearance] Tab
![Editor Options - [Appearance] Tap](resources/editor_options.png)
The following table shows each option in the [Appearance] tab.
-
Data Grid Setting
Option Description Incremental row fetch count Specifies the number of rows to be fetched at a time. -
Editor Setting
Option Description Tab policy Specifies whether to insert tabs or spaces when representing tab characters. Tab size Specifies the size of tab characters. Show line numbers (must be reopened) Displays line numbers. Highlight current line Highlights the current line. Appearance color options -
Line number background: Specifies the background color for the line number.
-
Current line highlight: Specifies the color to highlight the current line.
Color Specifies the color to be used. -
[Syntax Highlighting] Tab
![Editor Options - [Syntax Highlighting] Tab](resources/syntax_highlight.png)
The following table shows each option in the [Syntax Highlighting] tab.
-
Foreground
Option Description SQL Keywords Specifies the color used for highlighting SQL keywords. PL/SQL Keywords Specifies the color used for highlighting PL/SQL keywords. Datatypes Specifies the color used for highlighting data types. Functions Specifies the color used for highlighting functions. String Values Specifies the color used for highlighting string values. Single Line Comments Specifies the color used for highlighting single line comments. Multi Line Comments Specifies the color used for highlighting multiple line comments. -
Color
Specifies the color for the selected Foreground item.
-
Bold
Specifies the bold setting.
[Templates] Tab
![Editor Options - [Templates] Tab](resources/templates.png)
The following table shows each button configurable in the [Templates] tab.
| Button | Description |
|---|---|
| Adds a new template. | |
| Edits the selected template. | |
| Deletes the selected template. |
Table Editor
Users can open the Table Editor dialog by selecting Table Editor under Editor Options.
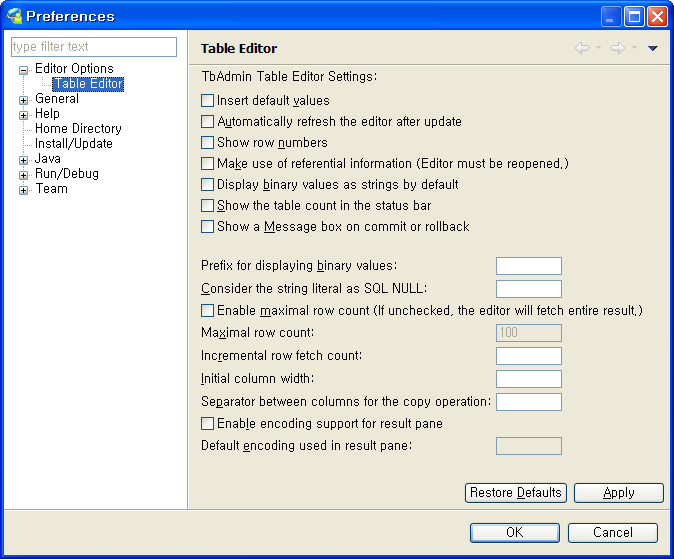
The following table shows each option configurable in the Table Editor dialog.
| Option | Description |
|---|---|
| Insert default values | Specifies whether to input default values for each option in the table. |
| Automatically refresh the editor after update | Specifies whether to automatically update the editor. |
| Show row numbers | Specifies whether to show row numbers. |
Make use of referential information (Table Editor must be reopened) | Specifies whether to use referential information between tables. |
| Display binary values as strings by default | Specifies whether to display binary numbers as a string by default. |
| Show the table count in the status bar | Specifies whether to show table count in the status bar. |
| Show a message box on commit or rollback | Specifies whether to pop up a message box for commit or rollback operations. |
| Prefix to prepend before binary display values | Specifies a prefix value to be added for a binary literal. |
| Consider the string literal as SQL NULL | Specify a character string value to be recognized as SQL NULL. |
Enable maximal row count Unchecked, Table Editor will fetch all results.) | Specifies whether to use the maximum number of rows. (If not specified, the value is filled with the number of all rows.) |
| Maximal row count | Specifies the number of maximum rows. |
| Incremental row fetch count | Specifies the maximum number of rows to be retrieved at a time. |
| Initial column width | Specifies column length. |
| Separator between columns for copy operation | Specifies a separator to be inserted between columns for copy operation. |
| Enable encoding support in result parts | Specifies whether to enable encoding for result parts. |
| Default encoding used in result parts | Specifies the default encoding used in result parts. |
Clicking Home Directory in the Help tree brings up the Home Directory dialog box as shown below.
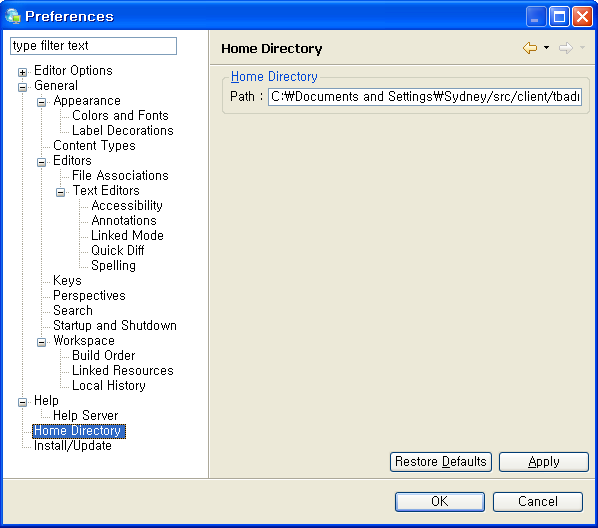
The following table shows the options used in the Home Directory dialog.
| Option | Description |
|---|---|
| Home Directory | Stores a variety of information necessary for a given user of the system. |