Table of Contents
- 7.1. Common DDL Syntax Elements
- 7.2. ALTER DATABASE
- 7.3. ALTER DISKSPACE
- 7.4. ALTER FUNCTION
- 7.5. ALTER INDEX
- 7.6. ALTER MATERIALIZED VIEW
- 7.7. ALTER MATERIALIZED VIEW LOG
- 7.8. ALTER PACKAGE
- 7.9. ALTER PROCEDURE
- 7.10. ALTER PROFILE
- 7.11. ALTER ROLE
- 7.12. ALTER ROLLBACK SEGMENT
- 7.13. ALTER SEQUENCE
- 7.14. ALTER TABLE
- 7.15. ALTER TABLESPACE
- 7.16. ALTER TRIGGER
- 7.17. ALTER TYPE
- 7.18. ALTER USER
- 7.19. ALTER VIEW
- 7.20. AUDIT
- 7.21. COMMENT
- 7.22. CREATE CONTEXT
- 7.23. CREATE CONTROLFILE
- 7.24. CREATE DATABASE
- 7.25. CREATE DATABASE LINK
- 7.26. CREATE DIRECTORY
- 7.27. CREATE DISKSPACE
- 7.28. CREATE FUNCTION
- 7.29. CREATE INDEX
- 7.30. CREATE MATERIALIZED VIEW
- 7.31. CREATE MATERIALIZED VIEW LOG
- 7.32. CREATE OUTLINE
- 7.33. CREATE PACKAGE
- 7.34. CREATE PACKAGE BODY
- 7.35. CREATE PROCEDURE
- 7.36. CREATE PROFILE
- 7.37. CREATE ROLE
- 7.38. CREATE SEQUENCE
- 7.39. CREATE SYNONYM
- 7.40. CREATE TABLE
- 7.41. CREATE TABLESPACE
- 7.42. CREATE TYPE
- 7.43. CREATE TYPE BODY
- 7.44. CREATE TRIGGER
- 7.45. CREATE USER
- 7.46. CREATE VIEW
- 7.47. DROP DATABASE LINK
- 7.48. DROP DIRECTORY
- 7.49. DROP DISKSPACE
- 7.50. DROP FUNCTION
- 7.51. DROP INDEX
- 7.52. DROP MATERIALIZED VIEW
- 7.53. DROP MATERIALIZED VIEW LOG
- 7.54. DROP OUTLINE
- 7.55. DROP PACKAGE
- 7.56. DROP PROCEDURE
- 7.57. DROP PROFILE
- 7.58. DROP ROLE
- 7.59. DROP SEQUENCE
- 7.60. DROP SYNONYM
- 7.61. DROP TABLE
- 7.62. DROP TABLESPACE
- 7.63. DROP TRIGGER
- 7.64. DROP TYPE
- 7.65. DROP TYPE BODY
- 7.66. DROP USER
- 7.67. DROP VIEW
- 7.68. EXPLAIN PLAN
- 7.69. FLASHBACK TABLE
- 7.70. GRANT
- 7.71. LOCK TABLE
- 7.72. NOAUDIT
- 7.73. PURGE
- 7.74. RENAME
- 7.75. REVOKE
- 7.76. TRUNCATE TABLE
This chapter describes the data definition language (DDL) provided by Tibero It first introduces the common syntax included in most DDL commands, and then describes each command.
DDL commands are listed in alphabetical order. Each command contains a description, syntax, and example. Each command is formatted according to [Figure 3.1], and keywords and syntax elements are described in tables.
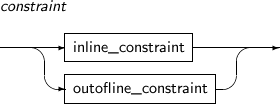
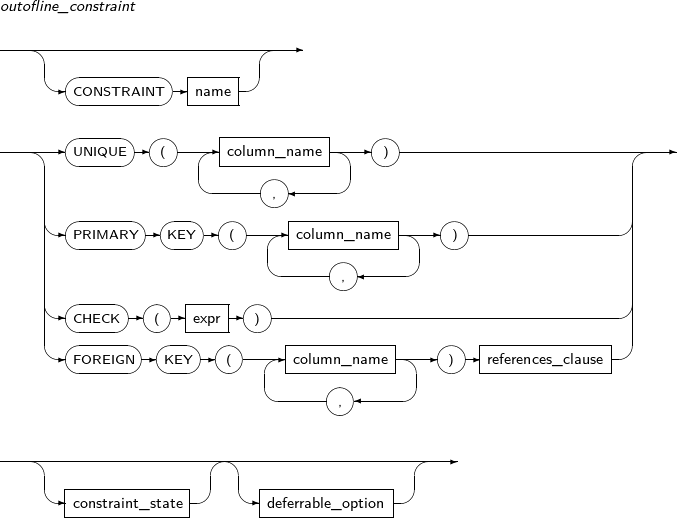
Constraints can be set to ensure the integrity of data that is contained in a table or view. Constraint names are optional. If omitted, a unique name will be generated automatically by the system. The constraints are NOT NULL, UNIQUE, PRIMARY KEY, FOREIGN KEY, and CHECK.
A detailed description of each constraint follows:
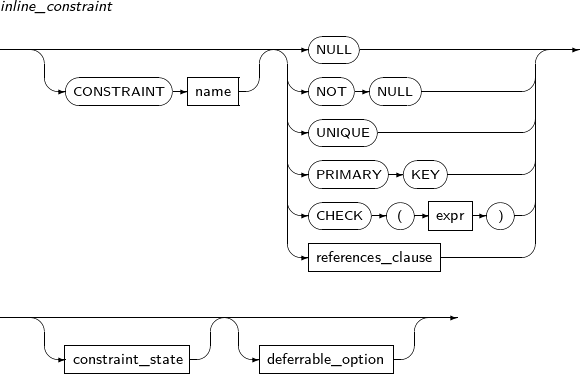

NOT NULL
This constraint enforces that a column cannot accept a NULL value. A value must always be present. On the contrary, if the constraint NULL, then null value is allowed. If neither of them is specified in a column, NULL is the default value.
UNIQUE
This constraint ensures that the data in a column is unique. A combination of values of columns in one row cannot be used for a combination of column values in another row. In other words, the same combination of column values cannot be specified in two or more rows at the same time.
The UNIQUE constraint allows a null value in the columns corresponding to the constraint. If the unique constraint contains only one column, many rows can have a null value in the column.
However, if the unique constraint contains many columns, it does not allow a combination of column values to be the same while only some of the columns are NULL, except when all of the columns are NULL.
The following example illustrates how to specify a UNIQUE key constraint:
UNIQUE(a, b)
As above, if the constraint is applied to columns a and b, it allows the values (1, null) and (null, 2), but doesn't allow two or more values of (1, null). However, if every column value is null (null, null), many rows can have that value.
PRIMARY KEY
This constraint has the characteristics of both the NOT NULL and UNIQUE constraints. A single table or view can have only one primary key constraint.
Tibero creates a unique index for columns that have both unique and primary key constraints. If an index is not specified in constraint_state, a unique index will be created automatically, or an existing unique constraint will be used.
FOREIGN KEY
The FOREIGN KEY constraint enforces a relationship between two key columns; a foreign key and a referenced key.
The column specified as the foreign key can only contain a value that already exists in the column specified as the referenced key. This also applies to a foreign key composed of multiple columns.
The data types and the number of columns specified as the foreign key should be the same as those specified by the referenced key.
The following example illustrates how to specify a foreign key constraint:
REFERENCED KEY = (1,2), (2,3), (4,2)
FOREIGN KEY   = (1,2), (2,3), (4,2)
As shown above, if (1,2), (2,3), (4,2) are the values that already exist in the columns specified as the referenced key, the columns specified as the foreign key can contain only (1,2), (2,3), or (4,2). Other values are not allowed. When referencing a column of another table, the REFERENCE OBJECT privilege is required for the corresponding table.
A single column can participate in several foreign key constraints. The referenced keys must be columns that are specified as a unique key or a primary key.
The referenced key columns can from the same table or another table. When referencing a column of the same table, the table name is optional.
When a value in the column of the referenced key is deleted, referential integrity can be compromised. To secure referential integrity, the foreign key needs to be handled at the same time.
For columns that have a foreign key constraint, Tibero internally creates a non-unique index or uses an existing index.
The options that can be set to handle foreign keys are as follows:
| Option | Description |
|---|---|
| ON DELETE | Specifies the action to be taken when deleting the referenced key value. |
| CASCADE | Deletes the foreign key values along with the targeted record. |
| SET NULL | Changes the foreign key value to NULL. |
CHECK
The CHECK constraint ensures that the condition expressed in expr is always true. It evaluates the condition whenever DML occurs in the table. If the condition is not satisfied, an error occurs.
Only one column can be used in the condition expression of the CHECK constraint of inline_constraint. For the CHECK constraint of outofline_constraint, every column of a table can be used. Columns of another table cannot be used in the condition expression.
Note
Constraints composed of a mix of unique, primary, and foreign key constraints cannot contain more than 32 columns.
A unique or primary key constraint uses an index with its columns. Therefore, the entire length of composed columns cannot exceed the maximum length allowed for an index.
A unique key and a primary key composed of the same columns cannot be specified at the same time.
LONG and LONG_RAW cannot be included in the key column of a unique, primary, or foreign key constraint.
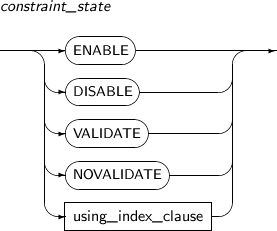
constraint_state enables or disables a constraint and can be specified to verify whether existing data satisfies the constraint.
Constraint states can be specified before or after the constraint is defined.
A detailed description of constraint_state follows:
-
Syntax

-
Components
-
constraint_state
Component Description ENABLE Indicates that a constraint will be applied to new data that is input.
By default a constraint will be set to ENABLE.
When ENABLE is set for a disabled constraint, any data that is input afterwards will be checked against the constraint again.
When a unique or primary key constraint become enabled, any unique index that already exists in the corresponding columns will be used. If a unique index doesn't exist, a new unique index will be created automatically.
Foreign key constraints that reference a non-unique index will automatically create a new index.
DISABLE Indicates that a constraint will not be applied to new data that is input.
When unique, primary, or reference key constraints are disabled, the related index will be deleted. A foreign key which refers to a disabled unique key or primary key cannot be set to ENABLE. If the index that the constraint uses existed prior to the creation of the constraint, it will not be deleted.
VALIDATE Checks and guarantees that data that already exists in the table satisfies the constraint.
If VALIDATE is set but some data does not satisfy the constraint, an error will occur and the DDL statement will fail.
If DISABLE VALIDATE is set, the statement will guarantee the integrity of existing data but will not restrict any new data that is input.
NOVALIDATE NOVALIDATE will not check if data that already exists satisfies the current constraint.
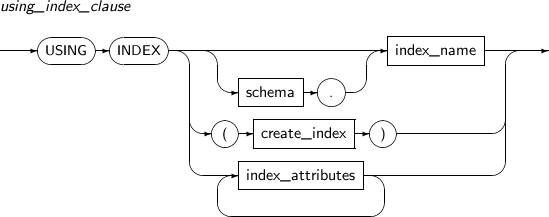
using_index_clause Index used to set a unique or primary key.
If schema.index_name is specified, it will use the corresponding index. If create_index is specified, an index will be created.
Refer to “7.29. CREATE INDEX” for detailed information about create_index and index_attributes.
-
using_index_clause
Component Description schema Schema to which the index to be used belongs. By default, the schema of the current user will be used. index_name Index name to be used. create_index Creates and uses a new index. Refer to“7.29. CREATE INDEX” for details. index_attributes Index properties. Refer to “7.29. CREATE INDEX” for details. -
atbl_con_alterstate_cl
Component Description ENABLE Refer to constraint_state in component descriptions. DISABLE Refer to constraint_state in component descriptions. VALIDATE Refer to constraint_state in component descriptions. NOVALIDATE Refer to constraint_state in component descriptions. PRIMARY KEY Primary key constraint. UNIQUE column_name Unique key constraint. In column_name, specify the column name in which the unique key constraint is specified. CONSTRAINT constraint_name Constraint name whose state will be changed. using_index_clause Refer to constraint_state in component descriptions. CASCADE Disables a primary or unique key constraint and all dependent foreign keys. This option must be included when constraints which have a foreign key are disabled.
KEEP INDEX Disables constraints without deleting the related index.
This is the default value.
DROP INDEX Removes the index associated with the constraint.
-
Constraints are not checked with every DML statement, but at the time of commit. Constraints are checked on the data modified through DML since the last commit.
If constraints are not met at the time of the commit, all data are rolled back to the point of the last commit.
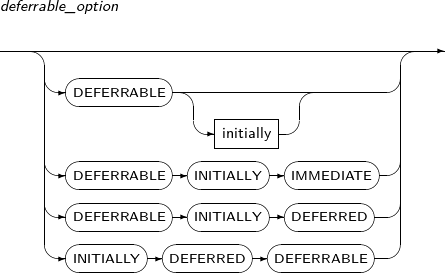
A detailed description of deferrable_option is as follows:
-
Syntax
-
Component
-
deferrable_option
Component Description DEFERRABLE (INITIALLY (IMMEDIATE)) Constraint clause that specifies deferrable constraints.
This is used when specifying deferrable constraints, but constraints are checked after each DML as with other constraints. INITIALLY or IMMEDIATE can be omitted without effecting the result.
DEFERRABLE INITIALLY DEFERRED Deferrable constraint is used, and constraints are checked only at the time of commit.
INITIALLY DEFERRED DEFERRABLE Deferrable constraint is used, and constraints are checked only at the time of commit. Same as DEFERRABLE INITIALLY DEFERRED.
-
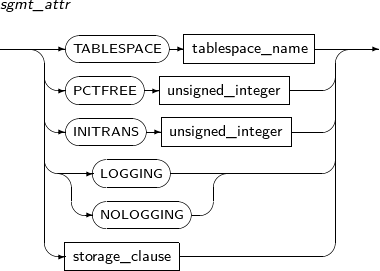
Specifies the physical characteristics and tablespace of a storage space.
A detailed description of sgmt_attr is as follows:
-
Syntax
-
Components
Component Description TABLESPACE tablespace_name Tablespace where the table data should be saved. By default, the user's default tablespace will be used.
For temporary tables, the default temporary table space will be used.
PCTFREE unsigned_integer How many extra spaces to use in anticipation of increased data.
Specify a number between 1 and 99. The default value is 10.
INITRANS unsigned_integer Percentage of the space to be used by transaction entries in each disk block. As long as space is available, the transaction entries will automatically extend when necessary, so a large value is not necessary for this parameter.
The minimum value is 1 and the maximum value varies depending on the disc block size. The default value is 2.
LOGGING / NOLOGGING If Direct-Path Loading is used, Redo logs are not recorded. However, in Archive Mode, logs are recorded.
If not specified, the default value is LOGGING.
storage_clause Detailed properties of a segment. Refer to “7.1.5. Storage_clause” for details.
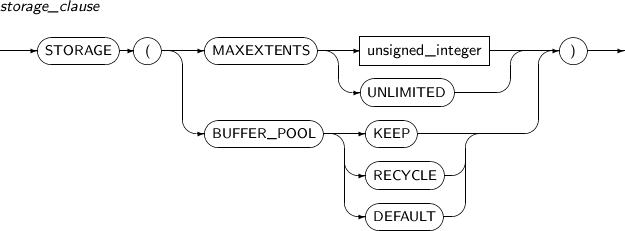
Defines detailed properties of a segment.
A detailed description of storage_clause follows:
-
Syntax
-
Components
Component Description MAXEXTENTS A limited number of extents will be allocated to a segment. unsigned_integer The maximum number of extents when limiting the number of extents. UNLIMITED Does not limit the number of extents.
The default is UNLIMITED.
BUFFER_POOL Which buffer pool the data block of the segment will be inserted to. KEEP Stores the segment block in memory by inserting it to KEEP buffer pool, which reduces the amount of I/O. The DB_KEEP_CACHE_SIZE parameter must be set in the $TB_SID.tip file in order to set the KEEP buffer pool in the buffer cache. If the DB_KEEP_CACHE_SIZE parameter is not set, setting BUFFER_POOL KEEP has no effect. RECYCLE Re-enters the segment block into the RECYCLE buffer pool to prevent the DEFAULT buffer pool from containing unnecessary buffer cache data.
The DB_RECYCLE_CACHE_SIZE parameter must be set in the $TB_SID.tip file in order to set the RECYCLE buffer pool in the buffer cache. If the DB_RECYCLE_CACHE_SIZE parameter is not set, setting BUFFER_POOL RECYCLE has no effect.
DEFAULT If DEFAULT is specified or the BUFFER_POOL option is not specified, the DEFAULT buffer pool will be used.
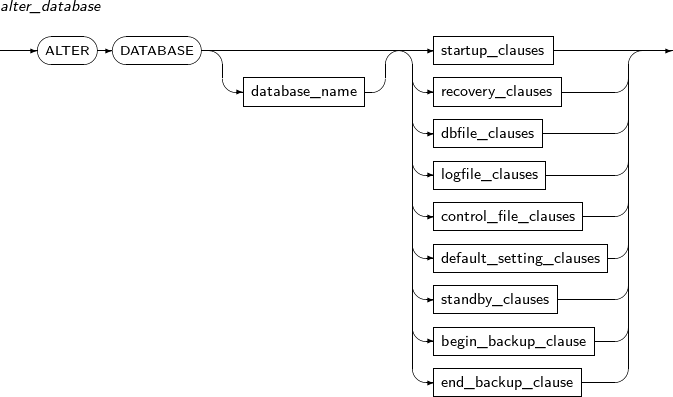
ALTER DATABASE changes the state of a database or component files. It is also used to recover a database.
A detailed description of ALTER DATABASE follows:
-
Syntax

-
Privileges
The SYSDBA privilege is required to run the ALTER DATABASE statement.
-
Components
-
alter_database
Component Description database_name Specifies the database to be changed. database_name can be omitted.
The value for this argument must be the same as the value specified in DB_NAME of the file $TB_SID.tip.
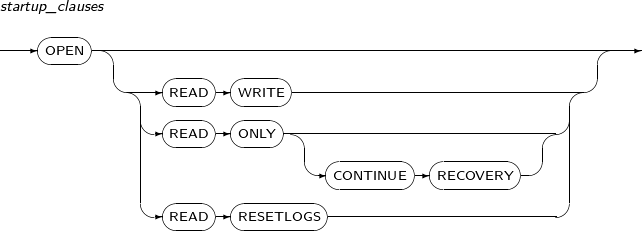
startup_clauses Starts the database so that users can access it.
Applicable only when the database is in the mount state.
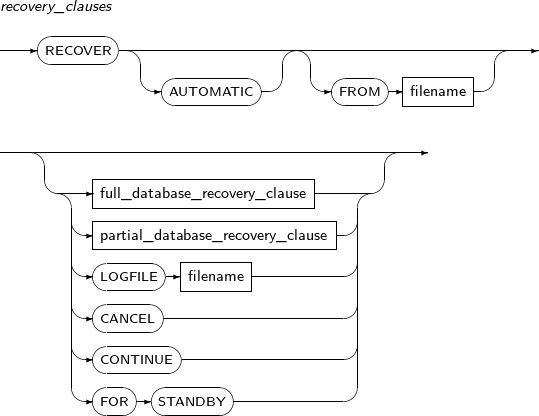
recovery_clauses Performs media recovery.
Applicable only when the database is in the mount state.
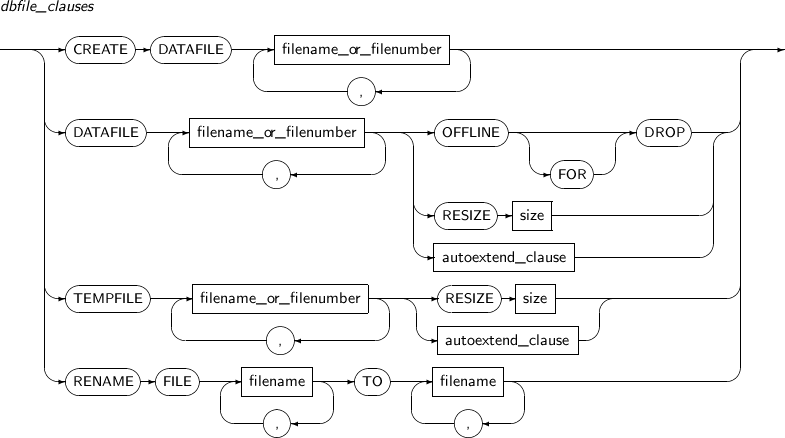
dbfile_clauses Adds or recreates a datafile.
This clause is divided into two types: one for recovering a file and the other for modifying a data file or a temporary file.
A file can be specified with an entire path or a file number.
The data file and temporary file number can be retrieved by using the following views:
-
V$DATAFILE
-
V$TEMPFILE
-
V$RECOVER_FILE
-
DBA_DATA_FILES
-
DBA_TEMP_FILES
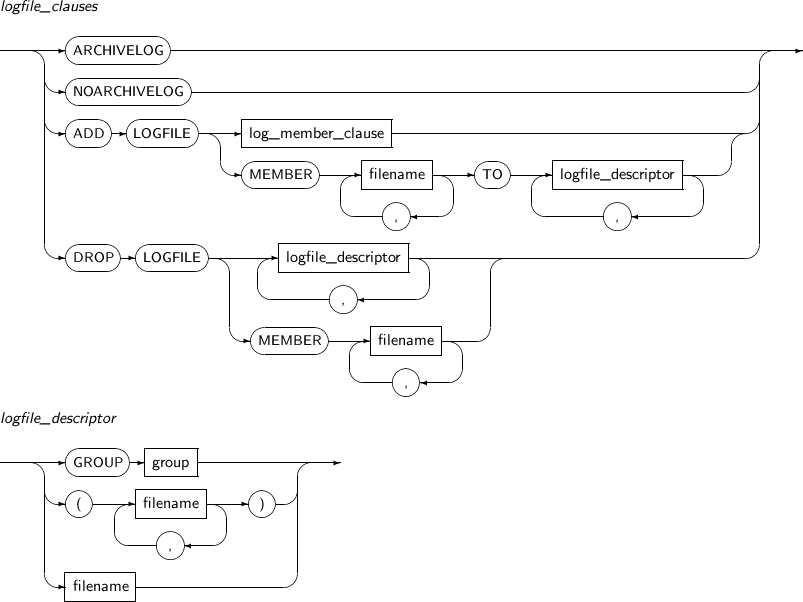
logfile_clauses Activates ARCHIVELOG mode, or adds or removes a log file.
Applicable only when the database is in the mount state.
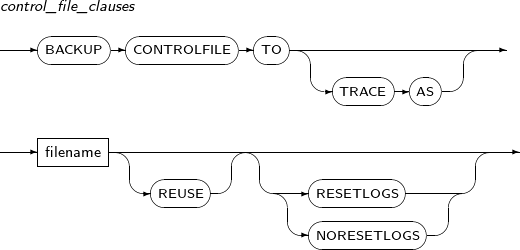
control_file_clauses This clause is divided into two types: one for physically copying the control file and generating a backup as a specified file, and the other for saving a statement that newly creates a control file to a specified file. That latter one can be used with various options.
If the file already exists, use the REUSE option.
The CREATE CONTROL FILE statement is divided into two cases: one with the RESETLOGS option and the other without the RESETLOGS option.
default_setting_clauses Changes the default tablespace of the database.
TEMPORARY tablespace and a regular tablespace can be modified.
standby_clauses Processes the jobs associated with the Standby database. begin_backup_clause Begins database backup dynamically. If tablespaces to back up are not specified, the entire database is backed up. end_backup_clause Ends database backup. -
-
startup_clauses
Component Description READ WRITE Starts the database in READ WRITE mode.
Users can read, write, and save to the Redo log.
By default, the mode is READ WRITE.
READ ONLY Allows users read-only access. Therefore, users cannot save to the Redo log. READ ONLY CONTINUE RECOVERY Allows a Standby database to be opened for read-only access while Redo is still being applied. Applicable only when the database is in the Standby state.
For more information, refer to Tibero Administrator's Guide.
READ RESETLOGS Resets the current log sequence number to 1 and archives any unarchived logs.
The remaining redo logs will be deleted as they are no longer necessary.
-
recovery_clauses
Component Description AUTOMATIC Automatically creates the name of the log file necessary to continue the recovery process.
When an automatic recovery is enabled, the online log file and the archive log file must have been correctly defined in control log file.
The user can place the archive log files in a desired directory by using the FROM clause. If the FROM clause is not specified, it defaults to the directory specified in the
LOG_ARCHIVE_DESTparameter.full_database_recovery_
clause
Starts the full recovery of a database.
If not specified, a media recovery will start.
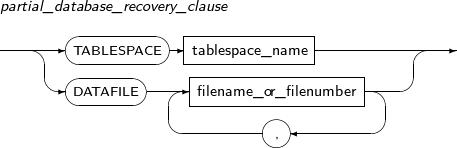
partial_database_recovery_
clause
Starts the recovery of a specific tablespace or datafile. LOGFILE Continues a recovery by applying the log file specified in this option. filename Specifies a file name. CANCEL Finishes an incomplete recovery. FOR STANDBY Builds standby with the primary's hot backup. A recovery is performed by following these steps:
Step Name Description 1 Start The recovery starts. 2 Continue The recovery sequentially proceeds using log files. 3 Finish The recovery completes. Recovery is divided into two types:
-
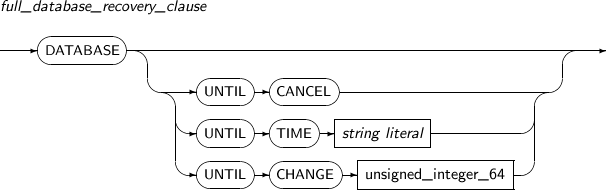
full_database_recovery_clause
Component Description UNTIL CANCEL Performs an incomplete recovery.
Specifies that log files will be recovered until the user ends the operation by using UNTIL CANCEL.
UNTIL TIME Specifies that data up to a certain time will be recovered.
string literal A data literal format must be used for UNTIL TIME.
UNTIL CHANGE Specifies that data up to a certain TSN value will be recovered.
The TSN value can be retrieved using the V$LOG view.
unsigned_integer_64 Specifies the TSN value when UNTIL CHANGE is used. -
partial_database_recovery_clause
Component Description TABLESPACE Recovers a specific tablespace. It is generally used to alter the OFFLINE status of the tablespace to online. tablespace_name Specifies the name of the database for which to perform media recovery. filename_or_filenumber Specifies the name or number of the data file for which to perform media recovery. -
dbfile_clauses
Component Description CREATE Creates an empty data file when there is no data file. Media recovery will be performed on the empty data file.
Applicable only when the database is in the mount state.
DATAFILE Explicitly specifies a data file by its name or number.
Multiple files can be used. Separate with commas (,).
filename_or_filenumber Specifies the file name or number. OFFLINE FOR DROP Drops a tablespace that contains an unrecoverable file during system operation.
Applicable only when the database is in the mount state.
RESIZE size Increases or decreases a file size.
The file size is specified with size. The size is (number of BLOCKs * DB_BLOCK_SIZE).
If a user tries resize the file to a smaller size, the file will remain the current size.
autoextend_clause Changes the AUTOEXTEND property. Refer to “7.24. CREATE DATABASE” for details. TEMPFILE Specifies a temporary file by its name or number.
Multiple files can be used. Separate with commas (,).
RENAME FILE Changes a file name. filename TO filename Changes the name of the file from the first filename to the second filename.
Multiple files can be used. Separate with commas (,).
-
logfile_clauses
Component Description ARCHIVELOG Activates ARCHIVELOG mode. NOARCHIVELOG
Activates NOARCHIVELOG mode.
A database running in NOARCHIVELOG mode can perform only a very limited recovery of changes.
ADD LOGFILE Adds online log files.
Either a log group can be added as a whole, or a particular log file can be added as a member of a group. The log file to be added must be specified with an absolute path.
This clause is not valid for the current log group.
This is applicable in both the mount state and while the database is running.
log_member_clause Specifies a log group number using a GROUP clause. Refer to “7.24. CREATE DATABASE” for details. MEMBER Specifies a certain log member file within a log group. filename Specifies a file name. logfile_descriptor Specifies a log group or a log file. DROP LOGFILE Deletes an online log file.
Like ADD LOGFILE, either a log group can be deleted as a whole, or a particular member of a group can be deleted.
This clause is not valid for the current log group.
This is applicable in both the mount state and while the database is running.
-
logfile_descriptor
Component Description GROUP group Specifies a log group to be added or deleted as a log file. filename Specifies a log member to be added or deleted as a log file. -
control_file_clauses
Component Description BACKUP CONTROLFILE TO Backs up the physical copy of the control file. BACKUP CONTROLFILE TO TRACE AS Backs up the CREATE CONTROLFILE statements. filename Name of a file where the physical copy of the control file or CREATE CONTROLFILE statements are saved. REUSE Locates the CREATE CONTROLFILE statements in an existing file. RESETLOGS Initializes logs while ignoring the existing log files. NORESETLOGS Continues to use the existing log files. -
default_setting_clauses
Component Description DEFAULT Changes a DEFAULT tablespace. TEMP Specifies the TEMP tablespace. If TEMP or UNDO is not specified, this becomes a general tablespace. TEMPORARY Specifies the TEMPORARY tablespace. If TEMPORARY is not specified, the tablespace becomes a regular tablespace. TABLESPACE Specifies a default tablespace name. tablespace_name Specifies the name of a tablespace. -
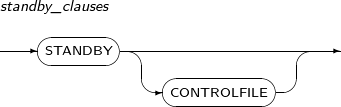
standby_clauses
Component Description STANDBY Switches into Standby mode. This is applicable only when the database is in MOUNT or READ ONLY state. STANDBY CONTROLFILE Uses the control files, copied from the Primary site, in the Standby database.
This is applicable when the database is in the mount state.
For more information, refer to Tibero Administrator's Guide.
-
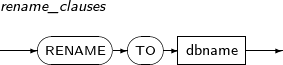
rename_clauses
Component Description RENAME TO DBNAME Changes the database name.
This is applicable when the database is in the mount state.
-
-
Examples
-
recovery_clauses
The following example illustrates how to start a recovery and process a complete recovery by individually applying log files:
SQL> ALTER DATABASE RECOVER;
Database altered.

SQL> ALTER DATABASE RECOVER LOGFILE
       '/database/archive/arc-d1141964974-s3-r0.arc';
Database altered.

SQL> ALTER DATABASE RECOVER LOGFILE
       '/database/archive/arc-d1141964974-s4-r0.arc';
Database altered.

SQL> ALTER DATABASE RECOVER LOGFILE '/database/logfile002.log';
Database altered.

SQL> ALTER DATABASE RECOVER CANCEL;
Database altered.
At the end of the example above, the recovery is finished using CANCEL.
The following example illustrates how to automatically perform a complete recovery using the AUTOMATIC option:
SQL> ALTER DATABASE RECOVER AUTOMATIC;
Database altered.
-
full_database_recovery_clause
The following example illustrates how to process an incomplete recovery by specifying UNTIL CANCEL:
SQL> ALTER DATABASE RECOVER DATABASE UNTIL CANCEL;
Database altered.

SQL> ALTER DATABASE RECOVER LOGFILE
       '/database/archive/arc-d1141964974-s3-r0.arc';
Database altered.

SQL> ALTER DATABASE RECOVER LOGFILE
       '/database/archive/arc-d1141964974-s4-r0.arc';
Database altered.

SQL> ALTER DATABASE RECOVER LOGFILE '/database/logfile002.log';
Database altered.

SQL> ALTER DATABASE RECOVER CANCEL;
Database altered.
In the example, three log files are recovered, and then the recovery is finished using CANCEL.
The following example illustrates how to process an incomplete recovery using UNTIL TIME:
SQL> ALTER DATABASE RECOVER AUTOMATIC DATABASE
       UNTIL TIME '2006-11-15 13:59:00';
Database altered.
The example above assumes that the user deletes a table at 2 P.M on 2006.11.15 by mistake. If the database must be recovered to the point in time immediately before the user deleted the table, an incomplete recovery should be performed.
First, copy the image file containing the data that was backed up to the restore point, and apply the last log file generated before the loss. Then, enable automatic recovery to 13: 59 pm on 2006.11.15.
The following example illustrates how to restore the database with TSN values using UNTIL CHANGE:
SELECT * FROM v$log;

GROUP# SEQUENCE#      BYTES MEMBERS ARC STATUS   FIRST_CHAN  FIRST_TIME
------ --------- ---------- ------- --- -------- ----------  ----------
     0         3 2147483648       2 NO  CURRENT        3250  2006-11-15
     1         1 2147483648       2 NO  INACTIVE       1319  2006-11-15
     2         2 2147483648       2 NO  INACTIVE       2074  2006-11-15

3 rows selected.

SQL> ALTER DATABASE RECOVER AUTOMATIC DATABASE UNTIL CHANGE 2074;

Database altered.
In the example above, v$Log is entered to search logs. Then, the TSN value '2074' is used to restore the database to the point in time where 'log group 2' is started.
v$Log enables the user to find a TSN value or the log where a problem occurred.
-
dbfile_clauses
The following example illustrates how to use CREATE DATAFILE:
SQL> SELECT file#, error FROM v$recover_file;

     FILE# ERROR
---------- -----------------------
         2 FILE MISSING

1 row selected.

SQL> ALTER DATABASE CREATE DATAFILE 2;
Database altered.
The example above shows how to create an empty file when a date file named FILE# 2 does not exist.
The following example illustrates how to drop a tablespace which belongs to the data file using OFFLINE FOR DROP:
SQL> SELECT file#, error FROM v$recover_file;

     FILE# ERROR
---------- -----------------------
         2 FILE MISSING

1 row selected.

SQL> ALTER DATABASE DATAFILE 2 OFFLINE FOR DROP;
Database altered.
OFFLINE FOR DROP is valid if the user is allowed to drop the tablespace containing an unrecoverable file during system operation.
The following example illustrates how to increase the file size using RESIZE:
SQL> SELECT file_name, blocks, autoextensible FROM
       dba_data_files WHERE file_name LIKE '%ts1.dbf';

FILE_NAME                BLOCKS AUTOEXTENSIBLE
-------------------- ---------- ---------------
/tmp/ts1.dbf               2576 NO

1 row selected.

SQL> ALTER DATABASE DATAFILE '/tmp/ts1.dbf' RESIZE 20M;
Database altered.

SQL> SELECT file_name, blocks, autoextensible FROM
       dba_data_files WHERE file_name LIKE '%ts1.dbf';

FILE_NAME                BLOCKS AUTOEXTENSIBLE
-------------------- ---------- ---------------
/tmp/ts1.dbf               5120 NO

1 row selected.
The following example illustrates how to activate AUTOEXTEND properties by specifying autoextend_clause:
SQL> SELECT file_name, blocks, autoextensible FROM dba_data_files WHERE file_name LIKE '%ts1.dbf'; FILE_NAME BLOCKS AUTOEXTENSIBLE -------------------- ---------- --------------- /tmp/ts1.dbf 5120 NO 1 row selected. SQL> ALTER DATABASE DATAFILE '/tmp/ts1.dbf' AUTOEXTEND ON NEXT 5M; Database altered. SQL> SELECT file_name, blocks, autoextensible, increment_by FROM dba_data_files WHERE file_name LIKE '%ts1.dbf'; FILE_NAME BLOCKS AUTOEXTENSIBLE INCREMENT_ -------------------- ---------- --------------- ---------- /tmp/ts1.dbf 5120 YES 1296 1 row selected. -
logfile_clauses
The following example illustrates how to run a database in ARCHIVELOG mode:
SQL> ALTER DATABASE ARCHIVELOG;
The following example illustrates how to add an online log file using ADD LOGFILE:
SQL> SELECT group#, member FROM v$logfile;

    GROUP#  MEMBER
----------  -------------------------------------
         0  /database/log001.log
         0  /database/log002.log
         1  /database/log003.log
         1  /database/log004.log
         2  /database/log005.log
         2  /database/log006.log

6 rows selected.

SQL> ALTER DATABASE ADD LOGFILE GROUP 3
     2 ('/database/log010.log', '/database/log011.log');
Database altered.

SQL> SELECT group#, member FROM v$logfile;

    GROUP#  MEMBER
----------  -------------------------------------
         0  /database/log001.log
         0  /database/log002.log
         1  /database/log003.log
         1  /database/log004.log
         2  /database/log005.log
         2  /database/log006.log
         3  /database/log010.log
         3  /database/log011.log

8 rows selected.
In the example above, a log group is added, containing two online log files, /database/log010.log and /database/log011.log, as members.
When adding online log files, the user can either register a log group as a whole or add individual log members to a particular log group. Here, the log file to be added must be specified with an absolute path.
The following example illustrates how to add a log member to a log group:
SQL> SELECT * FROM v$log;

GROUP# SEQUENCE#      BYTES MEMBERS ARC STATUS   FIRST_CHAN  FIRST_TIME
------ --------- ---------- ------- --- -------- ----------  ----------
     0         3 2147483648       2 NO  CURRENT        3260  2006/12/20
     1         1 2147483648       2 NO  INACTIVE       1325  2006/12/20
     2         2 2147483648       2 NO  INACTIVE       2065  2006/12/20
     3        -1 2147483648       3 NO  UNUSED            0  2006/12/20

4 rows selected.

SQL> SELECT group#, member FROM v$logfile;

    GROUP#  MEMBER
----------  -------------------------------------
         0  /database/log001.log
         0  /database/log002.log
         1  /database/log003.log
         1  /database/log004.log
         2  /database/log005.log
         2  /database/log006.log
         3  /database/log010.log
         3  /database/log011.log

8 rows selected.

SQL> ALTER DATABASE ADD LOGFILE MEMBER '/tmp/log012.log'
       TO GROUP 3;
Database altered.

SQL> SELECT group#, member FROM v$logfile;

    GROUP#  MEMBER
----------  -------------------------------------
         0  /database/log001.log
         0  /database/log002.log
         1  /database/log003.log
         1  /database/log004.log
         2  /database/log005.log
         2  /database/log006.log
         3  /database/log010.log
         3  /database/log011.log
         3  /database/log012.log

9 rows selected.
The example above adds a log file to Log Group 3. Use the $Log view to retrieve the current log groups. Use Log Switch to change the log groups.
In the example above, the V$LOG view shows that the log group is 0. A log member can be added to Log Group 3. After adding log member log 12 to Log Group 3, the result is displayed.
The following example illustrates how to delete an online log file using DROP LOGFILE:
SQL> SELECT group#, member FROM v$logfile;

    GROUP#  MEMBER
----------  -------------------------------------
         0  /database/log001.log
         0  /database/log002.log
         1  /database/log003.log
         1  /database/log004.log
         2  /database/log005.log
         2  /database/log006.log
         3  /database/log010.log
         3  /database/log011.log
         3  /database/log012.log

9 rows selected.

SQL> ALTER DATABASE DROP LOGFILE MEMBER '/database/log012.log';
Database altered.

SQL> SELECT group#, member FROM v$logfile;

    GROUP#  MEMBER
----------  -------------------------------------
         0  /database/log001.log
         0  /database/log002.log
         1  /database/log003.log
         1  /database/log004.log
         2  /database/log005.log
         2  /database/log006.log
         3  /database/log010.log
         3  /database/log011.log

8 rows selected.

SQL> ALTER DATABASE DROP LOGFILE GROUP 3;
Database altered.

SQL> SELECT group#, member FROM v$logfile;

    GROUP#  MEMBER
----------  -------------------------------------
         0  /database/log001.log
         0  /database/log002.log
         1  /database/log003.log
         1  /database/log004.log
         2  /database/log005.log
         2  /database/log006.log

6 rows selected.
The example above shows two situations: one deletes only the log member log12.log from Log Group 3 and the other deletes the entire log group Log Group 3.
-
control_file_clauses
The following example illustrates how to back up the CREATE CONTROL FILE using control_file_clauses:
SQL> ALTER DATABASE BACKUP CONTROLFILE TO TRACE AS
     '/backup/create_ctr.sql';
CREATE CONTROL FILE statements are stored in the file /backup/create_ctr.sql.
The following example illustrates how to back up CREATE CONTROL FILE statements with the RESETLOGS option being specified:
SQL> ALTER DATABASE BACKUP CONTROLFILE TO TRACE AS
     '/backup/create_ctr.sql' REUSE RESETLOGS;
The example above shows how to back up the CREATE CONTROL FILE statements to an existing file using the REUSE option.
The REUSE option is used to save the CREATE CONTROL FILE statement in an existing file. If RESETLOGS is not used, NORESETLOGS is enabled by default.
-
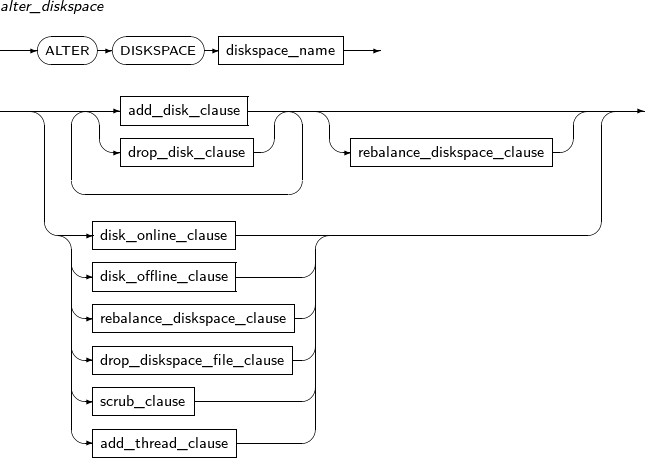
ALTER DISKSPACE changes the state of a diskspace and the properties of the disks in the diskspace.
A detailed description of ALTER DATABASE is as follows:
-
Syntax


-
Components
-
create_diskspace
Component Description diskspace_name Diskspace name. add_disk_clause Clause used to add disk(s) to the diskspace. The diskspace must be rebalanced before the disk can be used. drop_disk_clause Clause used to drop disk(s) from the diskspace. The diskspace must be rebalanced before the disk can be dropped. rebalance_diskspace_clause Clause used to redistribute data across the diskspace in order to add or drop disk(s). disk_online_clause Clause used to bring offline disk(s) online.
An offline disk becomes online through data synchronization.
disk_offline_clause Clause used to take online disk(s) offline.
Read/write access to the disks is lost immediately after they go offline.
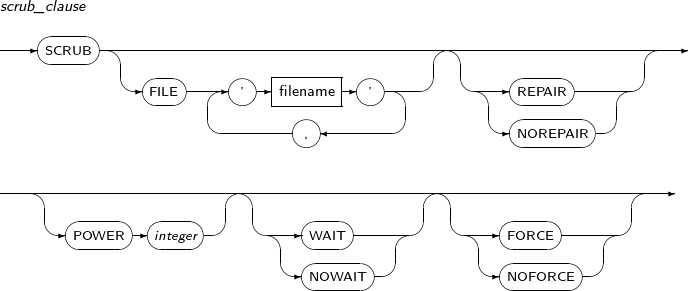
drop_diskspace_file_clause Clause used to drop file(s) from the diskspace. scrub_clause Clause used to scrub user data from the diskspace.
A diskspace created with NORMAL or HIGH redundancy level is automatically checked for data corruption and repaired.
add_thread_clause Clause used to add a thread for cluster configuration of the diskspace. -
add_disk_clause
Component Description FAILGROUP failgroup_name Name of the failgroup to add disk(s).
This is applicable only when the diskspace has NORMAL or HIGH redundancy level, and must be specified with alphanumeric characters of up to 48 bytes in length.
If not specified, each disk is set to a its own failgroup with the disk name as the failgroup name.
DISK qualified_disk_clause Disk(s) to add to the diskspace. -
qualified_disk_clause
Component Description search_string Path of the disk(s) to assign to the diskspace.
Use a wildcard to specify multiple disks. Must be in the path specified by the TAS_DISKSTRING initialization parameter.
must be specified with alphanumeric characters of up to 48 bytes in length.
NAME disk_name Disk name found with search_string. This is applicable only when a single disk is found via the search_string. Must be specified with alphanumeric characters of up to 48 bytes in length. The name of the disk is only used within TAS and is not related to the disk path. If not specified, a name is set automatically.
SIZE Size of the disk(s) found with search_string in bytes. If there are multiple disks, they are all set with the same size. If not specified, this is set to the actual disk size determined by TAS. If the size cannot be determined, an error is thrown and the size must be specified.
FORCE Size of the disk(s) found with search_string in bytes. The disk(s) found with search_string are assigned to the specified diskspace even if they already belong to another diskspace. This causes the existing diskspace to be dropped. NOFORCE An error is thrown when the disk(s) found with search_string already belong to another diskspace. Default value. -
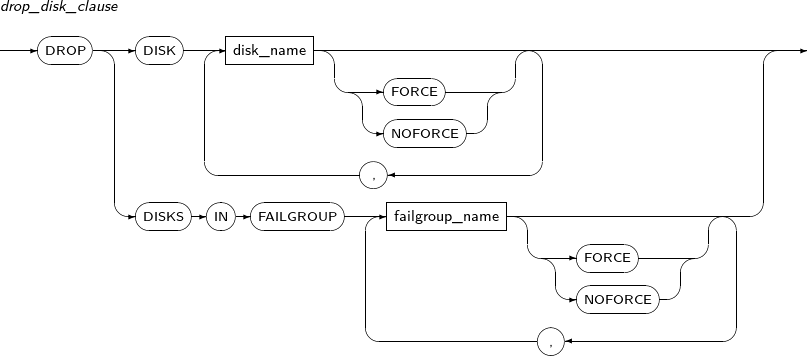
drop_disk_clause
Component Description DISK disk_name Disk name. FORCE Immediately drops disk(s) from the diskspace without waiting for rebalancing. Rebalancing is executed later using redundant copies on other disks.
This is used to drop a failed disk that cannot be read from.
NOFORCE Completely drops disk(s) after rebalancing.
Default value.
DISKS IN FAILGROUP failgroup_name Drops all disks in the specified failgroup. -
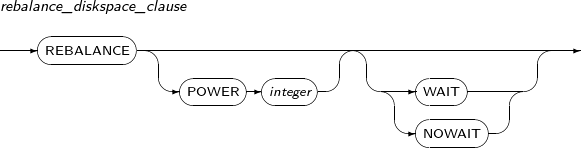
rebalance_diskspace_clause
Component Description POWER integer Sets the rebalancing speed to a value from 0 to 11.
Rebalancing speed increases as this value increases, but data concurrency is reduced.
If not specified, this value is automatically set.
WAIT Waits until rebalancing is complete. NOWAIT Immediately starts rebalancing without waiting.
Rebalancing can be still in progress even after successful command execution.
-
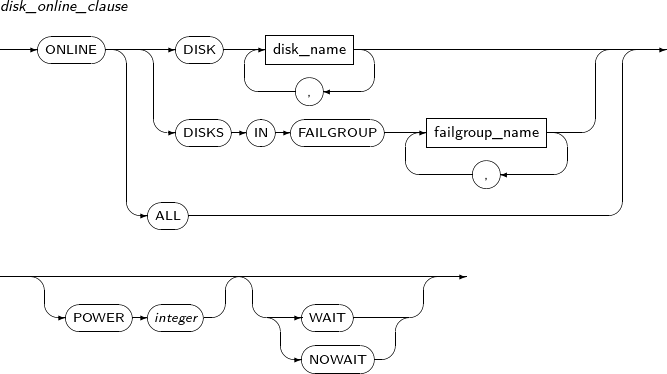
disk_online_clause
Component Description DISK disk_name Disk name. DISKS IN FAILGROUP failgroup_name Changes all disk(s) in the failgroup to online. ALL Brings all offline disk(s) to online. POWER integer Sets the data synchronization speed of the offline disk(s) to a value from 0 to 11. Synchronization speed increases as this value increases, but data concurrency is reduced. WAIT Waits until synchronization is complete. NOWAIT Immediately starts synchronization without waiting.
Synchronization can be still in progress even after successful command execution.
-
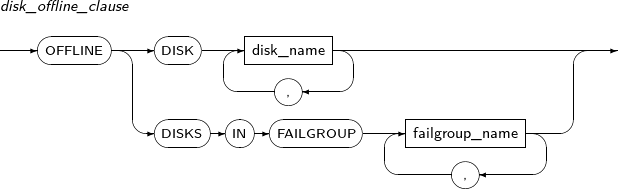
disk_offline_clause
Component Description DISK disk_name Disk name. DISKS IN FAILGROUP failgroup_name Takes all disk(s) in the failgroup to offline. -
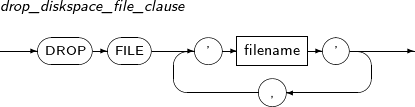
drop_diskspace_file_clause
Component Description FILE 'filename' File name. -
scrub_clause
Component Description FILE 'filename' File name. If not specified, all files in the diskspace are scrubbed. REPAIR Synchronizes data if data is not consistent with mirrored data. NOREPAIR Only outputs a dump if data is not consistent with mirrored data. Default value.
Dump is created in the path specified by the initialization parameter, TRACE_DUMP_DEST.
POWER integer Sets the data scrubbing speed to a value from 0 to 11. Scrub speed increases as this value increases, but data concurrency is reduced. WAIT Waits until scrubbing is complete. NOWAIT Immediately starts scrubbing without waiting.
Scrubbing can be still in progress even after successful command execution.
FORCE Executes scrubbing regardless of the overall system IO overhead. NOFORCE Does not execute scrubbing if the overall system IO overhead is high. Default value. -
add_thread_clause
Component Description thread_number Thread number.
This thread is used to configure TAS instance in a cluster, and is set as the THREAD initialization parameter.
-
-
Example
The following example shows how to use ALTER DISKSPACE to add and drop multiple disks and rebalance the diskspace.
ALTER DISKSPACE ds
    ADD DISK '/tas/dev/path30' NAME disk30 SIZE 512G,
             '/tas/dev/path31' NAME disk31 SIZE 256G;
ALTER DISKSPACE ds
    DROP DISK disk20, disk21;
ALTER DISKSPACE ds
    REBALANCE POWER 8 WAIT;
The following shows how to perform the previous example in a single statement.
ALTER DISKSPACE ds
    ADD DISK '/tas/dev/path30' NAME disk30 SIZE 512G,
             '/tas/dev/path31' NAME disk31 SIZE 256G
    DROP DISK disk20, disk21
    REBALANCE POWER 8 WAIT;
The following example shows how to use ALTER DISKSPACE to bring disks online.
ALTER DISKSPACE ds
    ONLINE DISK disk00, disk01
    POWER 5 NOWAIT;
The following example shows how to use ALTER DISKSPACE to take disks offline.
ALTER DISKSPACE ds
    DROP FILE '+ds/data00.dtf',
              '+ds/data01.dtf';
The following example shows how to use ALTER DISKSPACE to drop user files from the diskspace.
ALTER DATABASE ds
    DROP FILE '+ds/data00.dtf',
              '+ds/data01.dtf';
The following example shows how to use ALTER DISKSPACE to add a thread.
ALTER DISKSPACE ds
    ADD THREAD 1;
ALTER FUNCTION recompiles the specified tbPSM function. It is similar to the ALTER PROCEDURE statement.
Generally, if the tbPSM function included in an SQL statement is invalid, it will be automatically recompiled when the SQL statement is executed. For the invalidation of a function or procedure, refer to Tibero tbPSM Guide.
Regardless of the validity of the object, ALTER FUNCTION attempts recompilation. ALTER FUNCTION recursively checks all parent objects that have a direct or indirect dependency relationship. If the object is not valid, the function will try to recompile. It will also invalidate all child objects in direct and indirect dependencies.
For details, refer to “7.9. ALTER PROCEDURE”.
A detailed description of the ALTER FUNCTION follows:
-
Syntax

-
Privileges
A user must be the owner of the tbPSM function, or the ALTER ANY PROCEDURE system privilege is required.
-
Components
Component Description schema Specifies the schema name to which the function belongs. function_name Specifies the name of the function. -
Examples
The following example illustrates how to compile a tbPSM function using ALTER FUNCTION.
ALTER FUNCTION tibero.get_square COMPILE;
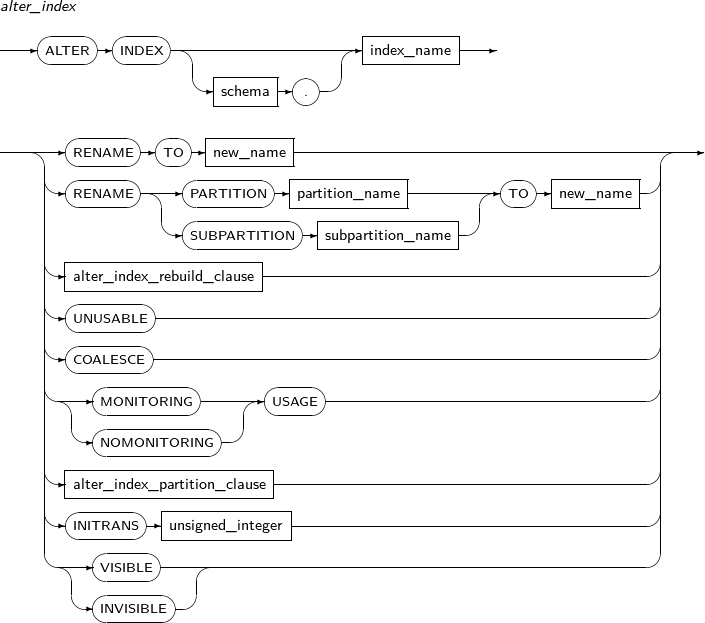
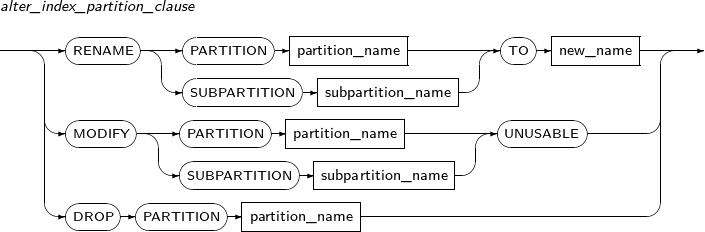
ALTER INDEX changes the properties of an index. It also is used to recreate or change the name of an index.
A detailed description of ALTER INDEX follows:
-
Syntax
-
Privileges
One of the following must be satisfied to execute the ALTER INDEX statement:
-
The index is part of the user's schema.
-
The user has the ALTER ANY INDEX system privilege.
-
-
Components
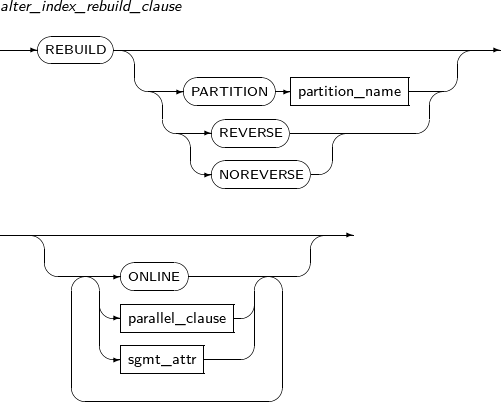
Component Description schema Specifies the schema name of an index or table. By default, the schema of the current user will be used. index_name Specifies the name of the index to be changed. RENAME Does not recreate the index; only changes its name. The partition or subpartition name of an index can be changed. new_name Specifies a new name for an index. PARTITION Changes the name of a partition. partition_name Specifies the name of the partition to be changed. SUBPARTITION Changes the name of a subpartition. subpartition_name Specifies the name of the subpartition to be changed. REBUILD Recreates an index.
This element is used when an index is less efficient, or to reuse a deactivated index.
When index creation is finished, the deactivated index will be activated again.
REVERSE An option for REBUILD.
This option reverses the byte order of the index block.
If not specified, an index will be recreated without reversing the byte order of the index block.
NOREVERSE An option for REBUILD.
An index will be recreated without reversing the byte order of the index block.
ONLINE An option for REBUILD.
Allows DML updates while the index is being rebuilt.
COALESCE Stores the contents of index blocks for which a user can free blocks for reuse. MONITORING USAGE Monitors whether indexes are used. Monitoring results can be viewed using V$OBJECT_USAGE. NOMONITORING USAGE Stops the monitoring of whether indexes are used. INITRANS unsigned_integer Sets the number of free spaces to initially hold transaction entries in the index block. The number of transaction entries increases automatically, so specifying an large value initially is not required. INVISIBLE Index status option.
Option to allow the optimizer to consider indexes. An invisible index is maintained by DML like a general index. However, it is ignored by the optimizer. -
Constraints
The following are the constraints of the ALTER INDEX statement.
-
REBUILD ONLINE REVERSE cannot be performed for functional indexes.
-
-
Examples
The following example illustrates how to change an index name using RENAME:
SQL> CONN u1/u1
Connected.

SQL> CREATE TABLE t (a NUMBER);
Table created.

SQL> CREATE INDEX i ON t (a);
Index created.

SQL> ALTER INDEX i RENAME TO j;
Index altered.

SQL> SELECT index_name FROM user_indexes;
 INDEX_NAME
 ---------------------------
 J

1 row selected.

SQL> ALTER INDEX u1.j RENAME TO k;
Index altered.

SQL> SELECT index_name FROM user_indexes;
 INDEX_NAME
 ---------------------------
 K

1 row selected.
The following example illustrates how to recreate an index using REBUILD:
SQL> ALTER INDEX i REBUILD;
Index altered.
The following example illustrates how to recreate an index by specifying the NOREVERSE and ONLINE options:
SQL> ALTER INDEX i REBUILD NOREVERSE ONLINE;
Index altered.
The following example illustrates the use of COALESCE:
SQL> ALTER INDEX i COALESCE;
Index altered.
The following example illustrates the use of MONITORING USAGE:
SQL> ALTER INDEX i MONITORING USAGE;
Index altered.
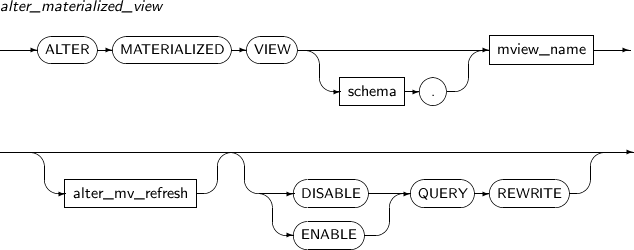
ALTER MATERIALIZED view alters an existing materialized view.
A detailed description of ALTER MATERIALIZED VIEW follows:
-
Syntax
-
Privileges
-
No special privilege is required to modify a materialized view in the user's schema.
-
When altering a materialized view owned by another user, the ALTER ANY MATERIALIZED system privilege is required.
To enable query rewrite, the privileges below are necessary:
-
If all master tables in the materialized view are in the user's schema, the QUERY REWRITE system privilege is required.
-
If any of master tables exists in another schema, the GLOBAL QUERY REWRITE system privilege is required.
-
If any of the materialized views exists in another schema, both the user and the owner of the schema must have the QUERY REWRITE system privilege. The owner of the materialized view must have the SELECT privilege for the tables of the other user.
-
-
Components
-
alter_materialized_view
Element Description alter_mv_refresh If a table referenced by the materialized view is updated, the materialized view should be refreshed to apply the current data. This clause lets a user specify the method, mode, and times for refreshes of the materialized view.
ENABLE Enables a materialized view for query rewrite. This is the default value. DISABLE Disables a materialized view for query rewrite. QUERY REWRITE Specifies whether to use the materialized view for query rewrite. -
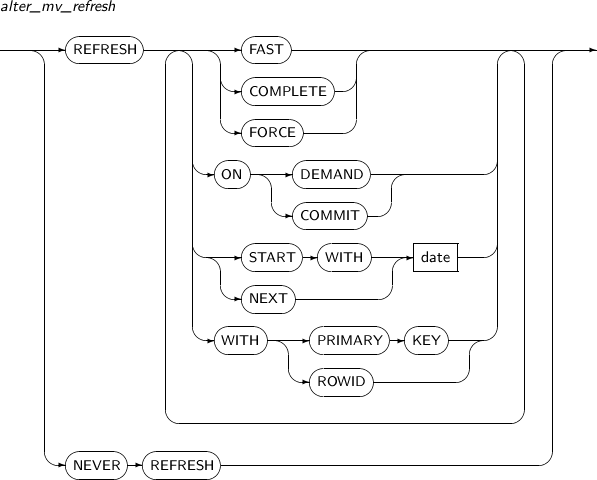
alter_mv_refresh
Element Description FAST Enables fast refresh. COMPLETE Enables a complete refresh by re-executing the query which defines the materialized view.
If COMPLETE is specified, complete refresh overrides fast refresh. (Default value)
FORCE Performs a fast refresh if possible. Otherwise, a complete refresh is executed. ON DEMAND Performs a refresh only when a user calls the REFRESH procedure in the DBMS_MVIEW package. (Default value) ON COMMIT If ON COMMIT is specified, a refresh will be performed whenever a master table is committed. However, START WITH or NEXT cannot be used with this clause.
ON COMMIT and ON DEMAND cannot be specified together.
START WITH Specifies the date when an automatic refresh is first performed.
START WITH values should be in the future.
If START WITH is specified without NEXT, the database only performs a refresh once.
NEXT Specifies a date expression for measuring the interval between automatic refreshes.
NEXT should be a time in the future.
If NEXT is specified without START WITH, the database will use NEXT as the first refresh time.
date Specifies a date literal for START WITH and NEXT. WITH PRIMARY KEY Performs a refresh using PRIMARY KEY. WITH ROWID Performs a refresh using ROWID. NEVER REFRESH Never executes an automatic refresh.
-
-
Examples
The following example illustrates how to change a materialized view using ALTER MATERIALIZED VIEW:
ALTER MATERIALIZED VIEW MV
  REFRESH START WITH SYSDATE NEXT SYSDATE + 10/1440;
In the example above, the existing materialized view has been changed to automatically refresh every 10 minutes using the START WITH and NEXT clauses. The date format is converted to minutes by dividing by the number of minutes in a day. (24 X 60 = 1440).
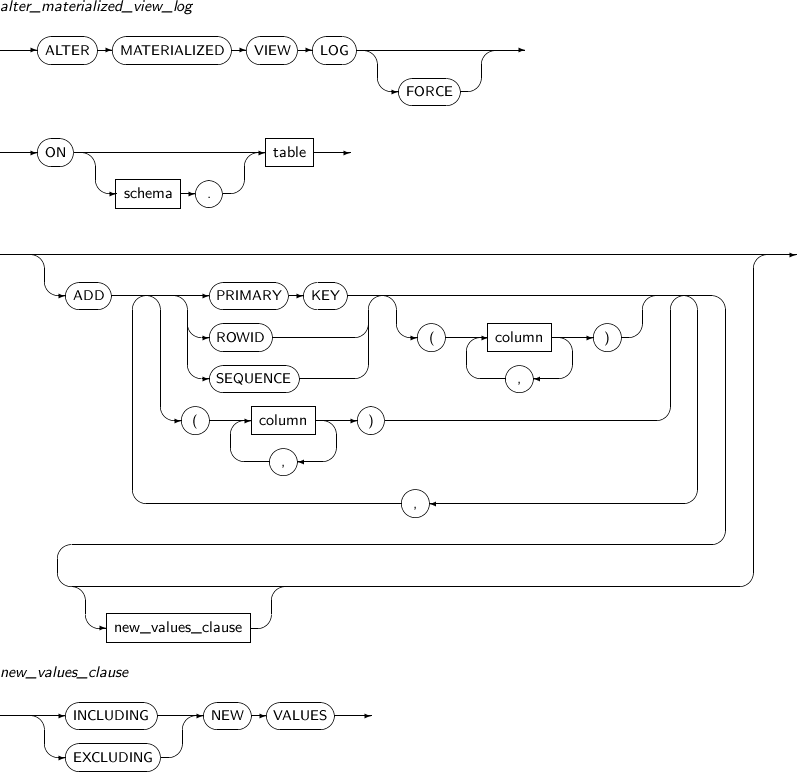
ALTER MATERIALIZED VIEW LOG modifies the materialized view log of a specified table.
A detailed description of ALTER MATERIALIZED VIEW LOG follows:
-
Syntax
-
Privileges
One of the following must be satisfied to execute the MATERIALIZED VIEW LOG statement:
-
The user owns the master table.
-
The user has the SELECT and ALTER privileges for the master table.
-
-
Components
-
alter_materialized_view_log
Component Description FORCE Specifies that even if a user attempts to add attributes which already exist to the materialized view, it adds only those which do not exist instead of generating an error. schema Specifies the schema that contains the master table. By default, the schema of the current user will be used. table Specifies the name of the master table associated with the materialized view log to be altered. PRIMARY KEY Records the PRIMARY KEY of updated rows of a master table in a materialized view log. ROWID Records the ROWID of updated rows of a master table in a materialized view log. SEQUENCE Records the order of updated rows of a master table in a materialized view log. column Specifies the columns of a master table to be recorded in a materialized view log. -
new_values_clause
Component Description INCLUDING NEW VALUES Specify INCLUDING to save both new and old values of update operations in the materialized view log. EXCLUDING NEW VALUES Specify EXCLUDING to save only the old values of update operations in the materialized view log. This is the default value.
-
-
Examples
The following example illustrates how to alter an existing materialized view log using ALTER MATERIALIZED VIEW LOG:
ALTER MATERIALIZED VIEW LOG FORCE
  ON DEPT ADD PRIMARY KEY, SEQUENCE (DNAME, LOC)
  INCLUDING NEW VALUES;
With the ALTER PACKAGE statement, a package specification, body, or both can be recompiled explicitly.
By recompiling explicitly, implicit recompilation can be prevented during runtime. This allows the overhead and compilation errors to be encountered in advance.
One entire package is regarded as a single unit. Therefore, the ALTER PACKAGE statement compiles all functions or procedures that are included in the package. ALTER PACKAGE cannot recompile an individual function or procedure in the package. Instead, use ALTER PROCEDURE or ALTER FUNCTION to alter those.
For more information about recompiling a parent object and invalidation of a child object, refer to “7.9. ALTER PROCEDURE”.
A detailed description of ALTER PACKAGE follows:
-
Syntax

-
Privileges
The user must be the owner of the package, or the ALTER ANY PROCEDURE system privilege is required.
-
Components
Component Description qualified_obj_name Specifies the package name to be recompiled. PACKAGE Both PACKAGE SPECIFICATION and PACKAGE BODY will be recompiled. This is the default value.
The object will recursively check all parent objects in direct or indirect dependencies. If necessary, the objects will be recompiled and revalidated.
All child objects in direct or indirect dependencies will be invalidated. (PACKAGE BODY is subordinate to other objects and specifications)
SPECIFICATION Only PACKAGE SPECIFICATION will be recompiled.
PACKAGE SPECIFICATION cannot be subordinate to another object, so compiling will be performed only for the specification.
All child objects in direct or indirect dependencies on PACKAGE SPECIFICATION will be invalidated. PACKAGE BODY will also be included in these child objects. The invalidated PACKAGE BODY will be automatically recompiled next time.
BODY All invalidated parent objects with direct or indirect dependencies on PACKAGE BODY will be recompiled.
If a specification is invalidated, it will be recompiled. The difference with the PACKAGE option is that recompiling with the BODY option occurs only if the specification is in an invalidated state.
All child objects that have direct or indirect dependency relationships will be invalidated.
The BODY option is useful when the PACKAGE BODY is rewritten or when only the PACKAGE BODY is invalidated.
-
Examples
The following example illustrates how to recompile a package using ALTER PACKAGE:
ALTER PACKAGE tibero.emp_pkg COMPILE;
ALTER PROCEDURE recompiles a specified tbPSM procedure. Generally, when a tbPSM procedure included in an SQL statement is invalid, it will be recompiled the next time the SQL statement is executed.
Procedure recompilation requires a similar level of resources to processing DDL, so it may affect SQL processing speed. It may also fail due to other invalidated schema objects. If recompilation fails, the SQL will also fail.
To avoid this problem, the ALTER PROCEDURE should be called in advance so that the invalidated objects become valid again.
When the ALTER PROCEDURE is called, the following tasks will be performed:
| Step | Description |
|---|---|
| 1 | The procedure will find all parent objects that have a dependency, and then try to recompile them if they are invalid. Each object will individually become valid again, and information related with DD will be updated and committed. Parent objects of each object will also be compiled recursively. If even one object fails, compiling ALTER PROCEDURE's target object will fail. |
| 2 | All child objects subordinate to this recompiled object will be invalidated. These invalidated objects can be automatically compiled again to become valid. |
| 3 | Regardless of whether ALTER PROCEDURE's target object is invalidated, it will be compiled again. This means that all child objects will be invalidated recursively regardless of the invalidation state. |
Note
This concept of compiling and the validation/invalidation procedure apply to the ALTER FUNCTION, ALTER PACKAGE, and ALTER TYPE statements as well.
A detailed description of ALTER PROCEDURE follows:
-
Syntax

-
Privileges
The user must be the owner of the procedure, or the ALTER ANY PROCEDURE system privilege is required.
-
Components
Component Description schema Specifies the schema name to which the procedure belongs. procedure_name Specifies the procedure name to be recompiled. -
Examples
ALTER PROCEDURE tibero.raise_salary COMPILE;
ALTER PROFILE changes the properties of a profile.
Note
Refer to “7.36. CREATE PROFILE” to create or remove a profile.
A detailed description of ALTER PROFILE follows:
-
Syntax
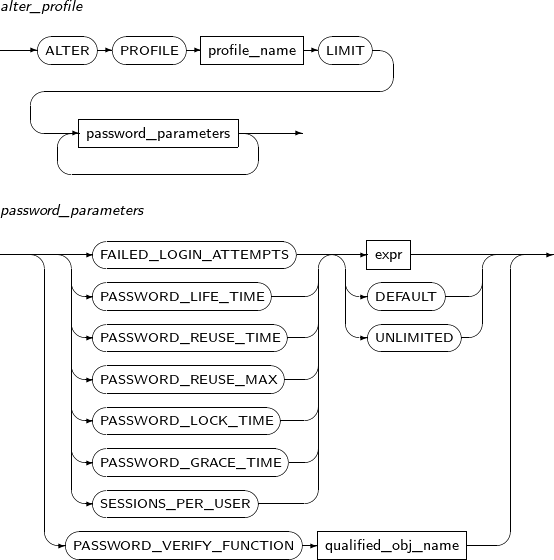
-
Privileges
The ALTER PROFILE system privilege is required.
-
Components
Component Description profile_name Specifies the name of the profile to be changed. password_paramenters Specifies the properties of the profile to be changed.
ALTER ROLE changes the password of a role. The privileges included in the role can be added or deleted using GRANT or REVOKE. The ALTER ROLE statement only changes the password of the role.
Note
Refer to “7.37. CREATE ROLE” or “7.58. DROP ROLE” to add or delete a role.
A detailed description of ALTER ROLE follows:
-
Syntax

-
Privileges
-
Changing the password of a ROLE using the ALTER ROLE statement is only allowed by the user who created the corresponding ROLE or a user who has been given the WITH ADMIN OPTION privilege.
-
A user who has the ALTER ANY ROLE system privilege can change the password for a ROLE that the user didn't create without having administrative privileges.
-
-
Components
Component Description role_name Specifies the name of the ROLE whose password should be changed.
The corresponding role should have been created by CREATE ROLE statement.
NOT IDENTIFIED Deletes the password of the ROLE. IDENTIFIED BY Changes the password of the ROLE. password The new password to set. -
Examples
The following example illustrates how to change password of a ROLE by using the ALTER ROLE statement:
SQL> CONN sys/tibero
Connected

SQL> CREATE ROLE a;
Role created.

SQL> SELECT role, password_required FROM dba_roles
     WHERE role='A';

ROLE                           PAS
------------------------------ ---
A                              NO

1 row selected.

SQL> ALTER ROLE a IDENTIFIED BY 'xxx';
Role altered.

SQL> SELECT role, password_required FROM dba_roles
     WHERE role='A';

ROLE                      PAS
------------------------------ ---
A                              YES

1 row selected.

SQL> ALTER ROLE a NOT IDENTIFIED;
Role altered.

SQL> SELECT role, password_required FROM dba_roles
     WHERE role='A';

ROLE                           PAS
------------------------------ ---
A                              NO

1 row selected.
In the example above, a ROLE is created through CREATE ROLE without specifying its password. Then, ALTER ROLE is used to specify a password as 'xxx' and then delete it again.
Note
Refer to “7.37. CREATE ROLE” or “9.6. SET ROLE” for password related examples.
ALTER ROLLBACK SEGMENT reduces the undo segment to the minimum or specified size. However, if the undo segment contains no reusable space because the undo segment retention time has passed or there are too many running transactions, the undo segment may not be reduced.
A detailed description of ALTER ROLLBACK SEGMENT follows:
-
Syntax
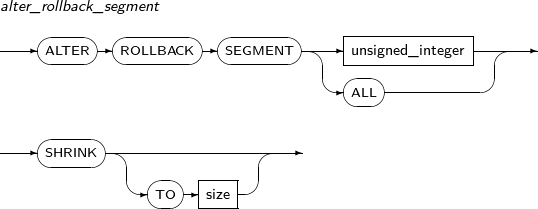
-
Privileges
The ALTER ROLLBACK SEGMENT system privilege is required.
-
Components
Component Description unsigned_integer The undo segment number. size The undo segment size (in bytes).
ALTER SEQUENCE changes the definition of a sequence.
Note
Refer to “7.38. CREATE SEQUENCE” and “7.59. DROP SEQUENCE” for details of sequence creation and deletion.
A detailed description of ALTER SEQUENCE follows:
-
Syntax

-
Privileges
The sequence should be located in a user's own schema, or the ALTER_ANY_SEQUENCE system privilege is required.
-
Components
Components Description schema Specifies the name of the schema that includes the sequence to be created. By default, the current user's schema will be used. sequence_name Specifies the name of a sequence to be created. It is a VARCHAR of up to 30 characters.
Sequence names use the same namespace as tables. Therefore, the name should not be the same as another sequence, table, synonym, or PSM name in the schema.
sequence_attributes By using the ALTER SEQUENCE statement, a user can change an existing sequence's incremental value, minimum value, maximum value, and the number of sequence numbers to be saved, and can also change the properties of the sequence. These changes will only be applied to sequence numbers created after the changes.
When using CACHE in sequence_attributes, some values may be missed because of the ALTER SEQUENCE statement. When using ALTER SEQUENCE, all values that exist in the sequence cache will be invalidated. It is not possible to change the START WITH attribute.
Refer to the “7.38. CREATE SEQUENCE” of sequence_attributes for details of sequence_attributes.
-
Examples
The following example illustrates how to change the sequence attribute test_seq, which is created from an example in “7.38. CREATE SEQUENCE”:
SQL> ALTER SEQUENCE test_seq MINVALUE 10 INCREMENT BY 3;
Altered.

SQL> SELECT test_seq.nextval FROM dual;

   NEXTVAL
----------
       105

1 row selected.

SQL> SELECT test_seq.nextval FROM dual;

   NEXTVAL
----------
       108

1 row selected.
ALTER TABLE modifies an existing table.
A detailed description of ALTER TABLE follows:
-
Syntax
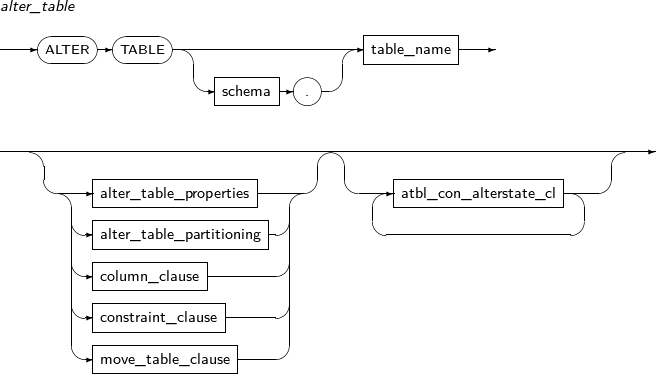


-
Privileges
No special privileges are required to change a table in a schema the user owns. To modify a table in another user's schema, the ALTER ANY TABLE system privilege is required.
-
Components
-
alter_table
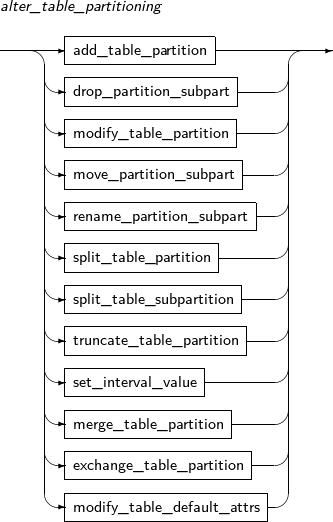
Component Description schema Specifies the name of the schema name in which the table to be changed is located. The current user's schema is used by default. table_name Specifies the name of the table to be changed. alter_table_properties Changes physical attributes such as PCTFREE, INITRANS, and storage_clause. atbl_con_alterstate_cl Changes a constraint's state. alter_table_partitioning Applicable only for a partitioned table.
Refer to “7.40. CREATE TABLE” for details of partitioned tables.
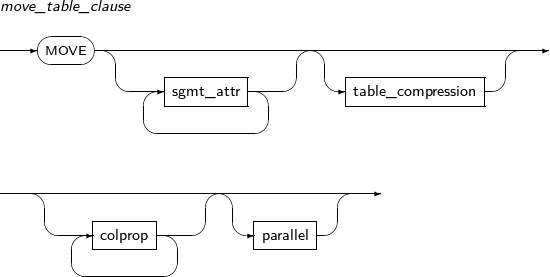
column_clause Adds, modifies, or deletes a table column. constraint_clause Adds, modifies, or deletes a table constraint. move_table_clause Moves a table to a new segment. To create a new segment, a new physical property is specified for the table. -
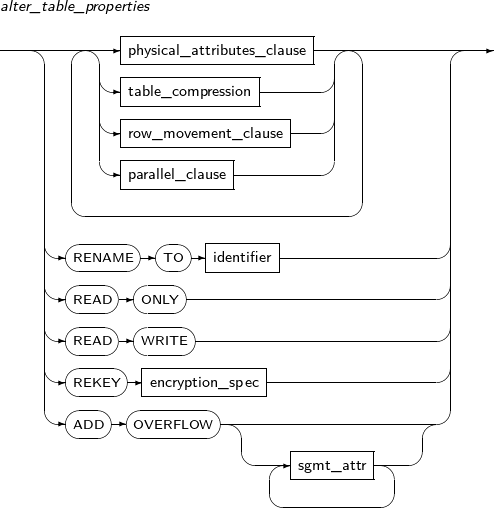
alter_table_properties
Component Description physical_attributes_clause Changes physical properties such as PCTFREE, INITRANS, and storage_clause. table_compression Specifies whether to compress a table. parallel_clause Specifies the default DOP (Degree of Parallelism), which is referred to by DML operations on the table. RENAME Changes the name of a table. TO identifier The new name for the table to be changed. READ ONLY Specifies a table as READ ONLY. READ WRITE Specifies a table as READ WRITE. REKEY encryption_spec The database creates a new encryption key. This clause cannot be used together with any other clauses in ALTER TABLE.
All encrypted columns of a table will be re-encrypted with a new key. If this clause is used with the USING option, they will be encrypted using a new encryption algorithm.
ADD OVERFLOW Adds an overflow segment to IOT table.
-
physical_attributes_clause
Component Description PCTFREE unsigned_integer Specifies the capacity to be reserved for data increases when saving data in the data block.
A number between 1 and 99 can be specified and the default value is 10.
INITRANS unsigned_integer Specifies the transaction entry space to be reserved for all data blocks. After the space has been depleted, space for additional transaction entries will be allocated from the free space in a block. Therefore, this value does not need to be large.
The minimum value is 1 and the maximum value differs based on the size of the disk block. The default value is 2.
storage_clause Specifies the properties of a segment.
Refer to “7.1.5. Storage_clause” for details.
-
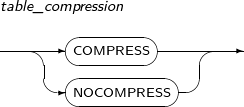
table_compression
Component Description COMPRESS Compresses a table. NOCOMPRESS Does not compress a table. -
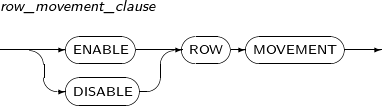
row_movement_clause
Component Description ENABLE ROW MOVEMENT Allows the database to move a row. ROWID may be changed accordingly.
DISABLE ROW MOVEMENT Does not allow the database to move a row. -
alter_table_partitioning
-
add_table_partition
Component Description partition_name Specifies the name of a partition to be added. range_partition_desc Specifies the details of a RANGE partition. list_partition_desc Specifies the details of a LIST partition. hash_partition_desc Specifies the details of a HASH partition. -
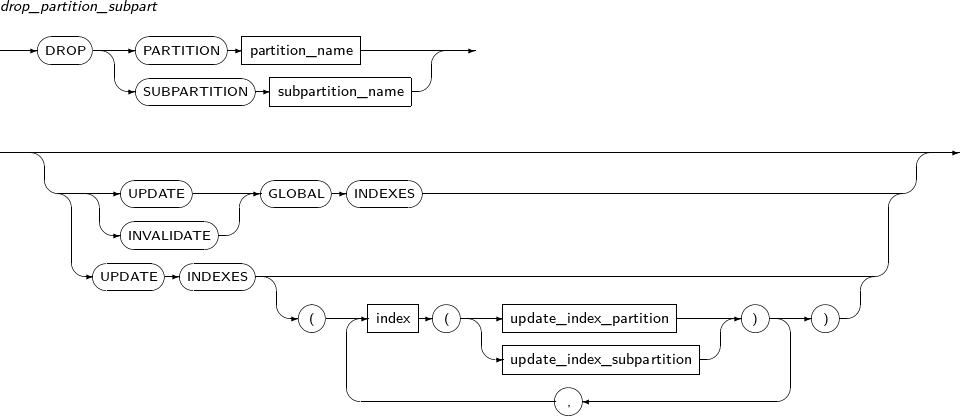
drop_partition_subpart
Component Description PARTITION Deletes a partition. partition_name Specifies the name of a partition to be deleted. SUBPARTITION Deletes a subpartition. subpartition_name Specifies the name of a subpartition name to be deleted. UPDATE GLOBAL INDEXES Updates global indexes. INVALIDATE GLOBAL INDEXES Invalidates global indexes. UPDATE INDEXES Updates specified indexes. -
modify_table_partition
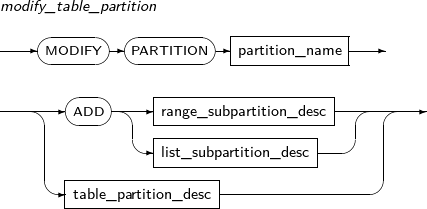
Component Description partition_name Specifies the name of a partition to be changed. ADD Adds a subpartition. (Currently, the use of a HASH subpartitioning method, such as LIST-HASH or RANGE-HASH, is not supported.) range_subpartition_desc Specifies the details of a RANGE partition. list_subpartition_desc Specifies the details of a LIST partition. hash_subpartition_desc Specifies the details of a HASH partition. table_partition_desc Specifies the physical properties of a partition. The syntax is similar to the syntax for table properties. -
move_partition_subpart
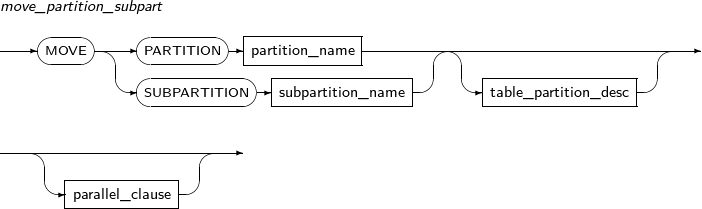
Component Description PARTITION Moves a partition. partition_name Specifies the name of a partition to be moved. SUBPARTITION Moves a subpartition. subpartition_name Specifies the name of a subpartition to be moved. table_partition_desc Specifies the physical properties of a partition. The syntax is similar to the syntax for table properties. -
rename_partition_subpart
Component Description PARTITION partition_name Specifies the name of a partition to be changed. subpartition_name Specifies the name of a subpartition to be changed. TO new_name Specifies the new name of a partition to be changed. -
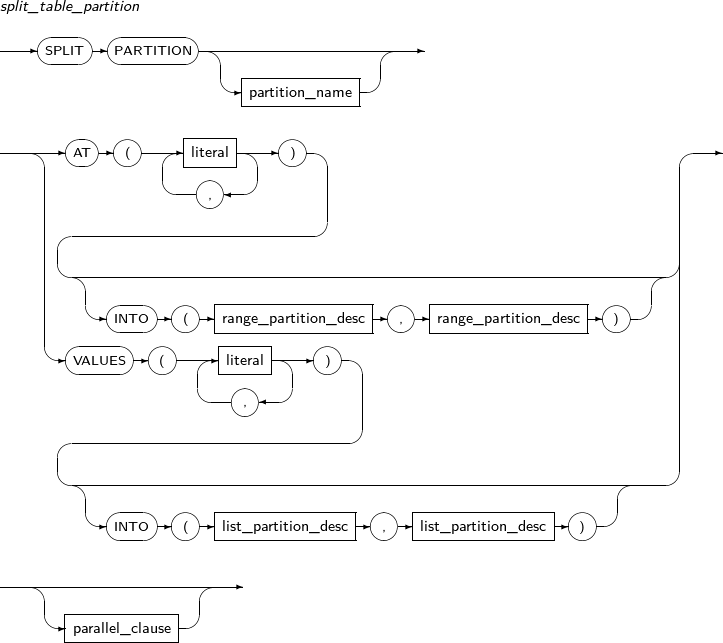
split_table_partition
Component Description partition_name Specifies the name of a partition name to be divided. AT literal For RANGE partitions, specify the bounds of a partitioning key by using AT.
A partition is divided into two partitions based on the value specified in literal.
INTO range_partition_desc Specifies the name and properties of a partition to be divided. VALUES literal LIST partition: VALUES is used to specify a partition key value, which serves as the basis on which a partition is split in two; one has the specified values and the other has the values that were not specified. Therefore, the values specified for the VALUES clause must be present in the values of the existing partition.
INTO list_partition_desc Specifies the name and properties of a partition to be split. -
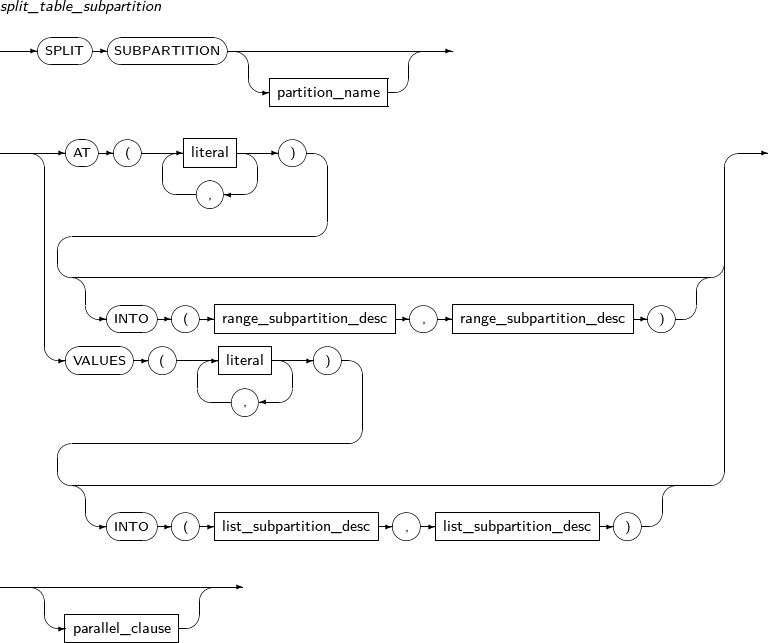
split_table_subpartition
Component Description partition_name Specifies the name of a subpartition to be split. AT literal RANGE partitions use the AT clause to set a partition key value, which serves as the basis on which a partition is split in two.
INTO range_subpartition_desc Specifies the name and properties of a subpartition to be split. VALUES literal LIST partition: VALUES is used to specify a partition key value, which serves as the basis on which a partition is split in two; one has the specified values and the other has the values that were not specified. Therefore, the values specified for the VALUES clause must be present in the values of the existing partition.
INTO list_subpartition_desc Specifies the name and properties of a subpartition to be split. -
exchange_table_partition
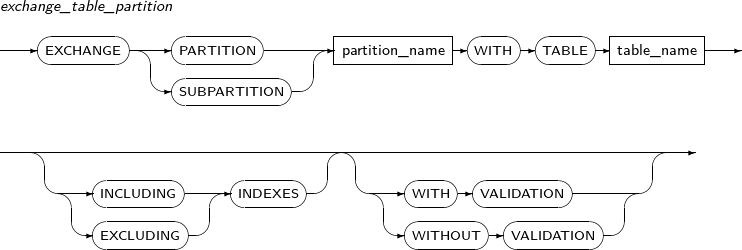
Component Description partition_name Name of a partition or subpartition. table_name Name of a table to be replaced by the partition and segment. INCLUDING INDEXES Specified to exchange a local index partition or subpartition for the table index (for a non-partitioned table) or local index (for a hash-partitioned table). EXCLUDING INDEXES Specified to mark all index partitions or subpartitions corresponding to the partition and all the regular indexes and index partitions on the exchanged table. If both INCLUDING INDEXES and EXCLUDING INDEXES are not specified, EXCLUDING INDEXES is used. WITH VALIDATION Generates an error if the rows of a table do not match the partition condition, constraint, etc. This defaults to VALIDATION if WITH VALIDATION or WITHOUT VALIDATION is set. WITHOUT VALIDATION Replaces the segment with the table even if the rows of the table do not match the partition condition, constraint, etc. -
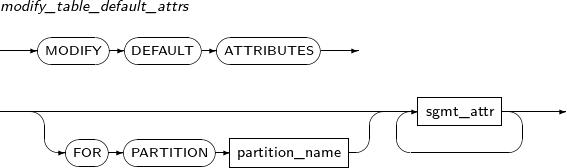
modify_table_default_attrs
Component Description partition_name Name of the partition or subpartition. sgmt_attr Refer to “7.1.4. Sgmt_attr” for the syntax of sgmt_attr. -
merge_table_partition
Component Description first_partition_name Name of the first partition to be merged. second_partition_name Name of the second partition to be merged. For range partitions, it must be set to the partition that follows the first partition. INTO partition_desc Name and attribute of a partition to be created. -
truncate_table_partition
Component Description PARTITION partition_name Specifies the name of the partition to be split. SUBPARTITION subpartition_name Specifies the name of the subpartition to be split. DROP STORAGE Collects the space used by a partition. In other words, collects all allocated EXTENTS.
If not specified, DROP STORAGE is used by default.
REUSE_STORAGE Does not collect the space used by a partition and continuously uses the space. -
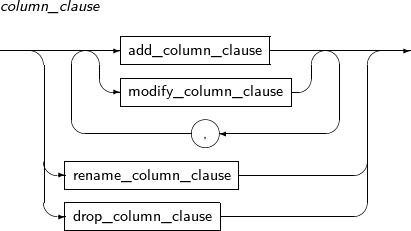
column_clause
Component Description add_column_clause Adds a new column to a table. The default value is inserted in the column of existing rows. If no default value is set, NULL is entered.
When inline constraints are specified, the inserted columns are verified. If the constraints are not satisfied, adding a column may fail.
If a LONG type column exists in a table, a new column cannot be added.
modify_column_clause Changes column properties.
The properties are data type, default value, inline constraint, and inline referential constraint.
rename_column_clause Changes the name of a column. drop_column_clause Removes a column from a table.
Related indexes, triggers, and comments will also be deleted.
REKEY encryption_spec REKEY instructs a database to create a new encryption key. It cannot be used in ALTER TABLE with any other statement.
All encrypted columns in a table are encrypted with a new key. They are encrypted with a new encryption algorithm if USING is used in encryption_spec.
-
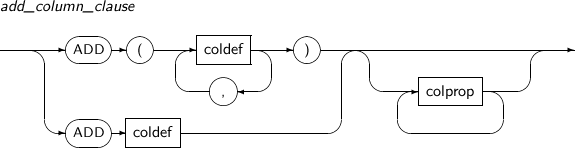
add_column_clause
Component Description coldef Sets the type and constraint of a column.
Refer to “7.40. CREATE TABLE” for the syntax of coldef.
colprop Sets the method for saving large object data types for each column.
Refer to “7.40. CREATE TABLE” for the syntax of colprop.
-
modify_column_clause
Component Description datatype Changes the data type of a column. Changing to an incompatible type, like from the NUMBER type to the CLOB type, is not allowed. Changing the precision and scale of a number type or the length of a VARCHAR is allowed.
When the precision or scale of a number type is reduced, all data in the corresponding column should be null or there should be no values. When the column length of a VARCHAR is reduced, there should be no data whose value has a longer length than the new length.
DEFAULT Changes the default value of a column. inline_constraint Adds or changes an inline constraint. -
rename_column_clause
Component Description old_colname RENAME COLUMN is used to change an existing column's name.
Specify the existing column name to be changed in old_colname.
TO new_colname Specifies a new name for the column to be changed in new_colname. -
drop_column_clause
Component Description column_name Specifies the column name to be deleted. CONSTRANTS This is used to delete a column which has constraints. However, a column which is used as a partitioning key in a partition table cannot be deleted. INVALIDATE INVALIDATE does not need to be specified. This is because the views and triggers which have a relationship with the table where the column is deleted will be invalidated automatically. The invalidated object will be verified when it is next used. -
constraint_clause
Component Description ADD outofline constraint Adds a new outofline constraint.
Refer to “7.1.1. Constraints” for outofline constraint related syntax.
RENAME CONSTRAINT Changes the name of an existing constraint. old_name Specifies the existing constraint name to be changed in old_name. TO new_name Specifies a new name for the constraint in new_name. MODIFY Changes the state of an existing constraint. DROP Removes an existing constraint. constraint_state Refer to “7.1.1. Constraints” for the syntax of constraint_state. PRIMARY KEY Specifies a primary key to be changed or deleted. UNIQUE column_name Specifies a unique key to be changed or deleted. CONSTRAINT name Specifies a constraint to be changed or deleted. CASCADE Deletes foreign keys when a primary or unique key constraint that is referenced by other columns is deleted.
If a foreign key is blocked, the primary/unique key cannot be individually deleted.
KEEP INDEX Deletes a constraint that uses an index, such as primary, unique, and foreign keys. The used indexes will not be removed.
DROP INDEX Deletes a constraint that uses index such as primary, unique, and foreign keys. The used indexes will also be removed.
DROP INDEX is the default value.
-
-
Examples
-
physical_attributes_clause
The following example illustrates the use of PCTFREE and INITRANS after creating a table:
CREATE TABLE atbl_exmp
(
    col1 NUMBER(10, 5),
    col2 VARCHAR(10),
    CONSTRAINT atbl_exm_pri_con PRIMARY KEY(COL1),
    CONSTRAINT atbl_exm_unq_con UNIQUE (COL2)
);

CREATE TABLE atbl_exmp_foreign_key
(
 col1 REFERENCES atbl_exmp (col1)
);

ALTER TABLE atbl_exmp PCTFREE 15 INITRANS 3;
The following example illustrates the use of atbl_con_alterstate_cl:
ALTER TABLE atbl_exmp PCTFREE 10 DISABLE PRIMARY KEY;

ALTER TABLE atbl_exmp ENABLE NOVALIDATE PRIMARY KEY;
-
column_clause
The following example illustrates the use of column_clause:
ALTER TABLE atbl_exmp ADD
(
    col3 VARCHAR(20),
    col4 CLOB
)
LOB (col4) STORE AS lob_sgmt_100 (DISABLE STORAGE IN ROW) ;

ALTER TABLE atbl_exmp RENAME COLUMN col2 TO column2;

ALTER TABLE atbl_exmp MODIFY
(
    col1 NUMBER(15, 7),
    col3 VARCHAR(15)
);
The example above shows how to use add_column_clause, rename_column_cluase, and modify_column_clause.
The following example illustrates the use of add_column_clause and modify_column_clause:
ALTER TABLE atbl_exmp ADD CONSTRAINT unq_con2 UNIQUE (col1, col3);

ALTER TABLE atbl_exmp MODIFY UNIQUE(col1, col3) DISABLE NOVALIDATE;

ALTER TABLE atbl_exmp RENAME CONSTRAINT unq_con2 TO atbl_exm_2;

ALTER TABLE atbl_exmp DROP PRIMARY KEY CASCADE;

ALTER TABLE atbl_exmp DROP CONSTRAINT alter_exm_unq_con KEEP INDEX;
The following example illustrates the use of rename_column_clause:
ALTER TABLE atbl_exmp RENAME TO atbl_exmp_2;
-
alter_table_partitioning
The following example illustrates the use of alter_table_partitioning:
CREATE TABLE atbl_part_exmp
(
    col1 NUMBER,
    col2 CLOB,
    col3 NUMBER
)
PARTITION BY RANGE (col1, col3)
(
    PARTITION atbl_part_1 VALUES LESS THAN (30, 40),
    PARTITION atbl_part_2 VALUES LESS THAN (50, 60)
);

ALTER TABLE atbl_part_exmp ADD PARTITION atbl_part_3
VALUES LESS THAN (60, 80);

ALTER TABLE atbl_part_exmp DROP PARTITION atbl_part_3;

ALTER TABLE atbl_part_exmp MOVE PARTITION atbl_part_2
TABLESPACE ts PCTFREE 14;

ALTER TABLE atbl_part_exmp RENAME PARTITION atbl_part_2 TO p2;

ALTER TABLE atbl_part_exmp SPLIT PARTITION p2 AT (40, 50)
INTO (PARTITION atbl_part_2, PARTITION atbl_part_3);
-
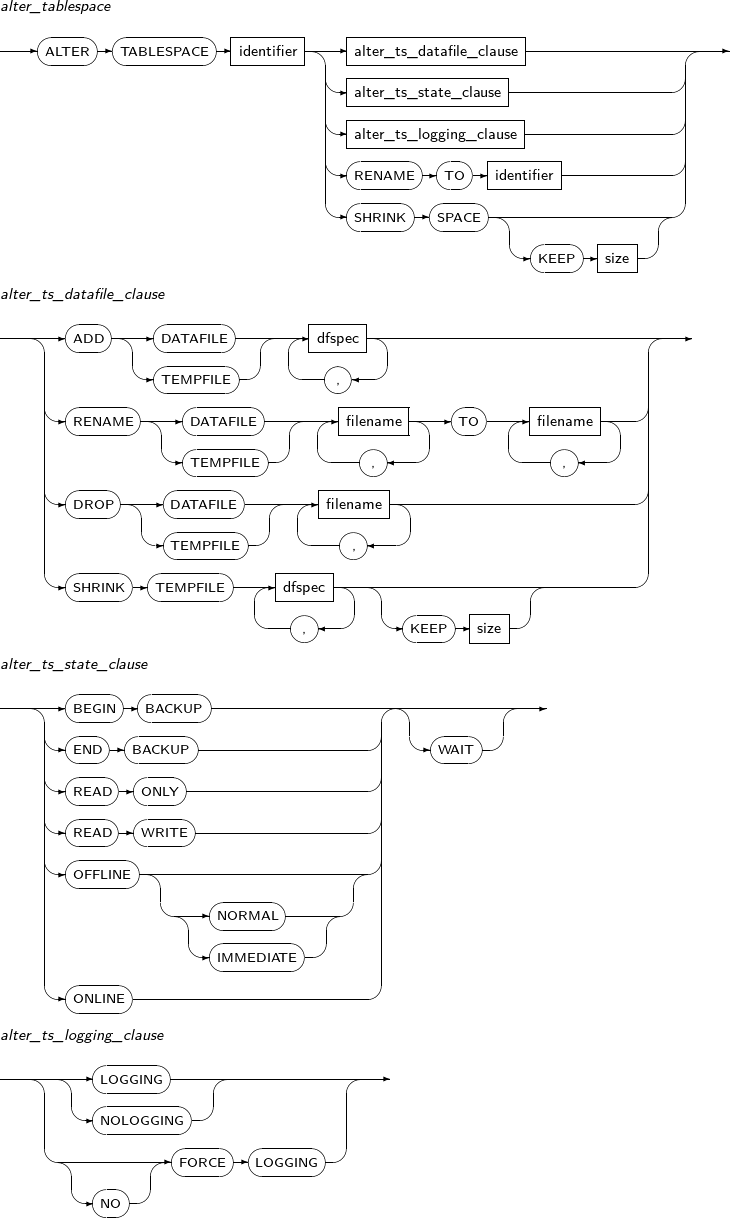
ALTER TABLESPACE changes the characteristics of a tablespace or data file.
A detailed description of ALTER TABLESPACE follows:
-
Syntax
-
Privileges
The SYSDBA privilege is required.
-
Components
-
alter_tablespace
Component Description alter_ts_datafile_clause Changes the characteristics of the file for the tablespace. alter_ts_state_clause Changes the characteristics of a tablespace. alter_ts_logging_clause Changes the logging settings of the tablespace. SHRINK SPACE Shrinks a temporary tablespace by releasing unused space and shrinking tempfiles.
Used only for a temporary tablespace.
Use the KEEP clause to specify a minimum size to shrink the tablespace to. -
alter_ts_datafile_clause
Component Description ADD DATAFILE Adds a data file.
Applicable for a permanent tablespace or undo tablespace. If no name is specified for the data file to be added, it will be created automatically.
ADD TEMPFILE Adds a temporary file.
Applicable for a temporary tablespace.
If no name is specified for the temporary file to be added, it will be created automatically.
dfspec A variety of settings related to the data file name or file size can be set. Refer to the “7.41. CREATE TABLESPACE” for details. RENAME DATAFILE Changes a data file path while restoring media.
Applicable for a permanent tablespace or undo tablespace.
RENAME TEMPFILE Changes a temporary file path during media recovery.
Applicable for temporary tablespaces.
DROP DATAFILE Deletes a data file.
The file to be deleted must be empty.
DROP TEMPFILE Deletes a temporary file.
The file to be deleted must be empty.
SHRINK TEMPFILE Reduces the size of a temporary file.
Applicable for temporary tablespaces.
[KEEP size] is the lower limit of the file size that can be reduced. If not specified, it is set to 0.
-
alter_ts_state_clause
Component Description BEGIN BACKUP
Starts a backup while a database is operating. For more information, refer to Tibero Administrator's Guide. END BACKUP
Ends a database backup. For more information, refer to Tibero Administrator's Guide. OFFLINE
Changes the state of a tablespace to offline.
When tablespace state changes to offline, all access to segments included in the tablespace are blocked. The state of every data file which belongs to the tablespace becomes offline.
-
OFFLINE NORMAL: Performs a checkpoint for the tablespace. It is not necessary to perform recovery for this tablespace when changing it back to online. NORMAL is the default value.
-
OFFLINE IMMEDIATE: Does not perform a checkpoint for tablespace. Therefore, a recovery must be performed for this tablespace before changing it back to online.
ONLINE
Changes the status of a tablespace to online.
It a tablespace needs to be recovered, its status cannot be changed to online. Perform a media recovery first.
-
-
alter_ts_logging_clause
Component Description LOGGING / NOLOGGING
Sets logging settings of the objects in the tablespace. If set to LOGGING, activities performed on the objects are recorded in the redo log file. If set to NOLOGGING, no logs are recorded. Logging setting is applied immediately after the setting is changed via ALTER TABLESPACE. FORCE LOGGING / NO FORCE LOGGING
If set to FORCE LOGGING, logs are recorded for the objects in the tablespace regardless of whether NOLOGGING is set or not. NO FORCE LOGGING removes the FORCE LOGGING setting. However, this setting cannot be used for UNDO tablespace which always turns on logging and TEMP tablespace which is never logged.
-
-
Examples
The following example illustrates how to add a data file to a tablespace. DBA_TABLESPACES allows a user to check the number of files used by a tablespace:
SQL> SELECT tablespace_name, ts_id, datafile_count
     FROM dba_tablespaces
     WHERE tablespace_name = 'T1';

TABLESPACE_NAME                     TS_ID DATAFILE_C
------------------------------ ---------- ----------
T1                                      3          1

1 row selected.

SQL> ALTER TABLESPACE t1 ADD DATAFILE 'ts2.dbf';

Tablespace altered.

SQL> SELECT tablespace_name,
            ts_id,
            datafile_count
     FROM dba_tablespaces
     WHERE tablespace_name = 'T1';

TABLESPACE_NAME                     TS_ID DATAFILE_C
------------------------------ ---------- ----------
T1                                      3          2

1 row selected.
ALTER TRIGGER compiles a database trigger or changes the name of a trigger. It can also activate or inactivate a trigger.
A detailed description of ALTER TRIGGER follows:
-
Syntax

-
Privileges
The trigger should be included in the user's schema, or the ALTER ANY TRIGGER system privilege is required.
-
Components
-
alter_trigger
Component Description RENAME Changes the name of a trigger.
Changing the name will not change the state of the trigger.
COMPILE Recompiles the trigger explicitly.
Recompiling explicitly can prevent implicit recompiling that may occur during runtime, and can avoid the overhead and compile errors that are followed by implicit compiling.
Tibero recompiles the objects that the trigger refers to if they are invalidated, then compiles the trigger. If the trigger is compiled successfully, the trigger becomes valid.
-
enable_option
Component Description ENABLE Activates a trigger. DISABLE Inactivates a trigger.
-
-
Example
The following example illustrates how to inactivate a trigger:
ALTER TRIGGER update_emp_sal DISABLE;
ALTER TYPE recompiles the specification of a user-defined type.
By explicitly recompiling, implicit recompilation that can occur during runtime is prevented. This can help avoid certain overhead and compilation errors.
For more information about recompilation of a parent object or invalidation of a child object, refer to “7.9. ALTER PROCEDURE”.
A detailed description of ALTER TYPE follows:
-
Syntax

-
Privilege
The type must be in the user's schema or the user must have the ALTER ANY TYPE privilege.
-
Components
Components Description schema Name of the schema to which the user-defined type belongs. type_name Name of the user type to be recompiled. SPECIFICATION/BODY Option to recompile the body or both the specification and body.
If not specified, both the specification and body are recompiled.
-
Example
CREATE TYPE tibero.two_dimensional_array  AS VARRAY (100) OF
one_dimensional_array;
/

CREATE TYPE tibero.one_dimensional_array AS VARRAY (100) OF NUMBER;
/

ALTER TYPE tibero.two_dimensional_array COMPILE;


CREATE TYPE object_type AS OBJECT(c1 NUMBER, c2 NUMBER, MEMBER
procedure print_attribute);
/

CREATE TYPE  BODY object_type
AS
    MEMBER PROCEDURE print_attribute
    AS
    BEGIN
            dbms_output.put_line( 'C1:' || c1 );
            dbms_output.put_line( 'C2:' || c2 );
    END;
END;
/

ALTER TYPE object_type COMPILE;

ALTER TYPE object_type COMPILE SPECIFICATION;

ALTER TYPE object_type COMPILE BODY;
ALTER USER changes user information.
Note
Refer to “7.45. CREATE USER” and “7.66. DROP USER” for details of creating or deleting a user.
A detailed description of ALTER USER follows:
-
Syntax
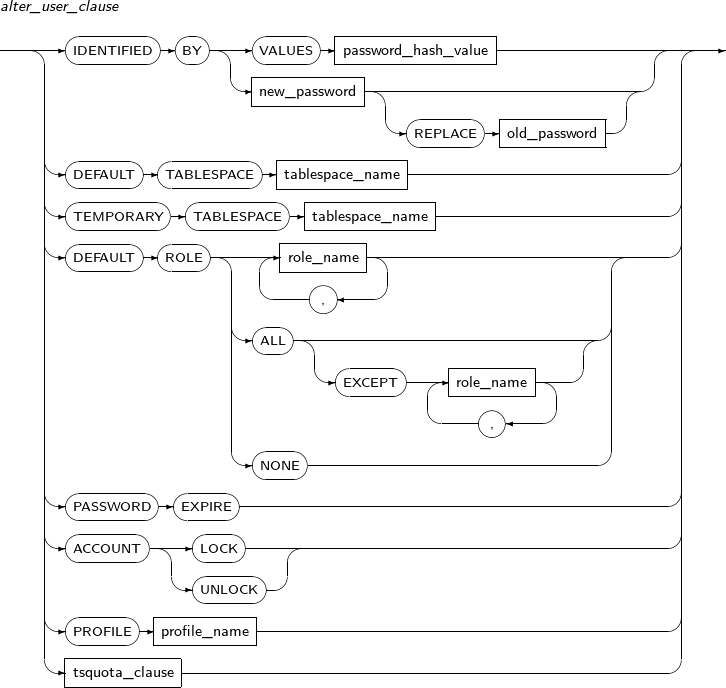
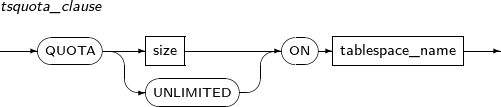
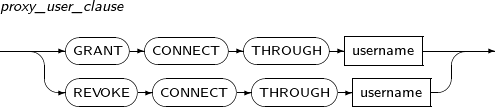
-
Privileges
The ALTER USER system privilege is required. A user does not need this system privilege to change his/her own password.
-
Components
-
alter_user
Component Description username Name of the user to be changed.
The user must have been previously created by CREATE USER.
alter_user_clause Information of the user to be changed.
Unlike CREATE USER, at least a single clause must be specified.
proxy_user_clause Settings needed to use the proxy user.
Required for additional settings to allow the user to access the proxy after executing the CREATE USER statement.
-
alter_user_clause
Component Description IDENTIFIED BY Changes a user's password.
Changing a different user's password is only allowed with the ALTER USER system privilege. When changing another user's password, the REPLACE clause is ignored.
VALUES 'password_hash_value' Changes a user's password to a new password that is encrypted with a hash value. Must have the SYS privilege. new_password The new password. A password can be a string of up to 63 bytes.
REPLACE This clause is used along with IDENTIFIED BY when a user changes his/her own authentication password.
A user can change his/her own password even without the ALTER USER system privilege. In this case, REPLACE is required and old_password must match the existing password.
old_password The existing password. A password can be a string of up to 63 bytes.
DEFAULT TABLESPACE Changes the default tablespace used.
When a table is created by CREATE TABLE, if a tablespace is not specified, the default tablespace is used.
DEFAULT ROLE Default role used when a user connects to the database.
Available roles must be given explicitly using the GRANT statement. Roles not granted to the user or through other roles cannot be used.
For more information, refer to “7.37. CREATE ROLE” and “7.70. GRANT”.
PASSWORD EXPIRE Changes the user password state to expired.
When a password state is expired, at the next user login, a message informs the user of the expired password and requests a password change.
ACCOUNT LOCK Changes the user state to LOCKED.
If a user state becomes locked, the user cannot use the database.
ACCOUNT UNLOCK Changes the user state to UNLOCKED. There are three methods to specify a default role:
No. Option Description 1 role_name Lists the roles used as default from among the given roles.
This is useful when specifying only a few roles.
2 ALL (EXCEPT) This option is useful when most roles are used as default.
When granting all but a few roles, specify the roles to be excluded with EXCEPT followed by ALL.
3 NONE Inactivates all roles except for necessary roles.
The roles granted to the user, other than the default role, can be dynamically activated or deactivated using SET ROLE. For more information, refer to “9.6. SET ROLE”.
-
tsquota_clause
Component Description QUOTA size ON tablespace_name Limits the size of the table space by the specified value.
QUOTA UNLIMITED ON tablespace_name Not limit the size of the tablespace. -
proxy_user_clause
Component Description GRANT Allows the user to access the proxy.
The granted proxy user can access the proxy.
REVOKE Prohibits the user from accessing the proxy.
The prohibited proxy user cannot access the proxy.
CONNECT THROUGH Connects through the proxy.
The username following the CONNECT THROUGH statement becomes the proxy user.
-
-
Examples
The following example illustrates how to change a user's password using IDENTIFIED BY:
SQL> CONN sys/tibero
Connected.

SQL> ALTER USER u1 IDENTIFIED BY 'p1';
User altered.

SQL> CONN u1/p1
Connected.

SQL> ALTER USER u1 IDENTIFIED BY 'p2';
TBR-7053: Invalid old password.

SQL> ALTER USER u1 IDENTIFIED BY 'p2' REPLACE 'p1';
User altered.
In the example above, because the user has the ALTER USER system privilege at the beginning, u1's password can be changed without using the REPLACE clause.
Because u1 does not have the ALTER USER system privilege, the user can only change his/her own password. Even when changing his/her own password, the REPLACE clause is required.
The following example illustrates how to change a default tablespace using DEFAULT TABLESPACE:
SQL> SELECT username, default_tablespace
     FROM dba_users
     WHERE username='U1';

USERNAME                       DEFAULT_TABLESPACE
------------------------------ ------------------------------
U1                             SYSTEM

1 row selected.

SQL> ALTER USER u1 DEFAULT TABLESPACE t1;
Altered.

SQL> SELECT username, default_tablespace
     FROM dba_users
     WHERE username='U1';

USERNAME                       DEFAULT_TABLESPACE
------------------------------ ------------------------------
U1                             T1

1 row selected.
The following example illustrates how to change a default role using DEFAULT ROLE:
SQL> CREATE ROLE a;
Role created.

SQL> CREATE ROLE b;
Role created.

SQL> CREATE ROLE c;
Role created.

SQL> GRANT CREATE SESSION TO a;
Granted.

SQL> GRANT a TO b;
Granted.

SQL> GRANT b, c TO u1;
Granted.

SQL> SELECT grantee, granted_role, default_role
     FROM dba_role_privs
     WHERE grantee='U1';

GRANTEE GRANTED_ROLE DEF
------- ------------ ---
U1      B            YES
U1      C            YES

2 rows selected.

SQL> ALTER USER u1 DEFAULT ROLE a;
TBR-7172: cannot enable role 'a' you have not been granted

SQL> GRANT a TO u1;
granted.

SQL> ALTER USER u1 DEFAULT ROLE NONE;
User altered.

SQL> SELECT grantee, granted_role, default_role
     FROM dba_role_privs
     WHERE grantee='U1';

GRANTEE GRANTED_ROLE DEF
------- ------------ ---
U1      B            NO
U1      C            NO
U1      A            NO

3 rows selected.

SQL> ALTER USER u1 DEFAULT ROLE ALL EXCEPT a, c;
User altered.

SQL> SELECT grantee, granted_role, default_role
     FROM dba_role_privs
     WHERE grantee='U1';

GRANTEE GRANTED_ROLE DEF
------- ------------ ---
U1      B            YES
U1      C            NO
U1      A            NO

3 rows selected.
In the example above, the three roles of A, B, and C are created through the CREATE ROLE statement. The privilege of role A is given to role B using the GRANT statement. Then, roles B and C are given to user u1. The example above shows the roles granted to user U1 in that state.
If role A, which was given to role B, is specified as the default role for user u1, an error occurs because user u1 was not directly granted role A.
After granting role A to user u1, use the DEFAULT ROLE NONE clause to remove all default roles. Then, check the roles granted to user U1. Notice that all default roles are off.
Now, use the DEFAULT ROLE ALL clause to specify all roles as default. This example shows how all roles are specified as default roles, except roles A and C, using the EXCEPT clause.
The following example illustrates how to expire a user password using PASSWORD EXPIRE:
SQL> ALTER USER u1 PASSWORD EXPIRE;
User altered.

SQL> CONN u1/p1
TBR-17002 :  password expired.
New password : ***
Retype new password : ***
Password changed.
Connected.
The following example illustrates how to change the user state to LOCKED and then to UNLOCKED using ACCOUNT:
SQL> ALTER USER u1 ACCOUNT LOCK;
User altered.

SQL> SELECT username, account_status
     FROM dba_users
     WHERE username='U1';

USERNAME                       ACCOUNT_STATUS
------------------------------ ----------------
U1                             LOCKED

1 row selected.

SQL> CONN u1/p1;
TBR-17006: account is locked.

SQL> CONN sys/tibero
Connected.

SQL> ALTER USER u1 ACCOUNT UNLOCK;
User altered.

SQL> SELECT username, account_status
     FROM dba_users
     WHERE username='U1';

USERNAME                       ACCOUNT_STATUS
------------------------------ ----------------
U1                             OPEN

1 row selected.

SQL> CONN U1/p1;
Connected.
ALTER VIEW compiles an invalidated view again. To use this command, the view must be in the user's schema or the user must have the ALTER ANY TABLE system privilege.
When a table is changed using the ALTER TABLE command, all views based on the table become invalidated. The invalidated views are automatically compiled when used in SQL statements. ALTER VIEW is used for recompiling a view before using it in SQL statements to prevent performance degradation and to find a possible problem in advance.
A detailed description of ALTER VIEW follows:
-
Syntax

-
Privilege
To execute the ALTER VIEW statement, the view must be in the user's schema or the user must have the ALTER ANY VIEW system privilege.
-
Component
Component Description schema Name of the schema that contains the view to be recompiled. If not specified, the current user's schema is used. view_name Name of a view. COMPILE Recompiles a view. An invalid view becomes valid or a view definition is changed when the definition of a view or table that is referred is changed. -
Example
ALTER VIEW tibero.MANAGER COMPILE;
AUDIT audits the use of a system privilege or a schema object privilege. Refer to “7.72. NOAUDIT” to remove the privileges being audited. A detailed description of privileges is explained in "Tibero Administrator's Guide".
A detailed description of AUDIT follows:
-
Syntax
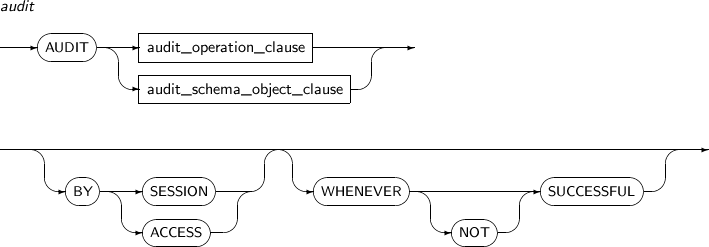
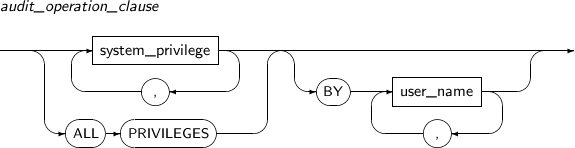
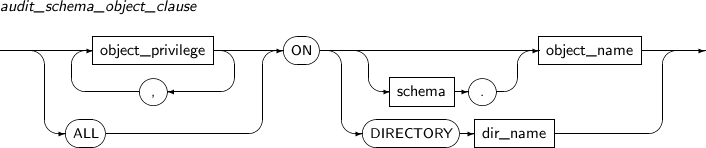
-
Privileges
-
The AUDIT SYSTEM privilege is required to audit system privileges.
-
When auditing a schema object or a directory object owned by another user, a user must have the AUDIT ANY system privilege.
-
A user can log any audit information by specifying the
AUDIT_TRAILparameter with an option other than NONE in the $TB_SID.tip file. If the parameter is set to NONE, auditing will be enabled but the information won't be logged. -
The SYS user will not be audited by default. When auditing a SYS user, set the
AUDIT_SYS_OPERATIONparameter to Y in the $TB_SID.tip file. All operations performed by SYS user will be logged in an audit log file.
-
-
Components
-
audit
Component Description audit_operation_clause Audits a system privilege. audit_schema_object_clause Audits a schema object privilege on a certain object.
The object types that can be audited are table, view, sequence, procedure, and directory.
BY SESSION Specifies how to generate an audit trail when a user is granted the audit system privilege.
BY SESSION writes repeated violations only once for each session.
BY ACCESS BY ACCESS records every violation even if they are the same violation.
If the AUDIT_TRAIL parameter value in a configuration file is 'OS', the system always operates as BY ACCESS, ignoring BY SESSION.
The default is BY ACCESS.
WHENEVER SUCCESSFUL Specifies how to generate an audit trail depending on the success or failure of the command when a user is granted the audit system privilege.
WHENEVER SUCCESSFUL generates an audit trail only when the command is successful.
If not specified, an audit trail will be generated regardless of success.
WHENEVER NOT SUCCESSFUL WHENEVER NOT SUCCESSFUL generates an audit trail only when the command fails. -
audit_operation_clause
Component Description system_privilege Specifies a system privilege to be audited.
Refer to the table in “7.70. GRANT” for details of system privilege types.
ALL PRIVILEGES Audits all system privileges. BY user_name Specifies a user to be audited.
If not specified, all users are audited.
-
audit_schema_object_clause
Component Description object_privilege Specifies the schema object to be monitored.
Refer to the table in “7.70. GRANT” for details of privilege types.
ALL Audits all the schema object privileges available for an object.
Refer to the table in “7.70. GRANT” for schema objects available for each target object.
ON Specifies an object whose schema object privilege will be audited. schema Specifies the name of the schema which the object belongs to.
By default, the schema of the current user will be used.
object_name Specifies an object name instead of a directory name. DIRECTORY dir_name Specifies a directory name.
-
-
Examples
-
audit
The following example illustrates how to generate an audit trail using BY SESSION:
SQL> AUDIT delete ON t BY SESSION WHENEVER SUCCESSFUL;
Audited.
-
audit_operation_clause
The following example illustrates how to generate an audit trail using BY user_name:
SQL> AUDIT create table BY tibero; Audited. -
audit_schema_object_clause
The following example illustrates how to specify an object audited for schema object privilege using ON:
SQL> AUDIT insert ON t;
Audited.
-
COMMENT creates a comment for a table, view, or associated column.
A detailed description of COMMENT follows:
-
Syntax
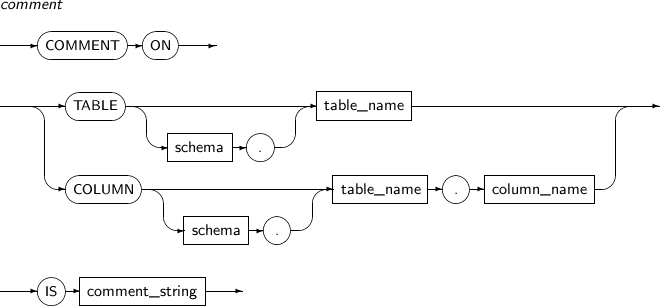
-
Privileges
No privilege is required to execute the COMMENT statement on the user's own schema objects. If the schema object is owned by another user, the COMMENT ANY TABLE system privilege is required.
-
Components
Component Description TABLE Creates a comment for a table or view.
Check the details of the created comment using the DBA_TAB_COMMENTS, USER_TAB_COMMENTS, and ALL_TAB_COMMENTS static views.
COLUMN Create a comment for a column which is included in a table or view.
Check the details of the created comment by using the DBA_COL_COMMENTS, USER_COL_COMMENTS, and ALL_COL_COMMENTS static views.
comment_string Details of the comment.
A comment is saved as a VARCHAR of up to 4,000 characters.
-
Example
The following example illustrates how to create a comment using COMMENT:
SQL> CREATE TABLE t1 (col1 NUMBER, col2 NUMBER);
Table created.

SQL> COMMENT ON TABLE t1 IS 'This is an example table.';
Commented.

SQL> SELECT * FROM user_tab_comments WHERE table_name = 'T1';

TABLE_NAME                      TABLE_TYP   COMMENTS
------------------------------  ---------   -------------------------
T1                              TABLE       This is an example table.

1 row selected.

SQL> COMMENT ON COLUMN t1.col1 IS 'This is the first column.';
Commented.

SQL> SELECT * FROM user_col_comments WHERE table_name = 'T1';

TABLE_NAME                     COLUMN_NAME             COMMENTS
------------------------------ ---------------------- -------------------------
T1                             COL1                   This is the first column.

1 row selected.
CREATE CONTEXT specifies the package that can create (or modify) a context namespace and manipulate the context of the namespace. The attributes of the namespace can be specified by using the DBMS_SESSION.SET_CONTEXT procedure in the specified package.
A detailed description of CREATE CONTEXT follows:
-
Syntax

-
Privilege
To create a context namespace, the user must have the CREATE ANY CONTEXT system privilege.
-
Component
-
create_context_clause
Component Description namespace Name of the context namespace to be created or modified. schema Schema of a package that manipulates the context. If not specified, the current schema is used. package_name Name of the package that manipulates the context. Even if the package does not currently exist, the DDL is normally executed. ACCESSED GLOBALLY Allows all sessions to access the context and read the contents while the database instance is available.
-
-
Example
The following example illustrates how to create a context using CREATE CONTEXT. The package that implements the security policy is pol_pkg, and the name of the context namespace is sec_ctx.
CREATE CONTEXT sec_ctx USING pol_pkg;
CREATE CONTROLEFILE creates a new control file based on information from existing data image files and log files.
This statement is used to change the maximum number of files or to replace a control file that has been damaged. This is only applicable in NOMOUNT mode.
In general, a control file creation statement is backed up with the statement ALTER DATABASE BACKUP CONTROLFILE TO TRACE.
A detailed description of CREATE CONTROLFILE follows.
-
문법
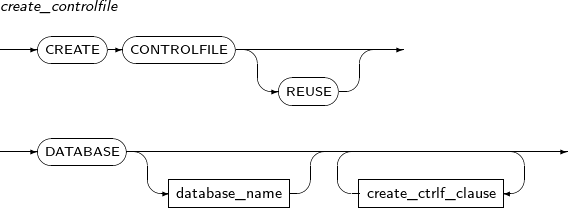
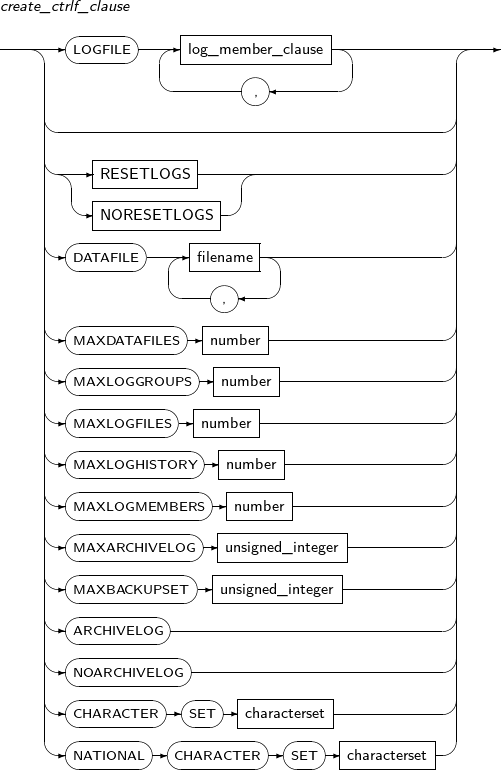
-
Privileges
If Tibero is running in NOMOUNT mode, only the SYS user can execute the CREATE CONTROLFILE statement.
-
Components
-
create_controlfile
Component Description REUSE The existing control files are reused and overwritten. DATABASE Specifies a database in which the control files will be stored. database_name Specifies the name of a database. create_ctrlf_clasuse Specifies a variety of properties of the control file. -
create_ctrlf_clasuse
Component Description LOGFILE Specifies an online log file.
An online log file must have two or more log groups, and each group must contain one or more members.
log_member_clause Assigns numbers for each log group.
By default, numbers are specified sequentially from 0.
RESETLOGS If RESETLOGS is specified, existing log files will be ignored and logs will be initialized.
NORESETLOGS If NORESETLOGS is specified, the existing valid log file will continue to be used. The log file must be an existing Redo log file that is still in use. This is the default value. MAXDATAFILES Sets the maximum number of data files to be used in the database.
The amount of space specified in MAXDATAFILES in the control file will be secured for data files. The number of data files must not exceed MAXDATAFILES.
The control file must be recreated when changing the MAXDATAFILES value.
Note that the larger MAXDATAFILES is, the more memory is required.
(Default value: 100, Minimum value: 10, Maximum value: 65533)
MAXLOGGROUPS Limits the maximum value of log groups. This value secures the space for log groups within the control file.
The control file must be recreated when changing the MAXLOGGROUPS value.
(Default value: 255, Maximum value: 255)
MAXLOGFILES This clause is the same as MAXLOGGROUPS, and is provided for user convenience.
MAXLOGGROUPS and MAXLOGFILES cannot be used at the same time.
MAXLOGMEMBERS Limits the maximum number of log files within a log group.
The control file must be recreated when changing the MAXLOGMEMBERS value.
(Default value: 8, Maximum Value: 8)
MAXARCHIVELOG Maximum number of archives recorded in a control file. If the maximum value is reached, new records overwrite the oldest records.
(Default value: 500, Maximum value: 64000)
MAXBACKUPSET Maximum number of backup sets recorded in a control file. The control file must be recreated when changing MAXBACKUPSET.
(Default value: 500, Maximum value: 5000)
MAXLOGHISTORY Maximum number of log file switches recorded in a control file. If the maximum value is reached, new records overwrite the oldest records.
(Default value: 500, Maximum value: 64000)
ARCHIVELOG Enables ARCHIVELOG mode.
Log groups are reused recursively. A previously used log group can be archived by the system before reuse.
NOARCHIVELOG Sets NOARCHIVELOG mode.
-
-
Examples
The following example illustrates how to create a control file using CREATE CONTROLFILE:.
CREATE CONTROLFILE REUSE DATABASE "t6db"
  LOGFILE
    GROUP 0 (
              '/disk2/log101.log',
              '/disk3/log102.log'
            ) SIZE 1M,
    GROUP 1 (
              '/disk1/log103.log',
              '/disk2/log104.log',
              '/disk3/log105.log'
            ) SIZE 2M
    NORESETLOGS
  DATAFILE
    '/disk1/system01.dbf', '/disk2/undo004.dbf'
  ARCHIVELOG
  MAXLOGFILES 30
  MAXLOGMEMBERS 8
  MAXARCHIVELOG 500
  MAXBACKUPSET 500
  MAXDATAFILES 200;
CREATE DATABASE creates a database.
A detailed description of CREATE DATABASE follows:
-
Syntax

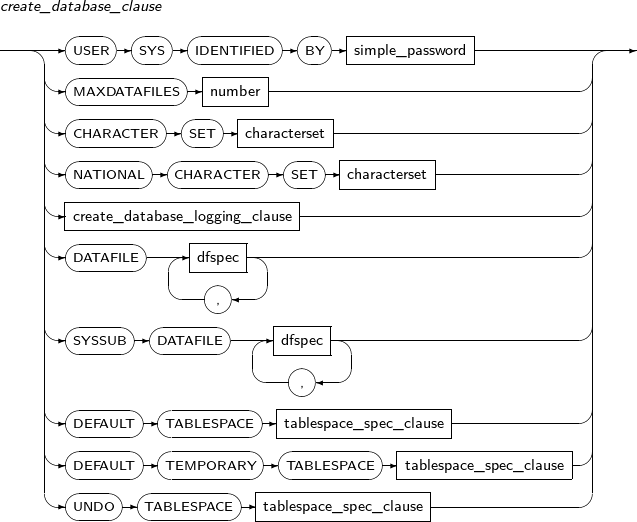
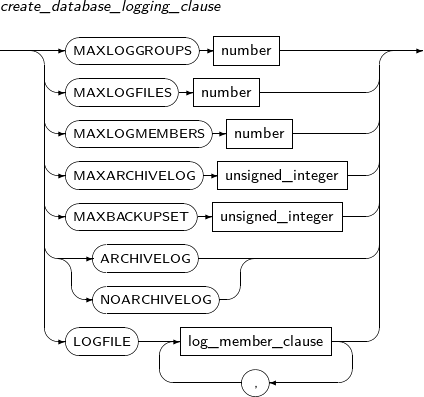

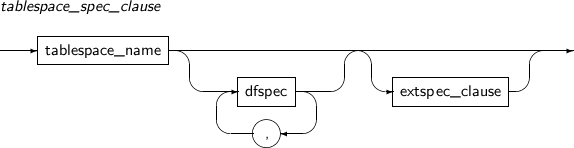
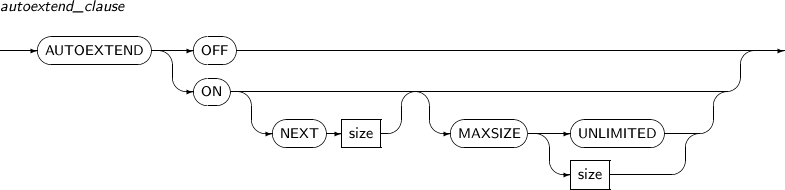
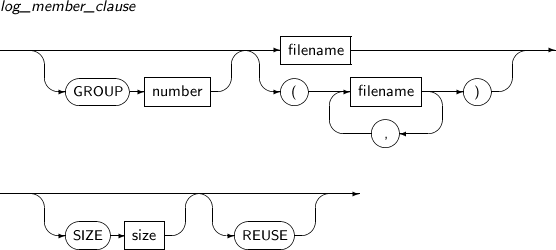
-
Privileges
If Tibero is running in NOMOUNT mode, only the SYS user can execute the CREATE DATABASE statement.
-
Components
-
create_database
Component Description database_name This should be same as the
DB_NAME$TB_SID.tip file.An error will occur if a control file is already specified in the file.
The default value is the same as the parameter in the environment configuration file.
create_database_clause Creates a new database.
Applicable only in NOMOUNT mode.
-
create_database_clause
Component Description USER SYS IDENTIFIED BY Specifies the SYS user password. The default value is 'tibero'.
The specified password can be changed using ALTER USER. Refer to “7.18. ALTER USER” for more information.
MAXDATAFILES Sets the maximum number of data files to be used in database.
The amount of space specified in MAXDATAFILES in the control file will be secured for data files. The number of data files must not exceed MAXDATAFILES.
The control file must be recreated when changing MAXDATAFILES. Note that the larger MAXDATAFILES is, the more memory is required.
(Default value: 100, Minimum value: 10, Maximum value: 65533)
CHARACTER SET Specifies the default character set for the database.
Options are:
-
ASCII: ASCII 7-bit English
-
EUCKR: EUC 16-bit Korean
-
MSWIN949: MS Windows code page 949 Korean (The default value)
-
UTF8: 24-bit International Characters
-
SJIS: Shift-JIS 16-bit Japanese
-
JA16SJIS: MS Windows code page 932 Japanese
-
JA16SJISTILDE: Japanese Shift-JIS character set including wave dash and the tilde, compatible with MS Windows code page 932
-
JA16EUC: EUC 24-bit Japanese
-
JA16EUCTILDE: Japanese EUC 24-bit character set including wave wash and the tilde
-
VN8VN3: VN3 8-bit Vietnamese
-
GBK: MS Windows MS Windows code page 936 Chinese
-
WE8MSWIN1252: MS Windows code page 1252 Western European
-
ZHT16HKSCS: HKSCS2001 Hong Kong MS Windows code page 950 Chinese
-
WE8ISO8859P1: ISO8859-1 Western European
-
EE8ISO8859P2: ISO8859-2 Eastern European
-
WE8ISO8859P9: ISO8859-9 Western European (Turkish)
-
WE8ISO8859P15: ISO8859-15 Western European
-
CL8MSWIN1251: MS Windows code page 1251 Cyrillic characters (Russian, Bulgarian)
-
CL8KOI8R: KOI8-R Cyrillic characters (Russian, Bulgarian)
-
CL8ISO8859P5: ISO8859-5 Cyrillic characters (Russian, Bulgarian)
-
RU8PC866: IBM-PC code page 866 8-bit Cyrillic characters (Russian)
-
SJISTILDE: SHIFT-JIS 16-bit Japanese including Fullwidth Tild
-
TH8TISASCII: Thailand industry standard 620-2533-ASCII 8-bit Thai
-
UTF16: 16/32-bit international standard multilingual
-
ZHT16BIG5: BIG5 16-bit Chinese
-
ZHT16MSWIN950: MS Windows code page 950 Chinese
NATIONAL CHARACTER SET Specifies the national character sets to be used to store columns defined as NCHAR, NCLOB, and NVARCHAR2
The national character set can be either UTF8 or UTF16. UTF16 is the default value.
- UTF16: 16-bit international standard language
DATAFILE Defines the data file for a system tablespace. One or more data files should be defined.
If not specified, the file '$TB_HOME/instance/$TB_SID/database/system001.dbf' will be added to the tablespace.
The file should be created as 'system001.dbf'. If a file with this name already exists, then 'system002.dbf, system003.dbf, ...'. will be tried until an unused file name is found.
($TB_HOME and $TB_SID indicate the environment variables of TB_HOME and TB_SID respectively.)
DEFAULT TABLESPACE Defines and specifies the default tablespace for a user.
By default, general users will use the SYSTEM tablespace.
DEFAULT TEMPORARY Defines a default temporary tablespace.
If the default temporary tablespace does not exist, the SYSTEM tablespace will be used as the temporary tablespace.
By default, a tablespace named 'TEMP' will be created and the file '$TB_HOME/instance/$TB_SID/database/temp001.dbf' will be added.
The file should be created as 'temp001.dbf'. If a file with this name already exists, then 'temp002.dbf, temp003.dbf, ...'. will be tried until an unused file name is found.
UNDO TABLESPACE Defines the Undo tablespace.
A single Undo tablespace must be defined.
If not specified, a tablespace named 'UNDO' will be created and the file '$TB_HOME/instance/$TB_SID/database/undo001.dbf' will be added.
The file should be created as 'undo001.dbf'. If a file with this name already exists, then 'undo002.dbf, undo003.dbf, ...'. will be tried until an unused file name is found.
-
-
create_database_logging_clause
Component Description LOGFILE Specifies an online log file.
Online log files must have two or more log groups and each group must contain one or more members.
MAXLOGGROUPS Limits the maximum value of log groups.
This value secures the space for log groups within control file.
The control file must be recreated when changing MAXLOGGROUPS.
The default value is 255 and the maximum value, LOGGROUP_CNTMAX_PER_DATABASE, is 255.
MAXLOGFILES This clause is the same as MAXLOGGROUPS, and is provided for user convenience.
MAXLOGGROUPS and MAXLOGFILES cannot be used at the same time.
MAXLOGMEMBERS Limits the maximum number of log files within a log group. The control file must be recreated when changing MAXLOGMEMBERS.
The default value is 8, and the maximum value, LOGMEMBER_CNTMAX_PER_LGGGROUP, is 8.
ARCHIVELOG Enables ARCHIVELOG mode.
A log group is reused recursively. A previously used log group can be archived by the system before being reused.
MAXARCHIVELOG Maximum number of archives recorded in a control file. If the maximum value is reached, new records overwrite the oldest records.
(Default value: 500, Maximum value: 64000)
MAXBACKUPSET Maximum number of backup sets recorded in a control file. The control file must be recreated when changing MAXBACKUPSET.
(Default value: 500, Maximum value: 5000)
MAXLOGHISTORY Maximum number of log file switches recorded in a control file. If the maximum value is reached, new records overwrite the oldest records.
(Default value: 500, Maximum value: 64000)
NOARCHIVELOG Sets NOARCHIVELOG mode. -
dfspec
Component Description filename A filename can be specified using an absolute or relative path.
A relative path will be specified as '$TB_HOME/database/$TB_SID/'.
SIZE Defines the file size in bytes.
Large files can be easily defined using symbols such as M (megabyte), K (kilobyte), and G (gigabyte).
REUSE Specifies whether to overwrite an existing file.
If REUSE is not specified, an error will occur when attempting to use a file which already exists.
autoextend_clause Specifies whether to automatically extend the file size when the data to be stored exceeds the specified file size.
-
tablespace_spec_clause
Component Description tablespace_name Specifies the name of a tablespace. dfspec Defines various configurations associated with file name and size.
Refer to the previous dfspec description for details.
extspec_clause Specifies how to manage the extent of a tablespace. -
autoextend_clause
Component Description AUTOEXTEND OFF Disables automatic extension for the data file.
When the data to be stored exceeds the file size, manually extend the size by using RESIZE of ALTER DATABASE or adding a file to the tablespace.
Refer to “7.2. ALTER DATABASE” for details of adding a file.
AUTOEXTEND ON Enables automatic extension for the data file. NEXT Specifies the amount of space to allocate if more extents are required.
A file that is too small will require extension more often, but a file that is too large uses unnecessary space.
MAXSIZE Specifies the maximum file size. -
log_member_clause
Component Description GROUP Assigns numbers for a log group.
By default, a number will be sequentially assigned from 0.
REUSE Overwrites an existing file.
-
-
Examples
The following example illustrates how to create a database using CREATE DATABASE:
create database "tibero"

user sys identified by tibero

maxinstances 8

maxdatafiles 100

character set MSWIN949

national character set UTF16

logfile

group 1 'log001.log' size 100M,

group 2 'log002.log' size 100M,

group 3 'log003.log' size 100M

maxloggroups 255

maxlogmembers 8

maxarchivelog 500

maxbackupset 500

noarchivelog

datafile 'system001.dtf' size 100M autoextend on next 100M maxsize unlimited

default temporary tablespace TEMP

tempfile 'temp001.dtf' size 100M autoextend on next 100M maxsize unlimited

extent management local autoallocate

undo tablespace UNDO

datafile 'undo001.dtf' size 100M autoextend on next 100M maxsize unlimited

extent management local autoallocate;
CREATE DATABASE LINK creates a database link. A database link enables a user to access another database's objects. By adding '@database link name' to the end of object name, a user can access another database's objects.
The database to access does not necessarily have to be a Tibero. However, there might be functional restrictions when using a different database's objects.
After a database link is created, the user can access objects from the connected database, including tables and views, to execute DML statements.
Note
Refer to Tibero Administrator's Guide for details.
A detailed description of CREATE DATABASE LINK follows:
-
Syntax
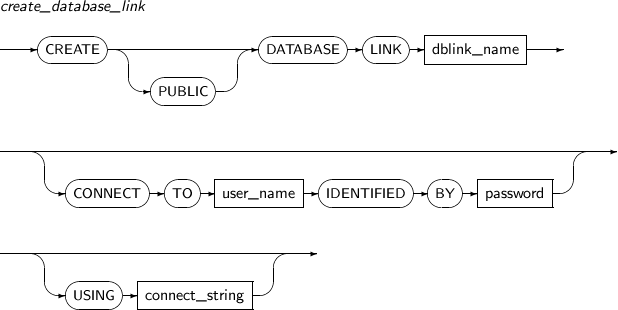
-
Privileges
-
The CREATE DATABASE LINK system privilege is required to create a database link.
-
The CREATE PUBLIC DATABASE LINK system privilege is required to create a public database link.
-
When creating a remote database link, the user must have the CREATE SESSION system privilege.
-
-
Components
Component Description PUBLIC Creates a public database link that is available to all users.
By default, a database link will only be accessible to the user who created it.
dblink_name Specifies the name of the database link to be created.
Note that a schema cannot be specified with the name of a database link. In other words, it is not possible to create a database link in another user's schema. The period character '.' is interpreted as a character in the database link name.
If a database link is not public, only the user who created it can use it. Create a public database link if other users will use it.
CONNECT TO user_name IDENTIFIED BY password Specifies the user name and password, which are required to access a remote database through a fixed database link.
By default, the current user's name and password will be specified.
USING connect_string Specifies the service name of a remote database as a literal.
A service should be saved in the file tbdsn.tbr. The service name, HOST, port number, database name, etc can be specified in this file.
The service name specified in the file tbdsn.tbr must be the same as connect_string.
-
Examples
The following example illustrates how to create database link using CREATE DATABASE LINK:
CREATE DATABASE LINK remote USING 'remote_tibero';

CREATE PUBLIC DATABASE LINK public_remote
  CONNECT TO tibero IDENTIFIED BY tmax USING 'remote_tibero';
CREATE DIRECTORY creates a directory object. Refer to “7.48. DROP DIRECTORY” for details of removing a directory.
A detailed description of CREATE DIRECTORY follows:
-
Syntax

-
Privileges
-
The CREATE ANY DIRECTORY system privilege is required to create a directory.
-
After a directory is created, read and write permission for the directory are given automatically. These permissions can be given to other users or roles.
-
-
Components
Component Description OR REPLACE Replaces an existing directory that has the same name as the new directory.
This clause is different from deleting a directory and creating a new one in that it maintains the existing privileges and references in the target directory.
dir_name The name of the directory object to be created. AS dir_path_string Specifies the directory path to which a directory object refers.
This does not check the path validity or access permissions.
If an invalid path is specified, access by external tables will result in an error. The directory path is represented by a character literal and is case-sensitive.
-
Examples
The following example illustrates how to create a directory object named tmp which points to the '/tmp' path using CREATE DIRECTORY.
SQL> CREATE DIRECTORY tmp AS '/tmp';

Directory created.
CREATE DISKSPACE creates a diskspace.
A detailed description of CREATE DISKSPACE is as follows:
-
Syntax
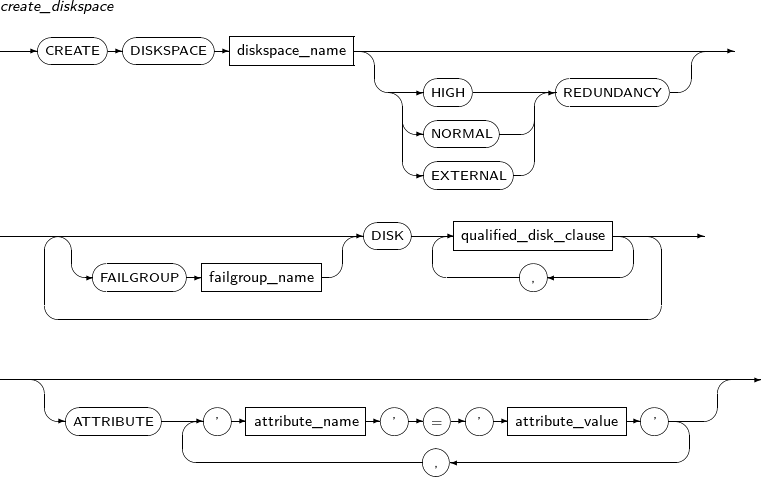
-
Components
-
create_diskspace
Component Description diskspace_name Diskspace name. REDUNDANCY File redundancy level for the diskspace. As the level increase, data loss risk decreases as well as the overhead for disk use and writes.
Level options are:
-
HIGH: Mirrors all files in the diskspace on three different failgroups. Three or more failgroups must exist and normal operation is guaranteed for failure on up to two failgroups.
-
NORMAL: Mirrors all files in the diskspace on two different failgroups. Two or more failgroups must exist and normal operation is guaranteed for failure on one failgroup. Default value.
-
EXTERNAL: No mirroring is used. Used when redundancy is possible within a disk or data loss is tolerable.
FAILGROUP failgroup_name Failgroup name of the disk.
This is applicable only when the diskspace has NORMAL or HIGH redundancy level, and must be specified with alphanumeric characters of up to 48 bytes in length.
If not specified, each disk is set to a its own failgroup with the disk name as the failgroup name.
DISK qualified_disk_clause Disk(s) to add to the diskspace. ATTRIBUTE Diskspace attributes that consists of the following options:
-
AU_SIZE: Allocates space on the diskspace in byte units. (Default value: 1MB)
-
SECTOR_SIZE: Sector size of the disks in the diskspace. (Default value: 512)
-
-
qualified_disk_clause
Component Description search_string Path of the disk(s) to assign to the diskspace.
Use a wildcard to specify multiple disks. Must be in the path specified by the TAS_DISKSTRING initialization parameter.
must be specified with alphanumeric characters of up to 48 bytes in length.
NAME disk_name Disk name found with search_string. This is applicable only when a single disk is found via the search_string. Must be specified with alphanumeric characters of up to 48 bytes in length. The name of the disk is only used within TAS and is not related to the disk path. If not specified, a name is set automatically.
SIZE Size of the disk(s) found with search_string in bytes. If there are multiple disks, they are all set with the same size. If not specified, this is set to the actual disk size determined by TAS. If the size cannot be determined, an error is thrown and the size must be specified.
FORCE Size of the disk(s) found with search_string in bytes. The disk(s) found with search_string are assigned to the specified diskspace even if they already belong to another diskspace. This causes the existing diskspace to be dropped. NOFORCE An error is thrown when the disk(s) found with search_string already belong to another diskspace. Default value.
-
-
Example
The following example shows how to use CREATE DISKSPACE to create a diskspace without redundancy.
CREATE DISKSPACE ds
    EXTERNAL REDUNDANCY
    DISK '/tas/dev/path0' NAME disk0 SIZE 512G,
         '/tas/dev/path1' NAME disk1 SIZE 256G;
The following example shows how to use CREATE DISKSPACE to create a diskspace with three failgroups.
CREATE DISKSPACE ds
    HIGH REDUNDANCY
    FAILGROUP fg0 DISK
        '/tas/dev/path00' NAME disk00 SIZE 512G,
        '/tas/dev/path01' NAME disk01 SIZE 512G
    FAILGROUP fg1 DISK
        '/tas/dev/path10' NAME disk10 SIZE 512G,
        '/tas/dev/path11' NAME disk11 SIZE 512G
    FAILGROUP fg2 DISK
        '/tas/dev/path20' NAME disk20 SIZE 512G,
        '/tas/dev/path21' NAME disk21 SIZE 512G
    ATTRIBUTE 'AU_SIZE' = '4M';
CREATION FUNCTION defines a new user function or replaces an existing function. A user function is a tbPSM program that has a return value. The function is saved and executed in the Tibero server. The difference between a user function and a user procedure is that a user function has a return value and can be included in a query or DML statement.
A detailed description of CREATE FUNCTION follows:
-
Syntax
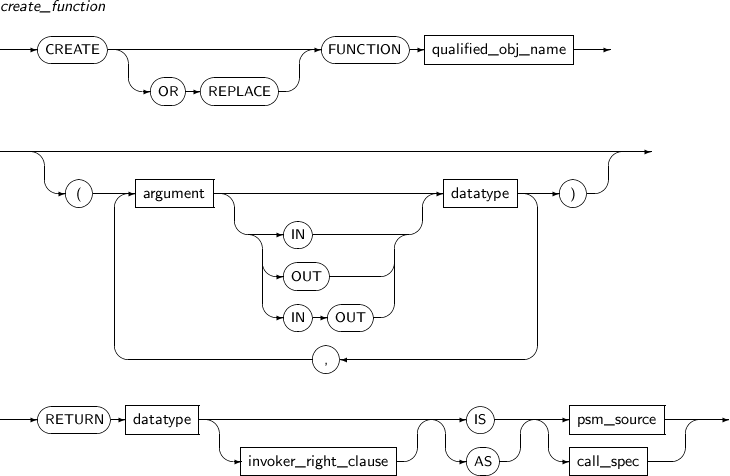
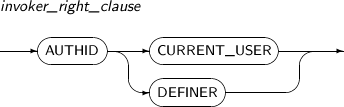
-
Privileges
The CREATE PROCEDURE system privilege is required to create a function in a user's own schema. To create or change a function in another user's schema, the CREATE ANY PROCEDURE system privilege or ALTER ANY PROCEDURE system privilege is required.
-
Components
-
create_function
Component Description OR REPLACE Redefines an existing function. If the OR REPLACE clause is included, the function will be recompiled.
This is different from deleting and recreating the function in that the OR REPLACE clause maintains the existing privileges of the function.
qualified_obj_name Specifies the schema and name of a function. argument Specifies the parameters of a function. A function can have 0 or more parameters.
If this clause is set to 0, omit the parentheses enclosing the parameter.
IN Specifies the direction of a parameter. The IN parameter receives external values. The default value is IN.
COMMIT, ROLLBACK, SAVEPOINT and DDL statements cannot be performed in the current transaction. Also, updates cannot be performed on the currently accessed tables.
OUT Specifies the direction of a parameter. The OUT direction indicates the function will provide a value for the parameter.
Any function included in DML statements cannot have an OUT parameter.
Any function which is called directly or indirectly from functions included in DML statements can have only OUT or IN OUT parameters.
IN OUT Specifies the direction of a parameter. IN OUT parameters are used for both input and output.
Any function that is included in DML statements cannot have the IN OUT parameter.
NOCOPY Passes the pointer for a parameter variable instead of a copy of the data.
Because the parameter is not copied, this can increase processing speed.
datatype Specifies the data type of a function parameter or return value.
For data types of function parameters or return values, all data types supported by tbPSM are valid. The data type of a return value cannot be specified with the length of a string or the precision and scale of a numeric value.
RETURN Specifies the data type of a return value. invoker_right_clause User functions can be divided into invoker-rights functions and definer-rights functions.
This will decide which user's privilege will be used to execute a function, which schema will be searched, etc.
The default is a definer-rights function.
IS IS is followed by the function body.
IS and AS are identical.
AS AS is followed by function body.
IS and AS are identical.
psm_source PSM source code is located here.
Refer to Tibero tbPSM Guide for details.
call_spec Indicates the specifications used to call the external function.
Refer to Tibero tbPSM Guide for details.
-
invoker_right_clause
Component Description AUTHID CURRENT_USER Declares a user function as an invoker-rights function. By default, the function is declared as a definer-rights function.
When this option specifies an invoker-rights function, the current user's privilege will be used and the current user's schema will be used when accessing objects. Therefore, if the user who calls the function changes, the task range and schema might change as well. This function is useful when many users work on the same task.
AUTHID DEFINER Declares a user function as a definer-rights function. This is the default value.
When this option specifies a definer-rights function, Tibero will use the privilege of the user who defined that function and search for an object to be accessed from that user's schema. Therefore, regardless of the caller, the work range and schema object being accessed are always consistent. This function is useful when allowing general users access to some part of system data such as DD.
-
-
Examples
The following example illustrates how to redefine a user function using CREATE FUNCTION:
CREATE OR REPLACE FUNCTION square(origin IN NUMBER)
  RETURN NUMBER IS
    origin_square NUMBER;
  BEGIN
    origin_square := origin * origin;

    RETURN origin_square;
  END;
CREATE INDEX creates an index. Indexes can be created for one or more columns of a table.
A detailed description of CREATE INDEX follows:
-
Syntax
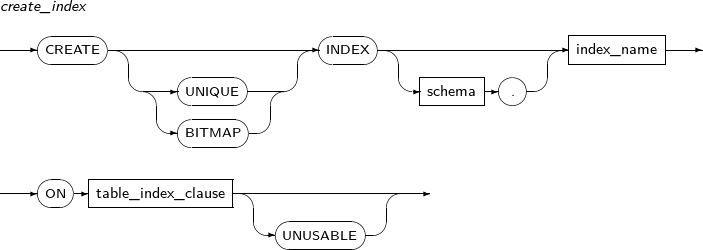
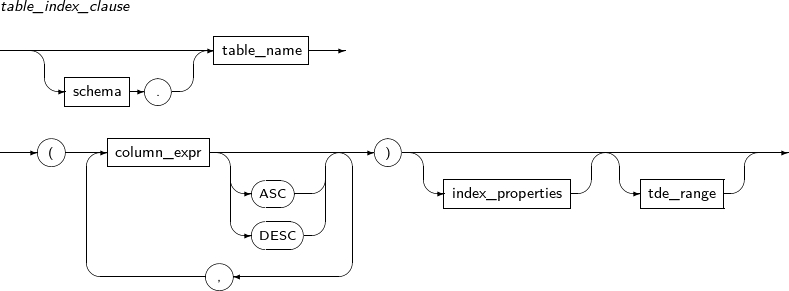
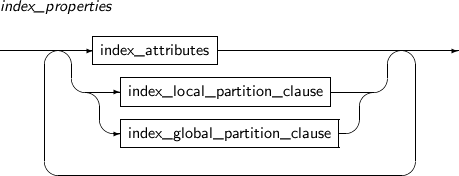
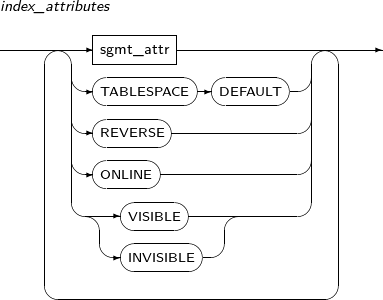
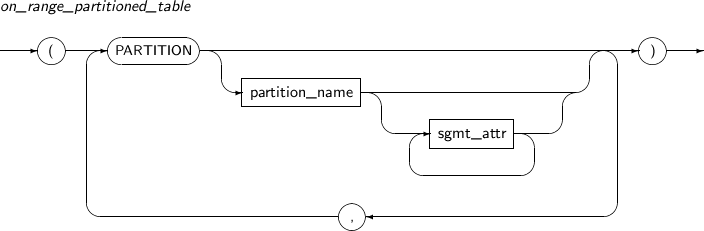
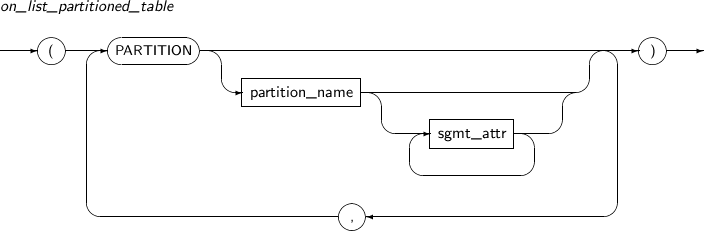

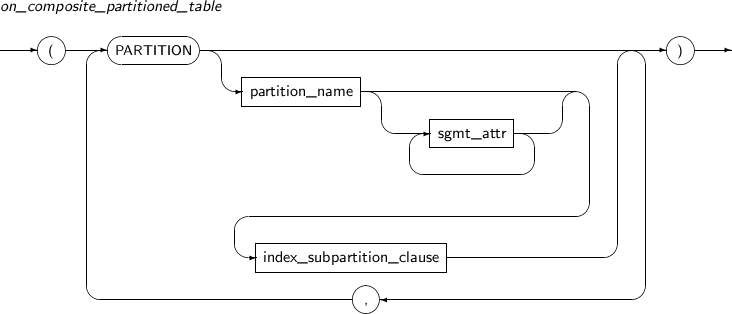
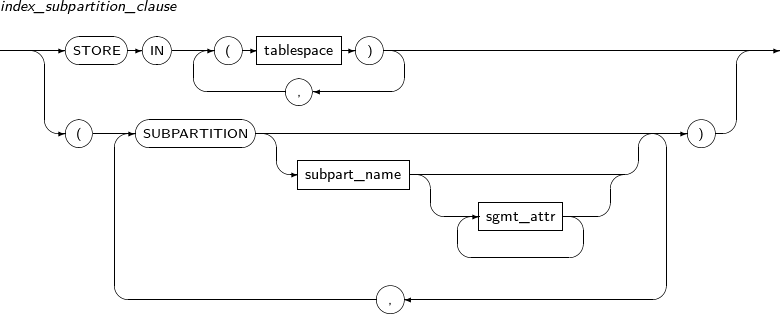
-
Privileges
One of the following conditions must be satisfied to run the CREATE INDEX statement:
-
The basic table is owned by user's own schema.
-
The user has the INDEX schema object privilege for the table.
-
The user has the CREATE ANY INDEX system privilege.
-
-
Components
-
create_index
Component Description UNIQUE Creates a unique index. In a unique index, duplicated key values cannot be stored. BITMAP Creates a bitmap index. schema Specifies the schema used to create an index. By default, the current user's schema will be used. index_name Specifies the name of an index to be created. ON table_index_clause Specifies the table in which index will be created. UNUSABLE Creates an index in a disabled state. The index must be recreated with the REBUILD option of ALTER INDEX to be used. -
table_index_clause
Component Description schema Specifies the schema to which the table where the index will be created belongs.
By default, the current user's schema will be used.
table_name Specifies the table name for which an index will be created. column_expr Specifies the column name or expression to be used as the index key.
LONG, LONG ROW, and LOB (large objects) cannot be used for an index key. The restriction also applies to the resulting expression value.
If an index with the same key exists in a database, there is a restriction on creating the same index. This prevents inefficiencies associated with having duplicated indexes. If the same index already exists, it is better to obtain the privilege to use that index than to create a duplicate index.
When using user defined functions in an index key expression, the function should be declared as DETERMINISTIC. If the function is changed or deleted, the index will be disabled. Any function used in an index key expression should have predictable results. For example, a function whose result value always changes, such as SYSDATE, cannot be used.
ASC Specifies index entries in ascending order by the column. (Default value) DESC Specifies the index entries of the column to be arranged in descending order. Descending order is used in two cases:
-
When using a composite key, specify (A, B DESC) if all values in column A are the same or when arranging column A in ascending order and column B in descending order.
-
When arranging insert keys in descending order, sort the keys in descending order to enhance the efficiency of indexes. Tibero indexes are optimized to insert keys in ascending order.
index_properties Specifies detailed properties of the index. tde_range Option to use an index of encrypted table to range scan. -
-
index_properties
Component Description index_attributes Specifies the physical attributes of an index. index_local_partition_clause Creates a local partition index.
This must be equal to the number of table partitions. Index partitioning is maintained automatically when table partitions are changed.
index_global_partition_clause Creates a global partition index.
Creates an index by specifying its own partitioning regardless of if there is a table partition or not.
-
index_attributes
Component Description sgmt_attr Refer to “7.1.4. Sgmt_attr” for the details of the syntax for sgmt_attr. TABLESPACE (DEFAULT) Specifies the tablespace in which an index will be created.
If this clause is omitted or set as DEFAULT, an index will be created in the base table.
REVERSE Creates index entries as reversed except for ROWID. When a large amount of data is concentrated in a few portions of the index, the rows are distributed more evenly. ONLINE Allows DML operations while an index is being created. INVISIBLE Index status option. Option to allow the optimizer to consider indexes. An invisible index is maintained by DML like a general index. However, it is ignored by the optimizer. -
index_local_partition_cluase
Component Description on_range_partitioned_table Creates a local partition index for a RANGE partition table. If the PARTITION clause is used, the number of PARTITION clauses should be same as the number of table partitions. If these number do not match, an error will occur.
Refer to “7.1.4. Sgmt_attr” for details.
on_list_partitioned_table Creates a local partition index for a LIST partition table.
For details, refer to on_range_partitioned_table.
on_hash_partitioned_table Creates a local partition index for a HASH partition table.
For details, refer to on_range_partitioned_table.
on_composite_partitioned_table Creates a local partition index for a composite partition table.
For details, refer to on_range_partitioned_table.
-
on_range_partitioned_table
Component Description partition_name Specifies an index partition name. By default, the name will be created automatically. sgmt_attr Specifies a segment attribute to be used as an index.
Refer to “7.1.4. Sgmt_attr” for details.
-
on_list_partitioned_table
Component Description partition_name Specifies an index partition name. By default, the system will create the name. sgmt_attr Specifies a segment attribute to be used as an index partition. Refer to “7.1.4. Sgmt_attr” for details.
-
on_hash_partitioned_table
Component Description STORE IN Specifies the tablespaces in which each partition will be located.
The specified number of tablespaces does not need to match the number of partitions. If the numbers do not match, the tablespace will be specified using a round-robin method.
tablespace Specifies a tablespace. partition_name Specifies an index partition name. By default, the system will create the name. sgmt_attr Specifies a segment attribute to be used as index partition. Refer to “7.1.4. Sgmt_attr” for details.
-
on_composite_partitioned_table
Component Description partition_name Specifies an index partition name. By default, the system will create the name. sgmt_attr Specifies a segment attribute to be used as an index partition. Refer to “7.1.4. Sgmt_attr” for details.
index_subpartition_clause Specifies the details for each subpartition. STORE IN can only be used when the subpartitioning method is HASH. The syntax is the same as other basic partitions.
For details, refer to on_range_partitioned_table.
-
index_subpartition_clause
Component Description STORE IN This clause can only be used when the subpartitioning method is HASH.
STORE IN specifies a tablespace where each partition will be located. The specified number of tablespaces does not need to match the number of partitions. If the numbers do not match, the tablespace will be specified using a round-robin method.
tablespace Specifies a tablespace. subpartition_name Specifies the name of an index subpartition. By default, the system will create the name.
sgmt_attr Specifies a segment attribute to be used as an index partition. Refer to “7.1.4. Sgmt_attr” for details.
-
index_global_partition_clause
Component Description RANGE Specifies the partitioning method of a subpartition as a RANGE partition. HASH Specifies the partitioning method of a subpartition as a HASH partition. column Specifies the base column among the columns used as index key. The partition key column should include the first part of the index key column. For example, if the index key is (a, b, c), then (a), (a, b), and (a, b, c) can all be specified as a partition key column. An error will occur if a partition key column does not include the first part of the index key column.
The index partitioning method is not related to how the table is partitioned. The two partitioning methods can be different. Even if the table is not partitioned, any indexes can still be partitioned. The reverse is also true: even if the table is partitioned, indexes might not be partitioned.
index_partitioning_clause Specifies the details of a RANGE index partition. hash_partition_desc Specifies the details of a HASH index partition. hash_partitions_by_quantity Creates a HASH partition with its tablespace and a number of partitions. -
index_partitioning_clause
Component Description partition_name Specifies the name of an index partition. By default, the system will create the name. value Specifies the base value to divide a partition.
A smaller value than what was specified will be included in the partition. If this clause is set to MAXVALUE, all values which are not included in other partitions will be included in the partition. The value should match the number of columns.
sgmt_attr Specifies a segment attribute to be used as index partition. Refer to “7.1.4. Sgmt_attr” for details.
-
-
Examples
-
create_index
The following example illustrates how to create an index in a disabled state by specifying UNUSABLE:
SQL> CREATE INDEX i ON t (a) UNUSABLE;
Index created.
-
table_index_clause
The following example illustrates how to create an index by specifying column_expr
SQL> CONN u1/u1 Connected.

SQL> CREATE TABLE t (a NUMBER, b VARCHAR(10));
Table created.

SQL> CREATE UNIQUE INDEX i ON t (a);
Unique created.

SQL> CREATE INDEX i2 ON t (UPPER(b));
Index created.
The following example illustrates that an error may occur when using a LONG, LONG RAW, or LOB as an index key specified in column_expr:
SQL> CREATE TABLE t (a NUMBER, b LONG);
Table created.

SQL> CREATE UNIQUE INDEX i ON t(a, b);
TBR-7086: cannot create an index on columns whose type is
LONG, LONG RAW, LOB.
The following example illustrates that an error may occur if there is an index which has the same index key as specified in column_expr:
SQL> CREATE UNIQUE INDEX i ON t (a);
Unique created.

SQL> CREATE UNIQUE INDEX j ON t (a);
TBR-7124: such index already exists.
The following example illustrates that an error occurs when user-defined functions are used in column_expr but the functions are not declared as DETERMINISTIC:
SQL> CREATE TABLE t (a NUMBER);
Table created.

SQL> CREATE FUNCTION plus4 (a NUMBER)
     RETURN NUMBER AS BEGIN RETURN a + 4; END;
Function created.

SQL> CREATE INDEX i ON t (plus4(a));
TBR-8082: nondeterministic function,
date or system variable not allowed here.
SQL> CREATE TABLE t (a NUMBER); Table created. SQL> CREATE INDEX i ON t (SYSDATE); TBR-8082: nondeterministic function, date or system variable not allowed here.
In the example above, the SYSDATE function cannot be used because its result value always changes.
The following example illustrates how to create a unique index by specifying UNIQUE:
SQL> CREATE UNIQUE INDEX i ON t (a);
Unique created.

SQL> INSERT INTO t VALUES (1);
1 row inserted.

SQL> INSERT INTO t VALUES (1);
TBR-10007: unique constraint violated.
The following example illustrates how to create an index in descending order by specifying DESC:
SQL> CREATE TABLE t (a NUMBER, b NUMBER);
Table created.

SQL> CREATE UNIQUE INDEX i ON t (a, b DESC);
Unique created.
-
index_attributes
The following example illustrates how to specify the tablespace where an index will be created by specifying TABLESPACE:
SQL> CONN sys/tibero Connected. SQL> CREATE TABLESPACE ts DATAFILE '/usr/ts.df' SIZE 10M; Tablespace created. SQL> CONN u1/u1 Connected. SQL> CREATE INDEX i ON t (a) TABLESPACE ts; Index created. -
index_local_partition_clause
The following example illustrates how to create a local partition index by specifying index_local_partition_clause:
SQL> CREATE TABLE t (a NUMBER, b NUMBER, c NUMBER)
     PARTITION BY RANGE (a, b)
     (PARTITION p1 VALUES LESS THAN (10, 10)
      TABLESPACE ts1, PARTITION p2
      VALUES LESS THAN (MAXVALUE, MAXVALUE)
      TABLESPACE ts2);
Table created.


SQL> CREATE INDEX i ON t (a, b) LOCAL
     (PARTITION p1, PARTITION p2, PARTITION p3);
TBR-7159: local index partition count is different with table's


SQL> CREATE INDEX i ON t (a, b) LOCAL
     (PARTITION p1 INITRANS 10, PARTITION p2 STORAGE (MAXEXTENTS 100));
Index created.
The following example illustrates how to create a local partition index by specifying index_local_partition_clause:
SQL> CONN sys/tibero Connected. SQL> CREATE TABLESPACE ts1 DATAFILE '/usr/ts1.df' SIZE 10M; Tablespace created. SQL> CREATE TABLESPACE ts2 DATAFILE '/usr/ts2.df' SIZE 10M; Tablespace created. SQL> CONN u1/u1 Connected. SQL> CREATE TABLE t (a NUMBER, b NUMBER, c NUMBER) PARTITION BY RANGE (a, b) (PARTITION p1 VALUES LESS THAN (10, 10) TABLESPACE ts1, PARTITION p2 VALUES LESS THAN (MAXVALUE, MAXVALUE) TABLESPACE ts2); Table created. SQL> CREATE INDEX i ON t (a, b) LOCAL; Index created. -
index_global_partition_clause
The following example illustrates how to create a global partition index by specifying index_global_partition_clause:
SQL> CONN sys/tibero
Connected.

SQL> CREATE TABLESPACE ts1 DATAFILE '/usr/ts1.df' SIZE 10M;
Tablespace created.

SQL> CREATE TABLESPACE ts2 DATAFILE '/usr/ts2.df' SIZE 10M;
Tablespace created.

SQL> CONN u1/u1
Connected.

SQL> CREATE TABLE t (a NUMBER, b NUMBER, c NUMBER);
Table created.

SQL> CREATE INDEX i ON t (a, b, c) GLOBAL PARTITION BY RANGE (a, b)
     (PARTITION p1 VALUES LESS THAN (10, 10)
      TABLESPACE ts1, PARTITION p2
      VALUES LESS THAN (MAXVALUE, MAXVALUE) TABLESPACE ts2);
Index created.
The following example illustrates that an error occurs when a partition key column is specified incorrectly when specifying column , a component of index_global_partition_clause:
SQL> CREATE INDEX i ON t (a, b)
     GLOBAL PARTITION BY RANGE (b)
     (PARTITION p1 VALUES LESS THAN (10) TABLESPACE ts1,
      PARTITION p2 VALUES LESS THAN (MAXVALUE) TABLESPACE ts2);
TBR-7225: global partitioned index must be prefixed.
The following example illustrates that an error occurs when a descending indexed key column is specified by partition key when specifying column, a component of index_global_partition_clause:
SQL> CREATE INDEX i ON t (a, b DESC)
     GLOBAL PARTITION BY RANGE (a, b)
     (PARTITION p1 VALUES LESS THAN (10, 10)
     TABLESPACE ts1, PARTITION p2 VALUES LESS THAN
        (MAXVALUE, MAXVALUE) TABLESPACE ts2);
TBR-7225: global partitioned index must be prefixed.
The following example illustrates that an error occurs when specifying value, a component of index_global_partition_clause. The value count does not match the column count or the value is not sorted.
SQL> CREATE INDEX i ON t (a, b)
    GLOBAL PARTITION BY RANGE (a, b)
    (PARTITION p1
      VALUES LESS THAN (10) TABLESPACE ts1,
      PARTITION p2 VALUES LESS THAN (MAXVALUE)
      TABLESPACE ts2);
TBR-7163: specified partition values are not correct.
The following example illustrates that an error occurs when the column type does not match when specifying value, a component of index_global_partition_clause.
SQL> CREATE INDEX i ON t (a, b)
     GLOBAL PARTITION BY RANGE (a)
     (PARTITION p1 VALUES LESS THAN ('abc') TABLESPACE ts1,
      PARTITION p2 VALUES LESS THAN (MAXVALUE) TABLESPACE ts2);
TBR-5074: given string does not represent a number in proper format.
The following example illustrates that an error occurs when MAXVALUE is not specified when specifying value, a component of index_global_partition_clause.
SQL> CREATE INDEX i ON t (a, b)
     GLOBAL PARTITION BY RANGE (a, b)
     (PARTITION p1 VALUES LESS THAN (10, 20) TABLESPACE ts1,
      PARTITION p2 VALUES LESS THAN (30, 40) TABLESPACE ts2);
TBR-7429: When creating global range partitioned index,
the partition whose partitioning key columns'
values are all MAXVALUE should be specified.
-
CREATE MATERIALIZED VIEW creates a materialized view and specifies the properties of the materialized view.
A detailed description of CREATE MATERIALIZED VIEW follows:
-
Syntax


-
Privileges
The conditions that must be satisfied to create a materialized view in the user's own schema:
-
The user is required to have the CREATE MATERIALIZED VIEW system privilege, and either the CREATE TABLE or CREATE ANY TABLE system privilege.
-
The user is required to have the SELECT object system privilege or SELECT ANY TABLE system privilege over any tables owned by another user.
The conditions that must be satisfied to create a materialized view in another user's schema:
-
The user is required to have the CREATE ANY MATERIALIZED VIEW system privilege and the CREATE TABLE system privilege.
-
The user is required to have the SELECT object system privilege or SELECT ANY TABLE system privilege over tables that the user who owns the schema does not have.
The conditions that must be satisfied to create a materialized view in which the QUERY REWRITE function is enabled:
-
When a user is not the owner of a table that the materialized view references, they must have the GLOBAL QUERY REWRITE system privilege. The user must have the QUERY REWRITE system privilege for each table which they do not own.
-
-
Components
-
create_materialized_view
Component Description schema Specifies the schema of a materialized view.
By default, the current user's schema will be used.
mview_name Specifies the name of a materialized view to be created. alias Specifies the alias for a materialized view. ON PREBUILT TABLE Creates a materialized view using an existing table. The table and the materialized view to be created must be in the same schema and have the same name.
-
WITH REDUCED PRECISION: Allows the accuracy of a table column to be different from the query result that defines the materialized view.
-
WITHOUT REDUCED PRECISION: The accuracy of table column and the result of the query which defines the materialized view must be the same. This is the default value.
AT Link to the database for a materialized view that has remote storage.
For more information, refer to .“Chapter 6. Materialized Views”
physical_properties Specifies the physical properties of a table.
Refer to “7.40. CREATE TABLE” for its related syntax.
materialized_view_props Specifies the attributes of a materialized view. USING INDEX Automatically creates the index necessary when the materialized view is created. (Default value)
This clause specifies the properties related to the index. Refer to “7.29. CREATE INDEX” for its related syntax.
USING NO INDEX Do not create indexes in a system when the materialized view is created. create_mv_refresh Sets a schedule, mode, and method that the database will use to refresh a materialized view.
If there is a change in a table that the materialized view references, the materialized view should be refreshed to apply the table's current data.
DISABLE Specifies that a materialized view should not be used in query rewrite. ENABLE Specifies that a materialized view should be used in query rewrite. (Default value) QUERY REWRITE Specifies if a materialized view will be used in query rewrite. AS subquery Specifies the query which defines a materialized view.
After a materialized view is created, Tibero will execute the query following AS and save the result in the materialized view.
All valid SQL statements can be used, but depending on the query, fast refresh may not be able to be used.
-
-
materialized_view_props
Component Description BUILD Specifies when to insert data into a materialized view. IMMEDIATE Inserts data immediately after a materialized view is created.
This is the default value.
DEFERRED Inserts data when refreshing for the first time. The first refresh is a complete refresh.
After the first refresh, the materialized view can be used in query rewrite.
-
create_mv_refresh
Component Description FAST Perform a fast refresh.
COMPLETE Performs a complete refresh by re-executing the query which defines a materialized view.
If COMPLETE is specified, a complete refresh will be used even if a fast refresh is possible. (Default value)
FORCE A fast refresh will be performed if possible. Otherwise, a complete refresh will be performed.
ON DEMAND Performs a refresh only when the REFRESH procedure of a package is called via DBMS_MVIEW. (Default value)
ON COMMIT When this clause is specified, a refresh is performed whenever a commit occurs to a master table. However, START WITH or NEXT cannot be specified.
ON COMMIT and ON DEMAND cannot be specified together.
START WITH Specifies the date type expression when auto refresh is started.
START WITH should be a time in the future.
If START WITH is specified without NEXT, the database will only perform a refresh once.
NEXT Specifies the date type expression used to calculate an auto refresh interval.
NEXT should be a time in the future.
If NEXT is specified without START WITH, the database decides the first refresh time by evaluating NEXT.
date Specifies a date literal to be specified in START WITH and NEXT. WITH PRIMARY KEY Performs a refresh using PRIMARY KEY. WITH ROWID Performs a refresh using ROWID. NEVER REFRESH Disables auto refresh.
-
-
Examples
The following example illustrates how to create a materialized view using CREATE MATERIALIZED VIEW:
CREATE MATERIALIZED VIEW MV AS SELECT * FROM T;
The following example illustrates how to set a refresh time using START WITH and NEXT when a materialized view is created:
CREATE MATERIALIZED VIEW MV
REFRESH START WITH SYSDATE NEXT SYSDATE + 10/1440
AS SELECT * FROM T;
The example above creates a materialized view which refreshes the existing materialized view every 10 minutes automatically using the START WITH and NEXT clauses.
The following example illustrates how to create a materialized view using ENABLE QUERY REWRITE and BUILD DEFERRED:
CREATE MATERIALIZED VIEW MV
  BUILD DEFERRED
  ENABLE QUERY REWRITE
  AS SELECT * FROM T;
The example above first activates the query rewrite function using ENABLE QUERY REWRITE, and then uses BUILD DEFERRED to insert the data when the view is first refreshed.
CREATE MATERIALIZED VIEW LOG creates a materialized view log in the specified master table and specifies the attributes of the materialized view. These logs are used to refresh the materialized view and record the changes of the master table.
A detailed description of CREATE MATERIALIZED VIEW LOG follows:
-
Syntax
-
Privileges
The conditions below must be satisfied to create a materialized view log:
-
When the user is the owner of the master table, the CREATE TABLE system privilege is required.
-
When creating a materialized view log in the another user's schema, the user must have the CREATE ANY TABLE system privilege, or the SELECT or SELECT ANY TABLE system privilege.
-
-
Components
-
create_materialized_view_log
Component Description schema Specifies the schema of the master table where a materialized view log will be created. By default, the schema of the current user will be used. table Specifies the name of the master table associated with the materialized view log to be created. physical_properties Specifies the physical attributes of the materialized view log table.
Refer to “7.40. CREATE TABLE” for its associated syntax.
PRIMARY KEY Records the PRIMARY KEY of updated rows of master table in a materialized view log. ROWID Records the ROWID of updated rows of master table in a materialized view log. SEQUENCE Records the order of updated rows of master table in a materialized view log. column Specifies the columns of a master table to be recorded in a materialized view log. -
new_values_clause
Component Description INCLUDING NEW VALUES Specify INCLUDING to save both new and old values in the log. EXCLUDING NEW VALUES Specify EXCLUDING to disable the recording of new values in the log. (Default value)
-
-
Examples
The following example illustrates how to create a materialized view log using CREATE MATERIALIZED VIEW LOG:
CREATE MATERIALIZED VIEW LOG ON DEPT;
The following example illustrates how to specify a column when creating a materialized view log. In this example, the DNAME and LOC columns are to be recorded in a materialized view log:
CREATE MATERIALIZED VIEW LOG ON DEPT WITH (DNAME, LOC);
CREATE OUTLINE creates an outline to save query plan information. An outline presents the plan information of a query as a collection of hints. Table access information and join sequences are currently saved as hints.
Note
Refer to “7.54. DROP OUTLINE” to remove an outline.
A detailed description of CREATE OUTLINE follows:
-
Syntax

-
Components
Component Description OR REPLACE If the outline to be created already exists, this clause removes the existing outline and recreates it. outline_name Specifies the name of an outline to be created. statement Specifies the query for which the outline will be created. -
Examples
The following example illustrates how to create an outline using CREATE OUTLINE:
SQL> CREATE OR REPLACE OUTLINE ol_join
     ON SELECT e.lname, d.dname FROM emp e, dept d WHERE e.deptno = d.deptno;

Outline Created.
Alternatively, when using the CREATE_STORED_OUTLINES parameter, outlines beginning with SYS_OUTLINE will be created automatically for queries:
SQL> alter session set CREATE_STORED_OUTLINES = y;

SQL> SELECT e.lname, d.dname FROM emp e, dept d WHERE e.deptno = d.deptno;
The USE_STORED_OUTLINES parameter will search for an applicable outline whenever a query is executed. Outlines will be applied only when the queries exactly match, so note any whitespace in the statement.
SQL> alter session set USE_STORED_OUTLINES = y;

SQL> SELECT e.lname, d.dname FROM emp e, dept d WHERE e.deptno = d.deptno;
CREATE PACKAGE creates a new package. A package is a group of interrelated procedures, functions, and other program objects gathered separately within a database.
A package declares these objects. The package body defines the actual contents of the objects.
A detailed description of CREATE PACKAGE follows:
-
Syntax
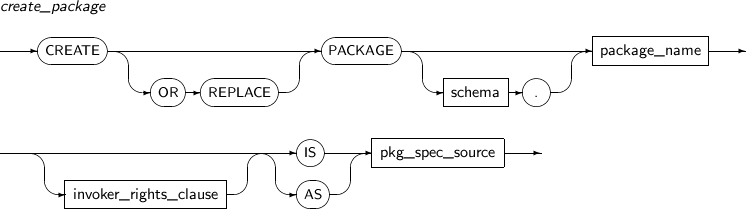
-
Privileges
The CREATE PROCEDURE system privilege is required to create a package within a user's own schema.
The CREATE ANY PROCEDURE system privilege is required to create a package within another user's schema.
-
Components
-
create_package
Component Description OR REPLACE Recreates a package if it already exists.
By using this clause, a user can avoid having to delete the specification, recreate it, and specify the object's privileges.
If the package specification changes, the package body will be invalidated. Therefore, the package will be recompiled if a user attempts to use it after the change.
schema Specifies the schema where the package belongs. package_name Specifies the name of the package. invoker_right_clause Determines whether to create an invoker-rights package or a definer-rights package. IS IS is followed by the function body.
IS is the same as AS.
AS AS is followed by the function body.
AS is the same as IS.
pkg_spec_source Specifies the package specification.
Refer to Tibero tbPSM Guide for details.
-
invoker_right_clause
Component Description AUTHID CURRENT_USER Creates an invoker-rights package.
When a procedure or function in this package is executed, it is treated as if it were executed with the schema and privileges of the current user.
AUTHID DEFINER Creates a definer-rights package.
When a procedure or function in this package is executed, it is treated as if it were executed with the schema and privileges of the defining user.
This is the default value.
-
-
Examples
The following example illustrates how to redefine a user function using CREATE PACKAGE:
CREATE OR REPLACE PACKAGE dept_pkg AS
  FUNCTION create (div_id NUMBER, loc_id NUMBER) RETURN NUMBER;
  PROCEDURE remove (dept_id NUMBER);
  END dept_pkg;
CREATE PACKAGE BODY creates a package body.
A detailed description of CREATE PACKAGE BODY follows:
-
Syntax
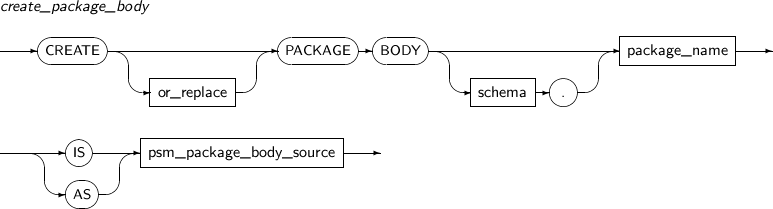
-
Privileges
The CREATE PROCEDURE system privilege is required to create a package in a user's own schema.
The CREATE ANY PROCEDURE system privilege is required to create a package in another user's schema.
-
Components
Component Description OR REPLACE Recreates a package body for a package that already exists.
By using this clause, the user can avoid having to delete the package body, recreate it, and specify the object's privileges.
If the package body changes, the recompiled package body will be applied to the new body.
schema Specifies the schema to which the package belongs. package_name Specifies the name of the package. IS IS is followed by the function body.
IS and AS are identical.
AS AS is followed by the function body.
IS and AS are identical.
psm_package_body_source Specifies a package specification.
Refer to Tibero tbPSM Guide for details.
-
Examples
The following example illustrates how to redefine a user function using CREATE PACKAGE BODY:
CREATE OR REPLACE PACKAGE BODY dept_pkg
  AS
  FUNCTION create (div_id NUMBER, loc_id NUMBER)
  RETURN NUMBER IS
  newid NUMBER;
  BEGIN
      SELECT dept_seq.NEXTVAL INTO newid FROM dual;
      INSERT INTO dept VALUES (newid, NULL, div_id, loc_id);
      RETURN (newid);
  END;
  PROCEDURE remove (dept_id NUMBER) IS
  BEGIN
      DELETE FROM dept WHERE dept.deptid = dept_id;
  END;
END dept_pkg;
CREATE PROCEDURE creates a new user procedure or alters an existing procedure. A user procedure is a tbPSM program. It is saved and executed in Tibero server.
The difference between a user procedure and a user function is that a user procedure does not have a return value and it cannot be used in a query or DML statement.
A user procedure is called directly from other procedures or called by using the EXECUTE command in the tbSQL utility.
A detailed description of CREATE PROCEDURE follows:
-
Syntax
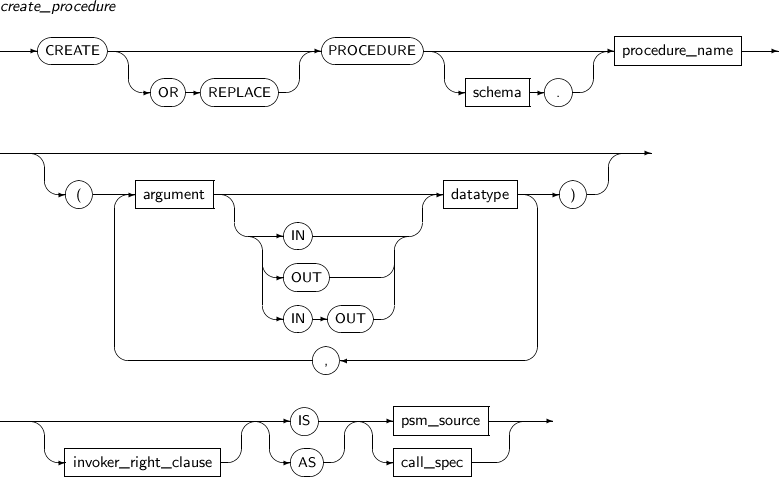
-
Privilege
The CREATE PROCEDURE system privilege is required to create a procedure in user's own schema.
To create or change a procedure in another user's schema, the CREATE ANY PROCEDURE or ALTER ANY PROCEDURE system privilege is required.
-
Components
-
create_procedure
Component Description OR REPLACE Redefines an existing procedure. If OR REPLACE is included, the procedure will be recompiled.
This is different from deleting and recreating the function in that the OR REPLACE clause maintains the existing privileges of the procedure.
schema Specifies a schema to which the procedure belongs. By default, the current user's schema will be used. procedure_name Specifies the name of a procedure to be created. argument Specifies the parameters of a procedure. A procedure can have 0 or more parameters.
If this clause is set to 0, omit the parentheses enclosing the parameter.
IN Specifies the direction of a parameter. The IN parameter receives external values. The default is IN.
COMMIT, ROLLBACK, SAVEPOINT and DDL statements cannot be performed in the current transaction. Also, updates cannot be performed on the currently accessed tables.
OUT Specifies the direction of a procedure's parameter. The OUT direction indicates the procedure will provide a value for the parameter.
Any procedure included in DML statements cannot have the OUT parameter.
Any procedure which is called directly or indirectly from the procedures included in DML statements can have only OUT or IN OUT parameters.
IN OUT Specifies the direction of a parameter. IN OUT parameters are used for both input and output.
Any procedure which is included in DML statements cannot have an IN OUT parameter.
NOCOPY Passes the pointer for a parameter variable instead of a copy of the data. Because the parameter variable is not copied, this clause can increase the processing speed. datatype Specifies the data type of a procedure parameter or return value.
For data types of procedure parameters or return values, all data types supported by tbPSM are valid. The data type of a return value cannot be specified along with length of a string or the precision and scale of a numeric value.
invoker_right_clause User procedures can be divided into invoker-rights procedures and definer-rights procedures.
This will decide which user's privilege will be used to execute a procedure, which schema will be searched, etc.
The default is a definer-rights procedures.
IS IS is followed by the procedure body.
IS and AS are identical.
AS AS is followed by the procedure body.
IS and AS are identical.
psm_source PSM source code is located here.
Refer to Tibero tbPSM Guide for details.
call_spec Indicates the specifications used to call the external procedure.
Refer to Tibero tbPSM Guide for details.
-
invoker_right_clause
Component Description AUTHID CURRECT_USER Declares a user function as an invoker-rights procedure. By default, the function is declared as a definer-rights procedure.
When this option specifies an invoker-rights procedure, Tibero will use the current user's privilege and search the object to be accessed from the current user's schema. Therefore, if the user who calls the procedure changes, the task range and schema might change as well. This procedure is useful when many users work on the same task.
AUTHID DEFINER Declares a user procedure as a definer-rights function. This is the default value.
When this option specifies a definer-rights procedure, Tibero will use the privilege of the user who defined that procedure and search for an object to be accessed from that user's schema. Therefore, regardless of the caller, the work range and schema object being accessed are always consistent. This procedure is useful when allowing general users access to some part of system data such as DD.
-
-
Example
The following example illustrates how to redefine a user procedure using CREATE PROCEDURE:
CREATE OR REPLACE PROCEDURE raise_salary (deptno NUMBER)
  AS
  BEGIN
  UPDATE EMP SET SALARY = SALARY * 1.05
  WHERE DEPTNO = deptno;
  END;
CREATE PROFILE creates a new profile.
Note
To change or remove information from profiles, refer to “7.10. ALTER PROFILE”, “7.57. DROP PROFILE”.
A detailed description of CREATE PROFILE follows:
-
Syntax
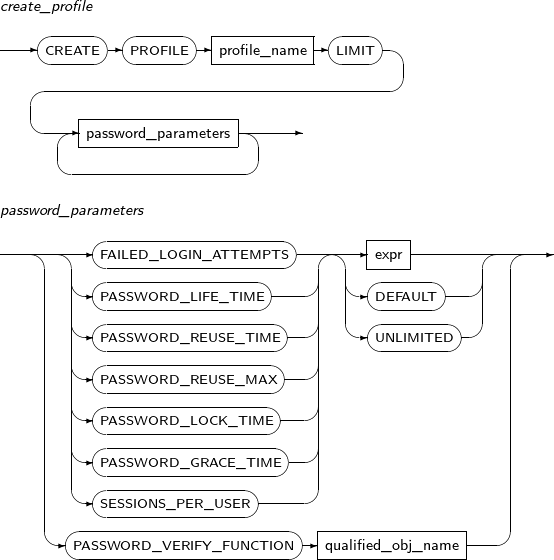
-
Privileges
The CREATE PROFILE system privilege is required to create a profile.
-
Components
-
create_user
Component Description profile_name Specifies the name of the profile to be created. Usernames are VARCHARs of up to 255 characters.
password_parameters Specifies user account access and password settings. -
password_parameters
Component Description FAILED_LOGIN_ATTEMPTS Specifies the number of failed login attempts allowed.
LOGIN_PERIOD Specifies a lock wait period.
PASSWORD_LIFE_TIME Specifies a password expiration period. The value can either be numeric or a formula.
A numeric value indicates a unit of days. For example, if this clause is set to 30, the password will expire after 30 days.
A formula value is used for special cases. For example, if this clause is set to 1/1440, the password will expire after one minute.
PASSWORD_REUSE_TIME Specifies the period during which a password cannot be reused.
For example, if this clause is set to 30, the password cannot be reused for 30 days.
PASSWORD_REUSE_MAX Specifies the number of password changes required before a password can be reused.
For example, if this clause is set to 10, a user must change their password 10 times before they can reuse the current value.
PASSWORD_LOCK_TIME Specifies an automatic lock release period. The value can either be numeric or a formula.
For example, if this clause is set to 1/1440, the lock status will be released after one minute.
PASSWORD_GRACE_TIME Specifies a password expiration warning period. The value can either be numeric or a formula.
The warning message will be issued the first time the user accesses the system after their password expires. For example, if PASSWORD_LIFE_TIME is set to 30 and PASSWORD_GRACE_TIME is set to 3, the password will expire after 30 days and the user will have 3-days notice after their first access. After the specified grace time, the account will become locked.
Password expiration warnings only occur when using tbSQL. If a user connections in another way (OCI, JDBC,etc), a password expiration error will occur.
SESSIONS_PER_USER Specifies the maximum number of sessions to which a user can connect. PASSWORD_VERIFY_FUNCTION Specifies the PSM function which checks whether a string is a valid password. Any of the basic functions which are included in the database can be used to specify the PSM function. Alternatively, users can define a new function.
By default, NULL_VERIFY_FUNCTION will be used. This function does not enforce any password restrictions.
-
-
Examples
-
create_profile
The following example illustrates how to create a profile:
In the example above, the user will be locked for one minute after the third failed login attempt. The password will expire after 90 days and the 10 most recent passwords cannot be reused when changing the password. The user will have 10-days notice after the password expires.
SQL> CREATE PROFILE prof LIMIT
      failed_login_attempts 3
      password_lock_time 1/1440
      password_life_time 90
      password_reuse_time unlimited
      password_reuse_max 10
      password_grace_time 10
      password_verify_function verify_function;
Profile 'PROF' created.
When a password is changed, the new password will be validated using verify_function.
If a limit is not specified, the profile will be created with the same limits that are defined for the DEFAULT profile.
Note
SYS user accounts are not locked due to reasons, such as password expiration or input error, even if a profile has been applied.
SQL> CREATE PROFILE prof
Profile 'PROF' created.
If only some parameters are defined for a newly created profile, the rest of the parameters will have the same value as specified in the DEFAULT profile. That is, the DEFAULT profile is referenced to create other profiles. To change the default values, use the ALTER PROFILE command.
Note
The DBA_PROFILES view can be used to retrieve the parameter values for each profile.
-
CREATE ROLE creates a role, which is a group of privileges. A role can contain both a set of privileges and other roles. Note that a role created by the CREATE ROLE statement will not have any privileges or other roles included. Use the GRANT statement to add privileges or roles.
Note
1. Refer to“7.11. ALTER ROLE” or “7.58. DROP ROLE” for details of changing or deleting the information of the created role.
2. Refer to“7.70. GRANT”, “7.75. REVOKE”, or “9.6. SET ROLE” for details of using the created role.
A detailed description of CREATE ROLE follows:
-
Syntax
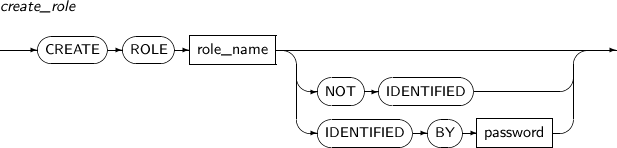
-
Privileges
The CREATE ROLE system privilege is required.
-
Components
Components Description role_name Specifies the name of the role to be created.
-
A role name is a VARCHAR of up to 30 characters.
-
The role name should not be the same as another role or username in the database.
NOT IDENTIFIED Specifies that a password is not used for the created role.
This is the default value.
IDENTIFIED BY Sets a password for the role to be created.
To activate a role that has a password that was set using SET ROLE, the specified password should be entered.
Refer to “9.6. SET ROLE” for details of how to use a password.
password Specifies the password for a role. -
-
Examples
The following example illustrates how to create a role using NOT IDENTIFIED:
SQL> CONN sys/tibero
Connected.

SQL> CREATE ROLE a;
Role created.

SQL> CREATE ROLE b NOT IDENTIFIED;
Role created.

SQL> CREATE USER u1 IDENTIFIED BY 'p1';
User created.

SQL> GRANT CREATE SESSION TO a;
Granted.

SQL> GRANT a, b TO u1;
Granted.

SQL> CONN u1/p1
Connected.

SQL> SET ROLE a;
Set.

SQL> SET ROLE b;
Set.
As in the example above, if a role is created using the NOT IDENTIFIED clause or by not specifying a password, the role can be used in the SET ROLE statement without any restrictions.
The following example illustrates how to set a password when creating a role using IDENTIFIED BY:
SQL> CONN sys/tibero
Connected.

SQL> CREATE ROLE c IDENTIFIED BY 'abc';
Role created.

SQL> GRANT CREATE SESSION TO c;
Granted.

SQL> GRANT c TO u1;
Granted.

SQL> CONN u1/p1
Connected.

SQL> SET ROLE c;
TBR-7181: need password to enable the role

SQL> SET ROLE c IDENTIFIED BY 'abc';
Set.
A role in which a password is set using IDENTIFIED BY works differently from a role set as NOT IDENTIFIED. As in the example above, when you activate a role with the SET ROLE statement, the password specified when the role was created should be entered.
CREATE SEQUENCE creates a sequence in the user's own schema or a specified schema.
Note
Refer to “7.13. ALTER SEQUENCE” or “7.59. DROP SEQUENCE” for details of changing or deleting a sequence.
Refer to “7.59. DROP SEQUENCE” for details of deleting a sequence.
A detailed description of CREATE SEQUENCE follows:
-
Syntax


-
Privileges
-
The CREATE SEQUENCE system privilege is required to create a sequence.
-
The CREATE ANY SEQUENCE system privilege is required to create a sequence in another user's schema.
-
-
Components
-
create_sequence
Component Description schema Specifies the name of the schema where the sequence will be created. By default, the schema of the current user will be used. sequence_name Specifies the name of a sequence to be created.
-
A sequence name is a VARCHAR of up to 30 characters.
-
Sequence names share a namespace with tables, so they should not have the same name as another sequence, table, synonym, or PSN name in the schema.
sequence_attributes Defines sequence attributes. Optional. -
-
sequence_attributes
Component Description INCREMENT BY Specifies the sequence interval.
If this value is a positive number, the sequence value will increase. If this value is a negative number, the sequence value will decrease.
The default value is 1.
This value must be less than the difference of MAXVALUE and MINVALUE.
START WITH Specifies the start value of a sequence.
The start value must be between MINVALUE and MAXVALUE.
If not specified, it is set to MINVALUE if INCREMENT BY is positive and MAXVALUE if negative.
NOMAXVALUE This is equivalent to not specifying MAXVALUE.
If the incremental value of a sequence is positive, MAXVALUE is INT64_MAX (the greatest value that the sequence can have). If the interval of a sequence is negative, MAXVALUE is -1.
MAXVALUE Specifies MAXVALUE.
MAXVALUE must be larger than MINVALUE.
Not specifying this clause is equivalent to specifying NOMAXVALUE.
NOMINVALUE This is equivalent to not specifying MINVALUE.
If the incremental value of a sequence is positive, MINVALUE is 1. If the incremental of a sequence is negative, MINVALUE is INT64_MIN (the smallest value that the sequence can have).
MINVALUE Specifies MINVALUE. MINVALUE cannot be greater than MAXVALUE. Not specifying this clause is equivalent to specifying NOMINVALUE. CYCLE If CYCLE is specified, the sequence values will continue being created even if the sequence reaches MAXVALUE or MINVALUE.
If the incremental value is positive, when the sequence value exceeds MAXVALUE, the sequence value will become MINVALUE. If the incremental value is negative, when the sequence value becomes smaller than MINVALUE, the sequence value will become MAXVALUE.
NOCYCLE This is opposite of CYCLE. If the sequence reaches MAXVALUE or MINVALUE, it no longer creates new values.
The default value is NOCYCLE.
CACHE For faster access, a range of sequences are saved in a sequence cache. When there is a request for a sequence value, the value can be retrieved from the sequence cache. If the saved sequence values are all used, new values are allocated. The value of the data dictionary is only modified at this time.
(Default value: 20)
For example, if N is specified for CACHE, data dictionary modification will occur only 1/N times compared to using NOCACHE. This allows for faster access. However, when an abnormal shut down occurs, the values saved in the cache will be lost.
NOCACHE Disables the sequence cache and retrieves the value manually every time. This modifies the data dictionary every time it receives a value. ORDER Allows a sequence to assign sequence values in the order of requests, regardless of nodes in a cluster environment.
Applicable only in a clustered environment.
NOORDER Does not guarantee that sequence values are assigned to each node in the order of requests in a clustered environment.
Sequences are cached for each node and sequence values are given in the order of requests within a node. However, across all nodes, the order of requests may be different from that of the sequence values.NOORDER is the default value.
-
-
Examples
The following example illustrates how to create a sequence named TEST_SEQ using CREATE SEQUENCE:
SQL> CREATE SEQUENCE test_seq
       START WITH 100
       MINVALUE 40
       MAXVALUE 200
       INCREMENT BY 2
       CYCLE;

Sequence created.

SQL> SELECT test_seq.NEXTVAL FROM dual;

TEST_SEQ.NEXTVAL
----------------
             100

1 row selected.

SQL> SELECT test_seq.NEXTVAL FROM dual;

TEST_SEQ.NEXTVAL
----------------
             102

1 row selected.
TEST_SEQ is a sequence that has a value that ranges from 40 to 200. When retrieving the first value using TEST_SEQ.nextval, the starting value of 100 will be displayed. Afterward, the value will increase by 2. If the value reaches 200, it will go back to 40 due to the CYCLE option.
CREATE SYNONYM creates a synonym in a user's own schema or another user's schema.
Note
Refer to “7.60. DROP SYNONYM” for details of deleting a synonym.
A detailed description of CREATE SYNONYM follows:
-
Syntax
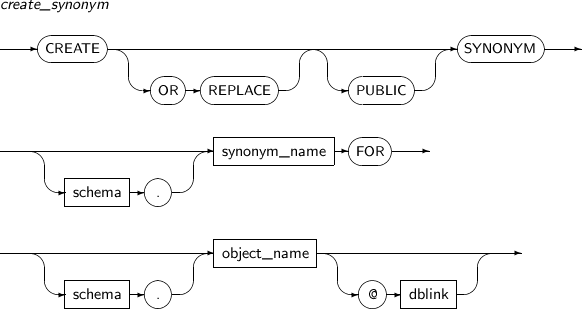
-
Privileges
-
The CREATE SYNONYM system privilege is required to create a synonym in a user's own schema.
-
The CREATE ANY SYNONYM system privilege is required to create a synonym in another user's schema.
-
The CREATE PUBLIC SYNONYM privilege is required to create a public synonym.
-
-
Components
Component Description OR REPLACE If the synonym to be created already exists, this replaces the synonym with a new one.
This is different from deleting and recreating a synonym in that this clause maintains the existing privileges and references of the synonym.
PUBLIC Creates a public synonym.
All users can access a public synonym, but in order to use the object to which public synonym refers, privilege over the object is required.
schema Specifies the name of the schema that includes the synonym to be created. By default, the schema of the current user will be used. synonym_name Specifies the name of the synonym to be created. A synonym name is a VARCHAR of up to 30 characters.
Synonym names use the same namespace as tables, so they should not have the same name as another synonym, public synonym, table, view, sequence, function, or procedure name within the schema.
FOR schema Specifies the name of the schema of the object that the synonym references.
The default value is the current user's schema.
object_name Specifies the object name of the synonym to be created.
The object does not need to exist yet and access privileges are not required. However, if the object does not exist or access is not allowed, using the synonym will cause an error.
dblink Specifies the name of the dblink for a synonym that is connected by a dblink. (@) must prepend the name of the database link.
Refer to Tibero Administrator's Guide for details of dblink.
The following schema objects can have synonyms:
-
Tables
-
Views
-
Sequences
-
PSM Functions
-
PSM Procedures
-
Synonyms
-
-
Examples
In this example a synonym emp is created for the user (or schema) tibero:
SQL> CREATE OR REPLACE SYNONYM emp FOR tibero.emp;

Created.
The following example illustrates how to create a public synonym using CREATE PUBLIC SYNONYM. The example shows how to create a synonym pt which can access t of SYS schema:
SQL> CREATE PUBLIC SYNONYM pt FOR sys.t;

Synonym created.
If a public synonym pt is created, all users can access t of SYS. However, to use t, the user must have the required privileges.
CREATE TABLES creates a table.
A detailed description of CREATE TABLE follows:
-
Syntax
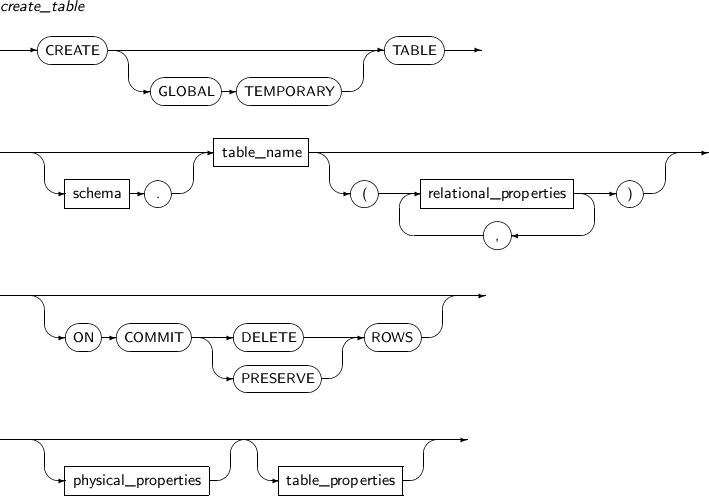
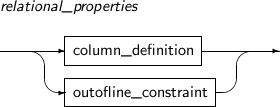
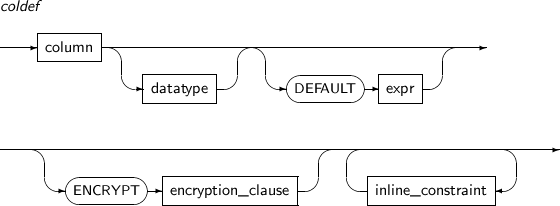
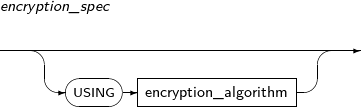
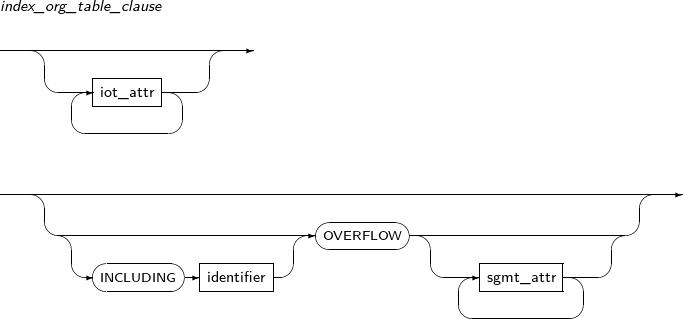

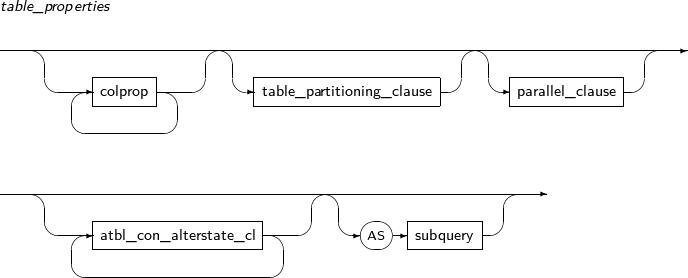
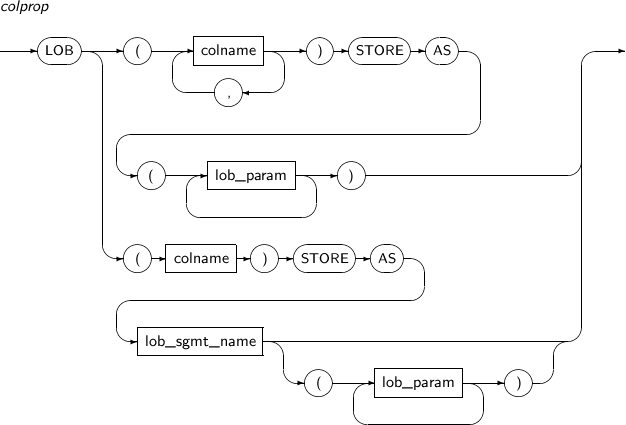
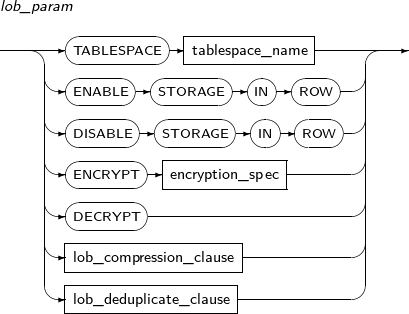
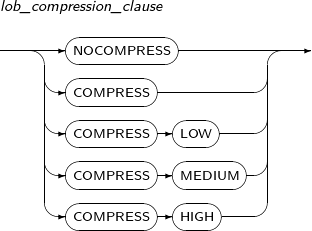

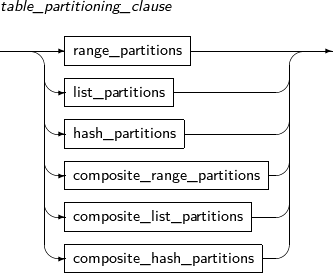
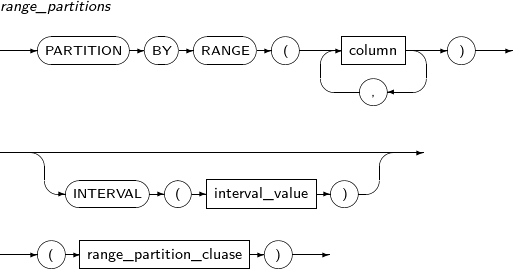

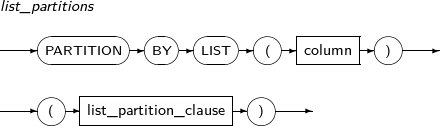
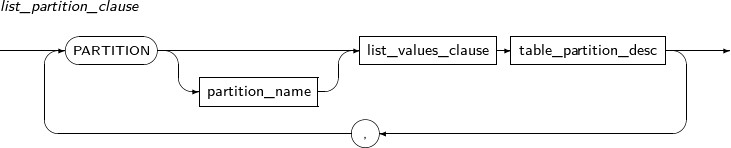
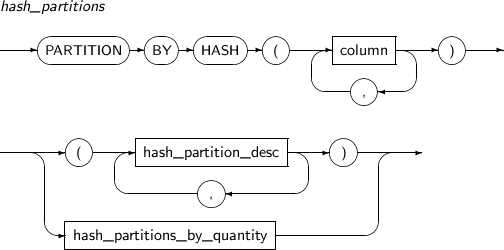
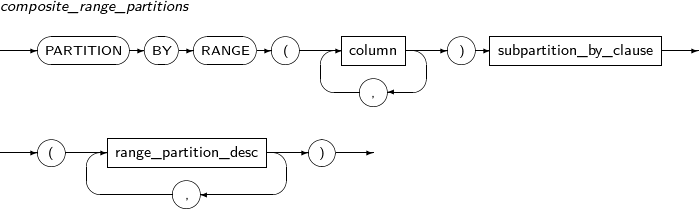

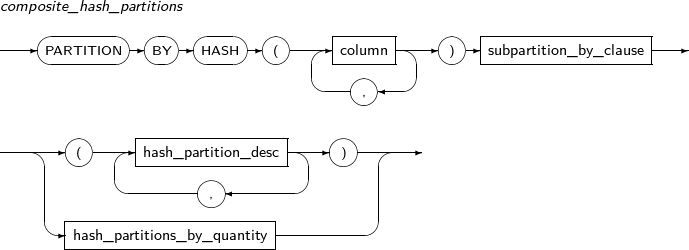
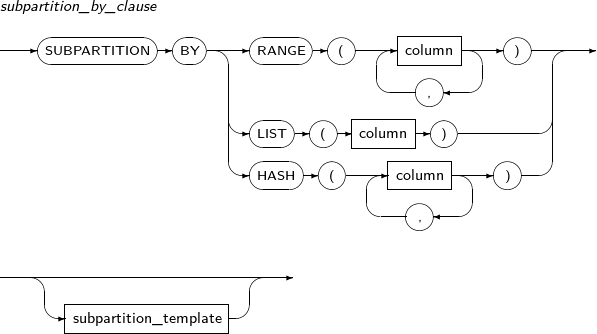
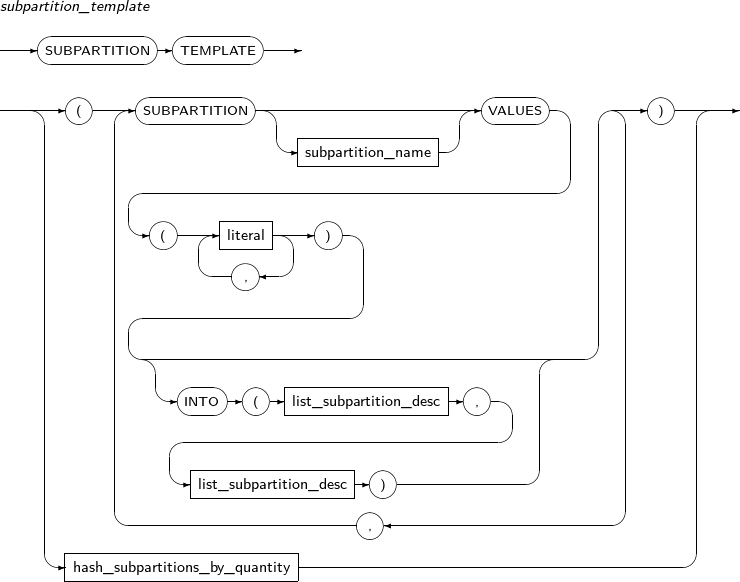

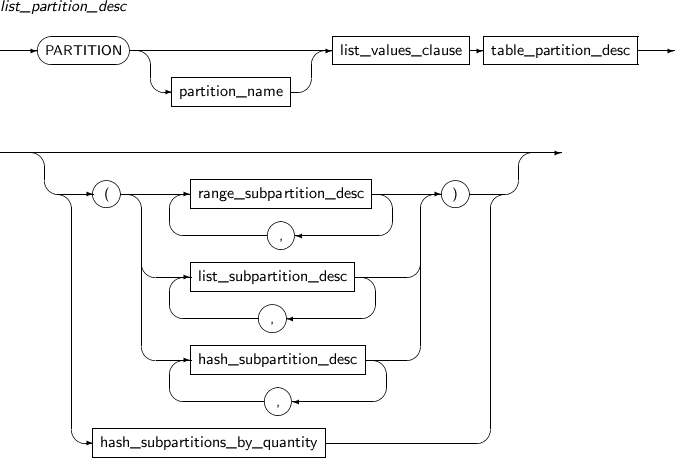
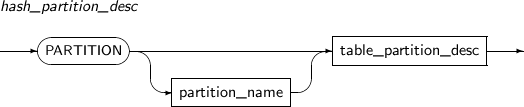
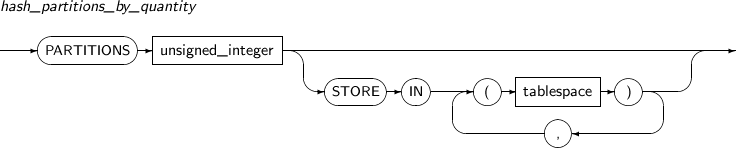


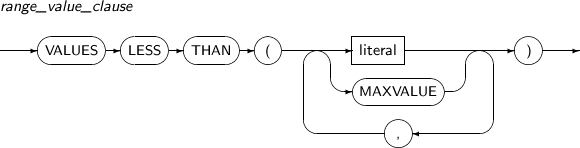
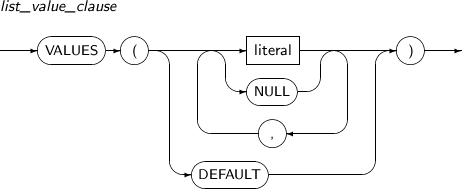
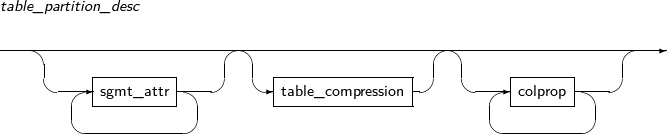
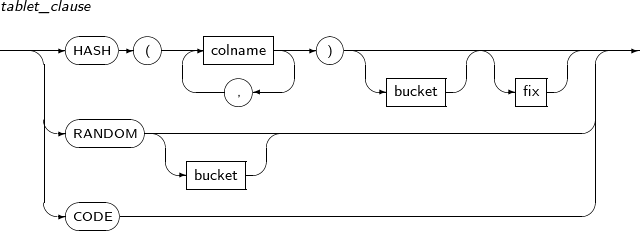
-
Privileges
-
The CREATE TABLE system privilege is required to create a table in a user's own schema.
-
The CREATE ANY TABLE system privilege is required to create a table in another user's schema.
-
-
Components
-
create_table
Component Description GLOBAL TEMPORARY Creates a temporary table. The schema of the temporary table appears to be the same in every session like a normal table, but the table's data is maintained separately in each session. Therefore, temporary table data of one session cannot be accessed or viewed from another session. The table data can only be accessed by the user's own session.
Temporary table data is saved in a temporary tablespace, not a permanent tablespace. When the session terminates, all data in the temporary table will be removed. The ON COMMIT option allows a user to specify the data transaction method of a temporary table.
A temporary table cannot specify sgmt_attr or colprop, and cannot have foreign key constraints.
schema Specifies the schema to which the table to be created will belong. By default, the schema of the current user will be used. table_name Specifies the table name to be created. relational_properties Sets table component properties such as column and constraint conditions. ON COMMIT DELETE ROWS This option is only used for temporary tables.
If ON COMMIT DELETE ROWS is specified, data in a temporary table will be removed when a transaction is committed. Even if this option is not specified, all data in the temporary table will be removed when the session ends.
By default, a temporary table is created with ON COMMIT DELETE ROWS.
ON COMMIT PRESERVE ROWS If ON COMMIT PRESERVE ROWS is specified, data will be saved to a table when a transaction is committed.
physical_properties Specifies the physical attributes of a table. table_properties Specifies table properties such as partitioning and the LOB (large object) storage method. -
relational_properties
Component Description column_definition Defines a table column. outofline_constraint Specifies a table's constraints.
Refer to “7.1.1. Constraints” for details of constraints.
-
coldef
Component Description datatype Specifies the data type of a column. DEFAULT expr Specifies the default value of a column. ENCRYPT encryption_spec Encrypts a column and specifies encryption options. inline_constraint Specifies the constraints of the table.
Refer to “7.1.1. Constraints” for details of constraints.
-
encryption_spec
Component Description USING encryption_algorithm Specifies the encryption algorithm used to encrypt a column.
encryption_algorithm is specified with a string. The encryption algorithms supported by
Tibero are as follows:
-
DES
-
3DES168
-
AES128
-
AES192 (Default value)
-
AES256
SALT, NO SALT Enables the SALT function to enhance the security of the generated result. SALT enhances security by creating different values for each column even when the column values are the same.
SALT cannot be used for an index because it encrypts the same value differently every time. The default value is SALT.
-
-
physical_properties
Component Description sgmt_attr Refer to “7.1.4. Sgmt_attr” for detailed syntax descriptions of sgmt_attr. table_compression Specifies whether to compress a table. ORGANIZATION EXTERNAL This clause should be followed by external_table_clause when an external data file is specified. external_table_clause Creates metadata for the external table so that the external data can be used as a read-only table.
Any attribute other than a column definition can be specified.
ORGANIZATION INDEX Used to create an index organized table. index_org_table_clause Used to configure an index organized table. -
table_compression
Component Description COMPRESS Compresses a table. NOCOMPRESS Disables table compression. -
index_org_table_clause
Component Description iot_attr Attributes used for creating an index organized table. INCLUDING Column to save in the index block along with the primary key. OVERFLOW Used to save data, excluding the primary key, separate from the index block. -
iot_attr
Component Description PCTTHRESHOLD Maximum size of the index block that can be used. (Unit: %) -
table_properties
Component Description colprop Specifies the method to store LOB data for each column. table_partitioning_clause Specifies the syntax for creating a partitioned table.
Supports RANGE partitioning, LIST partitioning, HASH partitioning, RANGE composite partitioning, and LIST composite partitioning. Each partition or subpartition can have different physical attributes.
A table with LONG or LONG RAW data cannot be partitioned. LOB and ROWID columns cannot be used as a partition key column.
Refer to Tibero Administrator's Guide for a detailed description of partitions.
parallel_clause Creates tables in parallel. It is used as the default DOP (Degree of parallelism) of DML operations performed on tables. atbl_con_alterstate_cl Changes a constraint state. AS subquery This creates a table using a subquery. -
colprop
Component Description colname Specifies the column name used to store LOB data. lob_sgmt_param Specifies the method to store LOB data. lob_name Specifies the LOB data type name. -
lob_param
Component Description TABLESPACE Specifies the tablespaces of a segment where a LOB is stored. ENABLE STORAGE IN ROW Small size LOBs, which are less than 4000 bytes, will be stored within a row's data like a general column rather than being stored by making a segment. (Default value)
DISABLE STORAGE IN ROW Stores LOB data in LOB segments regardless of their size. ENCRYPT Encrypts and stores LOB data. DECRYPT Stores LOB data without encryption. -
lob_compression_clause
Component Description NOCOMPRESS Does not compress LOB data. (Default value) COMPRESS Compresses LOB data with medium ratio and medium performance. COMPRESS LOW Compresses LOB data with the lowest ratio and high performance. COMPRESS MEDIUM Compresses LOB data with medium ratio and medium performance. COMPRESS HIGH Compresses LOB data with the highest ratio and low performance. -
lob_deduplicate
Component Description KEEP_DUPLICATE Allows duplicate LOB data in a segment. DEDUPLICATE Does not allow duplicate LOB data in a segment. Duplicate LOB data is removed. -
table_partitioning_clause
Component Description range_partitions Divides a table into partitions according to a range of the table partitioning key column values. list_partitions Divides a table into partitions according to the list of partition key column values. hash_partitions Divides a table into partitions according to the hashing result of partition key column values. composite_range_partitions Creates a composite RANGE partitioned table by repartitioning a RANGE partitioned table. composite_list_partitions Creates a composite LIST partitioned table by repartitioning a LIST partitioned table. composite_hash_partitions Divides a partition that was already divided into a HASH partition in order to create a composite HASH partition table. -
range_partitions
Component Description column Specifies a partition key column at which to split the partition. Rows will be included in a partition based on their column values. interval_value Interval value of a range partition.
Creates a new partition to execute DML if no partition that corresponds to the partition key column value exists when DML is generated in the partition table. The interval value is needed to calculate a newly created bound value. In range partitions, the bound value of a new partition is the bound value of the last partition plus a multiple of the interval value.
range_values_clause Specifies the upper bound of a partition.
The specified value is not included in the partition, and the number of bound values must be the same as the number of partitioning columns.
To express the maximum value, use the MAXVALUE reserved word. When MAXVALUE is used, all rows with a column value larger than that of the previous partition, including NULL, belong to the partition.
-
list_partitons
Component Description column Specifies a partition key column at which to split the partition. Rows will be included in a partition based on their column values.
List partitions are different from other partitions in that they can only specify one column.
list_values_clause Specifies the partition column value of a row to be included in a partition. In other words, the row with a partition column value that matches the specified value is included in the partition.
A row with a NULL value can be specified by using the NULL reserved word.
Like MAXVALUE of the RANGE partition, in a LIST partition, a partition that contains all the rows excluded from other partition can be specified using the reserved word DEFAULT. However, the DEFAULT value must be unique and can only be used in the last partition.
-
hash_partitions
Component Description column Specifies a partition key column at which to split the partition. Rows will be included in a partition based on their column values. hash_partition_desc Specifies attributes of a HASH partition. hash_partitions_by_quantity Creates a HASH partition more easily by only specifying the number of partitions and tablespaces. -
composite_range_partitions
Component Description subpartition_by_clause Divides a RANGE partition into a number of subpartitions.
As with partitioning, subpartitioning may use RANGE, LIST, or HASH. Specifies subpartitioning columns.
range_partition_desc Specifies attributes of a composite RANGE partition. -
composite_list_partitions
Component Description subpartition_by_clause Divides a LIST partition into a number of subpartitions.
As with partitioning, subpartitioning may use RANGE, LIST, or HASH. Specifies subpartitioning columns.
list_partition_desc Specifies the detailed configuration of a composite LIST partition. -
composite_hash_partitions
Component Description subpartition_by_clause Specifies the method used to partition a HASH partition again.
Like a default partitioning, RANGE, LIST, or HASH can be selected, and a subpartitioning column is specified.
hash_partition_desc Specifies detailed attributes of a HASH partition. hash_partitions_by_quantity Creates a HASH partition simply by specifying the number of partitions and tablespace. -
subpartition_by_clause
Component Description RANGE Enables the data to be RANGE-subpartitioned. LIST Enables the data to be LIST-subpartitioned. HASH Enables the data to be HASH-subpartitioned. column Specifies a partition key column at which to split the partition. subpartition_template Applies an attribute of a subpartition to all partitions. -
subpartition_template
Component Description SUBPARTITION TEMPLATE Applies an attribute of a subpartition to all partitions. list_subpartition_desc Attributes of a subpartition.
The definitions for subpartitions are the same as for partitions, except that SUBPARTITION and SUBPARTITIONS are the reserved words.
hash_subpartitions_by_quantity Creates a hash subpartition by specifying the number of subpartitions and tablespaces. -
range_partition_desc
Component Description PARTITION partition_name Specifies a partition name. range_values_clause Specifies the upper bound of a partition. The specified value will not be included in the partition. The number of upper bound values should match the number of partitioning columns.
Use the reserved word MAXVALUE for the maximum value. If MAXVALUE is used, all rows whose column values are greater than the previous column including NULL will be put in the partition.
table_partition_desc Specifies physical attributes of a partition.
The definitions for this clause are the same as for tables.
range_subpartition_desc Specifies attributes of a subpartition.
The definitions for subpartitions are the same as for partitions, except that the reserved words are SUBPARTITION and SUBPARTITIONS.
list_subpartition_desc Specifies attributes of a subpartition.
The definitions for subpartitions are the same as for partitions, except that the reserved words are SUBPARTITION and SUBPARTITIONS.
hash_subpartition_desc Specifies attributes of a subpartition.
The definitions for subpartitions are the same as for partitions, except that the reserved words are SUBPARTITION and SUBPARTITIONS.
hash_subpartition_by_quantity Creates HASH subpartitions more easily by only specifying the number of hash subpartitions and tablespaces. -
list_partition_desc
Component Description PARTITION partition_name Specifies a partition name. list_values_clause Specifies the partition column value of the row to be included in the partition. In other words, rows that have the specified partitioning column value will be included in the partition.
By using the reserved word NULL, rows can be set to NULL.
As with MAXVALUE for RANGE partitions, a LIST partition allows a user to specify a partition that includes all rows which are not in another partition by using the reserved word DEFAULT. However, DEFAULT cannot be used along with other values and can only be for the last partition.
table_partition_desc Specifies physical attributes of a partition.
The definitions for this clause are the same as for tables.
range_subpartition_desc Specifies attributes of a subpartition.
The definitions for subpartitions are the same as for partitions, except that the reserved words are SUBPARTITION and SUBPARTITIONS. Refer to range_partition_desc for a detailed description of the syntax.
list_subpartition_desc Specifies attributes of a subpartition.
The definitions for subpartitions are the same as for partitions, except that the reserved words are SUBPARTITION and SUBPARTITIONS.. Refer to list_partition_desc for a detailed description of the syntax.
hash_subpartition_desc Specifies attributes of a subpartition.
The definitions for subpartitions are the same as for partitions, except that the reserved words are SUBPARTITION and SUBPARTITIONS. Refer to hash_partition_desc for a detailed description of the syntax.
hash_subpartition_by_quantity Creates HASH subpartitions more easily by only specifying the number of hash subpartitions and tablespaces. -
hash_partition_desc
Component Description PARTITION partition_name Specifies the name of a partition By default, the system will create a name. table_partition_desc Specifies physical attributes of a partition.
The definitions for this clause are the same as for tables.
-
hash_partition_by_quantity
Component Description PARTITIONS unsigned_integer Specifies the number of partitions to be created. STORE IN tablespace Specifies the tablespace in which a partition will be located.
The specified number of tablespaces does not need to match the number of partitions. If the numbers do not match, tablespaces will be specified in a round-robin fashion.
-
range_subpartition_desc
Component Description subpartition_name Specifies the name of a subpartition. By default, the system will create a name. range_values_clause Specifies boundary value of a RANGE partition. table_partition_desc Specifies physical attributes of a partition.
The definitions for this clause are the same as for tables.
-
list_subpartition_desc
Component Description subpartition_name Specifies the name of a subpartition. By default, the system will create a name. list_values_clause Specifies the value of the LIST partition. table_partition_desc Specifies physical attributes of the partition.
The definitions for this clause are the same as for tables.
-
hash_subpartition_desc
Component Description subpartition_name Specifies the number of subpartitions to be created. By default, the system will create a name. table_partition_desc Specifies physical attributes of a partition.
The definitions for this clause are the same as for tables.
-
hash_subpartition_by_quantity
Component Description SUBPARTITIONS unsigned_integer Specifies the number of subpartitions to be created.
STORE IN tablespace Specifies the tablespace in which subpartitions are located.
The specified number of tablespaces does not need to match the number of subpartitions. If the numbers do not match, tablespaces will be specified in a round-robin fashion.
-
range_value_clause
Component Description literal Specifies the upper bound variable of a partition.
The specified value will not be included in the partition. The number of upper bound variables should match the number of partitioning columns.
MAXVALUE Use MAXVALUE to express the maximum value.
If MAXVALUE is used, all rows whose column values are greater than the previous column, including NULL, will be in the partition.
-
list_value_clause
Component Description literal Specifies the partition column value of the row to be included in the partition. In other words, rows that have the specified partitioning column value will be included in the partition. NULL By using the reserved word NULL, rows can be set to NULL.
DEFAULT Specify a partition that includes all rows which are not entered to the partitions by using the reserved word DEFAULT.
However, DEFAULT cannot be used along with other values and can only be used for the last partition.
-
table_partition_desc
Component Description sgmt_attr Refer to “7.1.4. Sgmt_attr” for detailed syntax descriptions of sgmt_attr. table_compression Specifies whether to compress a table. colprop Specifies the method to store LOB data for each column. -
atbl_con_alterstate_cl
Component Description ENABLE/DISABLE
VALIDATE/NOVALIDATE
The default is to set all constraints to ENABLE VALIDATE.
Refer to the “7.1.1. Constraints” for details.
PRIMARY KEY Activates or inactivates a primary key constraint which already exists in the table. UNIQUE column_name Activates or inactivates a unique key constraint which already exists in column_name. CONSTRAINT name Activates or inactivates a constraint which already exists. CASCADE Inactivates the corresponding foreign keys when the referenced primary key or unique key is inactivated.
This must be defined when a constraint which has a foreign key is inactivated.
KEEP INDEX Keeps the indexes used by a constraint when the constraint is deactivated. (Default value)
DROP INDEX Deletes corresponding indexes when constraints including primary keys, unique keys, or foreign keys are deleted.
using_index_clause Refer to the “7.1.1. Constraints” for details.
-
-
Examples
-
create_table
The following example illustrates how to create a general table which includes constraints and default values:
CREATE TABLE leagues ( league_id NUMBER PRIMARY KEY, name VARCHAR(20) UNIQUE );

CREATE TABLE teams (
    team_id     NUMBER       CONSTRAINT team_prim   PRIMARY KEY,
    name        VARCHAR(20)  CONSTRAINT team_uniq   UNIQUE,
    league      NUMBER       CONSTRAINT team_ref
                                                 REFERENCES leagues (league_id),
    tot_salary  NUMBER(10,3) CONSTRAINT team_sal_nn NOT NULL,
    tot_players NUMBER       CONSTRAINT team_player_limit
    CHECK (tot_players <= 40)
);

CREATE TABLE players ( player_id NUMBER,
    name      VARCHAR(20),
    nickname  VARCHAR(20),
    age       NUMBER,
    team      VARCHAR(20),
    join_date DATE          DEFAULT SYSDATE,
    PRIMARY KEY (player_id) USING INDEX
    (
        CREATE UNIQUE INDEX players_idx1 ON players(player_id)
    ),
    CHECK (age >= 15),
    CONSTRAINT players_uniq         UNIQUE (name, nickname),
    CONSTRAINT players_team         FOREIGN KEY(team) REFERENCES teams(name),
    CONSTRAINT players_join_date_nn CHECK (join_date IS NOT NULL)
The following example illustrates how to create a temporary table by specifying TEMPORARY:
CREATE GLOBAL TEMPORARY TABLE todays_sales ( product_id NUMBER NOT NULL, product_name VARCHAR(20), price NUMBER ) ON COMMIT PRESERVE ROWS; -
physical_properties
The following example illustrates how to create a table using sgmt_attr.
CREATE TABLE sgmt_attr_tbl_example (
    col1 NUMBER,
    col2 NUMBER )
TABLESPACE user1_ts
PCTFREE 30
INITRANS 3;
The following example illustrates how to create an external table by specifying ORGANIZATION EXTERNAL:
CREATE TABLE ext_tbl ( col1 VARCHAR2(30), col2 NUMBER, col3 VARCHAR2(30), col4 NUMBER, col5 VARCHAR2(30), col6 DATE ) ORGANIZATION EXTERNAL ( DEFAULT DIRECTORY FILE_DIR ACCESS PARAMETERS ( LOAD DATA INTO TABLE ext_tbl FIELDS TERMINATED BY ',' ESCAPED BY '\\' LINES TERMINATED BY '\n' IGNORE 1 LINES (col1, col2, col3, col4, col5, col6) ) LOCATION('FileInput.txt') ); -
table_properties
The following example illustrates how to create a table which contains as_subquery:
CREATE TABLE young_players ( player_id, name, alais, age, team )
AS
SELECT player_id, name, nickname, age, team
FROM players
WHERE age <= 25;
The following example illustrates how to create a table which contains colprop:
CREATE TABLE col_prop ( col1 CLOB, col2 BLOB ) LOB (col1) STORE AS lob_col_prop_col1 ( TABLESPACE lob_ts ENABLE STORAGE IN ROW ) LOB (col2) STORE AS lob_col_prop_col2 ( TABLESPACE lob_ts DISABLE STORAGE IN ROW ); -
table_partitioning_clause
The following example illustrates how to create a RANGE partition by specifying range_partitions :
CREATE TABLE years_sales (
    product_id   NUMBER,
    product_name VARCHAR(20),
    price        NUMBER,
    sold_date    DATE
)
PARTITION BY RANGE (sold_date)
(
    PARTITION jan_sales VALUES LESS THAN (TO_DATE('31-01-2006', 'DD-MM-YYYY')),
    PARTITION feb_sales VALUES LESS THAN (TO_DATE('28-02-2006', 'DD-MM-YYYY')),
    PARTITION mar_sales VALUES LESS THAN (TO_DATE('31-03-2006', 'DD-MM-YYYY')),
    PARTITION apr_sales VALUES LESS THAN (TO_DATE('30-04-2006', 'DD-MM-YYYY')),
    PARTITION may_sales VALUES LESS THAN (TO_DATE('31-05-2006', 'DD-MM-YYYY')),
    PARTITION jun_sales VALUES LESS THAN (TO_DATE('30-06-2006', 'DD-MM-YYYY')),
    PARTITION jul_sales VALUES LESS THAN (TO_DATE('31-07-2006', 'DD-MM-YYYY')),
    PARTITION aug_sales VALUES LESS THAN (TO_DATE('31-08-2006', 'DD-MM-YYYY')),
    PARTITION sep_sales VALUES LESS THAN (TO_DATE('30-09-2006', 'DD-MM-YYYY')),
    PARTITION oct_sales VALUES LESS THAN (TO_DATE('31-10-2006', 'DD-MM-YYYY')),
    PARTITION nov_sales VALUES LESS THAN (TO_DATE('30-11-2006', 'DD-MM-YYYY')),
    PARTITION dec_sales VALUES LESS THAN (TO_DATE('31-12-2006', 'DD-MM-YYYY'))
);
The following example illustrates how to create a list_partitions by specifying list_partitions:
CREATE TABLE country_sales (
    product_id   NUMBER,
    product_name VARCHAR(20),
    price        NUMBER,
    country      VARCHAR(20),
    sold_date    DATE
)
PARTITION BY LIST (country)
(
    PARTITION asia    VALUES ('KOREA', 'CHINA', 'JAPAN'),
    PARTITION america VALUES ('U.S.A.'),
    PARTITION europe  VALUES ('ENGLAND', 'SPAIN', 'GERMANY', 'ITALY'),
    PARTITION etc     VALUES (DEFAULT)
);
The following example illustrates how to create a hash_partitions by specifying hash_partitions:
CREATE TABLE product_sales (
    product_id   NUMBER,
    product_name VARCHAR(20),
    price        NUMBER,
    sold_date    DATE
)
PARTITION BY HASH (product_id)
PARTITIONS 4
STORE IN (ts1, ts2, ts3);
The following example illustrates how to create a composite RANGE partition by specifying conposit_range_partitions:
CREATE TABLE years_sales ( product_id NUMBER, product_name VARCHAR(20), price NUMBER, sold_date DATE ) PARTITION BY RANGE (sold_date) SUBPARTITION BY HASH (product_id) ( PARTITION jan_sales VALUES LESS THAN (TO_DATE('31-01-2006', 'DD-MM-YYYY')), PARTITION feb_sales VALUES LESS THAN (TO_DATE('28-02-2006', 'DD-MM-YYYY')), PARTITION mar_sales VALUES LESS THAN (TO_DATE('31-03-2006', 'DD-MM-YYYY')), PARTITION apr_sales VALUES LESS THAN (TO_DATE('30-04-2006', 'DD-MM-YYYY')), PARTITION may_sales VALUES LESS THAN (TO_DATE('31-05-2006', 'DD-MM-YYYY')), PARTITION jun_sales VALUES LESS THAN (TO_DATE('30-06-2006', 'DD-MM-YYYY')), PARTITION jul_sales VALUES LESS THAN (TO_DATE('31-07-2006', 'DD-MM-YYYY')), PARTITION aug_sales VALUES LESS THAN (TO_DATE('31-08-2006', 'DD-MM-YYYY')), PARTITION sep_sales VALUES LESS THAN (TO_DATE('30-09-2006', 'DD-MM-YYYY')), PARTITION oct_sales VALUES LESS THAN (TO_DATE('31-10-2006', 'DD-MM-YYYY')) SUBPARTITIONS 2, PARTITION nov_sales VALUES LESS THAN (TO_DATE('30-11-2006', 'DD-MM-YYYY')) SUBPARTITIONS 4, PARTITION dec_sales VALUES LESS THAN (TO_DATE('31-12-2006', 'DD-MM-YYYY')) ( SUBPARTITION dec_1, SUBPARTITION dec_2, SUBPARTITION dec_3, SUBPARTITION dec_4 ) ); -
atbl_con_alterstate_cl
The following example illustrates how to activate or inactivate a table constraint using atbl_con_alterstate_cl:
CREATE TABLE enable_disable (
    col1 NUMBER      PRIMARY KEY,
    col2 VARCHAR(10) UNIQUE,
    col3 NUMBER,
    col4 NUMBER,
    CONSTRAINT enable_disable_con001 CHECK (col3 > col4) ) DISABLE NOVALIDATE
    PRIMARY KEY ENABLE VALIDATE
    UNIQUE(col2) DISABLE CONSTRAINT enable_disable_con001;
-
CREATE TABLESPACE creates a tablespace. A tablespace is a logical space used to store schema objects such as tables and indexes.
A detailed description of CREATE TABLESPACE follows:
-
Syntax
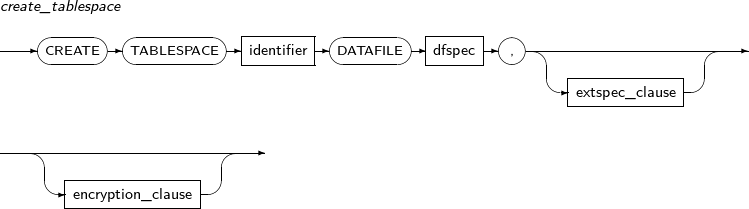
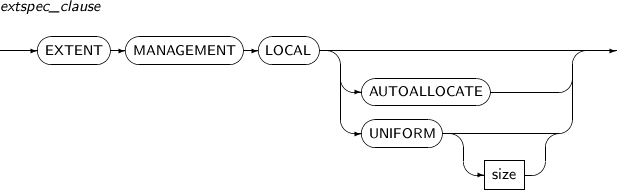

-
Privilege
The SYSDBA privilege is required to execute the CREATE TABLESPACE statement.
-
Components
-
create_tablespace
Component Description identifier Specifies the name of a tablespace to be created. dfspec Specifies the settings related the file such as file name and file size.
Refer to “7.24. CREATE DATABASE” for details.
extspec_clause Specifies how to manage a tablespace's extents. -
extspec_clause
Component Description EXTENT_MANAGEMENT_LOCAL Specify how to manage a tablespace's extent after EXTENT_MANAGEMENT_LOCAL. AUTOALLOCATE Allows the system set the extent size automatically. UNIFORM Allows the user to set the extent size. Extents are always created as the specified size. size Specifies the block size of an extent. The size of an extent is between 16 and 4,194,304 blocks. The default value is 16 blocks.
If the DB_BLOCK_SIZE parameter value in $TB_SID.tip is not a multiple of the block size, the value will be rounded floor to a multiple of the block size.
-
encryption_clause: Used to encrypt a tablespace.
Component Description encryption_spec Selects an encryption algorithm. Specify an encryption algorithm after USING with single quotation marks. The supported algorithms are DES, 3DES168, AES128, AES192, and AES256. (Default value: AES192) For more information, refer to Tibero Administrator's Guide.
-
-
Example
The following example illustrates how to create a tablespace using CREATE TABLESPACE:
CREATE TABLESPACE ts1 DATAFILE 'ts1.df', 'ts2.df'
  EXTENT MANAGEMENT LOCAL UNIFORM SIZE 256K;
Creates a user-defined type.
A user-defined type can be used as a tbPSM
A detailed description of CREATE TYPE follows:
-
Syntax


-
Privilege
To create a user-defined type in the user's schema, the user must have the CREATE TYPE system privilege.
To create or change a user-defined type in another user's schema, the user must have the CREATE ANY TYPE or ALTER ANY TYPE system privilege.
-
Components
-
create_type
Component Description OR REPLACE Redefines an existing user-defined type.
Recompiles the type that includes OR REPLACE.
OR REPLACE maintains the existing privilege on the type unlike when the type is deleted and recreated.
schema Schema that contains the user-defined type. If not specified, the current user's schema is used. type_name User-defined type to be created. oid_clause Not applicable in the current version. IS Either IS or AS can be selected according to the user's preference. There is no different between two options.
The contents of a type is followed by IS.
AS The same as IS. The contents of a type is followed by AS. VARYING ARRAY User-defined type to be created is an array type. The same as VARRAY. VARRAY User-defined type to be created is an array type. The same as VARYING VARRAY. unsigned_integer Integer that specifies the maximum length of an array. TABLE User-defined type to be created is a nested table. element_datatype Data type of an element.
Element data types are all supported by tbPSM
OBJECT User-defined type to be created is an object. attribute_name Attribute name. attribute_datatype Data type of an attribute.
Attribute data types are all data types supported by tbPSM
constructor_declaration Declaration of a constructor.
The return type is the same as constructor type. It is represented as SELF AS RESULT.
map_method_declaration Declaration of a map method.
The return type is always scalar type. It does not have a parameter or only contains SELF.
order_method_declaration Declaration of an order method.
The return type is always a number. It has the same type of parameter except for SELF. Can optionally have SELF.
normal_method_declaration Declaration of a method, which includes a function or subprogram.
Can optionally have SELF.
-
-
Example
The following example illustrates how to change an index name using CREATE TYPE:
--VARYING ARRAY TYPE
CREATE OR REPLACE TYPE sample_array_type AS VARRAY(10) OF NUMBER(8, 2);
/

-- TABLE TYPE
CREATE OR REPLACE TYPE sample_nested_table_type AS TABLE OF VARCHAR(1024);
/

-- VARYING ARRAY OF VARYING ARRAY TYPE
CREATE OR REPLACE TYPE array_of_array AS VARRAY(10) OF sample_array_type;
/

-- TABLE OF TABLE TYPE
CREATE OR REPLACE TYPE table_of_table AS TABLE OF sample_nested_table_type;
/
-- VARYING ARRAY OF TABLE TYPE
CREATE OR REPLACE TYPE array_of_table AS VARRAY(10) OF sample_nested_table_type;
/
-- TABLE OF  VARYING ARRAY
CREATE OR REPLACE TYPE table_of_array AS TABLE OF  sample_array_type;
/

-- OBJECT TYPE
CREATE OR REPLACE TYPE person AS OBJECT (name VARCHAR2(1024),
age NUMBER, gender VARCHAR(6));
/

-- OBJECT OF OBJECT TYPE
CREATE OR REPLACE TYPE employee AS OBJECT(pinfo person, department VARCHAR(64));
/

-- COLLECTION OF OBJECT
CREATE OR REPLACE TYPE employees AS VARRAY(100) OF employee;
/

CREATE OR REPLACE TYPE employees AS TABLE OF employee;
/

-- COLLECTION ATTRIBUTES

CREATE OR REPLACE TYPE scores AS TABLE OF NUMBER;
/

CREATE OR REPLACE TYPE students AS TABLE OF person;
/

CREATE OR REPLACE TYPE class AS OBJECT (code CHAR(10), name VARCHAR(100),
professor person, std students,  mterm_exam scores, final_exam scores);
/


-- OBJECT METHODS
CREATE TYPE constructor_example AS OBJECT (
    attr1 NUMBER,
    attr2 NUMBER,
    CONSTRUCTOR FUNCTION constructor_example(p1 NUMBER) RETURN SELF AS RESULT
);
/

CREATE TYPE BODY map_method_example
AS
    MAP MEMBER FUNCTION map_method_example RETURN VARCHAR
    AS
    BEGIN
        RETURN to_char(attr2);
    END;
END;
/

CREATE TYPE order_method_example AS OBJECT (
    attr1 NUMBER,
    attr2 NUMBER,
    ORDER MEMBER FUNCTION order_method_example(v order_method_example)
    RETURN NUMBER
);
/

CREATE TYPE normal_method_example AS OBJECT (
    attr1 NUMBER,
    attr2 NUMBER,
    MEMBER FUNCTION  normal_function_example(value NUMBER ) RETURN NUMBER,
    MEMBER PROCEDURE normal_procedure_example(SELF IN normal_method_example )
);
/
Creates the body of a user-defined type. Only object type can be as the type of body.
A detailed description of CREATE TYPE follows:
-
Syntax

-
Privilege
-
To create a user-defined type of body in the user's schema, the user must have the CREATE TYPE system privilege.
-
To create or change a user-defined type of body in another user's schema, the user must have the CREATE ANY TYPE or ALTER ANY TYPE system privilege.
-
-
Components
-
create_type
Component Description OR REPLACE Redefines an existing user-defined type.
Recompiles the type that includes OR REPLACE.
OR REPLACE maintains the existing privilege on the type unlike when the type is deleted and recreated.
schema Schema to contain the user-defined type body. If not specified, Tibero assumes it as the current user's schema. type_name Name of the user-defined type. constructor_definition Consists of creator specifications, declarations, and statements.
This must be the same as that defined in the CREATE TYPE statement. Definitions and statements are the same as the most specific type of PSM.
map_method_definition Consists of creator specifications, declarations, and statements.
Specifications must be the same as that defined in the CREATE TYPE statement. Definitions and statements are the same as the most specific type of PSM.
order_method_definition Consists of creator specifications, declarations, and statements.
Specifications must be the same as that defined in the CREATE TYPE statement. Definitions and statements are the same as the most specific type of PSM.
member_method_definition Consists of creator specifications, declarations, and statements.
Specifications must be the same as that defined in the CREATE TYPE statement. Definitions and statements are the same as the most specific type of PSM.
-
-
Example
The following example illustrates how to change an index name using CREATE TYPE BODY:
-- Example of a type body that has constructor.
DROP TYPE constructor_example;

CREATE TYPE constructor_example AS OBJECT (
    attr1 NUMBER,
    attr2 NUMBER,
    CONSTRUCTOR FUNCTION constructor_example(p1 NUMBER) RETURN SELF AS RESULT
);
/

CREATE TYPE BODY constructor_example
AS
    CONSTRUCTOR FUNCTION constructor_example(p1 NUMBER) RETURN SELF AS RESULT
    AS
    BEGIN
        attr1 := p1;      -- Set the input value as the first attribute.
        attr2 := p1 * p1; -- Set the square of the input value
        as the second attribute.

        RETURN;
    END;
END;
/

DROP TYPE map_method_example;

CREATE TYPE map_method_example AS OBJECT (
    attr1 NUMBER,
    attr2 NUMBER,
    MAP MEMBER FUNCTION map_method_example RETURN VARCHAR
);
/

CREATE TYPE BODY map_method_example
AS
    -- Map method only retrieves one scalar value from object instance.
    MAP MEMBER FUNCTION map_method_example RETURN VARCHAR
    AS
    BEGIN
        RETURN to_char(attr2);
    END;
END;
/

DROP TYPE order_method_example;

CREATE TYPE order_method_example AS OBJECT (
    attr1 NUMBER,
    attr2 NUMBER,
    ORDER MEMBER FUNCTION order_method_example(v order_method_example)
RETURN NUMBER
);
/

CREATE TYPE BODY order_method_example
AS
    -- Order method returns a number by comparing the object type of two instances.
    ORDER MEMBER FUNCTION order_method_example(v order_method_example)
    RETURN NUMBER
    AS
    BEGIN
        IF attr1  v.attr1 THEN
            RETURN -1;
        ELSIF attr1 = v.attr1 THEN
            RETURN 0;
        ELSE
            RETURN 1;
        END IF;
    END;
END;
/

DROP TYPE normal_method_example;

CREATE TYPE normal_method_example AS OBJECT (
    attr1 NUMBER,
    attr2 NUMBER,
    MEMBER FUNCTION  normal_function_example(value NUMBER ) RETURN NUMBER,
    MEMBER PROCEDURE normal_procedure_example(SELF IN normal_method_example )
);
/

CREATE TYPE BODY normal_method_example
AS
    MEMBER FUNCTION  normal_function_example(value NUMBER ) RETURN NUMBER
    AS
    BEGIN
        return ( attr1 + attr2 ) * value;
    END;
    MEMBER PROCEDURE normal_procedure_example(SELF IN normal_method_example )
    AS
    BEGIN
        dbms_output.put_line ('attribute1:' || self.attr1);
        dbms_output.put_line ('attribute2:' || self.attr2);
    END;

END;
/
CREATE TRIGGER creates a database trigger. A trigger is a tbPSM block that is connected to a table, schema, and database.
When a trigger is created, it is in an inactivated state. After creating a trigger, you can change the state using ALTER TRIGGER or ALTER TABLE. A trigger in an activated state will fire the moment a given condition is satisfied.
When a trigger generates a compilation error, the trigger is created but remains in a non-executable state. As a result, all DML statements which satisfy the trigger condition are blocked until the trigger which generated the error is changed to an inactivated state.
To use a DDL or DB entry trigger, _DDL_TRIGGER_ENABLE must be set to Y.
A detailed description of CREATE TRIGGER follows:
-
Syntax
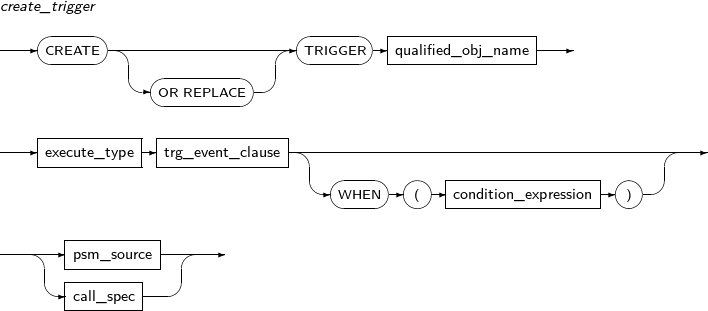

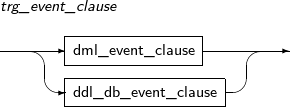
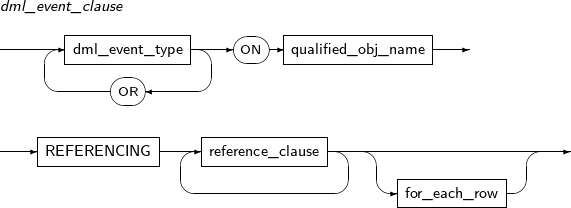


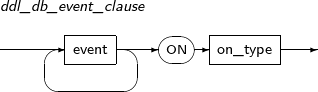
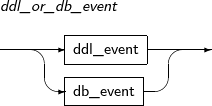

-
Privileges
-
The CREATE TRIGGER system privilege is required to create a trigger in a user's own schema.
-
The CREATE ANY TRIGGER system privilege is required to create a trigger within another user's schema.
-
The ADMINISTER DATABASE TRIGGER system privilege is required to create a trigger connected to the database.
-
When a trigger executes an SQL statement or calls a procedure or function, the trigger owner must have the relevant privileges.
-
-
Components
-
create_trigger
Component Description OR REPLACE Changes the content of a trigger which already exists. execute_type Trigger execution type. BEFORE Allows a trigger to fire before each event to be executed.
A row trigger is executed before a row is changed.
AFTER Allows a trigger to fire after each event to be executed.
A row trigger is executed after a row has changed.
INSTEAD OF Fires the trigger instead of executing the triggering event. This is applicable only for a DML event on views. It cannot be specified for a trigger on a table.
dml_event_clause Makes a trigger a DML event trigger.
A DML event trigger is executed whenever the specified DML statement is executed.
ddl_db_event_clause Makes a trigger a DDL or DB event trigger.
A DML event trigger is executed whenever the specified DDL statement or DB event is executed.
WHEN condition_expression Specifies the condition when a trigger will fire. The trigger will not fire until this condition is satisfied.
If this condition is specified for a DML event trigger, FOR EACH ROW must also be specified.
psm_source Specifies a procedure to be executed when a trigger fires.
Explicitly specifies the tbPSM block.
call_spec Specifies a procedure to be executed when a trigger fires.
Calls a stored procedure using the CALL statement. Refer to “8.4. CALL” for details.
-
dml_event_clause
Component Description dml_event_type Fires a trigger whenever the DML statement specified in dml_event_type is executed. ON schema Specifies the schema to which the created trigger will be connected. By default, the schema of the current user will be used. object_name Specifies the name of the object to which a trigger will be connected. REFERENCING reference_clause Specifies how a trigger references a row value of the table.
When a trigger references row-level triggers, existing rows are accessed by the name OLD and new rows are accessed by the name NEW. For example, if there is a column named A in a table, and you want to specify a new value, you can write PSM code within the trigger as follows:
:OLD.A := 1;
If you want to reference a row's current value with any name other than NEW or OLD you can use this clause to change the name.
FOR EACH ROW Allows a trigger become a row trigger.
Executes a row trigger for every row affected by the trigger events. By default, a trigger becomes a statement-level trigger. A statement-level trigger is only fired when an SQL statement that generates the trigger event is performed.
-
dml_event_type
Component Description DELETE Allows a trigger to fire whenever a row is deleted via the DELETE statement. INSERT Allows a trigger to fire whenever a row is inserted via the INSERT statement. UPDATE Allows a trigger to fire whenever a row is changed via the UPDATE statement. UPDATE OF Allows a trigger to fire whenever the column value defined in OF is changed. -
reference_clause
Component Description OLD Provides a reference to the existing value of the row in the table. NEW Provides a reference to the new value of the row in the table. AS identifier Specifies a name other than OLD or NEW. -
ddl_db_event_clause
Component Description event DDL or DB event. on_type Target on which a DDL or DB event occurred. Either a schema or database. -
ddl_or_db_event
Component Description ALTER Fires the trigger when DDL ALTER occurs. ANALYZE Fires the trigger when DDL ANALYZE occurs. ASSOCIATE STATISTICS Fires the trigger when DDL ASSOCIATE STATISTICS occurs. AUDIT Fires the trigger when DDL AUDIT occurs. COMMENT Fires the trigger when DDL COMMENT occurs. CREATE Fires the trigger when DDL CREATE occurs. DISASSOCIATE STATISTICS Fires the trigger when DDL DISASSOCIATE STATISTICS occurs. DROP Fires the trigger when DDL DROP occurs. GRANT Fires the trigger when DDL GRANT occurs. NOAUDIT Fires the trigger when DDL NOAUDIT occurs. RENAME Fires the trigger when DDL RENAME occurs. REVOKE Fires the trigger when DDL REVOKE occurs. TRUNCATE Fires the trigger when DDL TRUNCATE occurs. DDL Fires the trigger when any DDL occurs. SERVERERROR Fires the trigger when EVENT SERVERERROR occurs. LOGON Fires the trigger when EVENT LOGON occurs. LOGOFF Fires the trigger when EVENT LOGOFF occurs. STARTUP Fires the trigger when EVENT STARTUP occurs. SHUTDOWN Fires the trigger when EVENT SHUTDOWN occurs. SUSPEND Fires the trigger when EVENT SUSPEND occurs.
-
-
Examples
The following example illustrates how to create a trigger using CREATE TRIGGER:
CREATE OR REPLACE TRIGGER "tibero".tr1
 AFTER DELETE ON tbl2 FOR EACH ROW
BEGIN
 IF(DELETING) THEN
   DELETE FROM tbl3
     WHERE ID  = :OLD_ID;
 END IF;
END;
/
The following example illustrates how to create a DDL trigger using CREATE TRIGGER:
CREATE OR REPLACE TRIGGER ddl_trg_example
 AFTER CREATE ON DATABASE
BEGIN
 INSERT INTO test VALUES (0);
END;
/
CREATE USER creates a new user.
Note
Refer to “7.18. ALTER USER” and “7.66. DROP USER” to change user information or to delete a user, respectively.
A detailed description of CREATE USER follows:
-
Syntax
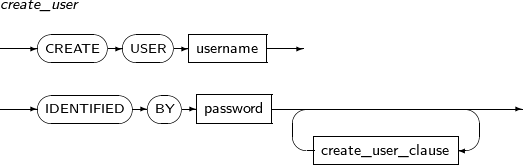
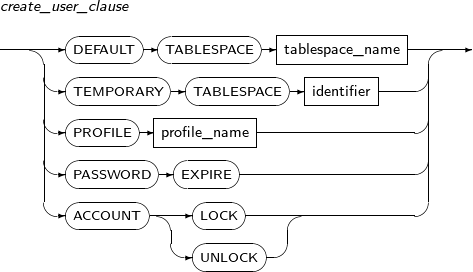
-
Privileges
-
To create a user, the CREATE USER system privilege is required.
-
A user created by CREATE USER has no privileges. Therefore, the CREATE SESSION system privilege is required to access a database with the created user. The user may also need other privileges to complete tasks. Refer to “7.70. GRANT” for details of system privileges.
-
-
Components
-
create_user
Component Description username Specifies the name of the user. A username is a VARCHAR of up to 30 characters.
A user name should not be the same as another user or role name in the database.
IDENTIFIED BY password Allows a user to be authenticated. A password is made of a string of characters. To include special characters, use a quotation mark (' or ") at the start and end of the password. To use a case sensitive password, use single quotation marks. The maximum length of the password string is 63 characters. Because some client programs or database management programs cannot use long passwords, using a password of less than 20 characters is recommended.
create_user_clause Specifies the default values of the created user. Optional. -
create_user_clause
Component Description DEFAULT TABLESPACE Specifies a default tablespace for the user. The tablespace should already exist.
By default, the system tablespace will be used. However, the system tablespace is for internal use, so creating a separate tablespace is recommended.
Refer to “7.41. CREATE TABLESPACE” for details of creating a tablespace.
PROFILE Specifies a profile which defines user access and password policies. PASSWORD EXPIRE Creates the user password in an expired state so that the user must create a new password the first time the user accesses the database. ACCOUNT LOCK Creates the user in a locked state. By default, the user will be created in an unlocked state. ACCOUNT UNLOCK Creates the user in an unlocked state.
-
-
Examples
-
create_user
The following example illustrates how to create a user and set the default tablespace using the DEFAULT TABLESPACE statement:
SQL> CREATE TABLESPACE t1 DATAFILE 't1.dbf' SIZE 10M EXTENT MANAGEMENT LOCAL UNIFORM SIZE 256K; Tablespace created. SQL> CREATE USER u1 IDENTIFIED BY 'p1' DEFAULT TABLESPACE t1; User created. SQL> SELECT username, default_tablespace FROM dba_users WHERE username='U1'; USERNAME DEFAULT_TABLESPACE ------------------------------ ------------------------------ U1 T1 1 row selected. -
create_user_clause
The following example illustrates how to create a user and change the password state to an expired state using the PASSWORD EXPIRE statement:
SQL> CREATE USER u2 IDENTIFIED BY 'p2'
       PASSWORD EXPIRE;
User created.

SQL> GRANT CREATE SESSION TO u2;
Granted.

SQL> CONN u2/p2
TBR-17002: password expired.

New password : ***
Retype new password : ***
Password changed
Connected.
The following example illustrates how to create a user and change the user state to a locked state using the ACCOUNT LOCK statement:
SQL> CREATE USER u3 IDENTIFIED BY 'p3'
       ACCOUNT LOCK;
User created.

SQL> SELECT username, account_status
     FROM dba_users WHERE username='U3';

USERNAME                       ACCOUNT_STATUS
------------------------------ ----------------
U3                             LOCKED

1 row selected.

SQL> GRANT CREATE SESSION TO u3;
Granted.

SQL> CONN u3/p3
TBR-17006: account is locked.
-
CREATE VIEW creates a view in a user's own schema or another user's schema.
Note
Refer to “7.67. DROP VIEW” to delete a view.
A detailed description of CREATE VIEW follows:
-
Syntax
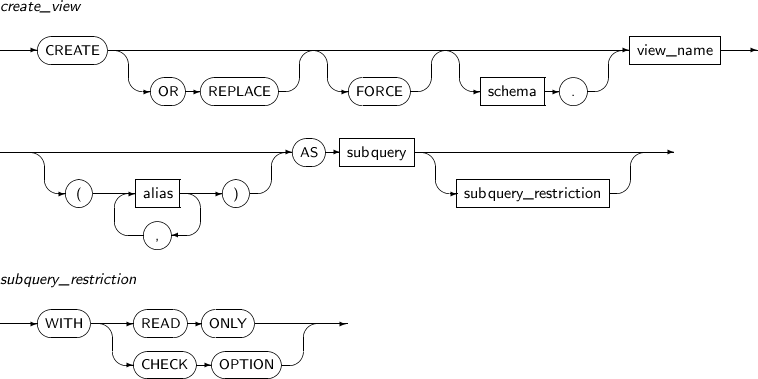
-
Privileges
-
The user must be the owner of the schema, or the CREATE ANY VIEW system privilege is required.
-
The owner of the schema which includes the view must have the relevant privileges for SELECT, INSERT, UPDATE, and DELETE for all tables and views that the view references. Refer to “5.1. SELECT”, “8.1. INSERT”, and “8.2. UPDATE”, “8.3. DELETE” for details of each statement.
-
-
Components
-
create_view
Component Description OR REPLACE Replaces an existing view with a new one.
This is different from deleting and recreating the view in that it maintains the existing privileges and references of the view.
FORCE Creates a view even if objects the view references do not exist or the view does not have appropriate privileges for an object.
The created view can be used after the objects are created or relevant privileges are granted.
schema Specifies the name of the schema where the view will be created. By default, the schema of the current will be used. view_name Specifies the name of the view to be created. The view name is a VARCHAR of up to 30 characters.
View names use the same namespace as tables, so it cannot be the same as other views, public synonyms, tables, sequences, packages, functions, or procedure names.
alias Indicates the result expression from a subquery. The alias is a VARCHAR of up to 30 characters.
If the expression generated as a result of the subquery is a simple column name, specify that column name as alias. If the expression generated as a result of the subquery is not a simple column name, the alias must be specified.
As a result of the subquery, the number of view columns should be the same as the number of row columns. The alias name should also be unique within a view.
An alias must be specified for a subquery that outputs the ROWID column.
AS subquery Specifies the subquery that defines the view. The method for specifying the subquery is the same as a SELECT statement. Refer to the “5.1. SELECT” for details.
A view definition subquery has the following constraints:
-
It cannot use a sequence for the result column of the view definition subquery.
-
When using ROWID, ROWNUM, or LEVEL for the result column of the view definition subquery, an alias must be specified.
-
If (*) is used for the result column of view definition subquery and the user later adds new columns to the table, the newly added columns will not be automatically added to the view. The user must create a new view using the OR REPLACE clause.
subquery_restriction Specifies attributes of the view defined by the subquery. -
-
subquery_restriction
Component Description WITH READ ONLY Specifies the view created by the subquery as READ ONLY so that it cannot be modified. The view can only be read. WITH CHECK OPTION Prohibits any updates to rows which are not selected by the view.
For a joined view, the joined and repeated columns can never be updated. For INSERT, just like UPDATE, the inserted row must be selected through the view, but this is only applicable when there is one base table. A joined view can never be inserted.
In the case of DELETE, deletion is possible if the key preserved table which is the target for deletion is not repeated because the table does not form a self join.
-
-
Examples
-
create_view
The following example illustrates an error message that occurs when using a sequence as a result column from a subquery which defines a view via AS subquery:
SQL> CREATE SEQUENCE s;
Sequence created.

SQL> CREATE VIEW v AS SELECT s.NEXTVAL FROM t;
TBR-8074: sequence not allowed here
at line 1, column 26:
CREATE VIEW v AS SELECT s.NEXTVAL FROM t
The following example illustrates an error message that occurs if an alias is not specified when using ROWNUM as a result column from a subquery which defines a view via AS subquery:
SQL> CREATE VIEW v AS SELECT rownum FROM dual;
TBR-7084: expression not named with a column alias
When ROWID, ROWNUM, or LEVEL is used as the result column of a view definition subquery, an alias must be set.
The following example illustrates the case where an alias is not specified to create a view via AS subquery:
SQL> CREATE TABLE contract
       (age NUMBER, sex NUMBER, salary NUMBER,
        workplace VARCHAR(30));

Table created.

SQL> CREATE TABLE factory
       (location VARCHAR(30) UNIQUE, num_of_goods NUMBER);

Table created.

SQL> CREATE VIEW contract_in_seoul AS
     SELECT age, sex, salary * 1000 salary_won
     FROM contract
     WHERE workplace = "Seoul";
The important part of this example is that an alias of the view is not specified when an expression (salary * 1000) is written for a result column of the subquery. Because an alias (salary_won) is declared as an expression in the subquery, the alias will be used and the expression is thereby correct.
-
subquery_restriction
The following example illustrates how to create a view as read only using WITH READ ONLY. A view that is created as read only cannot be updated:
SQL> CREATE VIEW read_only_contract AS
    SELECT * FROM contract WITH READ ONLY;

View created.

SQL> SELECT column_name, updatable FROM user_updatable_columns
    WHERE table_name = 'READ_ONLY_CONTRACT';

   COLUMN_NAME                    UPD
   ------------------------------ ---
   AGE                            NO
   SEX                            NO
   SALARY                         NO
   WORKPLACE                      NO

   4 rows selected.
The following example illustrates a view using WITH CHECK OPTION. A view created with this option this can be updated only when it passes CHECK OPTION:
SQL> CREATE VIEW contract_view_with_check AS
    SELECT * FROM contract WHERE age > 18 WITH CHECK OPTION;

View created.

SQL> INSERT INTO contract_view_with_check
     VALUES (18, 2, 1000, 'New York');
TBR-10010: view WITH CHECK OPTION where-clause violation

SQL> INSERT INTO contract_view_with_check
     VALUES (19, 2, 1000, 'New York');

1 row inserted.
-
Updatable View
An updatable view enables INSERT, UPDATE, and DELETE on the reference table through the view. To know which columns can be modified by the updatable view, refer to the USER_UPDATABLE_COLUMNS static view. This view has information about which columns(aliases) of an updatable view can be modified.
The following example illustrates a view created by joining two tables:
SQL>CREATE VIEW contract_view AS
    SELECT c.age, c.salary, f.location, f.num_of_goods
    FROM contract c, factory f
    WHERE c.workplace = f.location;

View created.

SQL> SELECT column_name, updatable FROM user_updatable_columns
    WHERE table_name = 'CONTRACT_VIEW';

COLUMN_NAME                    UPD
------------------------------ ---
AGE                            YES
SALARY                         YES
LOCATION                       NO
NUM_OF_GOODS                   NO

4 rows selected.
The column location of the table factory does not have a unique value in CONTRACT_VIEW and rows of CONTRACT_VIEW don't have a one-to-one correspondence with rows in the table, so the factory table cannot be updated by the view CONTRACT_VIEW:
SQL> INSERT INTO contract_view VALUES (26, 1, 'New York', 0);
TBR-8057: non updatable columns
at line 1, column 2:
INSERT INTO contract_view VALUES (26, 1, 'New York', 0)

SQL> INSERT INTO contract_view (age, salary) VALUES (26, 1);

1 row inserted.
DROP DATABASE LINK deletes a database link.
Note
For detailed information about database links, refer to Tibero Administrator's Guide.
A detailed description of DROP DATABASE LINK follows:
-
Syntax

-
Privileges
When deleting a database link that exists in a user's own schema, no privileges are required.
The DROP PUBLIC DATABASE LINK system privilege is required to remove a public database link.
-
Components
Component Description PUBLIC Specifies that a public database link will be deleted.
By default, database links in the user's own schema will be deleted.
dblink_name Specifies the name of the database link to be deleted. Note that a schema cannot be specified when defining the name of a database link.
The '.' character is recognized as part of the name in a database link, so deleting a database link that exists in another user's schema is not possible.
-
Examples
The following example illustrates the use of DROP DATABASE LINK and DROP PUBLIC DATABASE LINK:
DROP DATABASE LINK remote;

DROP PUBLIC DATABASE LINK public_remote;
DROP DIRECTORY deletes a directory object.
Note
Refer to “7.26. CREATE DIRECTORY” to create a directory.
A detailed description of DROP DIRECTORY follows:
-
Syntax

-
Privileges
The DROP ANY DIRECTORY system privilege is required to remove a directory.
-
Components
Component Description dir_name Specifies the name of the directory to be removed. -
Examples
The following example illustrates how to delete a directory tmp using DROP DIRECTORY:
SQL> DROP DIRECTORY tmp;

Directory dropped.
DROP DISKSPACE drops a diskspace.
A detailed description of DROP DISKSPACE is as follows:
-
Syntax

-
Components
-
drop_diskspace
Component Description diskspace_name Name of the diskspace to drop. FORCE Initializes all disks in the diskspace so that it cannot be mounted again. INCLUDING CONTENTS Deletes the diskspace and all its files. EXCLUDING CONTENTS Drops the diskspace only if it has no user files. An error occurs if any user files exist.
Default setting if no other conditions are set.
-
-
Examples
The following example shows how to use DROP DISKSPACE to drop a diskspace.
DROP DISKSPACE ds FORCE INCLUDING CONTENTS;
DROP FUNCTION deletes a user function. Any view, function, or procedure that includes the deleted function will be invalidated. When an invalidated statement, function, or procedure is executed, the system will attempt to recompile it, but a compilation error might occur.
A detailed description of DROP FUNCTION follows:
-
Syntax

-
Privileges
The user must be the owner of the schema where the function exists, or the DROP ANY PROCEDURE system privilege is required.
-
Components
Component Description schema Specifies the schema name to which the function to be deleted belongs. By default, the schema of the current user will be used. function_name Specifies the function name to be deleted. -
Examples
The following example illustrates how to delete a user function using DROP FUNCTION:
DROP FUNCTION tibero.get_square;
DROP INDEX deletes an index. SQL statements, functions, and procedures that use the deleted index will be invalidated. When an invalidated statement, function, or procedure is executed, the system will optimize the statement or compile without using the index.
A detailed description of DROP INDEX follows:
-
Syntax
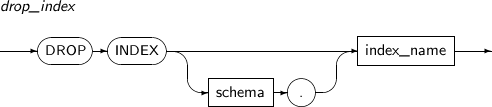
-
Privileges
One of the following conditions should be satisfied to execute this command:
-
The user owns the index.
-
The user has the DROP ANY INDEX system privilege.
-
-
Components
Component Description schema Specifies the name of the schema of the index's table. index_name Specifies the name of the index to be removed. -
Examples
The following example illustrates how to delete an index using DROP INDEX:
DROP INDEX u2.i;
DROP MATERIALIZED VIEW deletes a materialized view.
A detailed description of DROP MATERIALIZED VIEW follows:
-
Syntax

-
Privileges
-
No privileges are required to drop a materialized view that the user owns.
-
When deleting a materialized view in another user's schema, the DROP ANY MATERIALIZED VIEW system privilege is required. A user must also have the privileges to remove the views, tables, and indexes that the database uses to maintain the materialized view data.
-
-
Components
Component Description schema Specifies the name of the schema to which the materialized view to be deleted belongs. By default, the current user's schema will be used. mview_name Specifies the name of the materialized view to be deleted. PRESERVE TABLE If PRESERVE TABLE is specified, the view's contents will remain in a table with the same name as the materialized view even after the view is deleted. -
Examples
The following example illustrates how to delete a materialized view using PRESERVE TABLE:
DROP MATERIALIZED VIEW MV
  PRESERVE TABLE;
DROP MATERIALIZED VIEW LOG deletes a materialized view log from a specified master table.
A detailed description of DROP MATERIALIZED VIEW LOG follows:
-
Syntax

-
Privilege
Privileges to delete the table are required.
-
Components
Component Description schema Specifies the schema of the master table associated with the materialized view log to be removed. By default, the schema of the current user will be used. table Specifies the name of the master table associated with the materialized view log to be removed. -
Example
The following example illustrates how to remove a materialized view log using the ALTER MATERIALIZED VIEW LOG statement:
DROP MATERIALIZED VIEW LOG ON DEPT;
DROP OUTLINE drops a created outline.
Note
Refer to “7.32. CREATE OUTLINE” to create a new outline.
A detailed description of DROP OUTLINE follows:
-
Syntax

-
Components
Component Description outline_name Specifies the name of an outline to be removed. -
Examples
The following example illustrates how to remove an outline using DROP OUTLINE:
SQL> DROP OUTLINE ol_join;
Outline 'OL_JOIN' dropped.
A user can disable the use of stored outlines using the USE_STORED_OUTLINES parameter:
SQL> alter session set USE_STORED_OUTLINES = n;
DROP PACKAGE deletes a package stored in the database.
A detailed description of DROP PACKAGE follows:
-
Syntax

-
Privileges
The DROP ANY PROCEDURE system privilege is required to delete a package.
-
Components
Component Description BODY If BODY is specified, only the body of the package will be deleted. Otherwise, both the package specification and the body will be deleted.
If only the body is deleted, other objects that depend on the object of this package will not be invalidated. However, functions and procedures of the package cannot be called until the body is created again.
When both the package specification and body are deleted, local objects that depend on the package specification will be invalidated. When this object is next referenced, the database will try to recompile the object. If the package has not been recreated, an error will occur.
schema Specifies the schema name to which the package to be deleted belongs. By default, the schema of the current user will be used. package_name Specifies the package name to be deleted. -
Examples
The following example illustrates how to use DROP PACKAGE:
DROP PACKAGE parts_pkg;

DROP PACKAGE BODY tibero.test_pkg;
DROP PROCEDURE deletes a user procedure.
Any function or procedure that includes the deleted procedure will be immediately invalidated. If a user executes the invalidated function or procedure, the server will attempt to recompile it, but errors related to the object will occur.
A detailed description of DROP PROCEDURE follows:
-
Syntax

-
Privileges
The user must be the owner of the schema which includes the target procedure, or the DROP ANY PROCEDURE system privilege is required.
-
Components
Component Description schema Specifies the schema name to which the procedure to be deleted belongs. By default, the schema oft he current user will be used. procedure_name Specifies the procedure name to be deleted. -
Examples
The following example illustrates how to use DROP PROCEDURE:
DROP PROCEDURE raise_salary;
DROP PROFILE deletes a profile.
Note
Refer to “7.36. CREATE PROFILE” or “7.10. ALTER PROFILE” for information about creating or changing a profile.
A detailed description of DROP PROFILE follows:
-
Syntax

-
Privileges
The DROP PROFILE system privilege is required.
-
Components
Component Description username Specifies the name of a profile to be removed. CASCADE If a user belongs to the profile and CASCADE is specified, the user will automatically be assigned to the DEFAULT profile.
If a user belongs to the profile and CASCADE is not specified, an error will occur and the profile will not be removed.
DROP ROLE deletes a created role. It revokes the role from any user and any role it has been granted to.
Any session currently using the corresponding role is not affected, but the role cannot be used in subsequently created sessions.
Note
Refer to “7.37. CREATE ROLE” and “7.11. ALTER ROLE” when creating a new role or to change the created role information.
A detailed description of DROP ROLE follows:
-
Syntax
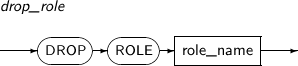
-
Privileges
The DROP ROLE system privilege is required.
-
Components
Component Description role_name The name of the role to be deleted. The role should have been created by CREATE ROLE. -
Examples
The following example illustrates how to delete a role using DROP ROLE:
SQL> CONN sys/tibero
Connected.

SQL> CREATE USER u1 IDENTIFIED BY 'p1';
User created.

SQL> CREATE ROLE a;
Role created.

SQL> GRANT a TO u1;
Granted.

SQL> SELECT grantee, granted_role
     FROM dba_role_privs
     WHERE granted_role='A';

GRANTEE                        GRANTED_ROLE
------------------------------ ------------------------------
SYS                            A
U1                             A

2 rows selected.

SQL> DROP ROLE a;
Role dropped.

SQL> SELECT grantee, granted_role
     FROM dba_role_privs
     WHERE granted_role='A';

GRANTEE                        GRANTED_ROLE
------------------------------ ------------------------------

0 row selected.
In the example above, a role is created using the CREATE ROLE statement, and this role is granted to the user U1. When the role is deleted with the DROP ROLE statement, the role granted to U1 is automatically deleted.
DROP SEQUENCE deletes a specified sequence definition.
A detailed description of DROP SEQUENCE follows:
-
Syntax

-
Privileges
If the current user is not the owner of the schema, the DROP_ANY_SEQUENCE system privilege is required.
-
Components
Component Description schema Specifies the name of the schema which includes the sequence to be deleted. By default, the schema of the current user will be used. sequence_name Specifies the name of the sequence to be deleted. -
Examples
The following example illustrates how to delete the sequence test_seq created by CREATE_SEQUENCE's example:
SQL> DROP SYNONYM emp;

Synonym dropped.

SQL> DROP PUBLIC SYNONYM tabs;

Synonym dropped.
DROP SYNONYM deletes a synonym.
Note
Refer to “7.39. CREATE SYNONYM” to create a synonym.
A detailed description of DROP SYNONYM follows:
-
Syntax

-
Privileges
-
If the current user is not the owner of the schema, the DROP ANY SYNONYM system privilege is required.
-
To delete a public synonym, the DROP PUBLIC SYNONYM system privilege is required.
-
-
Components
Component Description PUBLIC Deletes a public synonym. Note that a schema cannot be specified. schema Specifies the name of the schema that includes the synonym to be deleted. By default, the current user's schema is used. synonym_name Specifies the name of the synonym to be deleted. -
Examples
The following example illustrates how to delete the synonyms emp and tabs created by CREATE_SYNOMYM's example:
SQL> DROP SYNONYM emp;

Synonym dropped.

SQL> DROP PUBLIC SYNONYM tabs;

Synonym dropped.
DROP TABLE deletes a table. When a table is deleted, all associated database objects such as constraints, indexes, and triggers are deleted along with the table. For a partitioned table, all partitions are deleted.
When a table is deleted, any views, procedures, or packages which reference the table are invalidated instead of being deleted. If a table with the same name is later created and the conditions to use these objects are satisfied, they will become valid after they are next accessed.
A detailed description of DROP TABLE follows:
-
Syntax
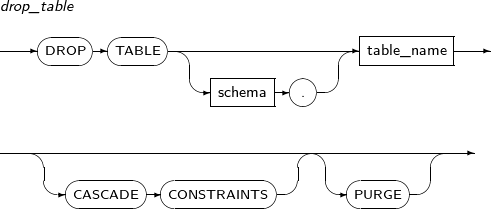
-
Privileges
If the user does not own the schema, the DROP ANY TABLE system privilege is required.
-
Components
Component Description schema Specifies the name of the schema which includes the table to be deleted. By default, the schema of the current user will be used. table_name Specifies the name of the table to be deleted. CASCADE CONSTRAINTS If a foreign key constraint exists in the table to be deleted, use CASCADE CONSTRAINTS to delete the constraints from tables which reference the foreign key. PURGE When the RECYCLEBIN function is used with USE_RECYCLEBIN set to Y, as long as the PURGE option is not specified, the table will not be deleted but its name will be changed.
If the value of the initialization parameter
USE_RECYCLEBINis set to 'N', the table will be deleted even if PURGE is specified.To completely delete a table, specify the PURGE option. After it has been deleted, the table can be recovered using the FLASHBACK TABLE statement. Refer to“7.69. FLASHBACK TABLE” for detailed information on the FLASHBACK TABLE statement.
-
Examples
The following example illustrates how to delete a table using DROP TABLE:
DROP TABLE table_exmp;

DROP TABLE table_exmp_cas CASCADE CONSTRAINTS;
DROP TABLESPACE deletes a tablespace.
A detailed description of DROP TABLESPACE follows:
-
Syntax

-
Privileges
The SYSDBA system privilege is required.
-
Components
Component Description identifier Specifies the name of a tablespace to be deleted. INCLUDING CONTENTS Deletes all objects within a tablespace.
When attempting to delete a tablespace that contains an object, if this clause is not specified, an error will occur and the tablespace will not be deleted.
AND DATAFILES Specify this clause to delete the data file along with the tablespace. CASCADE CONSTRAINTS Deletes all referential integrity constraints that reference the table saved in the tablespace to be deleted.
When attempting to delete a tablespace that contains a table with referential integrity constraints, if CASCADE CONSTRAINTS is not specified, an error will occur and the tablespace will not be deleted.
-
Examples
The following example illustrates how to delete all associated objects and data files when deleting a tablespace using INCLUDING CONTENTS:
DROP TABLESPACE ts1;

DROP TABLESPACE ts1 INCLUDING CONTENTS AND DATAFILES;
DROP TRIGGER deletes a trigger from the database. If a triggered table is deleted via the DROP TABLE statement, all triggers in the table will be deleted as well.
A detailed description of DROP TRIGGER follows:
-
Syntax
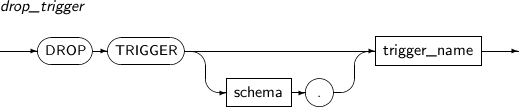
-
Privileges
If the user does not own the schema, the DROP ANY TRIGGER system privilege is required.
-
Components
Component Description schema Specifies the name of the schema which includes the trigger to be deleted. By default, the schema of the current user will be used. trigger_name Specifies the name of the trigger to be deleted. -
Examples
The following example illustrates how to delete a trigger that belongs to the schema emp using DROP TRIGGER:
DROP TRIGGER emp.bonus_check;
Drops a user-defined type. A function, procedure, or package that contains the dropped type is immediately invalidated. If an invalidated package function, procedure, or package is executed, an error is returned during compilation.
If a type contains the user-defined type to be dropped, the FORCE option must be used to drop the user-defined type. A type that contains a dropped user-defined type is immediately invalidated. The invalidated type is compiled when any function, procedure or package that uses this type is executed or another user-defined type that contains the invalidated type is compiled.
A detailed description of DROP TYPE follows:
-
Syntax

-
Privileges
The user-defined type must be in the user's own schema or the user must have the DROP ANY TYPE system privilege.
-
Components
Component Description schema Name of the schema to which the user-defined type to be dropped belongs. If not specified, the user's own schema is used. type_name Name of the user-defined type to be dropped. FORCE Forcibly drops the user-defined type even if it is used by another user-defined type. -
Examples
The following example illustrates how to use DROP TYPE:
CREATE TYPE tibero.two_dimensional_array  AS VARRAY (100) OF one_dimensional_array;
/

CREATE TYPE tibero.one_dimensional_array AS VARRAY (100) OF NUMBER;
/

DROP TYPE tibero.one_dimensional_array FORCE;

DROP TYPE tibero.two_dimensional_array;
Drops the body of an object type. Even if the body is dropped, the specification of the type is not invalidated. Other schema objects dependent upon the specification are not invalidated.
A detailed description of DROP TYPE BODY follows:
-
Syntax

-
Privileges
The user-defined type must be in the user's own schema or the user must have the DROP ANY TYPE system privilege.
-
Components
Component Description schema Name of the schema that contains the user-defined type whose body will be dropped. If not specified, the user's own schema is used. type_name Name of the user-defined type whose body will be dropped. -
Examples
The following example illustrates how to use DROP TYPE BODY:
CREATE TYPE object_type AS OBJECT(
    c1 NUMBER,
    c2 NUMBER,
    MEMBER PROCEDURE print_attribute);
/

CREATE TYPE  BODY object_type
AS
    MEMBER PROCEDURE print_attribute
    AS
    BEGIN
            dbms_output.put_line( 'C1:' || c1 );
            dbms_output.put_line( 'C2:' || c2 );
    END;
END;
/

DROP TYPE BODY object_type;
DROP USER deletes a user.
Note
Refer to “7.45. CREATE USER” or “7.18. ALTER USER” to delete or change a user.
Warning
The SYS user must not be deleted.
A detailed description of DROP USER follows:
-
Syntax
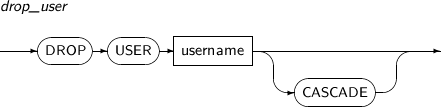
-
Privileges
The DROP USER system privilege is required.
-
Components
Component Description username Specifies the name of the user to be deleted. CASCADE If the user to be deleted owns any objects, the objects will also be deleted.
When attempting to delete a user that owns any objects without specifying CASCADE, an error will occur and the user will not be deleted.
-
Examples
The following example illustrates how to delete a user using DROP USER:
SQL> CREATE USER u1 IDENTIFIED BY 'p1';
User created.

SQL> DROP USER u1;
User dropped.

SQL> CREATE USER u2 IDENTIFIED BY 'p2';
User created.

SQL> GRANT CREATE SESSION TO u2;
Granted.

SQL> GRANT RESOURCE TO u2;
Granted.

SQL> CONN U2/p2
Connected.

SQL> CREATE TABLE t1 (a NUMBER, b NUMBER);
Table created.

SQL> CONN sys/tibero
Connected.

SQL> DROP USER u2;
TBR-7134: cascade is required to remove this user from the system

SQL> DROP USER u2 CASCADE;
User dropped.
When the first user is created, the user has no objects and can be deleted with DROP USER.
When the second user is created, they also create table t1. Therefore, the user owns an object and cannot be deleted using only DROP USER. The user can only be deleted when CASCADE is specified.
DROP VIEW deletes a view.
Other views and synonyms that reference the deleted view will not be deleted, but will be invalidated. If a new view is created that can replace the deleted view, the objects will become valid again.
Note
Refer to “7.46. CREATE VIEW” to create a view.
A detailed description of DROP VIEW follows:
-
Syntax
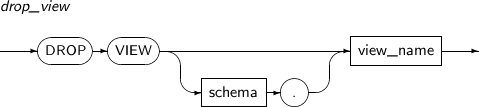
-
Privileges
If the user does not own the schema, the DROP ANY VIEW system privilege is required.
-
Components
Component Description schema Specifies the name of the schema which contains the view to be removed. By default, the schema of the current user will be used. view_name Specifies the name of the view to be removed. -
Examples
The following example illustrates how to delete a view using DROP VIEW:
SQL> DROP VIEW v;
View dropped.
The following example illustrates how to delete a view with DROP VIEW and then create a new view to revalidate the objects which reference the view:
SQL> CREATE TABLE t (a NUMBER, b NUMBER, c NUMBER);
Table created.

SQL> INSERT INTO t VALUES (123, 456, 789);
1 row inserted.

SQL> CREATE VIEW v1 AS SELECT a, b FROM t;
View created.

SQL> CREATE VIEW v2 AS SELECT a FROM v1;
View created.

SQL> select * from v2;
         A
----------
       123

1 row selected.

SQL> DROP VIEW V1;
View dropped.

SQL> SELECT * FROM v2;
TBR-8088: view V2 has errors
at line 1, column 16:
SELECT * FROM v2;


SQL> CREATE VIEW v1 AS SELECT a FROM t;
View created.

SQL> SELECT * FROM v2;
         A
----------
       123

1 row selected.
In the example above, when view v1 is deleted, the view v2, which referenced the view v1, can no longer be used. However, the objects will be validated again by creating a new v1 to replace the deleted view v1, even if the view definition is different.
EXPLAIN PLAN saves the execution plan of an SQL statement to a specified table. By default, the result is saved in the PLAN_TABLE table. If a table with the same schema as PLAN_TABLE is specified, the result can be stored that table.
The EXPLAIN PLAN statement is similar to DML. Therefore, if an SQL statement is executed, auto commit does not occur.
A detailed description of EXPLAIN PLAN follows:
-
Syntax
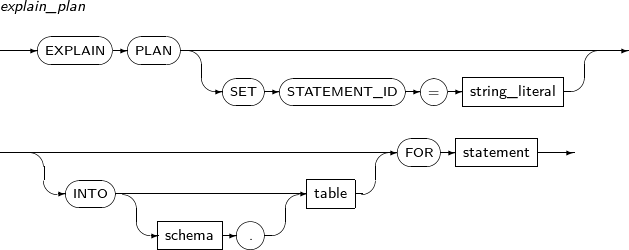
-
Privileges
Write permission to the table where the result will be saved is required.
-
Components
Component Description SET STATEMENT_ID Saves the STATEMENT_ID column to the table where the result will be stored.
This column is used to distinguish the result from those of other execution plans in the table. By default, NULL is inserted.
INTO table Specifies the name of the table where the result will be stored.
The table should exist before executing the EXPLAIN PLAN statement. By default, the current user's schema will be used.
FOR statement Specifies the SQL statement that should be explained. -
Examples
The following example illustrates how to save the result of executing an explain plan via the statement EXPLAIN PLAN:
EXPLAIN PLAN SET STATEMENT_ID = 'Plan Example 1' INTO plan_table
FOR UPDATE employees SET salary = salary * 1.10
    WHERE dept_id = (SELECT dept_id FROM dept WHERE location_id = 1200);
FLASHBACK TABLE restores a table to a specific point in time or recovers a dropped table. It is recommended that a table be restored with a different name so that the original table is not overwritten. The original table can be flashed back to another time in the past.
FLASHBACK TABLE can only restore tables, not the associated indexes, triggers, and constraints. In addition, tables can be flashed back to the time specified by UNDO_RETENTION, but _TSN_TIME_MAP_SIZE must be greater than or equal to UNDO_RETENTION. This value can be set with an option in $TB_SID.tip.
FLASHBACK TABLE cannot restore a table to a point of time before DDL executed. Tables are the only objects that can be flashed back.
The followings are tables that cannot be flashed back.
-
System tables
-
Virtual tables
-
AQ tables
-
Partition tables
-
Tables that belong to a cluster
-
TEMP tables
-
External tables
-
Tables that can be queried using DB links
When recovering a deleted table, set USE_RECYCLEBIN to Y to enable the RECYCLEBIN function.
There are cases when FLASHBACK TABLE cannot be used because objects are not dropped to RECYCLEBIN even if USE_RECYCLEBIN is set to Y. The following are cases when FLASHBACK TABLE cannot be used.
-
When TEMP tables are dropped
-
When objects of the SYS account are dropped.
-
Original tables on which ALTER MOVE was executed.
If a table is deleted with RECYCLEBIN enabled, the names of tables, indexes, triggers, and constraints are changed but the table remains in the recycle bin. However, foreign key constraints related to the table are deleted.
If the RECYCLEBIN function is used, tables in the RECYCLEBIN view can be restored. When a table is restored, the table name can be restored to the previous name or to a new name, but the names of indexes, triggers, and constraints are not restored to their previous names.
A detailed description of FLASHBACK TABLE follows:
-
Syntax
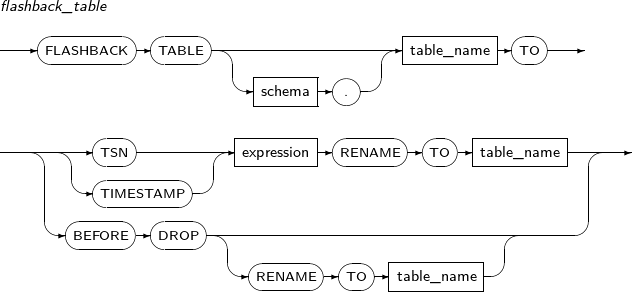
-
Privileges
The DROP_ANY_TABLE privilege is required to restore a deleted table.
-
Components
Component Description schema Specifies the name of the schema which includes the table to be restored. By default, the schema of the current user is used. table_name Specifies the name of the table to be restored.
Specify the original name of the table or the system-generated recycle bin object name.
If there are multiple tables with the same original name in the recycle bin, the most recently dropped table is restored.
This command recovers the latest copy of the table.
TSN Restores to a specific TSN. TIMESTAMP Restores to a specific TIMESTAMP. expression Specifies the clause required to recover a table using TSN and TIMESTAMP. TSN indicates a specific point of TSN, and TIMESTAMP indicates a specific time. BEFORE DROP Recovers a deleted table. This clause is only used in conjunction with the RENAME to table_name statement. RENAME TO table_name Renames the table when restoring it from the recycle bin. This clause is necessary when the original name is already being used by another table. -
Examples
The following example illustrates how to recover a table using FLASHBACK TABLE.
SQL> ALTER SYSTEM SET USE_RECYCLEBIN=Y;
System altered.

SQL> CREATE TABLE t (a NUMBER);
Table 'T' created.

SQL> INSERT INTO t values (1);
1 row inserted.

SQL> COMMIT;
Commit completed.

SQL> SELECT * FROM t;
          A
-----------
          1
1 row selected.

SQL> SELECT CURRENT_TSN FROM V$DATABASE;
CURRENT_TSN
-----------
      68887
1 row selected.

SQL> EXEC DBMS_LOCK.SLEEP(30);
PSM completed.

SQL> INSERT INTO t values (2);
1 row inserted.

SQL> COMMIT;
Commit completed.

SQL> SELECT * FROM t;
          A
-----------
          1
          2
2 rows selected.

SQL> FLASHBACK TABLE t TO SCN 68887 RENAME TO t_scn;
Flashbacked.

SQL> SELECT * FROM t_scn;
          A
-----------
          1
1 row selected.

SQL> FLASHBACK TABLE t TO TIMESTAMP (SYSTIMESTAMP - INTERVAL '1' MINUTE)
   2 RENAME TO t_timestamp;
Flashbacked.

SQL> SELECT * FROM t_timestamp;
          A
-----------
          1
1 row selected.

SQL> DROP TABLE t;
Table 'T' dropped.

SQL> SELECT * FROM t;  -- This table is removed.
TBR-8033: Specified schema object was not found.
at line 1, column 16:
SELECT * FROM t

SQL> FLASHBACK TABLE t TO BEFORE DROP RENAME TO t2;
Flashbacked.

SQL> SELECT * FROM t2;

         A
----------
         1

1 row selected.
GRANT grants a system privilege, schema object privilege, or role to a general user, PUBLIC user, or role.
Note
Refer to “7.75. REVOKE” to retrieve a granted privilege or role.
Refer to “7.37. CREATE ROLE”, “7.11. ALTER ROLE”, and “7.58. DROP ROLE” to create, change, or delete a role.
A detailed description of GRANT follows:
-
Syntax
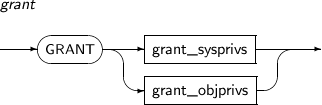
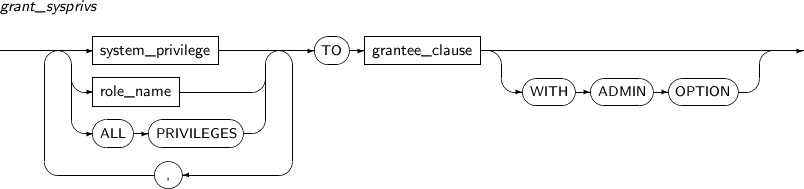
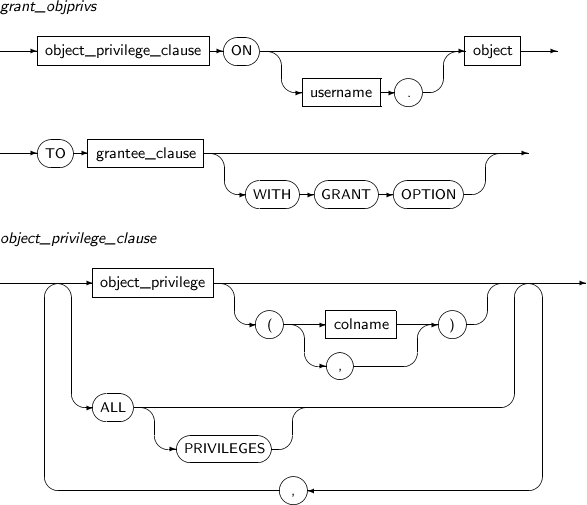
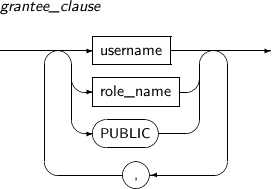
-
Privileges
To grant a privilege or authority using GRANT, a user must have the corresponding privilege or authority.
Component Description System Privilege To grant a system privilege, a user must have been granted the system privilege with the GRANT statement. However, not all system privileges can be granted. Only privileges that a user received using WITH ADMIN OPTION can be granted.
If a user has the GRANT ANY PRIVILEGE system privilege, they can grant any system privilege.
Role As with system privileges, a user can only grant a role using the GRANT statement if the user created the role or if the role was granted to the user using WITH ADMIN OPTION.
If a user has the GRANT ANY ROLE system privilege, they can grant any role.
Schema Object Privilege A user can only grant a schema object privilege if the user owns the object or if the user was granted the schema object privilege using WITH GRANT OPTION.
If user has the GRANT ANY OBJECT PRIVILEGE system privilege, they can grant any role.
-
Components
-
grant
Component Description grant_sysprivs Grants a system privilege or role. grant_objprivs Grants a schema object privilege. -
grant_sysprivs
Component Description system_privilege Specifies a system privilege. For detailed information about the types of system privileges, refer to the following "System Privilege Table". role_name Specifies a role. For detailed information about roles, refer to “7.37. CREATE ROLE”, “7.11. ALTER ROLE”, and “7.58. DROP ROLE”. ALL PRIVILEGES Grants all available system privileges. Only a user who has the GRANT ANY PRIVILEGE system privilege can use the ALL PRIVILEGES clause.
For detailed information about system privileges that can be granted, refer to the following table.
TO grantee_clause Specifies the target for which the privilege or role will be granted. The available targets are normal users, PUBLIC users, and roles. Note that if a user grants a privilege or role to a PUBLIC user, all users can access it. WITH ADMIN OPTION System privileges and roles can be divided into two types: the Use Privilege, which enables a user to use the corresponding privilege or role, and the Admin Privilege, which enables a user to grant the corresponding privilege to others.
When a user grants a system privilege or role by specifying WITH ADMIN OPTION, they are granting both the Use Privilege and Admin Privilege.
Without WITH ADMIN OPTION, a user can only use a privilege or role; they cannot grant it. When the GRANT ANY PRIVILEGE system privilege is granted to a user, the user is allowed to grant system privileges that are owned by other users. The GRANT ANY ROLE system privilege allows the same for roles.
Note that if an Admin Privilege, which enables granting the corresponding privilege or role to other users, is given to a user using WITH ADMIN OPTION, the granting user cannot revoke the Admin Privilege without revoking the Use Privilege. Therefore, revoke the granted system privilege or role, and then grant the corresponding system privilege or role again without using WITH ADMIN OPTION.
-
object_objprivs
Component Description object_privilege_clause Specifies a schema object privilege. (username.)object Specifies the target for a schema object privilege. If username is omitted, the user's own schema will be used.
If the target is a synonym, the base object of the synonym will be used. That is, granting or revoking a schema object privilege for a synonym is the same as granting or revoking the privilege for the base object of the synonym.
TO grantee_clause Identifies the object to which the privilege or role will be granted. The available targets are normal users, roles, and PUBLIC users. WITH GRANT OPTION Similar to the WITH ADMIN OPTION option for system privileges. When a user grants a schema object privilege to another user, they are enabling the grantee to use WITH GRANT OPTION.
One major difference exists between WITH GRANT OPTION and WITH ADMIN OPTION: If user A grants a schema object privilege to user B, if user A subsequently has that schema object privilege revoked, user B will also have their privilege revoked.
As with system privileges, a user can grant any object schema privilege for objects in their own schema.
When the GRANT ANY PRIVILEGE system privilege is granted to a user, the user is allowed to grant system privileges that are owned by other users. The GRANT ANY ROLE system privilege allows the same for roles.
WITH GRANT OPTION can only be used for users, not roles.
-
object_privilege_clause
Component Description object_privilege Specifies a schema object privilege. For detailed information about the types of schema object privileges, refer to the following table. colname Schema object privileges allow for more fine-grained control than system privileges. A user can selectively grant object privileges for certain columns of an object.
If a user only wants to grant schema object privileges for certain columns, list the column names.
However, not all schema object privileges can be granted for every column. Only INSERT, REFERENCES, and UPDATE can be granted for certain columns.
ALL PRIVILEGES Grants all available schema object privileges. Only a user who has the GRANT ANY PRIVILEGE system privilege can use the ALL PRIVILEGES clause. -
grantee_clause
Component Description user_name Specifies the target user for the schema object privilege. role_name Specifies the target role for the schema object privilege. PUBLIC Specifies the target PUBLIC user for the schema object privilege.
Note that when a privilege or role is granted to a PUBLIC user, all users can access it.
-
-
Examples
-
grant_sysprivs
The following example illustrates how to create a user and grant the CREATE SESSION system privilege to the user by specifying the privilege in system_privilege:
SQL> CONN sys/tibero
Connected.

SQL> CREATE USER u1 IDENTIFIED BY 'a';
User created.

SQL> SELECT grantee, privilege FROM dba_sys_privs
     WHERE grantee='U1';

GRANTEE                    PRIVILEGE
-------------------------- ------------------------------------

0 row selected.

SQL> GRANT CREATE SESSION TO u1;
Granted.

SQL> SELECT grantee, privilege FROM dba_sys_privs
     WHERE grantee='U1';

GRANTEE                    PRIVILEGE
-------------------------- ------------------------------------
U1                         CREATE SESSION

1 row selected.
When a new user is created, the user typically has no privileges. The user needs the CREATE SESSION system privilege to access the database. The example above shows how the CREATE SESSION system privilege is granted to the created user.
The following example illustrates how to grant the RESOURCE role to the created user U1 by specifying the role in role_name:
SQL> SELECT grantee, granted_role FROM dba_role_privs
     WHERE grantee='U1';

GRANTEE                        GRANTED_ROLE
------------------------------ ------------------------------

0 row selected.

SQL> SELECT * FROM dba_roles;

ROLE                           PAS
------------------------------ ---
DBA                            NO
CONNECT                        NO
RESOURCE                       NO

3 rows selected.

SQL> GRANT RESOURCE TO u1;
Granted.

SQL> SELECT grantee, granted_role FROM dba_role_privs
     WHERE grantee='U1';

GRANTEE                        GRANTED_ROLE
------------------------------ ------------------------------
U1                             RESOURCE

1 row selected.
The RESOURCE role is a basic role. It is created automatically when a database is created.
The following example illustrates how to show the basic system privilege to create schema objects:
SQL> SELECT grantee, privilege FROM dba_sys_privs
     WHERE grantee='RESOURCE';

GRANTEE                    PRIVILEGE
-------------------------- ------------------------------------
RESOURCE                   CREATE TABLE
RESOURCE                   CREATE SEQUENCE
RESOURCE                   CREATE PROCEDURE
RESOURCE                   CREATE TRIGGER

4 rows selected.
The following example illustrates how to grant all system privileges using ALL PRIVILEGE:
SQL> GRANT ALL PRIVILEGES TO u1;
Granted.

SQL> SELECT grantee, privilege FROM dba_sys_privs
     WHERE grantee='u1';

GRANTEE                    PRIVILEGE
-------------------------- ------------------------------------
U1                         ALTER SYSTEM
U1                         CREATE SESSION
U1                         ALTER SESSION
U1                         CREATE TABLESPACE
U1                         ALTER TABLESPACE
U1                         DROP TABLESPACE
U1                         CREATE USER
U1                         ALTER USER
...
The following example illustrates how to create a role and grant the CREATE SESSION system privilege to the role:
SQL> CREATE ROLE aaa;
Role created.

SQL> GRANT CREATE SESSION TO aaa;
Granted.

SQL> SELECT grantee, privilege FROM dba_sys_privs
     WHERE grantee='AAA';

GRANTEE                    PRIVILEGE
-------------------------- ------------------------------------
AAA                        CREATE SESSION

1 row selected.
The above example creates a role named aaa and grants the CREATE SESSION system privilege to the role. Granting a privilege to a role is the same as granting a privilege to a user.
It is also possible to grant a role to another role. However, as shown in the example below, a circular relationship is not permitted between roles.
SQL> CREATE ROLE aaa;
Role created.

SQL> CREATE ROLE bbb;
Role created.

SQL> GRANT aaa TO bbb;
Granted.

SQL> GRANT bbb TO aaa;
TBR-7173: circular role grant detected
The following example illustrates the difference between using WITH ADMIN OPTION and not using it.
SQL> CREATE USER u2 IDENTIFIED BY xxx;
User created.

SQL> CREATE USER u3 IDENTIFIED BY zzz;
User created.

SQL> GRANT CREATE SESSION TO u2;
Granted.

SQL> GRANT CREATE TABLE TO u2 WITH ADMIN OPTION;
Granted.

SQL> SELECT grantee, privilege, admin_option
     FROM dba_sys_privs WHERE grantee='u2';

GRANTEE                PRIVILEGE                        ADM
---------------------- -------------------------------- ---
U2                     CREATE SESSION                   NO
U2                     CREATE TABLE                     YES

2 rows selected.

SQL> CONN u2/xxx
Connected.

SQL> GRANT CREATE SESSION TO u3;
TBR-17004: get authorization for this action first.

SQL> GRANT CREATE TABLE TO u3;
Granted.
The above example creates users u2 and u3 and assigns the CREATE SESSION system privilege to u2. The CREATE SESSION system privilege is granted to user u2, and the CREATE TABLE system privilege is also granted using WITH ADMIN OPTION.
When the example connects to the database as user u2, the CREATE TABLE system privilege, which was granted by using WITH ADMIN OPTION, can be granted to the user u3, but the CREATE SESSION system privilege cannot be granted.
-
grant_objprivs
The following example illustrates how to grant a schema object privilege to users by specifying the schema object privilege in object_privilege:
SQL> CREATE USER u5 IDENTIFIED BY xxx;
User created.

SQL> GRANT CONNECT,RESOURCE TO u5;
Granted.

SQL> CREATE USER u6 IDENTIFIED BY zzz;
User created.

SQL> GRANT CONNECT TO u6;
Granted.

SQL> CONN u5/xxx
Connected.

SQL> CREATE TABLE t1 (a NUMBER, b NUMBER, c NUMBER);
Table created.

SQL> INSERT INTO t1 VALUES (1, 2, 3);
1 row inserted.

SQL> SELECT * FROM t1;
         A          B          C
---------- ---------- ----------
         1          2          3

1 row selected.

SQL> GRANT SELECT ON t1 TO u6;
Granted.

SQL> CONN u6/zzz
Connected.

SQL> SELECT * FROM u5.t1;
         A          B          C
---------- ---------- ----------
         1          2          3

1 row selected.
In the example above, users u5 and u6 are created. The privilege that allows a user to both access the database and create schema objects is granted to user u5, and only the privilege to access the database is given to user u6.
The example connects to the database as user u5 and creates a table using the CREATE TABLE command. Then, the example inserts some data and grants the query privilege to user u6 for the created table so that u6 can execute a query statement on it.
If user u5 had not granted this privilege to u6, the following error would occur:
SQL> SELECT * FROM u5.t1;
TBR-8033: schema object does not exist
at line 1, column 16:
SELECT * FROM u5.t1;
The following example illustrates how to specify privileges for individual columns:
SQL> CONN u5/xxx;
Connected.

SQL> GRANT INSERT (a, b), UPDATE (a, b) ON t1 TO u6;
Granted.

SQL> CONN u6/zzz
Connected.

SQL> INSERT INTO u5.t1 VALUES (100, 200, 300);
TBR-8053: not enough privilege

SQL> INSERT INTO u5.t1(a, b) VALUES (100, 200);
1 row inserted.

SQL> SELECT * FROM u5.t1;
         A          B          C
---------- ---------- ----------
       100        200
         1          2          3

2 rows selected.

SQL> UPDATE u5.t1 SET c=100 WHERE a=100;
TBR-8053: not enough privilege

SQL> UPDATE u5.t1 SET a=11 WHERE a=100;
1 row updated.

SQL> SELECT * FROM u5.t1;
         A          B          C
---------- ---------- ----------
        11        200
         1          2          3

2 rows selected.
In the above example, user u5 grants the INSERT and UPDATE privileges for columns A and B of u5's table t1 to user u6. User u6 can then insert or update columns A and B of u5's table t1. If u6 tries to insert or update other columns, such as column C in the example above, the TBR-8053: not enough privilege error will occur.
The following example illustrates how to grant all available schema object privileges that a user can grant using GRANT ALL:
SQL> CONN u5/xxx
Connected.

SQL> CREATE TABLE t2 (c1 NUMBER, c2 NUMBER);
Table created.

SQL> GRANT ALL ON t2 TO u6;
Granted.

SQL> CONN u6/zzz
Connected.

SQL> SELECT owner, table_name, privilege
     FROM user_tbl_privs WHERE table_name='T2';

OWNER            TABLE_NAME       PRIVILEGE
---------------- ---------------- ---------------------
U5               T2               ALTER
U5               T2               DELETE
U5               T2               INDEX
U5               T2               INSERT
U5               T2               SELECT
U5               T2               UPDATE
U5               T2               REFERENCES

7 rows selected.
The following example illustrates how to grant a privilege for a synonym:
SQL> CONN sys/tibero
Connected.

SQL> GRANT CREATE SYNONYM TO u5;
Granted.

SQL> CONN u5/xxx
Connected.

SQL> CREATE TABLE t3 (c1 NUMBER, c2 NUMBER);
Table created.

SQL> CREATE SYNONYM s3 FOR t3;
Synonym created.

SQL> GRANT SELECT, INSERT ON s3 TO u6;
Granted.

SQL> CONN u6/zzz
Connected.

SQL> INSERT INTO u5.t3 VALUES (1, 2);
1 row inserted.

SQL> SELECT * FROM u5.s3;
        C1         C2
---------- ----------
         1          2

1 row selected.

SQL> SELECT owner, table_name, privilege
     FROM user_tbl_privs WHERE table_name='t3';

OWNER            TABLE_NAME       PRIVILEGE
---------------- ---------------- --------------------------
U5               T3               INSERT
U5               T3               SELECT

2 rows selected.

SQL> SELECT owner, table_name, privilege
     FROM user_tbl_privs WHERE table_name='s3';

OWNER            TABLE_NAME       PRIVILEGE
---------------- ---------------- --------------------------

0 row selected.
In the example above, user u5 creates a new table t3, and then creates a synonym s3 for the table t3. Then, u5 grants the SELECT and INSERT privileges for synonym s3 to user u6. The user u6 now has these privileges for table t3, which the synonym represents. User u6 can now insert and select from table t3 directly.
-
grantee_clause
The following example illustrates how to grant a schema object privilege to a PUBLIC user:
SQL> CONN sys/tibero
Connected.

SQL> CREATE PUBLIC SYNONYM s1 FOR u5.t1;
Synonym created.

SQL> GRANT SELECT ON s1 TO PUBLIC;
Granted.

SQL> SELECT owner, table_name, privilege
     FROM dba_tbl_privs
     WHERE grantee='PUBLIC' AND owner='U5';

OWNER            TABLE_NAME       PRIVILEGE
---------------- ---------------- --------------------------
U5               T1               SELECT

1 row selected.

SQL> CREATE USER u7 IDENTIFIED BY aaa;
User created.

SQL> GRANT CONNECT TO u7;
Granted.

SQL> CONN u7/aaa
Connected.

SQL> SELECT * FROM s1;
         A          B          C
---------- ---------- ----------
        11        200
         1          2          3

2 rows selected.
In the example above, a schema object privilege is granted to a PUBLIC user. Granting an object privilege to a PUBLIC user is used to give a privilege for a public synonym, which is usually created using the CREATE SYNONYM statement. Granting an object privilege to a PUBLIC user for any other purpose must be done with care due to security concerns.
The following example illustrates how to use WITH GRANT OPTION:
SQL> CONN u5/xxx
Connected.

SQL> CREATE TABLE t4 (c1 NUMBER, c2 NUMBER);
Table created.

SQL> GRANT SELECT ON t4 TO u6 WITH GRANT OPTION;
Granted.

SQL> GRANT INSERT ON t4 TO u6;
Granted.

SQL> CONN u6/zzz
Connected.

SQL> SELECT owner, table_name, privilege, grantable
     FROM user_tbl_privs WHERE table_name='T4';

OWNER            TABLE_NAME       PRIVILEGE                GRA
---------------- ---------------- ------------------------ ---
U5               T4               INSERT                   NO
U5               T4               SELECT                   YES

2 rows selected.

SQL> INSERT INTO u5.t4 VALUES(1, 2);
1 row inserted.

SQL> SELECT * FROM u5.t4;
        C1         C2
---------- ----------
         1          2

1 row selected.

SQL> GRANT INSERT ON u5.t4 TO u7;
TBR-17004: get authorization for this action first.

SQL> GRANT SELECT ON u5.t4 TO u7;
Granted.

SQL> CONN U7/aaa;
Connected.

SQL> SELECT * FROM u5.t4;
        C1         C2
---------- ----------
         1          2

1 row selected.
The example above shows the purpose of WITH GRANT OPTION. As with WITH ADMIN OPTION for system privileges, the query access privilege that u5 granted to u6 using WITH GRANT OPTION can also be granted to u7 by u6. However, the row INSERT privilege that was granted to user u6 without WITH GRANT OPTION cannot be granted to user u7.
The following example illustrates the difference between WITH ADMIN OPTION and WITH GRANT OPTION:
SQL> CONN u5/xxx
Connected.

SQL> REVOKE ALL ON u4 FROM u6;
Revoked.

SQL> CONN u7/aaa
Connected.

SQL> SELECT * FROM u5.t4;
TBR-8053: not enough privilege
at line 1, column 16:
SELECT * FROM u5.t4;
When a privilege that used WITH GRANT OPTION is revoked from a user, all privileges that same user granted to other users are also revoked. When the schema object privilege for table t4, which was granted to user u6, is revoked, the schema object privilege, which the user u6 granted to user u7, will also be revoked. Therefore, user u7 will no longer be able to perform SELECT on table t4 of user u5.
-
System Privilege
The following is the table of system privileges:
Schema Object Privilege
The following is a table of schema object privileges:
Schema Object Privilege
The objects that can have a schema object privilege are tables, views, and sequences. The following table shows what kinds of object privileges can be defined:
| Schema Object Privilege | Tables | Views | Sequences | PSM Programs (Procedure, Function, etc.) | Directories |
|---|---|---|---|---|---|
| SELECT | O | O | O | ||
| INSERT | O | O | |||
| ALTER | O | O | |||
| UPDATE | O | O | |||
| DELETE | O | O | |||
| TRUNCATE | O | ||||
| EXECUTE | O | ||||
| INDEX | O | ||||
| REFERENCES | O | O | |||
| READ | O | ||||
| WRITE | O |
Locks one or more tables, table partitions, and table subpartitions in a specific mode. LOCK TABLE has a higher priority than automatic locking due to the DML operation. When performing an operation, LOCK TABLE controls access to a table by other users.
A locked table is not released until the transaction is committed or rolled back. A table inquiry operation does not require a table to be locked, so table inquiries by other users are not denied even when the table is locked.
A detailed description of LOCK TABLE follows:
-
Syntax
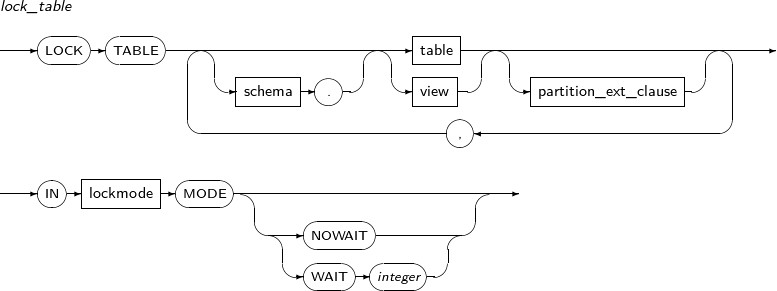
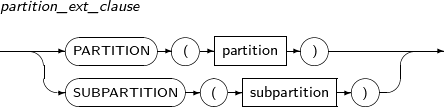
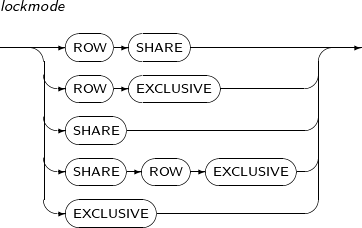
-
Privileges
To lock a table in the schema of the user, no special privileges are required. However, to lock a table in the schema of another user, the LOCK ANY TABLE system privilege is required.
-
Components
-
lock_table
Component Description schema Schema name that contains the table to be locked. If unspecified, user's schema is used. table, view Name of the table or view to be locked. partition_ext_clause Partition or subpartition to be locked. lockmode MODE Lock mode. NOWAIT If a table cannot be locked because it is locked by another user, a failure occurs without waiting for the lock to be released. WAIT integer If a table cannot be locked because it is locked by another user, waits a specified period of time for the lock to be released. If the lock is not released within the specified period (seconds), a failure occurs.
-
partition_ext_clause
Component Description partition Name of the table partition to be locked. subpartition Name of the table subpartition to be locked. -
lockmode
Component Description ROW SHARE Allows concurrent access to a table. Prevents users from locking the table for exclusive access. ROW EXCLUSIVE Similar to ROW SHARE but prohibits locking in SHARE mode.
This mode is set automatically when performing UPDATE, INSERT, or DELETE.
SHARE Concurrent inquiries are possible but prohibits modifications to the table. SHARE ROW EXCLUSIVE Used to look at a whole table. Allows other users to look at a table, but prohibits users from locking in SHARE mode or modifying the table.
EXCLUSIVE Only permits queries on the locked table. Prohibits all other operations.
-
-
Examples
The following example illustrates how to lock a table using LOCK TABLE:
LOCK TABLE table_exmp IN EXCLUSIVE MODE NOWAIT;

LOCK TABLE table_exmp PARTITION (part_exmp1) IN SHARE MODE WAIT 3;
NOAUDIT stops the audit of a system or schema object privilege.
Note
Refer to “7.20. AUDIT” for details of audit privileges.
A detailed description of NOAUDIT follows:
-
Syntax
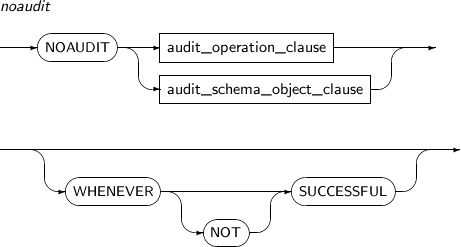
-
Privileges
-
The AUDIT SYSTEM system privilege is required to stop auditing system privileges.
-
To stop auditing schema objects or directory objects owned by other users, the AUDIT ANY system privilege is required.
-
-
Components
-
noaudit
Component Description audit_operation_clause Disables auditing a system privilege. audit_schema_object_clause Disables auditing a specific object. WHENEVER SUCCESSFUL Disables auditing depending on the success or failure of a command.
Disables auditing when a command is performed successfully.
By default, auditing is disabled regardless of success or failure.
WHENEVER NOT SUCCESSFUL Disables auditing when a command fails.
By default, auditing is disabled regardless of success or failure.
-
audit_operation_clause
Component Description system_privilege Disables auditing a system privilege.
Refer to the table in “7.70. GRANT” for the types if system privileges.
ALL PRIVILEGES Disables auditing all system privileges. BY user_name Disables auditing for a specific user. By default, it is applied to all users. -
audit_schema_object_clause
Component Description object_privilege Disables auditing a schema object privilege.
Refer to the table in “7.70. GRANT” for the types of schema object privileges.
ALL Disables auditing all schema object privileges that can be used for the corresponding object. Refer to the table in “7.70. GRANT” for the schema object privileges available for each object type.
ON Disables auditing a specific object. schema Specifies the schema which includes the object chosen for auditing. By default, the schema of the current user will be used. object_name Specifies the name of a non-directory object. DIRECTORY dir_name Specifies the name of a directory object.
-
-
Examples
-
noaudit
The following example illustrates how to disable auditing when the command is performed successfully by specifying WHENEVER SUCCESSFUL:
SQL> NOAUDIT delete ON t WHENEVER SUCCESSFUL;
Noaudited.
-
audit_operation_clause
The following example illustrates how to disable auditing a user using BY user_name:
SQL> NOAUDIT create table BY tibero; Noaudited. -
audit_schema_object_clause
The following example illustrates how to disable auditing an object using ON:
SQL> NOAUDIT insert ON t;
Noaudited.
-
Purge deletes schema objects that are included in RECYCLEBIN view. A deleted schema object can be recovered using FLASHBACK TABLE statement.
The following queries will return all schema objects in the RECYCLEBIN view:
SELECT * FROM RECYCLEBIN;

SELECT * FROM USER_RECYCLEBIN;
A detailed description of PURGE follows:
-
Syntax
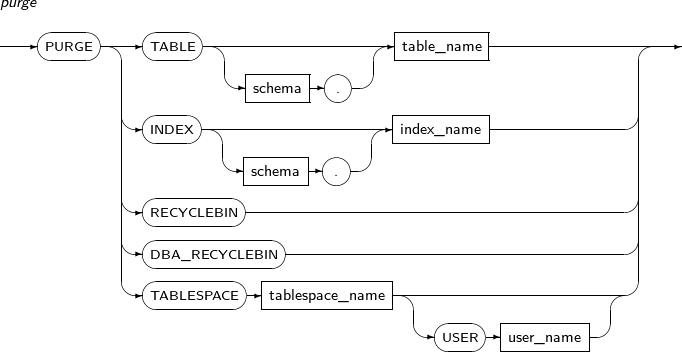
-
Privileges
-
The privilege to delete tables and indexes is required.
-
To execute the PURGE DBA_RECYCLEBIN statement, the SYSDBA privilege is required.
-
-
Components
Component Description TABLE table_name Deletes a table from the recycle bin. Either the original name or the system-generated name can be specified in this clause. If multiple tables with the same name exist in the RECYCLEBIN view, and if the original name is specified, the oldest table will be deleted. INDEX index_name Deletes an index from the recycle bin. Either the original name or the system-generated name can be specified in this clause. If multiple indexes with the same name exist in the RECYCLEBIN view, and if the original name is specified, the oldest index will be deleted. RECYCLEBIN Deletes all objects in the USER_RECYCLEBIN view from the recycle bin. DBA_RECYCLEBIN Deletes all objects in the DBA_RECYCLEBIN view from the recycle bin. TABLESPACE tablespace_name USER user_name Deletes an object which exists in a certain tablespace from the recycle bin. If the USER clause is specified, only that user's objects will be deleted from the tablespace. -
Examples
The following example illustrates how to delete a table from the recycle bin using PURGE:
SQL> ALTER SYSTEM SET USE_RECYCLEBIN=Y;
System altered.

SQL> CREATE TABLE t (a NUMBER);
Table 'T' created.

SQL> DROP TABLE t;
Table 'T' dropped.

SQL> PURGE TABLE t;
Purged.
RENAME changes the name of a table, view, or synonym. A user can only rename objects that they own.
Associated constraints, indexes, and privileges will be also renamed along with the object. Views, functions, and procedures which reference the changed object will be immediately invalidated.
A detailed description of RENAME follows:
-
Syntax

-
Privileges
No privileges are required to use RENAME.
-
Components
Component Description old_name Specifies the name of the object to be changed. new_name Specifies the new name for the object to be changed. -
Examples
The following example illustrates how to change a user name using RENAME:
RENAME emp TO employee;
REVOKE revokes a system privilege, schema object privilege, or role from a general user, PUBLIC user, or role.
Note
Refer to “7.70. GRANT” to grant a privilege or role.
Refer to “7.37. CREATE ROLE”, “7.11. ALTER ROLE”, or “7.58. DROP ROLE” to create, change, or remove a role.
A detailed description of REVOKE follows:
-
Syntax
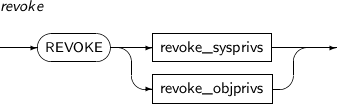
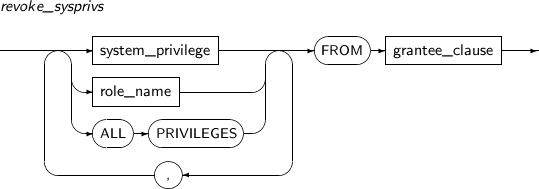

-
Privileges
Different privileges are required to revoke each privilege or authority:
Target to be Revoked Description System Privilege To revoke a system privilege, a user needs the privilege that allows them to manage the system privilege in addition to the system privilege itself.
If a user has the GRANT ANY PRIVILEGE system privilege, the user can revoke any system privilege.
That is, any system privilege granted to a user using GRANT can also be revoked through REVOKE.
Role As with system privileges, revoking is only possible if the user created the role or was given the role using WITH ADMIN OPTION.
If a user has the GRANT ANY PRIVILEGE system privilege, the user can revoke any role.
That is, if a user can grant a role using GRANT, they can also revoke it using REVOKE.
Schema Object Privilege Revoking a system object privilege differs slightly from revoking a privilege or role. A user can only revoke schema object privileges that they granted.
Even if an object privilege is for an object in the user's own schema, if that user didn't grant the object privilege, they cannot revoke it.
If a user has the GRANT ANY OBJECT PRIVILEGE system privilege, the user can revoke any object privilege.
If an object privilege was granted from a user with the GRANT ANY OBJECT PRIVILEGE system privilege and that user didn't have an object privilege specially for that object, the object owner can revoke the privilege.
A user's privilege cannot be revoked using REVOKE if either of the following are true:
-
The privilege or role has not been granted to the user.
-
The privilege or role has been granted to the user by another role.
-
-
Components
-
revoke
Component Description revoke_sysprivs Revokes a system privilege or role. grant_objprivs Revokes a schema object privilege. -
revoke_sysprivs
Component Description system_privilege Specifies a system privilege. Refer to the table in “7.70. GRANT” for the types of system privileges. role_name Specifies a role. For detailed information on roles, refer to “7.37. CREATE ROLE”, “7.11. ALTER ROLE”, and “7.58. DROP ROLE”. ALL PRIVILEGES Revokes all available system privileges. This is used to revoke privileges from a user with all system privileges. If this clause is used for a user who only has some system privileges, an error occurs. FROM grantee_clause Specifies the target from whom the privilege or role will be revoked. Available targets are normal users, PUBLIC users, and roles. -
grant_objprivs
Component Description object_privilege Specifies a schema object privilege. Refer to the table in “7.70. GRANT” for the types of system privileges. Unlike granting a privilege, a user can revoke a privilege for an object even if the object privilege was granted at the column level. ALL (PRIVILEGES) Revokes all privileges granted for an object. Unlike system privileges, this clause will find and remove all privileges granted to the user for an object, even if the user does not have all privileges for the object.
Even when the USE_TRUNCATE_PRIVILEGE parameter is off, revokes the TRUNCATE object privilege.
(username.)object Specifies the object for a schema object privilege. If username is omitted, objects in the user's own schema will be used.
If the object is a synonym, the base object of the synonym will be used instead. That is, granting or revoking a schema object privilege for the synonym is the same as granting or revoking the privilege for the base object of the synonym.
FROM grant_clause Specifies the target from whom the object privilege will be revoked. Available targets are normal users, PUBLIC users, and roles. Unless a user has the WITH ANY OBJECT PRIVILEGE system privilege, only schema object privileges granted by the user can be revoked. CASCADE CONSTRAINTS This clause is used when the REFERENCES object privilege is revoked. It is also used when the REFERENCES schema object privilege was previously given and the user attempts to revoke all schema object privileges that are granted by ALL (PRIVILEGES).
When this clause is used, all referential integrity constraints that the revokee has defined using the REFERENCES object privilege are removed, and then the privilege is revoked.
If referential integrity constraints were created and a user attempts to revoke the REFERENCES privilege without using the CASCADE CONSTRAINTS clause, an error will occur.
-
grantee_clause
Component Description user_name Specifies a normal user from whom the schema object privilege will be revoked. role_name Specifies a role from which the schema object privilege will be revoked. PUBLIC Specifies a PUBLIC user from whom the schema object privilege will be revoked.
-
-
Examples
-
revoke_sysprivs
The following illustrates how to grant and revoke the CREATE SESSION system privilege from a user by specifying system_privilege:
SQL> CONN sys/tibero
Connected.

SQL> CREATE USER u1 IDENTIFIED BY a;
User created.

SQL> GRANT CREATE SESSION TO u1;
Granted.

SQL> SELECT grantee, privilege FROM dba_sys_privs
     WHERE grantee='U1';

GRANTEE                        PRIVILEGE
------------------------------ --------------
U1                             CREATE SESSION

1 row selected.

SQL> REVOKE CREATE SESSION FROM u1;
Revoked.

SQL> SELECT grantee, privilege FROM dba_sys_privs
     WHERE grantee='U1';

GRANTEE                        PRIVILEGE
------------------------------ ---------

0 row selected.
The following illustrates how to revoke the basic role, CONNECT, granted to the user u1 by specifying it in role_name.
SQL> SELECT role FROM dba_roles;
ROLE
------------------------------
DBA
CONNECT
RESOURCE

3 rows selected.

SQL> GRANT CONNECT TO u1;
Granted.

SQL> SELECT grantee, granted_role FROM dba_role_privs
     WHERE grantee='U1';

GRANTEE                        GRANTED_ROLE
------------------------------ ------------------------------
U1                             CONNECT

1 row selected.

SQL> REVOKE CONNECT FROM u1;
Revoked.

SQL> SELECT grantee, granted_role FROM dba_role_privs
     WHERE grantee='U1';

GRANTEE                        GRANTED_ROLE
------------------------------ ------------------------------

0 row selected.
The following illustrates how to grant and revoke all system privileges using ALL PRIVILEGES:
SQL> GRANT ALL PRIVILEGES TO u1;
Granted.

SQL> REVOKE ALL PRIVILEGES FROM u1;
Revoked.

SQL> GRANT ALL PRIVILEGES TO u1;
Granted.

SQL> REVOKE CREATE SESSION FROM u1;
Revoked.

SQL> REVOKE ALL PRIVILEGES FROM u1;
TBR-7172: cannot revoke privilege you did not grant

SQL> GRANT CREATE SESSION TO u1;
Granted.

SQL> REVOKE ALL PRIVILEGES FROM u1;
Revoked.
When a system privilege is revoked using the ALL PRIVILEGES clause, the user or role must have all system privileges to perform the task successfully. The above example shows TBR-7172: cannot revoke privilege you did not grant which occurs when a system privilege is revoked using ALL PRIVILEGES clause from a user who does not have all system privileges.
The following illustrates how to create a role r, and then grant and revoke the basic role CONNECT and the system privilege CREATE SESSION:
SQL> CONN sys/tibero Connected. SQL> CREATE ROLE r1; Created. SQL> GRANT CONNECT, CREATE TABLE TO r1; Granted. SQL> SELECT grantee, granted_role FROM dba_role_privs WHERE grantee='R1'; GRANTEE GRANTED_ROLE ------------------------------ ------------------------------ R1 CONNECT 1 row selected. SQL> SELECT grantee, privilege FROM dba_sys_privs WHERE grantee='R1'; GRANTEE PRIVILEGE ------------------------------ ------------------------------ R1 CREATE TABLE 1 row selected. SQL> REVOKE CONNECT, CREATE TABLE FROM r1; Revoked. SQL> SELECT grantee, granted_role FROM dba_role_privs WHERE grantee='R1'; GRANTEE GRANTED_ROLE ------------------------------ ------------------------------ 0 row selected. SQL> SELECT grantee, privilege FROM dba_sys_privs WHERE grantee='R1'; GRANTEE PRIVILEGE ------------------------------ ------------------------------ 0 row selected. -
revoke_objprivs
The following illustrates a user u1 creating table t1, granting the schema object privilege for the table to user u2, and then revoking the privilege:
SQL> CONN sys/tibero
Connected.

SQL> -- Create user.
SQL> CREATE USER u1 IDENTIFIED BY a;
User created.

SQL> CREATE USER u2 IDENTIFIED BY a;
User created.

SQL> CREATE USER u3 IDENTIFIED BY a;
User created.

SQL> -- Grant a role to the user.
SQL> GRANT CONNECT, RESOURCE, DBA TO u1;
Granted.

SQL> GRANT CONNECT, RESOURCE TO u2;
Granted.

SQL> -- Change to user U1.
SQL> CONN u1/a
Connected.

SQL> -- Create a table for a test.
SQL> CREATE TABLE t1 (c1 NUMBER, c2 NUMBER, c3 NUMBER);
Table created.

SQL> -- Grant the schema object privilege to the user U2, and then check.
SQL> GRANT SELECT ON t1 to u2;
Granted.

SQL> GRANT INSERT (c1, c2), UPDATE (c1) ON t1 TO u2;
Granted.

SQL> SELECT owner, table_name, privilege FROM dba_tbl_privs
     WHERE grantee='U2';

OWNER      TABLE_NAME PRIVILEGE
---------- ---------- --------------------
U1         T1         SELECT

1 row selected.

SQL> SELECT grantee, owner, table_name, column_name, privilege
     FROM dba_col_privs WHERE grantee='U2';

GRANTEE    OWNER      TABLE_NAME COLUMN_NAM PRIVILEGE
---------- ---------- ---------- ---------- --------------------
U2         U1         T1         C1         INSERT
U2         U1         T1         C2         INSERT
U2         U1         T1         C1         UPDATE

3 rows selected.

SQL> -- Revoke the schema object privilege that was granted to the user U2.
SQL> REVOKE SELECT, INSERT, UPDATE ON t1 FROM u2;
Revoked.

SQL> SELECT owner, table_name, privilege FROM dba_tbl_privs
     WHERE grantee='U2';

OWNER      TABLE_NAME PRIVILEGE
---------- ---------- --------------------

0 row selected.

SQL> SELECT grantee, owner, table_name, column_name, privilege
     FROM dba_col_privs WHERE grantee='U2';

GRANTEE    OWNER      TABLE_NAME COLUMN_NAM PRIVILEGE
---------- ---------- ---------- ---------- --------------------

0 row selected.
As described above, when granting an object privilege, the privilege for the entire table and privileges for only certain columns are different. However, when revoking an object privilege, users can treat them the same.
The following example illustrates user u1 revoking all schema object privileges for the table t1 which were granted to user u2 using ALL PRIVILEGES:
SQL> GRANT ALL ON t1 TO u2;
Granted.

SQL> SELECT owner, table_name, privilege FROM dba_tbl_privs
     WHERE grantee='U2';

OWNER      TABLE_NAME PRIVILEGE
---------- ---------- --------------------
U1         T1         ALTER
U1         T1         DELETE
U1         T1         INDEX
U1         T1         INSERT
U1         T1         SELECT
U1         T1         UPDATE
U1         T1         REFERENCES

7 rows selected.

SQL> REVOKE ALTER, REFERENCES ON t1 FROM u2;
Revoked.

SQL> SELECT owner, table_name, privilege FROM dba_tbl_privs
     WHERE grantee='U2';

OWNER      TABLE_NAME PRIVILEGE
---------- ---------- --------------------
U1         T1         DELETE
U1         T1         INDEX
U1         T1         INSERT
U1         T1         SELECT
U1         T1         UPDATE

5 rows selected.

SQL> REVOKE ALL ON t1 FROM u2;
Revoked.

SQL> SELECT owner, table_name, privilege FROM dba_tbl_privs
     WHERE grantee='U2';

OWNER      TABLE_NAME PRIVILEGE
---------- ---------- --------------------

0 row selected.
Unlike granting a privilege, a user can revoke a privilege for an object even if the object privilege was granted at the table or column level.
The following illustrates how to revoke a schema object privilege using a synonym:
SQL> CREATE SYNONYM s1 FOR t1;
Synonym created.

SQL> -- Grant the schema object privilege to the user U2.
SQL> GRANT SELECT ON t1 TO u2;
Granted.

SQL> SELECT owner, table_name, privilege FROM dba_tbl_privs
     WHERE grantee='U2';

OWNER      TABLE_NAME PRIVILEGE
---------- ---------- --------------------
U1         T1         SELECT

1 row selected.

SQL> -- Revoke the privilege using a synonym.
SQL> REVOKE ALL ON s1 FROM u2;
Revoked.

SQL> SELECT owner, table_name, privilege FROM dba_tbl_privs
     WHERE grantee='U2';

OWNER      TABLE_NAME PRIVILEGE
---------- ---------- --------------------

0 row selected.
Privileges for a base object can be revoked or granted using a synonym as shown above.
-
grantee_clause
Without the GRANT ANY OBJECT PRIVILEGE system privilege, a user can only revoke a schema object privilege that they granted.
The following is an example:
SQL> GRANT SELECT ON t1 TO u2 WITH GRANT OPTION;
Granted.

SQL> CONN u2/a
Connected.

SQL> GRANT SELECT ON u1.t1 TO u3;
Granted.

SQL> CONN u1/a
Connected.

SQL> SELECT grantee, owner, table_name, privilege
     FROM dba_tbl_privs
     WHERE owner='U1' AND table_name='t1';

GRANTEE    OWNER      TABLE_NAME PRIVILEGE
---------- ---------- ---------- --------------------
U2         U1         T1         SELECT
U3         U1         T1         SELECT

2 rows selected.

SQL> REVOKE SELECT ON t1 FROM u3;
TBR-7170: object privilege not granted to user

SQL> REVOKE SELECT ON t1 FROM u2;
Revoked.

SQL> SELECT grantee, owner, table_name, privilege
     FROM dba_tbl_privs
     WHERE owner='U1' AND table_name='t1';

GRANTEE    OWNER      TABLE_NAME PRIVILEGE
---------- ---------- ---------- --------------------

0 row selected.
In the above example, the user u1 granted the privilege which allows query access to table t to the u2 using the WITH GRANT OPTION.
This means that user u2 will have the privilege to manage query privileges for table t1 of user u1. Therefore, user u2 can grant the query privilege for table t1 of user u1 to user u3.
Next, user u1 checks which users have the schema object privilege for table t1. Users u2 and u3 have the corresponding privilege. User u1 did not grant the query privilege to user u3, so user u1 cannot revoke the privilege from user u3. Instead, if user u1 revokes the schema object privilege granted to user U2, all schema object privileges granted by user U2 will also be revoked.
Refer to “7.70. GRANT” for more information about WITH GRANT OPTION.
The following illustrates how to revoke the privileges for an object that has referential integrity constraints using CASCADE CONSTRAINTS:
SQL> CREATE TABLE t2 (c1 NUMBER PRIMARY KEY, c2 NUMBER);
Table created.

SQL> GRANT REFERENCES ON t2 TO u2;
Granted.

SQL> CONN u2/a
Connected.

SQL> CREATE TABLE t3 (c1 NUMBER, c2 NUMBER, c3 NUMBER,
                      FOREIGN KEY (c3) REFERENCES u1.t2(c1));
Table created.

SQL> CONN u1/a
Connected.

SQL> REVOKE REFERENCES ON t2 FROM u2;
TBR-17005: cascade option required to revoke.

SQL> REVOKE REFERENCES ON t2 FROM u2 CASCADE CONSTRAINTS;
Revoked.
The user u1 granted the schema object privilege to create referential integrity constraints for table t2 to user u2. User u2 created table t3 using this privilege.
If user u1 tries to revoke the schema object privilege granted to user u2, the operation will fail because of the referential integrity constraints created by user u2. However, if CASCADE CONSTRAINTS is used, the problematic referential integrity constraints created by user u2 will be deleted, and the schema object privilege will also be revoked.
-
TRUNCATE TABLE initializes the contents of a table. To delete the entire contents of a table, a user can use DROP TABLE and then recreate the table, or can use DELETE. However, TRUNCATE has some advantages over DELETE.
TRUNCATE has the following advantages:
-
DROP TABLE removes all associated indexes and constraints from a table whereas they remain when TRUNCATE TABLE is used.
-
If the REUSE STORAGE option is used, a user can skip space allocation when using INSERT again, which increases efficiency.
-
TRUNCATE processes much faster than DELETE.
A detailed description of TRUNCATE TABLE follows:
-
Syntax
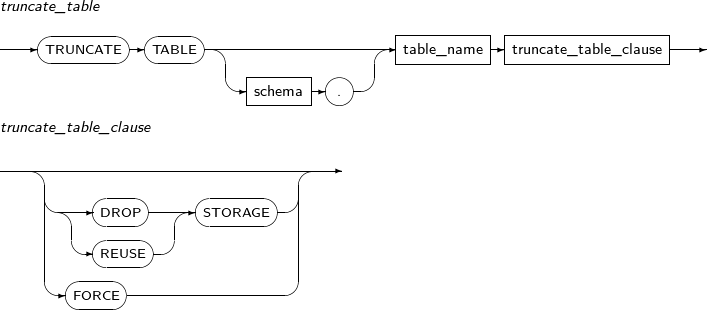
-
Privileges
One of the following must be satisfied to execute this command.
-
The table is in the schema of the current user.
-
The user has the DROP ANY TABLE system privilege.
-
The user has the TRUNCATE ANY TABLE system privilege. To use this privilege, the USE_TRUNCATE_PRIVILEGE parameter must be set to Y.
-
-
Components
Component Description schema Specifies the schema name of the table. By default, the schema of the current user will be used. REUSE STORAGE When this clause is used, extents that were allocated to a segment will not be returned to the tablespace.
When data is inserted, the system does not have to find free space in the tablespace, which increases efficiency.
DROP STORAGE Returns the extents of a segment. This is the default value. Component Description schema Specifies the schema name of the table. By default, the schema of the current user will be used. REUSE STORAGE When this clause is used, extents that were allocated to a segment will not be returned to the tablespace.
When data is inserted, the system does not have to find free space in the tablespace, which increases efficiency.
DROP STORAGE Returns the extents of a segment. (Default value) FORCE Forcibly truncates when truncation failed due to lack of available tablespace. If a DDL is cancelled during truncation or a DDL fails due to abnormal termination when the FORCE option is used, the contents of the table are not recovered. In this case, TRUNCATE TABLE must be executed again to complete the operation. -
Examples
The following example illustrates how to initialize the contents of a table using TRUNCATE TABLE:
TRUNCATE TABLE u2.t;
TRUNCATE TABLE t REUSE STORAGE;