Table of Contents
This chapter explains how to set up and start JEUS and WebAdmin.
The following are the steps for configuring a JEUS system and WebAdmin.
JEUS WebAdmin can be used to easily manage all JEUS components, configure the environment, perform monitoring, and manage applications.
Use the following steps to start WebAdmin.
-
Run the startDomainAdminServer script from command prompt to start JEUS Domain Administration Server.
Note
The startDomainAdminServer script is in the 'JEUS_HOME/bin/' directory and must be set in the system path. To execute WebAdmin, it must first be configured in the <enable-webadmin> attribute of domain.xml. For more information about <enable-webadmin>, refer to JEUS WebAdmin Guide. "2.2. Logging In".
Example:
C:\TmaxSoft\JEUS8\bin>startDomainAdminServer -u administrator -p <password>
**************************************************************
  - JEUS Home         : C:\TmaxSoft\JEUS8
  - Added Java Option :
  - Java Vendor       : Sun
**************************************************************

C:\Users\Tmax>"D:\java\jdk1.8.0_111\bin\java" -server -Xmx512m -Xbootclasspath/p:"C:\TmaxSoft\JEUS8\lib\system\extension.jar" -classpath "C:\TmaxSoft\JEUS8\lib\system\bootstrap.jar"
-Dsun.rmi.dgc.client.gcInterval=3600000
-Dsun.rmi.dgc.server.gcInterval=3600000
-Djeus.jvm.version=hotspot
-Djeus.home="C:\TmaxSoft\JEUS8"
 -Djava.naming.factory.initial=jeus.jndi.JNSContextFactory
-Djava.naming.factory.url.pkgs=jeus.jndi.jns.url
-Djava.library.path="C:\TmaxSoft\JEUS8\lib\system"
-Djava.endorsed.dirs="C:\TmaxSoft\JEUS8\lib\endorsed"
-Djava.util.logging.manager=jeus.util.logging.JeusLogManager
-Djava.util.logging.config.file="C:\TmaxSoft\JEUS8\bin\logging.properties"
-Djeus.properties.replicate=jeus,java.util.logging,sun.rmi.dgc
-Djava.net.preferIPv4Stack=true  jeus.server.LauncherBootstrapper -u administrator -p <password>

================ JEUS LICENSE INFORMATION ================
=== VERSION : JEUS 8 (8.0.0.0-b83)
=== EDITION: Enterprise (Trial License)
=== NOTICE: This license restricts the number of allowed clients.
=== Max. Number of Clients: 5
==========================================================
This license is not appropriate for product runtime mode. Replace the license with an appropriate one.
[2016.12.28 14:27:07][2] [launcher-1] [Launcher-0012] Starting the server [adminServer] with the command
 D:\java\jdk1.8.0_111\bin\java -DadminServer -Xmx1024m -XX:MaxPermSize=128m -server -Xbootclasspath/p:C:\TmaxSoft\JEUS8\lib\system\extension.jar -classpath C:\TmaxSoft\JEUS8\lib\system\bootstrap.jar -Djava.security.policy=C:\TmaxSoft\JEUS8\domains\jeus_domain\config\security\policy -Djava.library.pa
th=C:\TmaxSoft\JEUS8\lib\system -Djava.endorsed.dirs=C:\TmaxSoft\JEUS8\lib\endorsed -Djeus.properties.replicate=jeus,java.util.logging,sun.rmi.dgc -Djeus.jvm.version=hotspot -Djava.util.logging.config.file=C:\TmaxSoft\JEUS8\bin\logging.properties -Dsun.rmi.dgc.server.gcInterval=3600000 -Djava.util.l
ogging.manager=jeus.util.logging.JeusLogManager -Djeus.home=C:\TmaxSoft\JEUS8 -Dsun.rmi.dgc.client.gcInterval=3600000 -Djeus.domain.name=jeus_domain -Djava.naming.factory.initial=jeus.jndi.JNSContextFactory -Djava.naming.factory.url.pkgs=jeus.jndi.jns.url -Djeus.server.protectmode=false -XX:+UnlockD
iagnosticVMOptions -XX:+LogVMOutput -XX:LogFile=C:\TmaxSoft\JEUS8\domains\jeus_domain\servers\adminServer\logs\jvm.log jeus.server.admin.DomainAdminServerBootstrapper -u administrator -domain jeus_domain -server adminServer .
[2016.12.28 14:27:07][2] [launcher-1] [Launcher-0014] The server[adminServer] is being started ...
[2016.12.28 14:27:09][2] [adminServer-1] [SERVER-0248] The JEUS server is STARTING.
[2016.12.28 14:27:09][0] [adminServer-1] [SERVER-0000] Version information - JEUS 8 (8.0.0.0-b83).

... Omitted

[2016.12.28 14:27:12][2] [adminServer-1] [WEB-3857] <Session information of Context(webadmin)>
- session descriptor -
    - timeout           : 30(min)
    - max session count : -1
    - shared            : false
    - reload-persistent : false
- session tracking mode -
    - Cookie     : true
    - URL Rewrite: false
    - SSL        : false

- session cookie config -
    - cookie-name : JSESSIONID
    - version         : 0
    - domain          : null
    - path            : null
    - max-age         : -1 (browser-lifetime)
    - secure          : false
    - http-only       : true

[2016.12.28 14:27:12][2] [adminServer-1] [WEB-1032] Distributed the web context [webadmin] information
- Virtual host    : DEFAULT_HOST
- Context path    : /webadmin
- Document base   : C:\TmaxSoft\JEUS8\domains\jeus_domain\servers\adminServer
\.workspace\deployed\webadmin\1482902768895\fakeWebadmin_war___
- Module version  : 3.0

[2016.12.28 14:27:12][1] [adminServer-1] [WebSocketServer-0026] There are no WebSocket server endpoints so that WebSocketContainer is not created.
[2016.12.28 14:27:12][2] [adminServer-1] [WEB-3480] The web module [webadmin, packaged time=1482902768895, index=01] has been successfully distributed.
[2016.12.28 14:27:12][2] [adminServer-1] [Deploy-0096] Successfully distributed the application[webadmin].
[2016.12.28 14:27:12][2] [adminServer-1] [WEB-3484] ServletContext[name=webadmin, path=/webadmin, ctime=Wed Dec 28 14:27:12 KST 2016, apptime=1482902768895, index=01] started successfully.
[2016.12.28 14:27:13][2] [launcher-11] [Launcher-0034] The server[adminServer] initialization completed successfully[pid : 8040].
[2016.12.28 14:27:13][0] [launcher-1] [Launcher-0040] Successfully started the server. The server state is now RUNNING.
-
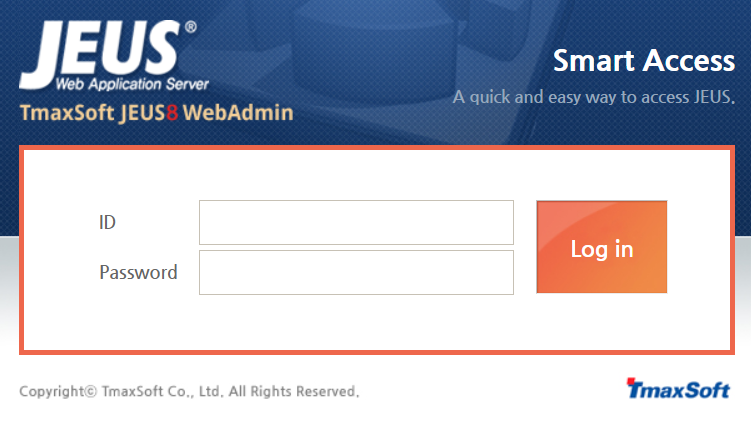
Open a Web browser to access WebAdmin. Enter the login ID and password that was specified during JEUS installation. WebAdmin is accessed through a specific port. The default port is '9736'.
http://<localhost>:9736/webadmin
-
After a successful login, the main WebAdmin page will appear.

The server instances that manage the actual application service engines and services are called Managed Servers (MSs). Multiple MSs can exist in a single domain. Applications are deployed to MSs, and the MSs provide the resources and services that the applications need.
Adding Managed Servers
Add new MSs and then add listeners to the MSs.
-
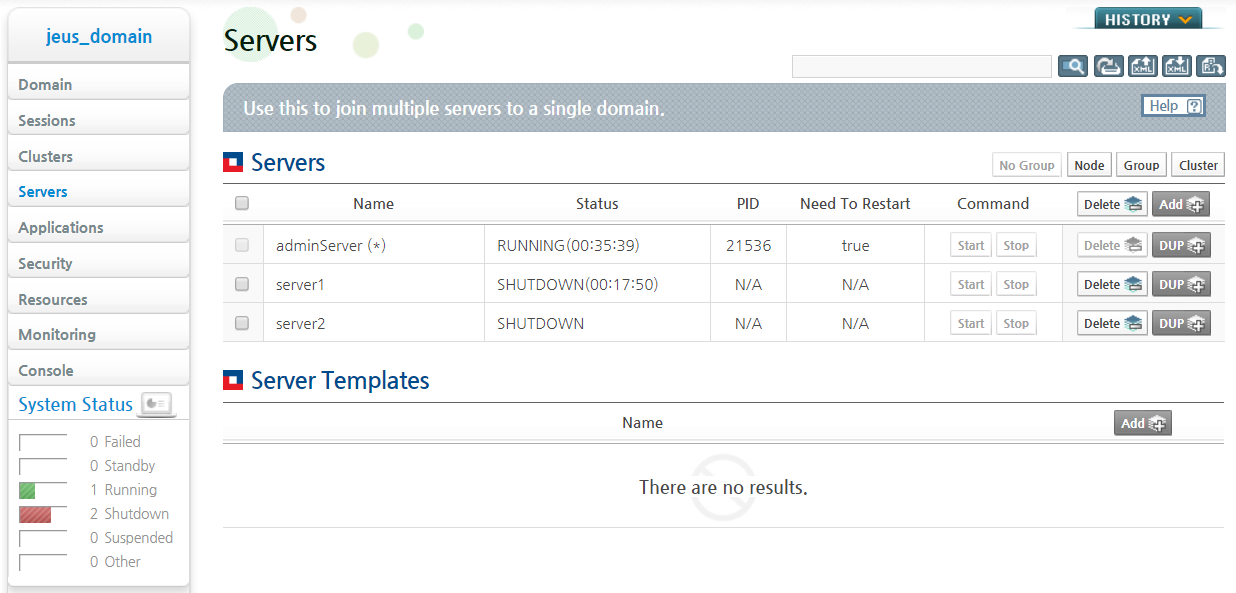
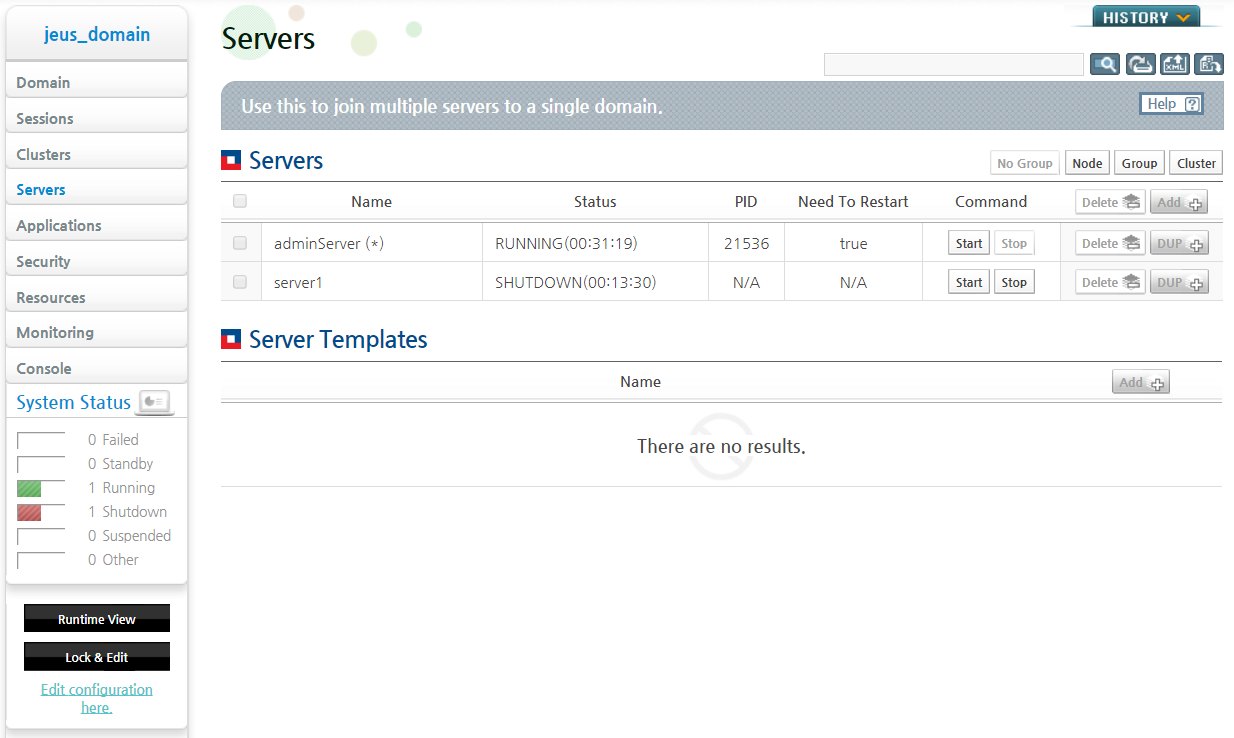
Click [Servers] from the left pane to go to the Servers page. Click [Add] to add a server.
Note
Click [Lock & Edit] to make dynamic configuration changes. [Lock & Edit] locks JEUS configurations so that they can be modified. If this button is disabled, [Add] will also be disabled.
-
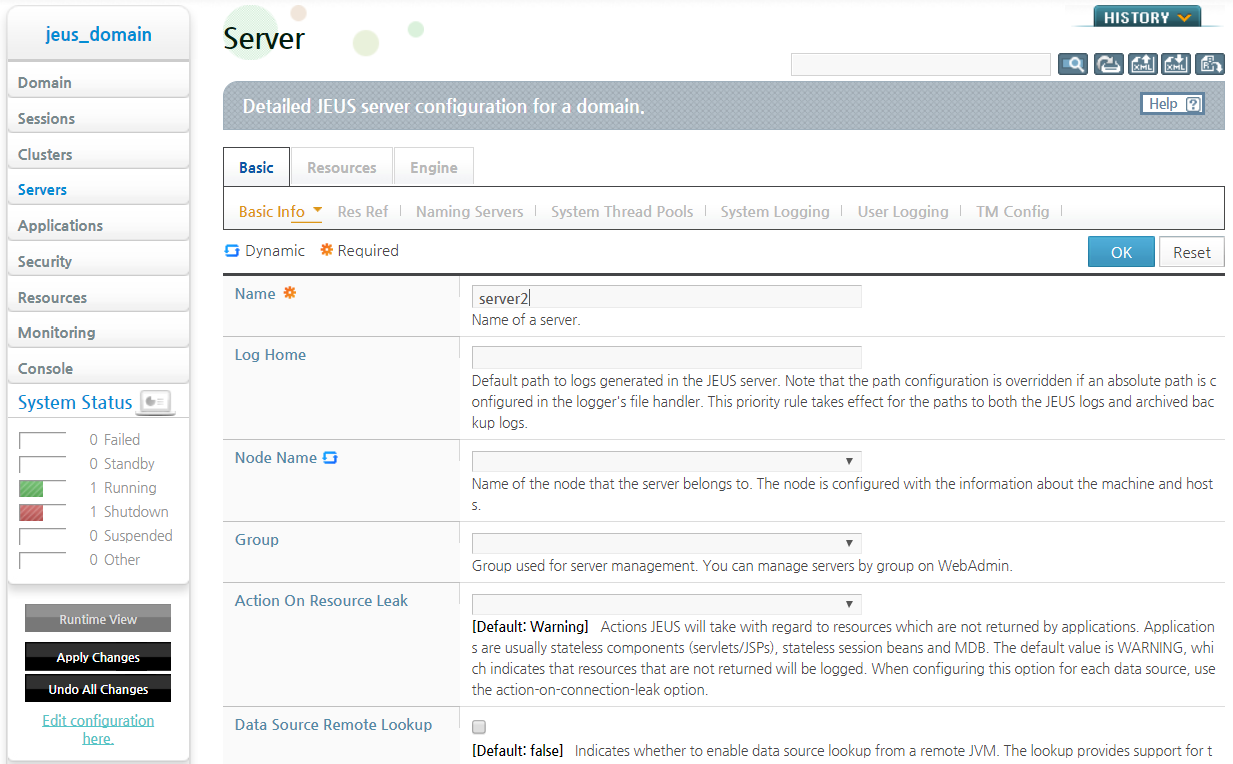
Fill in the required fields of the Basic Information section and then click [OK].
-
Click [Apply Changes] on the bottom left of the screen to dynamically apply the configurations.
-
When the changes have been applied to the server, the following message will be displayed. Use this information to check that the MS has been created correctly.
-
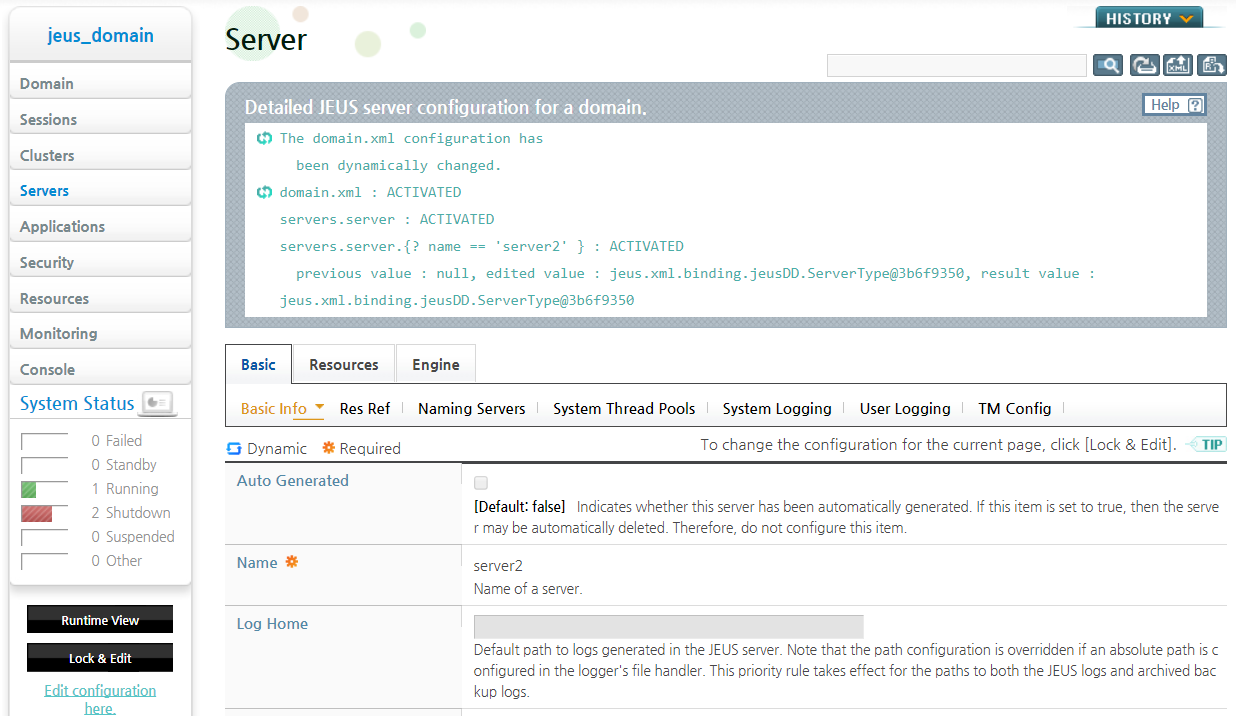
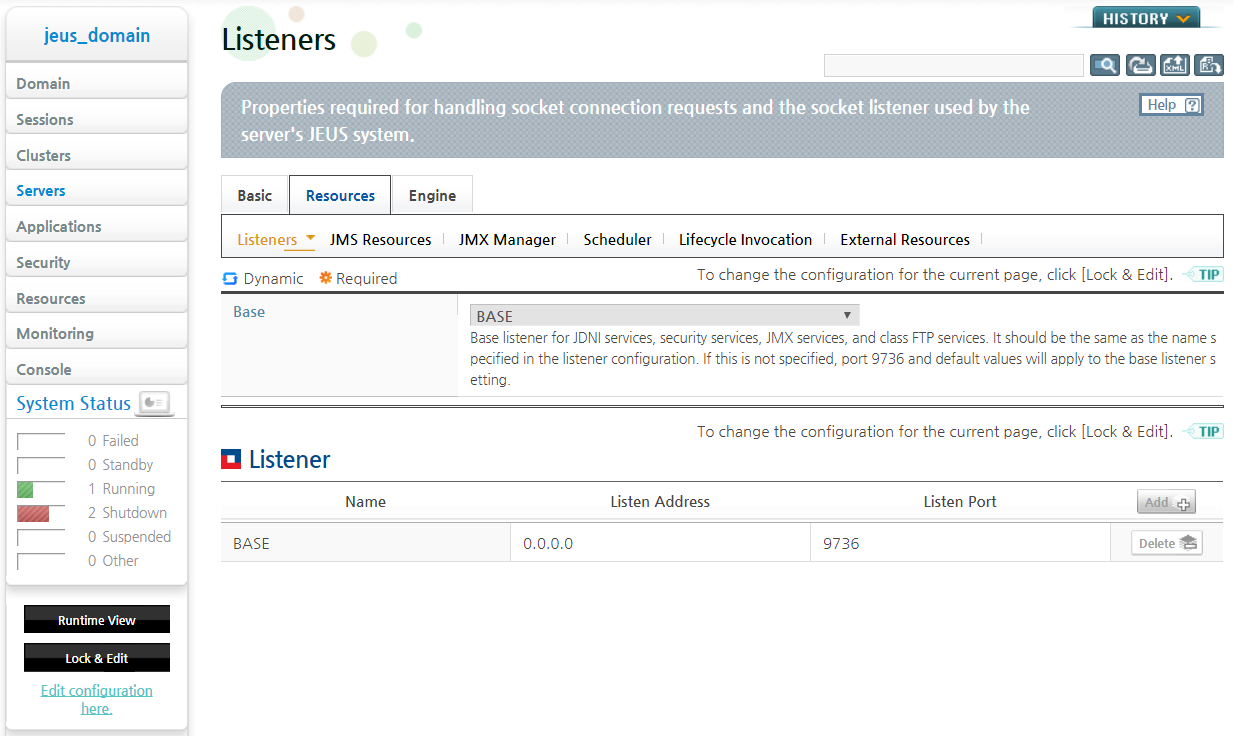
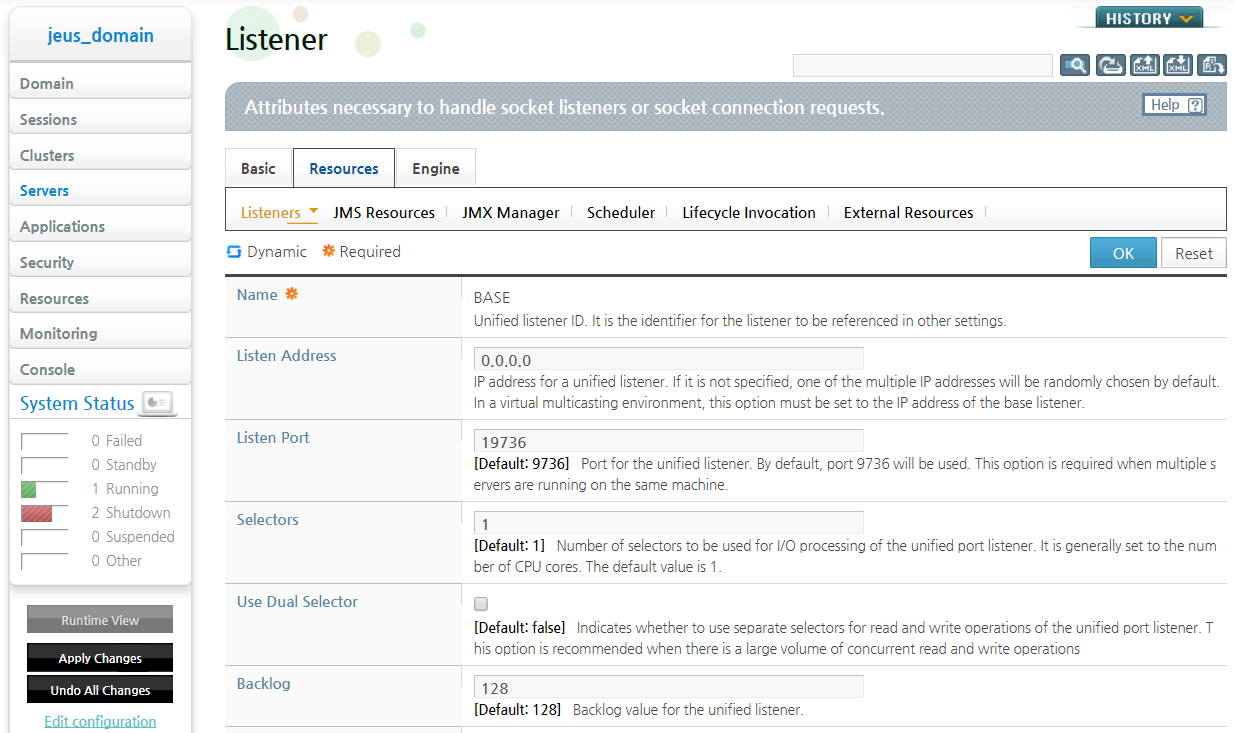
The BASE listener is used to start the MSs. The BASE listener uses port 9736 by default. Because DAS uses the same port, change the BASE listener to use another port.
Click [Servers] from the left menu to go to the Servers page. Select a server to view from the list and then click [Resource] > [Listener]. Click the BASE listener from the Listeners page to go to the Listener properties page.
-
Change the Listen Portfrom the default value of 9736 to another value and then click [OK].
-
Click [Apply Changes] from the left pane to apply the changes.
Configuring HTTP Listeners
Only the [Basic] section needs to be configured to start an MS. However, additional Listener property settings are required to use the Web services.
-
Select [Servers] from the left pane to go to the Servers page and then select a server. Click [Resources] > [Listeners] to go to the Listeners page. On the Listeners page, click [Add].
Note
Click [Lock & Edit] to make dynamic configuration changes. [Lock & Edit] locks JEUS configurations so that they can be modified. If this button is disabled, [Add] will also be disabled.
-
On the Listener page, set the Name and Listen Port properties and then click [OK].
Note
The specified port must not be already in use by another listener.
-
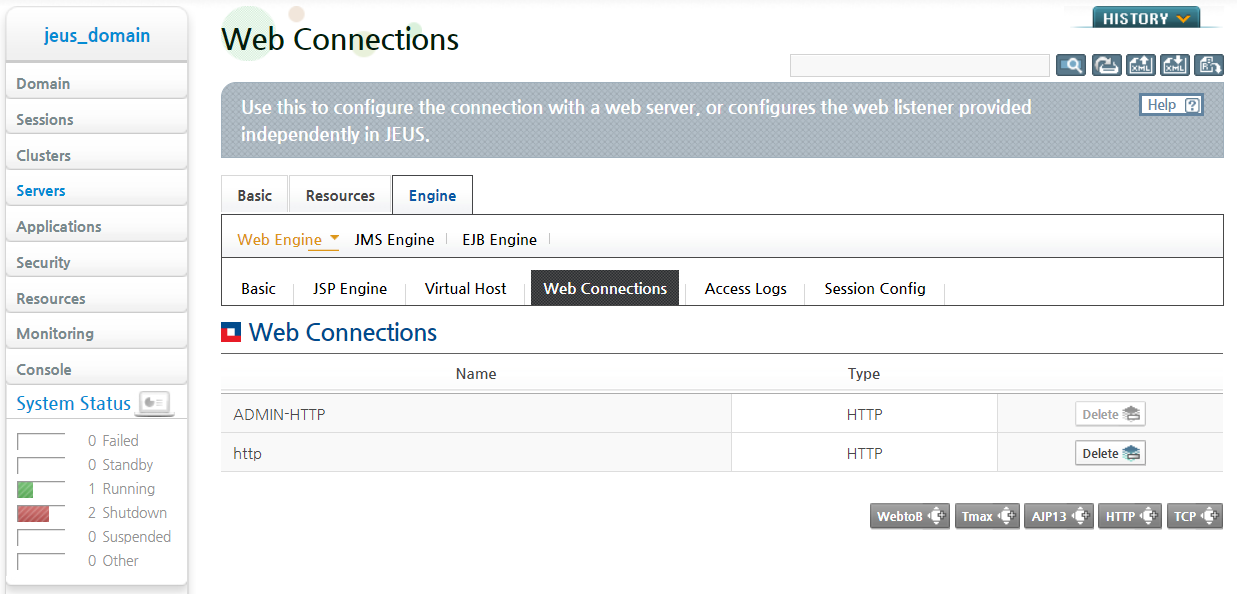
Click [Engine] > [Web Engine] > [Web Connections] to go to the Web Connections page. For this example, click [HTTP] to configure an HTTP listener.
-
On the HTTP Listener screen, set the Name and Server Listener Ref properties. For the Server Listener Ref option, select 'http-listener' from the drop-down list.
-
Click the [Apply Changes] from the left pane to apply the changes.


Configuring WebtoB Connectors
JEUS 8 does not support web engines that start an embedded WebtoB. To use an embedded WebtoB, compile the WebtoB configuration file to manually execute the embedded WebtoB, and then add a WebtoB connector to connect with the embedded WebtoB.
-
Compile the configuration file ($JEUS_HOME/webserver/config/ws_engine.m) of the embedded WebtoB.
Note
Since the configuration file of the embedded WebtoB, which is installed by default, is not compiled, the configuration file must be compiled before starting the embedded WebtoB.
C:\TmaxSoft\JEUS8\webserver\config>wscfl -i ws_engine.m Current configuration: Number of client handler(HTH) = 1 Supported maximum user per node = 2018 Supported maximum user per handler = 2018 Successfully created the configuration file (C:/TmaxSoft/JEUS8/webserver/config/wsconfig) for node paper-PC. The host name of the running machine is paper-PC. C:\TmaxSoft\JEUS8\webserver\config> -
Start the embedded WebtoB.
C:\TmaxSoft\JEUS8\webserver\config>wsboot Booting WebtoB on node (paper-PC) Starting WSM at 04/30/13 11:06:56 Starting HTL at 04/30/13 11:06:56 Starting HTH at 04/30/13 11:06:56 Current WebtoB Configuration: Number of client handlers (HTH) = 1 Supported maximum user per node = 2018 Supported maximum user per handler = 2018 Starting SVR(C:/TmaxSoft/JEUS8/webserver/bin/htmls.exe) at 04/30/13 11:06:56 Starting SVR(C:/TmaxSoft/JEUS8/webserver/bin/cgis.exe) at 04/30/13 11:06:56 Starting SVR(C:/TmaxSoft/JEUS8/webserver/bin/ssis.exe) at 04/30/13 11:06:56 C:\TmaxSoft\JEUS8\webserver\config> -
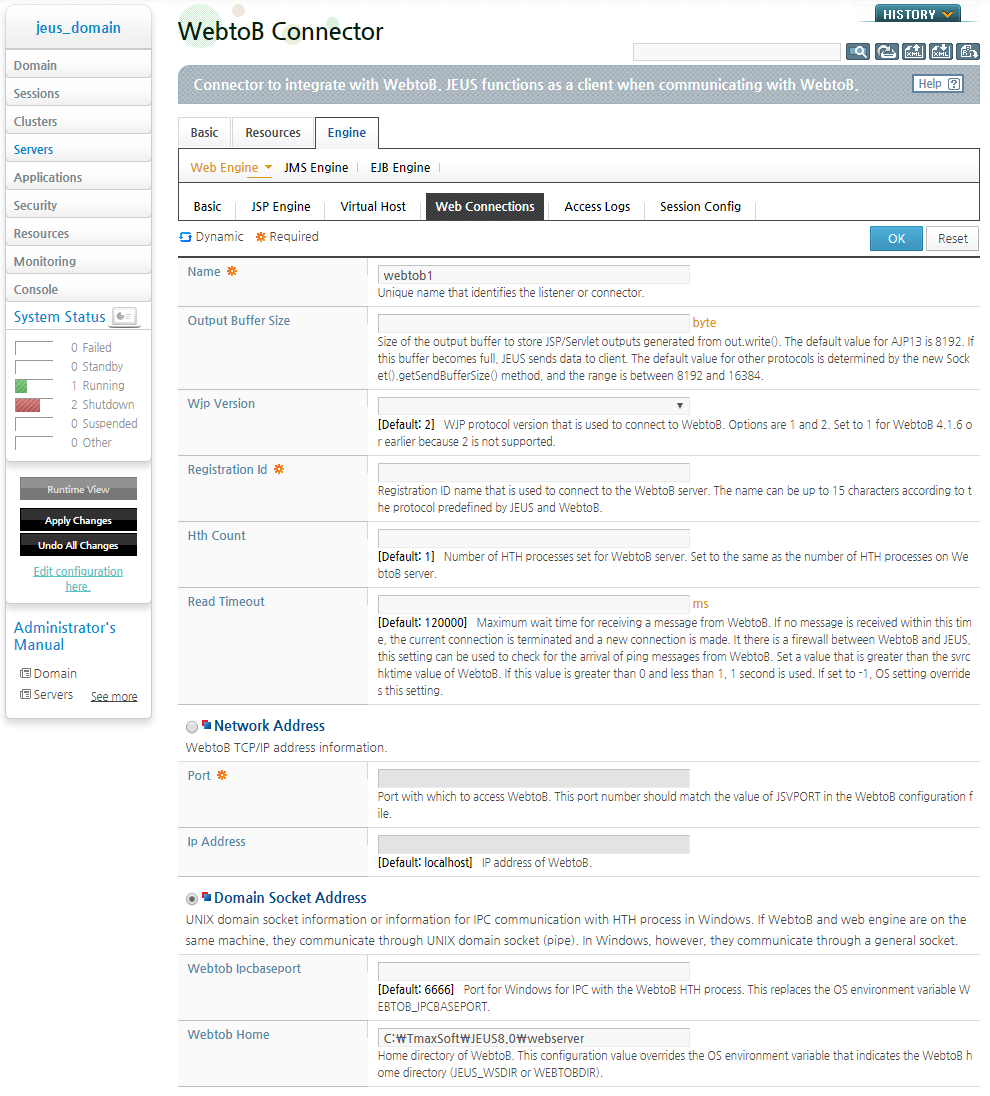
Select [Servers] from the left pane to go to the Servers page and then select a server. Click [Engine] > [Web Engine] > [Web Connections]to go to the Web Connections page. On the WebConnections page, click [WEBTOB].
Note
Click [Lock & Edit] to make dynamic configuration changes. [Lock & Edit] locks JEUS configurations so that they can be modified. If this button is disabled, [WEBTOBE] will also be disabled.
-
On the Webtob Connector screen, set the Name, WebtoB Home, and Thread Pool Numberproperties. When the configuration is complete, click [OK].
Note
To configure the Thread Pool Number property, refer to the WebtoB settings. If the configurations of the embedded WebtoB is not changed after installation, use the default Thread Pool count of 5.
-
Click [Apply Changes] from the left pane to apply the changes.
-
Restart JEUS to apply the WebtoB connector settings.
JEUS can be used to configure the database connectivity by configuring data sources.
The following example uses the Apache Derby database that is included with JEUS. Apache Derby is located in the 'JEUS_HOME/derby' directory.
Execute the following command to start Derby on UNIX, Linux, or Windows.
JEUS_HOME\bin> startderby
Execute the following command to stop Derby.
JEUS_HOME\bin> stopderby
Note
Derbyclient.jar, the Derby JDBC driver file, must be located in the 'JEUS_HOME/lib/datasource' directory to be able use Derby in JEUS. This file is included in JEUS by default.
For detailed information about Derby, refer to http://db.apache.org/derby/.
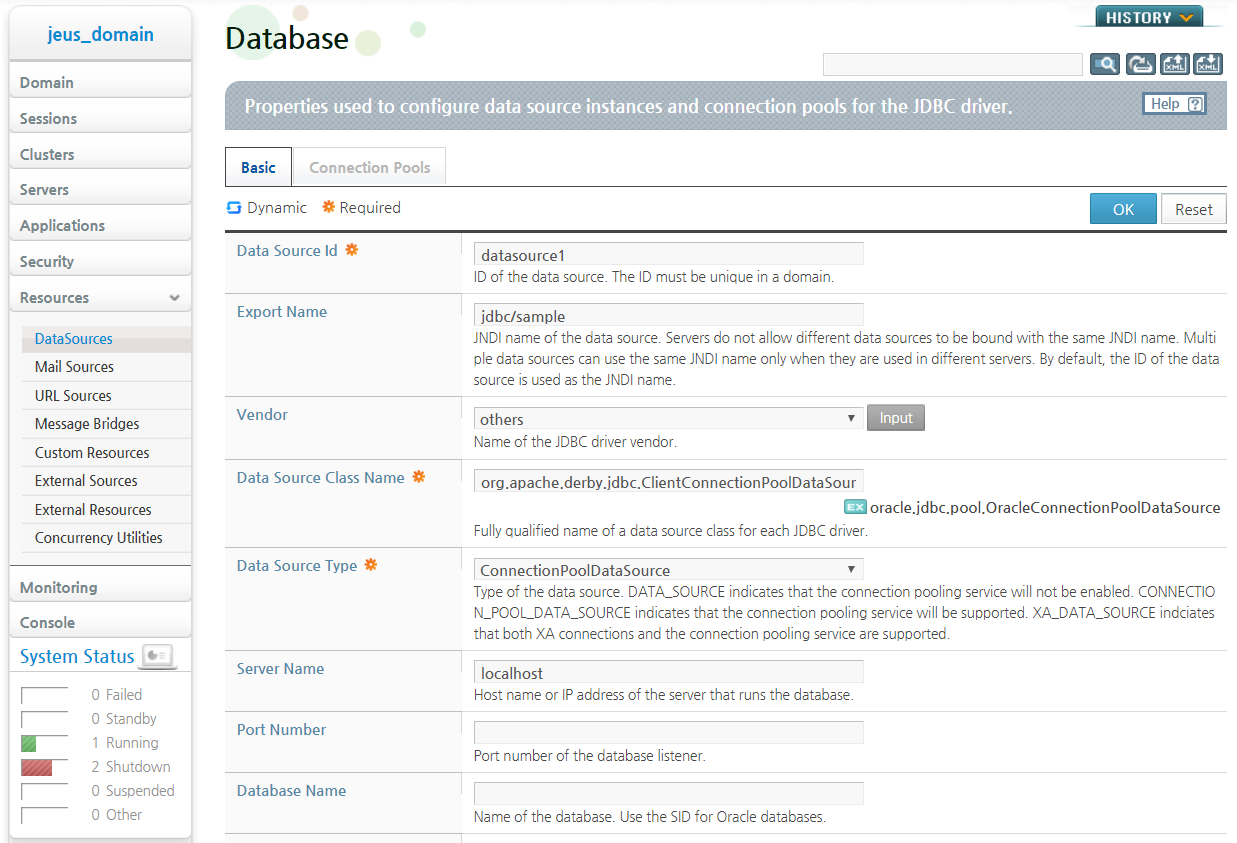
The following example registers a data source named 'jdbc/sample' to use a database called 'sample'.
To add a data source:
-
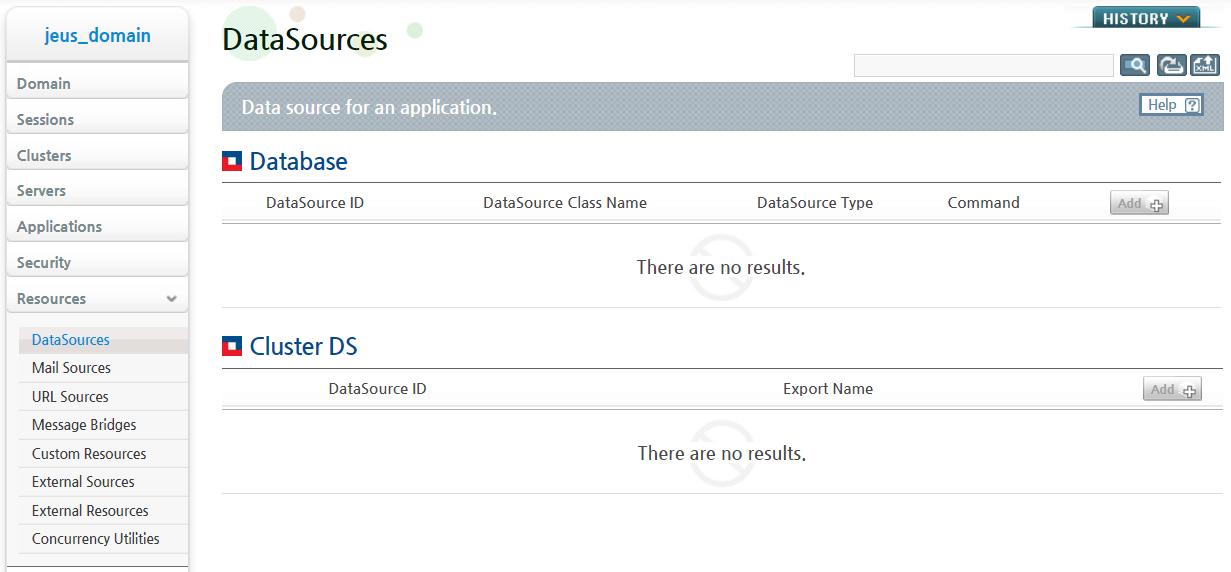
Click [Resources] > [DataSources] from the left pane of the WebAdmin screen. The DataSources page appears. To add a data source, click [Add] from the Database table.
Note
Click [Lock & Edit] to make dynamic configuration changes. [Lock & Edit] locks JEUS configurations so that they can be modified. If this button is disabled, [Add] will also be disabled.
-
Configure the Database properties and then click [OK].
-
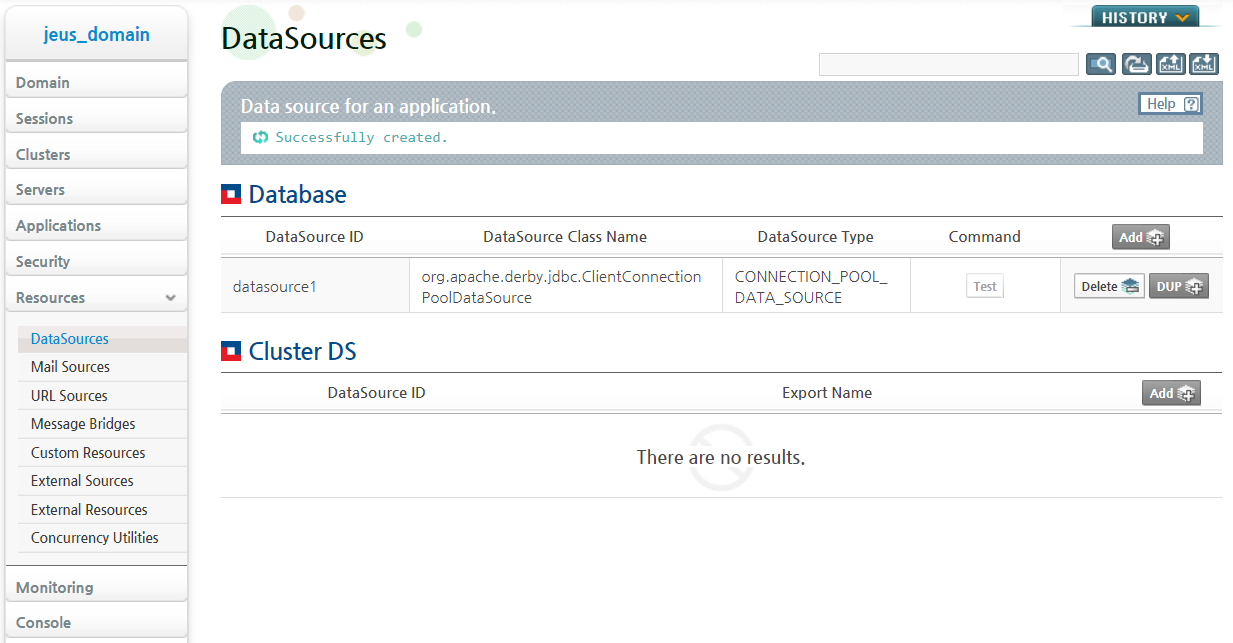
Verify that the data source has been correctly added to the list.
-
Click [Servers] from the left pane to go to the Server List page. Select a server from the list to go to the Server page. For DataSources, select the newly added data source for the server.

DAS must be running in order to start MSs in WebAdmin. To start or stop an MS while DAS is running, either its node manger must be running or the SSH properties must be configured on the server. For detailed information about SSH properties, refer to JEUS Node Manager Guide.
Note
SSH is not available on Windows. The node manager must be started before starting MS on Windows.
To start MSs in WebAdmin,
-
Click [Servers] on the left pane of WebAdmin. The Servers page will appear. Select a server from the list and then click the [Resource] > [Listener] tab. On the Listeners page, click [Add] from the Listener list table. Set the required Listener options and then click [OK].
-
On the [Servers] page, click [start] or [stop] to start or stop each MS.