Table of Contents
This chapter describes how to install and uninstall Tibero in GUI mode (Windows and Win32), console mode (Linux and Linux32), and manual mode (Windows and Linux). The installation processes for the GUI and console modes for each platform are the same except for the path delimiter.
The following is the installation process for Tibero for Windows in GUI Mode:
-
Insert the Tibero installation CD into the CD-ROM drive, and run the binary executable file (Tibero_DB_5_Win_x86.exe). The Tibero 5 SP1 installer will begin.
-
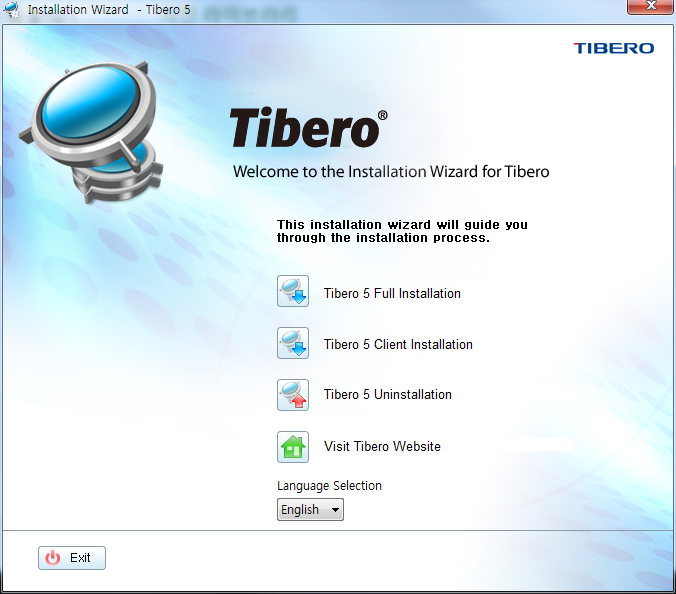
When the file runs, the following installation wizard appears.
Select a language (Korean or English) and an installation method.
The available installation methods are below:
Installation Method Description Tibero 5 SP1 Full Installation Typical installation. Both the server and client for Tibero are installed. Tibero 5 SP1 Client Installation Alternate installation. Only the client for Tibero is installed. The client installation process is the same as the 'Tibero 5 SP1 Full Installation' process except that no database is created.
The following instructions describe the Tibero 5 SP1 Full Installation. Click [Tibero 5 SP1 Full Installation] to continue.
-
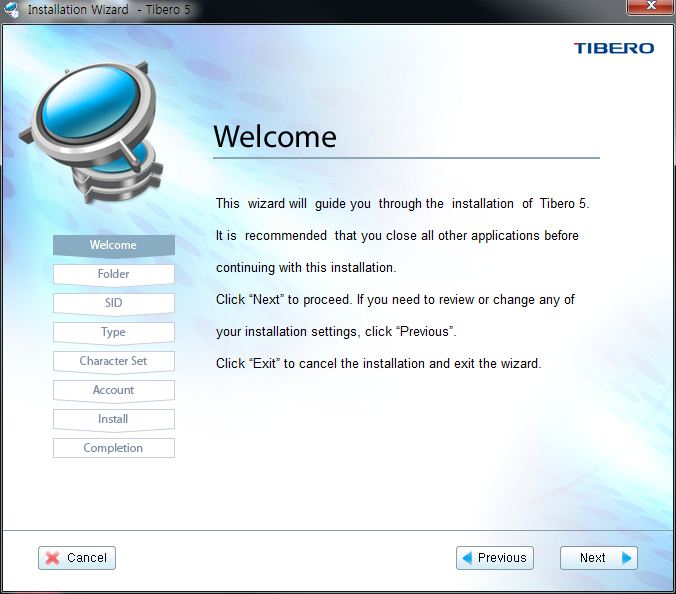
The Welcome screen that introduces the Tibero installation appears. After reading the information, click the [Next] button to continue. To stop the installation, click the [Cancel] button.
-
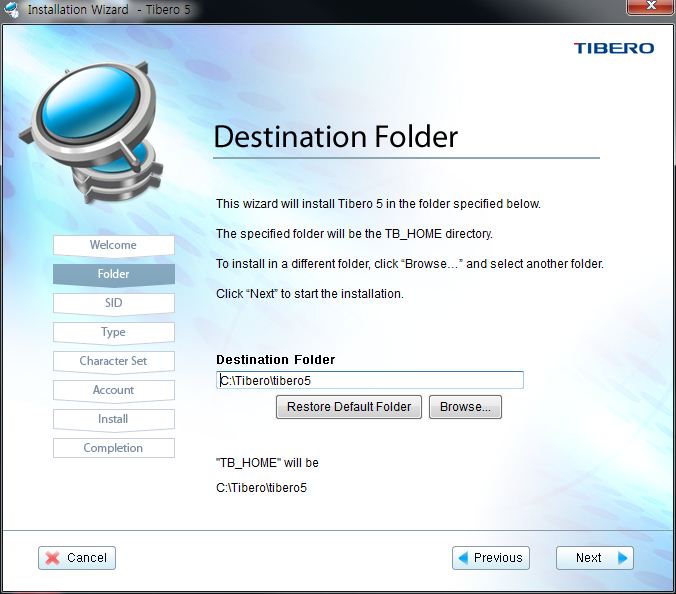
The screen for selecting a Tibero destination folder appears:
The default folder is 'C:\Tibero\tibero5'.
Tibero is installed in the destination folder, and the parameter TB_HOME is set to this value in the user configuration file. The folder name must not include any blank spaces.
To change the destination folder, click the [Browse...] button and select the desired folder. To restore the default destination folder, click the [Restore Default Folder] button.
After installation begins, a log file (tiberoLog.txt) is created. Click the [Next] button to continue.
-
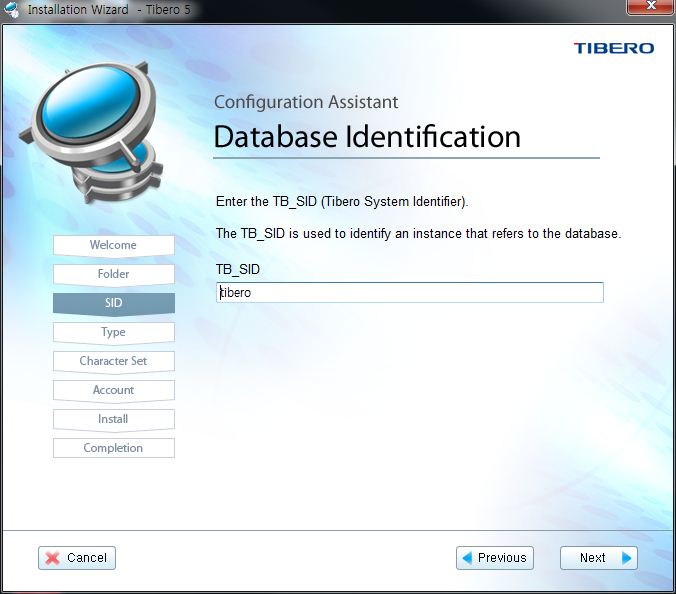
Choose an SID then click the [Next] button to continue.
Note the following when choosing a SID:
-
An SID must be unique within a given server. (Default value: tibero)
-
An SID may contain numbers, letters, dashes, and underscores.
-
An SID cannot contain special characters and the first character cannot be a number.
-
-
Select either the 'Typical' or 'Custom' installation type and click the [Next] button. The following instructions describe the Custom installation type.
A description of each installation type follows:
-
Typical
Installs with the default listener port number, SID, data block size, and shared memory key.
-
Custom
Installs with a user-selected port number, SID, data block size, and shared memory key.
Setting Value Data Block Size Must be one of the following: 2, 4, 8, 16, or 32 KB.
-
-
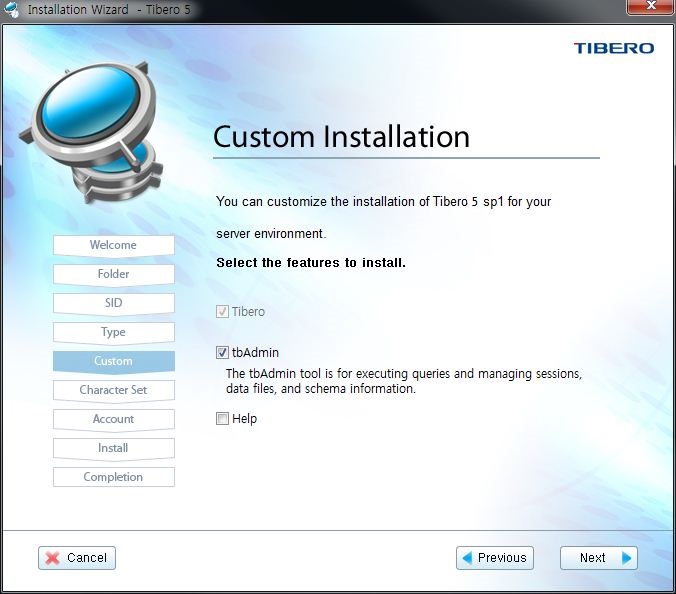
Choose whether to install the tbAdmin tool, then click the [Next] button.
Select the "tbAdmin" checkbox to install the tbAdmin tool. If the tool is installed, the default installation folder is %TB_HOME%\client\bin\tbAdmin.
-
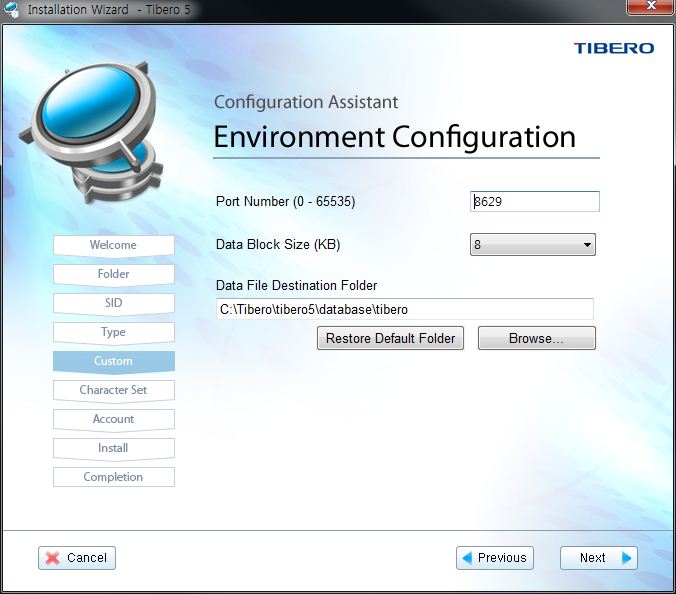
Enter a port number, data block size, and data file destination folder, then click the [Next] button.
A description of each input item follows:
-
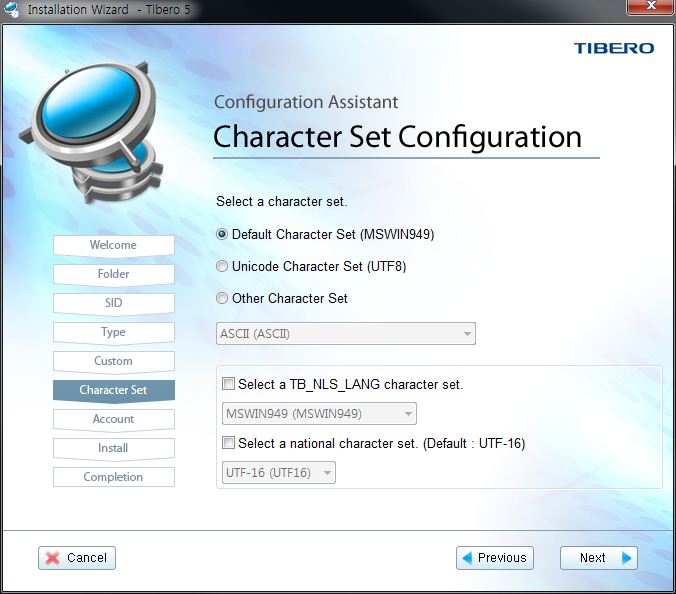
Select a character set for the database.
If necessary, select a client character set (TB_NLS_LANG) as well as the database's national character set. Select one of the character sets and then click the [Next] button.
-
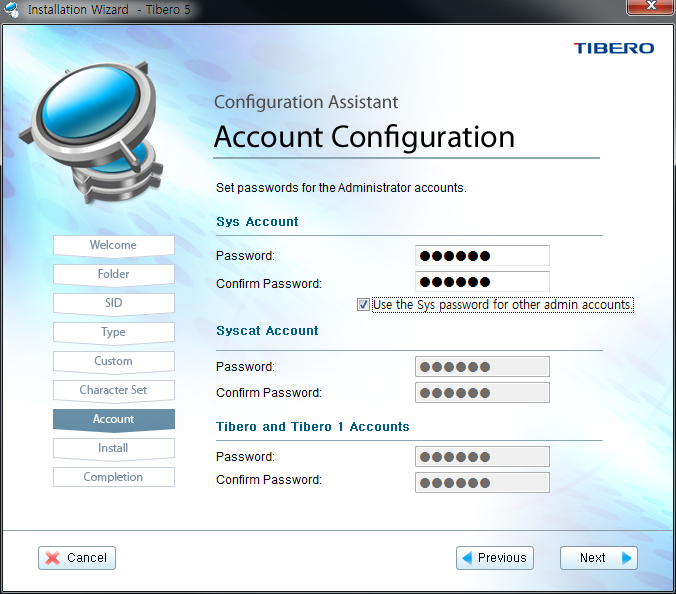
Enter information for the default user accounts in Tibero DB: Sys, Syscat, Tibero, and Tibero1. For each account, re-enter the password in "Confirm Password."
Click the [Next] button to continue.
-
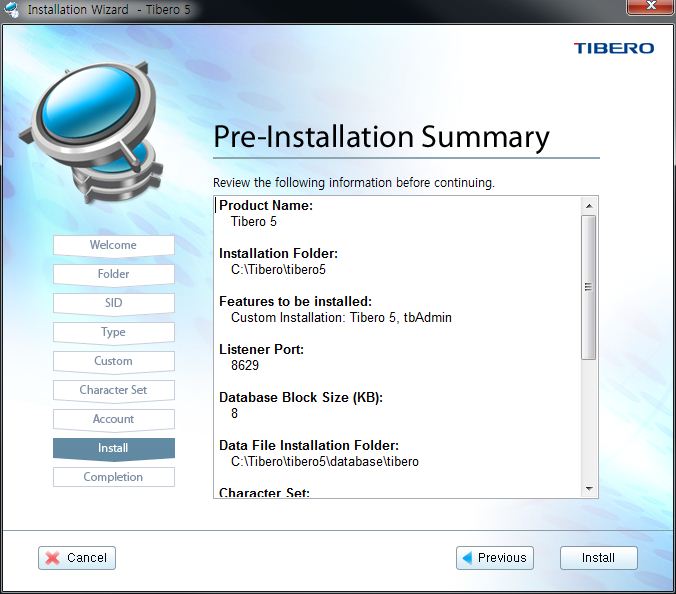
The pre-installation summary screen appears. Review the installation details, verify the installation folder, and then click the [Install] button to install Tibero.
To change the installation details, return to the previous screen by clicking the [Previous] button.
-
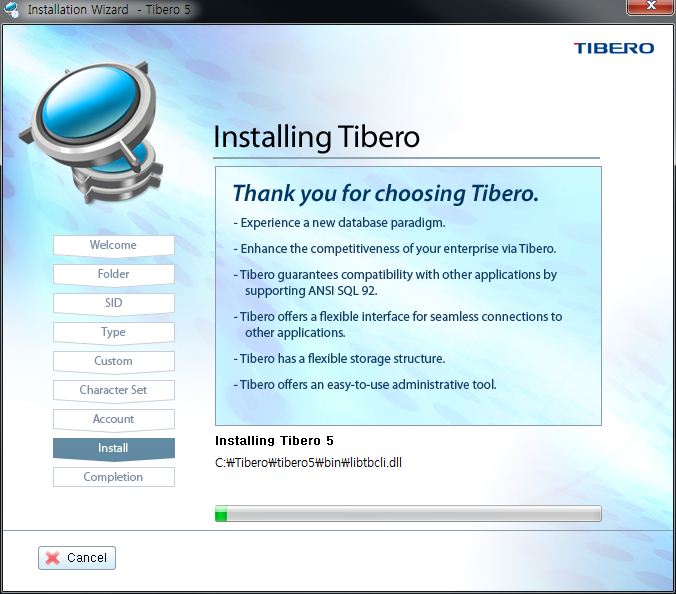
The Tibero installation may take a few minutes. The installation progress bar shows the progress of the installation.
During installation, software is copied, links are created, and a database is created in the data file destination folder.
-
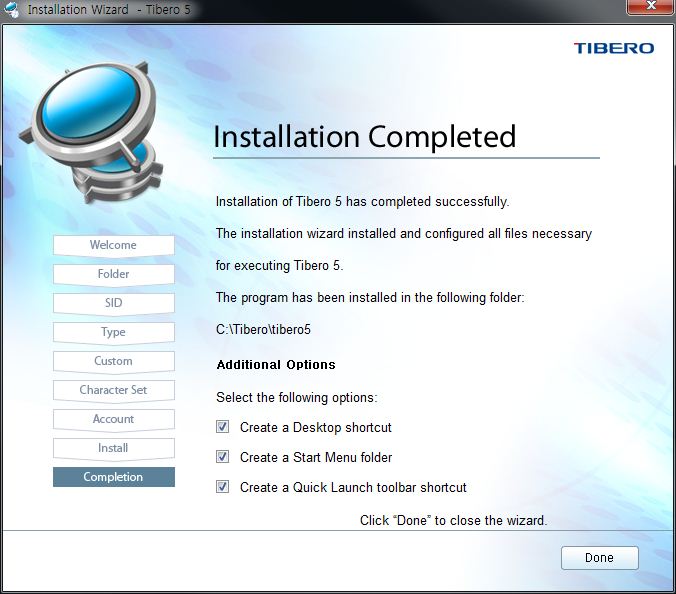
When Tibero installs properly, the following screen appears. Select the desired options, then click the [Done] button to complete the installation.
The following is the Tibero installation process for Linux in console mode:
-
A user can set the directory for temporary files that are created when running Tibero installer by using the environment variable 'TB_INST_TMP_DIR'.
$export TB_INST_TMP_DIR=/optIf not specified, the default directory for temporary files that are created during the installation will be the home directory of the user. After the installation is complete, the temporary files will be deleted.
-
Run the binary executable file Tibero_DB_5_Linux_x86_32.bin as shown. The Tibero 5 SP1 installer will begin.
$./Tibero_5_Linux_x86_32.binTo install Tibero for Linux in GUI mode, run the file with the -G option or the -g option. The following instructions describe the installation process for Linux in console mode.
-
When the file runs, the following will be displayed in the console:
 ======================================================
 Introduction
 --------------------------

 Tibero Installer will guide you through the installation of Tibero 5 SP1.

 It is strongly recommended that you quit all programs before
 continuing with this installation.

 Respond to each prompt to proceed to the next step in the
 installation.

 You may cancel this installation at any time by typing
 'quit'. PRESS <ENTER> TO CONTINUE:
-
Enter the desired installation path for Tibero, then press the <Enter> key.
 ======================================================
 Choose Install Folder
 --------------------------

 Please specify a base location for Tibero to be installed.
 Tibero will be installed under TB_HOME directory.

 -> Default Install Path: /home/tibero/Tibero/tibero5
    ( TB_HOME : /home/tibero/Tibero/tibero5 )

 ENTER AN ABSOLUTE PATH,
 OR PRESS <ENTER> TO ACCEPT THE DEFAULT :
The default path is /home/tibero/Tibero/tibero5. To modify this path, enter an absolute path. Tibero is installed in this location, which is set using TB_HOMEUP HOME in the user environment configuration file. The directory name cannot contain a space character.
-
Choose an SID, then press the <Enter> key.
====================================================== SID --------------------------- Each instance is uniquely identified by SID, and the database is references by the instance. TB SID (DEFAULT: tibero): -
Select an installation type. The following instructions describe the Custom installation type. After selecting whether to install the tbAdmin tool and help files, proceed to the next step.
 ======================================================
 Select Installation Type
 --------------------------

 Please select the Installation Type to install.
 ->      1- Typical <default>
         2- Custom
 ENTER THE NUMBER FOR THE INSTALL SET, OR PRESS
 <ENTER> TO ACCEPT THE DEFAULT :2
 Do you want to install tbAdmin? (y/n) y
 Do you want to install help files? (y/n) y
A description of each installation type follows:
-
Enter a listener port, database block size, data file path, then press the <Enter> key. The data file path must not include any spaces.
 ======================================================
 Listener Port (DEFAULT: 8629) :
 DATABASE BLOCK SIZE(K) (DEFAULT: 8) :
 DATA FILE PATH (DEFAULT: /home/tibero/Tibero/tibero5):
-
Select a character set for the database. Select one of the character sets, and press the <Enter> key to continue.
 ======================================================
 Character Set Configuration
 --------------------------

 Please select the default character set.
 1. MSWIN949 <Default>
 2. UTF8
 3. ASCII
 4. EUC-KR
 5. SHIFT-JIS
 6. EUC-JP
 7. EUC-CN
 8. GBK
 >
-
Select a national character set for the database. Select one of the national character sets, then press the <Enter> key to continue.
 ======================================================
 National Character Set Configuration
 --------------------------

Please select the default national character set.
1. UTF16 <Default>
2. UTF8
 >
-
Select a client character set. Select one of the national character sets, then press the <Enter> key to continue.
 ======================================================
 TB_NLS_LANG Character Set Configuration
 --------------------------

Please select the default TB_NLS_LANG character set.
0. Noting <Default>
1. MSWIN949
2. UTF8
3. ASCII
4. EUC-KR
5. SHIFT-JIS
6. JA16SJIS
7. JA16SJISTILDE
8. JA16EUC
9. JA16EUCTILDE
 >
-
Enter information about the default user accounts in Tibero DB: Sys, Syscat, Tibero, and Tibero1. For each account, re-enter the password for confirmation.
 ======================================================
 Account Configuration
 --------------------------

 Please set the password for Administrator Accounts.
 Sys password :
 Confirm Sys password :
 Do you want to use the Sys password for Syscat, Tibero and Tibero1?(y/n) y
-
The pre-installation summary appears. Review the installation details, verify the installation path and other information, enter y and then press the <Enter> key to installTibero.
 ======================================================
 Pre-Installation Summary
 -------------------------

 Please Review the Following Information Before Continuing.
 Product Name                : Tibero 5 SP1
 TB_HOME                     : /home/tibero/Tibero/tibero5
 TB_SID                      : tibero
 Install Folder              : /home/tibero/Tibero/tibero5
 Install Set                 : Customize(Tibero 5 SP1, tbAdmin, help files)
 Listener Port               : 8629
 DataBase BLOCK SIZE(K)      : 8
 DATA FILE PATH              : /home/tibero/Tibero/tibero5/database/tibero
 Character Set               : MSWIN949
 National Character Set         : UTF16

 Is this information correct?(y/n)
-
The Tibero installation may take a few minutes. During the installation, software is copied, links are created, and a database is created in the data file path. After Tibero installs properly, the following will be displayed. To complete the installation, press the <Enter> key.
 ======================================================
 Installing Tibero 5 SP1
 --------------------------

 (100) Tibero 5 SP1 uncompressed completely
 (100) tbAdmin uncompressed completely
 (100) Help files uncompressed completely
 0                 50                100 (%)
 |==================|=================|
 Installation Completed
-
After the Tibero installation completes, a database is created. After the database is created, modify the user configuration file for the system environment.
For instructions on setting the configuration file, refer to section “3.2.2. Applying and Verifying the User Configuration File”.
Tibero can be manually installed in both Windows and Linux. This method is defined as manual mode.
Windows
The following is the installation process for Tibero for Windows in manual mode.
-
Verify that the following two files are prepared:
-
Binary executable file (tar.gz)
-
License file (license.xml)
-
-
Click the [Environment Variables] button in the [Start] > [Settings] > [Control Panel] > [System] > [Advanced] tab to set the environment variables. The following is an example:
Environment Variable Value TB_HOME C:\Tibero\tibero5 TB_SID tibero PATH C:\Tibero\tibero5\bin;C:\Tibero\tibero5\client\bin -
Extract the compressed binary executable file (tar.gz) to the C:\Tibero directory. Copy the issued license file (license.xml) to the license subdirectory of %TB_HOME%.
-
Enter the following command in the %TB_HOME%\bin directory. The service name may be omitted.
tbinstall %TB_HOME% %TB_SID% [-s Service Name]
When this command is executed, Tibero is registered as a Windows service. The Windows service can be verified at [Start] > [Settings] > [Control Panel] > [Administrative Tools] > [Service].
C:\Tibero\tibero5\bin>tbinstall C:\Tibero\tibero5 tibero
 Microsoft (R) Windows Script Host version 5.6
 Copyright (C) Microsoft Corporation 1996-2001. All rights reserved.

 TB_HOME = C:\Tibero\tibero5
 TB_SID = tibero
 service account = LocalSystem
 Tibero_tibero installed successfully.
-
Enter the following command in the %TB_HOME%\config directory.
gen_tip.bat
When this command is executed, an environment file (.tip) and the files tbdsn.tbr and psm_commands.bat are created.
C:\Tibero\tibero5\config>gen_tip.bat
 Using TB_SID [tibero]
C:\Tibero\tibero5\config\tibero.tip generated
C:\Tibero\tibero5\client\config\tbdsn.tbr generated.
C:\Tibero\tibero5\config\psm_commands.bat generated
Note
1. For more information on how to configure tbdsn.tbr, refer to Appendix A. tbdsn.tbr in the "Tibero Administrator's Guide."
2. For more information on how to configure %TB_SID%.tip, refer to "Appendix A. Example of Initialization Parameters" of the "Tibero Reference Guide."
-
Start Tibero server in 'NOMOUNT' mode.
C:\Tibero\tibero5\bin>tbboot nomount

Tibero instance started up (NOMOUNT mode).
-
Access the database by using tbSQL utility. In the following example, a database is accessed by using the 'sys' account.
C:\Tibero\tibero5\bin>tbsql sys/tibero

tbSQL 5 SP1

Copyright (c) 2001-2011 TmaxData Corporation. All rights reserved.

Connected to Tibero.
-
Create a desired database using the CREATE DATABASE statement.
SQL>create database
      user sys identified by tibero
      maxinstances 8
      maxdatafiles 100
      character set MSWIN949 -- UTF8, EUCKR, ASCII, MSWIN949, JA16SJIS
      national character set UTF16 -- UTF16, UTF8
      logfile group 1 'C:\Tibero\tibero5\database\tibero\log001.log'
                       size 100M,
              group 2 'C:\Tibero\tibero5\database\tibero\log002.log'
                       size 100M,
              group 3 'C:\Tibero\tibero5\database\tibero\log003.log'
                       size 100M
       maxloggroups 255
       maxlogmembers 8
       noarchivelog
             datafile 'C:\Tibero\tibero5\database\tibero\system001.dtf'
                       size 100M
                       autoextend on next 100M
                       maxsize unlimited
       default temporary tablespace TEMP
             tempfile 'C:\Tibero\tibero5\database\tibero\temp001.dtf'
                       size 100M
                       autoextend on next 100M
                       maxsize unlimited
                       extent management local autoallocate
       undo tablespace UNDO
             datafile 'C:\Tibero\tibero5\database\tibero\undo001.dtf'
                       size 100M
                       autoextend on next 100M
                       maxsize unlimited
                       extent management local autoallocate;
Database created.
SQL> quit;
Note
For more information about the CREATE DATABASE statement and available character sets, refer to the "Tibero SQL Reference Guide."
-
After the database is created, restart Tibero using the tbboot command.
SQL> quit;
C:\Tibero\tibero5\bin>tbboot

Tibero instance started up (NORMAL mode)
-
Enter the system.vbs command in the %TB_HOME%\scripts directory to execute the file (*.sql, hereafter SQL file) including SQL statements in the current directory. When the SQL file is executed a role, System user, view, and package are created. The default passwords for the sys and syscat account are tibero and syscat respectively.
C:\Tibero\tibero5\scripts>system.vbs
 Microsoft (R) Windows Script Host Version 5.6
 Copyright (C) Microsoft Corporation 1996-2001. All rights reserved.

Enter SYS password:
*******
Enter SYSCAT password:
*******
Creating the role DBA...
       Running C:\Tibero\tibero5\scripts\create_dba_gen.sql...
Creating system users & roles?(Y/N):
y
Creating system users & roles...
       Running C:\Tibero\tibero5\scripts\system_users.sql...
Creating virtual tables(1)...
       Running C:\Tibero\tibero5\scripts\vt_drop_gen.sql...
Creating virtual tables(2)...
       Running C:\Tibero\tibero5\scripts\vt_create_gen.sql...
Granting public access to _VT_DUAL...
       Running C:\Tibero\tibero5\scripts\vt_dual.sql...
Creating the system generated sequences...
       Running C:\Tibero\tibero5\scripts\create_seq.sql...
Creating internal dynamic performance views...
       Running C:\Tibero\tibero5\scripts\dpvx.sql...
Creating system packages:
       Running C:\Tibero\tibero5\scripts\pkg\pkg_standard.sql...
       Running C:\Tibero\tibero5\scripts\pkg\pkg_dbms_output.sql...
       Running C:\Tibero\tibero5\scripts\pkg\pkg_dbms_lob.sql...
       Running C:\Tibero\tibero5\scripts\pkg\pkg_dbms_utility.sql...
       Running C:\Tibero\tibero5\scripts\pkg\pkg_dbms_obfuscation.sql...
       Running C:\Tibero\tibero5\scripts\pkg\pkg_dbms_transaction.sql...
       Running C:\Tibero\tibero5\scripts\pkg\pkg_dbms_random.sql...
       Running C:\Tibero\tibero5\scripts\pkg\pkg_dbms_lock.sql...
       Running C:\Tibero\tibero5\scripts\pkg\pkg_dbms_system.sql...
       Running C:\Tibero\tibero5\scripts\pkg\pkg_dbms_job.sql...
       Running C:\Tibero\tibero5\scripts\pkg\pkg_utl_raw.sql...
       Running C:\Tibero\tibero5\scripts\pkg\pkg_utl_file.sql...
       Running C:\Tibero\tibero5\scripts\pkg\pkg_tb_utility.sql...
       Running C:\Tibero\tibero5\scripts\pkg\pkg_dbms_sql.sql...
       Running C:\Tibero\tibero5\scripts\pkg\pkg_dbms_rowid.sql...
       Running C:\Tibero\tibero5\scripts\pkg\pkg_dbms_repair.sql...
       Running C:\Tibero\tibero5\scripts\pkg\pkg_dbms_application_info.sql...
       Running C:\Tibero\tibero5\scripts\pkg\pkg_dbms_java.sql...
       Running C:\Tibero\tibero5\scripts\pkg\pkg_utl_encode.sql...
       Running C:\Tibero\tibero5\scripts\pkg\pkg_utl_url.sql...
       Running C:\Tibero\tibero5\scripts\pkg\pkg_utl_http.sql...
       Running C:\Tibero\tibero5\scripts\pkg\pkg_dbms_session.sql...
Creating public synonyms for system packages...
       Running C:\Tibero\tibero5\scripts\pkg\pkg_synonym.sql...
Creating auxiliary tables used in static views...
       Running C:\Tibero\tibero5\scripts\systbl_gen.sql...
Creating system tables related to job...
       Running c:\Tibero\tibero5\scripts\systbl_job.sql...
Create system tables related to profile?(Y/N):
y
Creating system tables related to profile...
       Running c:\Tibero\tibero5\scripts\sys_profile.sql...
Creating static views...
       Running c:\Tibero\tibero5\scripts\catalogview.sql...
Creating static view descriptions...
       Running c:\Tibero\tibero5\scripts\sv_dict.sql...
Creating packages for statistics:
       Running c:\Tibero\tibero5\scripts\pkg\pkg_sys_util.sql...
       Running c:\Tibero\tibero5\scripts\pkg\pkg_dbms_stats_internal.sql...
       Running c:\Tibero\tibero5\scripts\pkg\pkg_dbms_stats.sql...
Creating packages for log errors:
       Running c:\Tibero\tibero5\scripts\pkg\pkg_dbms_errlog.sql...

Creating packages for mview:
       Running c:\Tibero\tibero5\scripts\rewrite_table.sql...
       Running c:\Tibero\tibero5\scripts\pkg\pkg_dbms_mview_util.sql...
       Running c:\Tibero\tibero5\scripts\pkg\pkg_dbms_mview.sql...
       Running c:\Tibero\tibero5\scripts\pkg\pkg_dbms_mview_refresh_util.sql..
       Running c:\Tibero\tibero5\scripts\pkg\pkg_dbms_redefinition_stats.sql..
       Running c:\Tibero\tibero5\scripts\pkg\pkg_dbms_redefinition.sql...
Creating packages for text:
       Running c:\Tibero\tibero5\scripts\pkg\pkg_text.sql...
Creating remaining public synonyms for system packages...
       Running c:\Tibero\tibero5\scripts\pkg\pkg_synonym2.sql...
       Running c:\Tibero\tibero5\scripts\iparam_desc_gen.sql...
       Running c:\Tibero\tibero5\scripts\trace_event_desc_gen.sql...
Creating dynamic performance views...
       Running c:\Tibero\tibero5\scripts\dpv.sql...
Creating dynamic performance view descriptions...
       Running c:\Tibero\tibero5\scripts\dpv_dict.sql...
Check APM status..
       Running c:\Tibero\tibero5\scripts\apm_check_status.sql...
Stop APM..
       Running c:\Tibero\tibero5\scripts\apm_stop.sql...
Creating APM tables?(Y/N):
y
Dropping tables used in APM...
       Running c:\Tibero\tibero5\scripts\apm_drop.sql...
Creating auxiliary tables used in APM...
       Running c:\Tibero\tibero5\scripts\apm.sql...
Creating packages for APM...
       Running c:\Tibero\tibero5\scripts\pkg/pkg_dbms_apm.sql...
Start APM
       Running c:\Tibero\tibero5\scripts\apm_start.sql...
Creating spatial meta tables and views ...
       Running c:\Tibero\tibero5\scripts\create_gis.sql...
Creating internal system tables...
       Running c:\Tibero\tiberot5\scripts\sys_tbl.sql...

C:\Tibero\tibero5\scripts>
The system.vbs command allows the user to verify that the following items have been created.
Item Description default system users & roles Specifies whether to create system users and assign permissions. For initial installation, you must enter 'Y'.
-
Y: Creates a system user and assigns permissions.
-
N: Saves data.
system tables related to profile Specifies whether to create a table for the profiles that define the password management policies of each user. For initial installation, you must enter 'Y'.
-
Y: Creates a new table after deleting the existing one.
-
N: Saves data.
For more information about profiles, refer to "Chapter 5 User Management and Database Security" of "Tibero Administrator's Guide'.
dbms_stats job to Job Scheduler Specifies whether to schedule a job to collect statistical information of database objects. It is recommends to enter 'Y' for initial installation.
-
Y: Schedules a new job that is used to collect statistical information after deleting the existing one.
-
N: No job is scheduled.
APM tables Specifies whether to create APM related tables for regularly and automatically collecting statistical information. For initial installation, you must enter 'Y'.
-
Y: Creates a new table by deleting the existing one.
-
N: Saves data.
For more information about APM, refer to "Chapter 14 Automatic Performance Monitoring" of "Tibero Administrator's Guide."
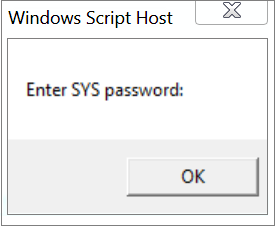
If an alter window appears and no progress is made after running system.sh, enter the cscript //H:cscript command and then run system.vbs again. This allows user to enter the password of the sys or syscat account.
Note
Since system.vbs connects to a database by using the Windows environment variable %TB_SID%, a user must check that the same DSN name doesn't already exist among the Windows data sources. If the DSN with the same name already exists, system.vbs may connect through the existing DSN instead of the desired DSN.
-
-
If Tibero is installed properly, the tblistener and tbsvr processes are executed. The two processes can be checked in the [Process] tab in Windows Task Manager by pressing <Ctrl> + <Alt> + <Del> at the same time.
Image Name                User Name           CPU            Memory Usage
...
tblistener.exe              SYSTEM             00             2,804 KB
tbsvr.exe                   SYSTEM             00           216,056 KB
...
Linux
The following is the installation process for Tibero for Linux in manual mode:
-
Verify that the following two files are prepared:
-
Binary executable file (tar.gz)
-
License file (license.xml)
-
-
Set the environment variables in the environment files (.bashrc, .bash_profile, .profile, etc.) for each user account for the corresponding OS. The following is an example:
export TB_HOME=/home/tibero/Tibero/tibero5
export TB_SID=tibero
export LD_LIBRARY_PATH=$TB_HOME/lib:$TB_HOME/client/lib
export PATH=$PATH:$TB_HOME/bin:$TB_HOME/client/bin
Note
1. Changing the environment variables varies depending on the OS. For more detailed information, refer to each corresponding OS guide.
2. For detailed description of each environment variable, refer to“3.2.2. Applying and Verifying the User Configuration File”.
-
Extract the compressed binary executable file (tar.gz) to the /home/tibero/Tibero directory. Copy the issued license file (license.xml) to the $TB_HOME/license directory.
-
Enter the following command from the $TB_HOME/config directory.
gen_tip.sh
When this command is executed, an environment file (.tip) and the files tbdsn.tbr and psm_commands are created.
tibero@Tibero:~/Tibero/tibero5/config$ gen_tip.sh
Using TB_SID "tibero"
/home/tibero/Tibero/tibero5/config/tibero.tip generated
/home/tibero/Tibero/tibero5/config/psm_commands generated
/home/tibero/Tibero/tibero5/client/config/tbdsn.tbr generated.
Running client/config/gen_esql_cfg.sh
Done.
Note
1. For more information on how to configure tbdsn.tbr, refer to Appendix A. tbdsn.tbr in "Tibero Administrator's Guide."
2. For more information on how to configure TB_SID.tip file, refer to "Appendix A. Example of Initialization Parameters" in the "TiberoDB Reference Guide."
-
Start the Tibero server in 'NOMOUNT' mode.
tibero@Tibero:~/Tibero/tibero5/bin$ tbboot nomount
listener port = 8629
change core dump dir to /home/tibero/Tibero/tibero5/instance/tibero

Tibero 5 SP1

Copyright (c) 2001-2011 TmaxData Corporation. All rights reserved.

Tibero instance started suspended at NOMOUNT mode.

tibero@Tibero:~/Tibero/tibero5/bin$
-
Access a database using the tbSQL utility. In this example, a database is accessed with the 'sys' user.
tibero@Tibero:~/Tibero/tibero5/client/bin$ tbsql sys/tibero

tbSQL 5 SP1

Copyright (c) 2001-2011 TmaxData Corporation. All rights reserved.

Connected to Tibero.
-
Create a database using the CREATE DATABASE statement.
SQL> create database
        user sys identified by tibero
        maxinstances 8
        maxdatafiles 100
        character set MSWIN949 -- UTF8, EUCKR, ASCII, MSWIN949, JA16SJIS
        national character set UTF16 -- UTF16, UTF8
        logfile group 1 '/home/tibero/Tibero/tibero5/database/tibero/log001.log'
                         size 100M,
                group 2 '/home/tibero/Tibero/tibero5/database/tibero/log002.log'
                         size 100M,
                group 3 '/home/tibero/Tibero/tibero5/database/tibero/log003.log'
                         size 100M
        maxloggroups 255
        maxlogmembers 8
        noarchivelog
               datafile '/home/tibero/Tibero/tibero5/database/tibero/
                         system001.dtf'
                         size 100M
                         autoextend on next 100M
                         maxsize unlimited
        default temporary tablespace TEMP
               tempfile '/home/tibero/Tibero/tibero5/database/tibero/temp001.dtf'
                         size 100M
                         autoextend on next 100M
                         maxsize unlimited
                         extent management local autoallocate
        undo tablespace UNDO
               datafile '/home/tibero/Tibero/tibero5/database/tibero/undo001.dtf'
                         size 100M
                         autoextend on next 100M
                         maxsize unlimited
                         extent management local autoallocate;
Database created.

SQL>
-
After the database is created, restart Tibero using the tbboot command.
[tibero@Tibero ~]$ tbboot
listener port = 8629
change core dump dir to /home/tibero/Tibero/tibero5/bin

Tibero 5 SP1

Copyright (c) 2001-2011 TmaxData Corporation. All rights reserved.

Tibero instance started up (NORMAL mode).
-
Enter the system.sh command in the $TB_HOME/scripts directory to run the SQL file. When the file runs, a role, system user, view, package, etc. are created. The default passwords for the sys and syscat accounts are tibero and syscat respectively.
tibero@Tibero:~/Tibero/tibero5/scripts$ system.sh
Enter SYS password:
*******

Enter SYSCAT password:
*******

Creating the role DBA...
Create default system users & roles?(Y/N):
Y

Creating system users & roles...
Creating virtual tables(1)...
Creating virtual tables(2)...
Granting public access to _VT_DUAL...
Creating the system generated sequences...
Creating internal dynamic performance views...
Creating system packages:
    Running /home/tibero/Tibero/tibero5/scripts/pkg/pkg_standard.sql...
    Running /home/tibero/Tibero/tibero5/scripts/pkg/pkg_dbms_output.sql...
    Running /home/tibero/Tibero/tibero5/scripts/pkg/pkg_dbms_lob.sql...
    Running /home/tibero/Tibero/tibero5/scripts/pkg/
             pkg_dbms_utility_internal.sql...
    Running /home/tibero/Tibero/tibero5/scripts/pkg/pkg_dbms_utility.sql...
    Running /home/tibero/Tibero/tibero5/scripts/pkg/pkg_dbms_obfuscation.sql...
    Running /home/tibero/Tibero/tibero5/scripts/pkg/pkg_dbms_transaction.sql...
    Running /home/tibero/Tibero/tibero5/scripts/pkg/pkg_dbms_random.sql...
    Running /home/tibero/Tibero/tibero5/scripts/pkg/pkg_dbms_lock.sql...
    Running /home/tibero/Tibero/tibero5/scripts/pkg/pkg_dbms_system.sql...
    Running /home/tibero/Tibero/tibero5/scripts/pkg/pkg_dbms_job.sql...
    Running /home/tibero/Tibero/tibero5/scripts/pkg/pkg_utl_raw.sql...
    Running /home/tibero/Tibero/tibero5/scripts/pkg/pkg_utl_file.sql...
    Running /home/tibero/Tibero/tibero5/scripts/pkg/pkg_tb_utility.sql...
    Running /home/tibero/Tibero/tibero5/scripts/pkg/pkg_dbms_sql.sql...
    Running /home/tibero/Tibero/tibero5/scripts/pkg/pkg_dbms_rowid.sql...
    Running /home/tibero/Tibero/tibero5/scripts/pkg/pkg_dbms_repair.sql...
    Running /home/tibero/Tibero/tibero5/scripts/pkg/
             pkg_dbms_application_info.sql...
    Running /home/tibero/Tibero/tibero5/scripts/pkg/pkg_dbms_java.sql...
    Running /home/tibero/Tibero/tibero5/scripts/pkg/pkg_utl_encode.sql...
    Running /home/tibero/Tibero/tibero5/scripts/pkg/pkg_utl_url.sql...
    Running /home/tibero/Tibero/tibero5/scripts/pkg/pkg_utl_http.sql...
    Running /home/tibero/Tibero/tibero5/scripts/pkg/pkg_dbms_session.sql...
Creating public synonyms for system packages...
Creating auxiliary tables used in static views...
Create system tables related to profile?(Y/N):
Y

Creating system tables related to profile...
Creating static views...
Creating static view descriptions...
Creating packages for statistics:
    Running /home/tibero/Tibero/tibero5/scripts/pkg/pkg_sys_util.sql...
    Running /home/tibero/Tibero/tibero5/scripts/pkg/pkg_dbms_stats_internal.sql...
    Running /home/tibero/Tibero/tibero5/scripts/pkg/pkg_dbms_stats.sql...
Register dbms_stats job to Job Scheduler?(Y/N):
y

Registering dbms_stats job to Job Scheduler...
Creating packages for mview:
    Running /home/tibero/Tibero/tibero5/scripts/rewrite_table.sql...
    Running /home/tibero/Tibero/tibero5/scripts/pkg/pkg_dbms_mview_util.sql...
    Running /home/tibero/Tibero/tibero5/scripts/pkg/pkg_dbms_mview.sql...
    Running /home/tibero/Tibero/tibero5/scripts/pkg/pkg_dbms_redefinition.sql...
Creating remaining public synonyms for system packages...
    Running /home/tibero/Tibero/tibero5/scripts/iparam_desc_gen.sql...
Creating auxiliary tables used in metric system...
metrics package creating...
    Running /home/tibero/Tibero/tibero5/scripts/pkg/pkg_dbms_metrics.sql...
Creating dynamic performance views...
Creating dynamic performance view descriptions...
Check APM status..
Stop APM
Create apm tables?(Y/N):
Y

Creating auxiliary tables used in APM...
Creating packages for APM...
    Running /home/tibero/Tibero/tibero5/scripts/pkg/pkg_dbms_apm.sql...
Start APM
Creating spatial meta tables and views ...
Creating internal system tables...
tibero@Tibero:~/Tibero/tibero5/scripts$
The system.vbs command allows users to check whether the following items have been created.
Item Description default system users & roles Specifies whether to create system users and assign permissions. For initial installation, you must enter 'Y'.
-
Y: Creates a system user and assigns permissions.
-
N: Saves data.
system tables related to profile Specifies whether to create a table for the profiles that define the password management policies of each user. For initial installation, you must enter 'Y'.
-
Y: Creates a new table after deleting the existing one.
-
N: Saves data.
For more information about profiles, refer to "Chapter 5 User Management and Database Security" of "Tibero Administrator's Guide'.
dbms_stats job to Job Scheduler Specifies whether to schedule a job to collect statistical information of database objects. It is recommends to enter 'Y' for initial installation.
-
Y: Schedules a new job that is used to collect statistical information after deleting the existing one.
-
N: No job is scheduled.
APM tables Specifies whether to create APM related tables for regularly and automatically collecting statistical information. For initial installation, you must enter 'Y'.
-
Y: Creates a new table by deleting the existing one.
-
N: Saves data.
For more information about APM, refer to "Chapter 14 Automatic Performance Monitoring" of "Tibero Administrator's Guide."
-
-
The Tibero process will start when Tibero installation completes successfully. The process can be checked by running the following command.
tibero@Tibero:~/Tibero/tibero5/scripts$ ps -ef | grep tbsvr
tibero   31697 31696  0 21:12 pts/2    00:00:00 tbsvr         ...
tibero   31698 31697  0 21:12 pts/2    00:00:00 tbsvr_WT001   ...
tibero   31699 31697 11 21:12 pts/2    00:00:12 tbsvr_WT002   ...
tibero   31700 31697  0 21:12 pts/2    00:00:00 tbsvr_SEQW    ...
tibero   31701 31697  0 21:12 pts/2    00:00:00 tbsvr_LOGW    ...
tibero   31702 31697  0 21:12 pts/2    00:00:00 tbsvr_LOGA    ...
tibero   31703 31697  0 21:12 pts/2    00:00:00 tbsvr_CKPT    ...
tibero   31704 31697  0 21:12 pts/2    00:00:00 tbsvr_BLKW000 ...
tibero   32040  6771  0 21:14 pts/2    00:00:00 grep tbsvr    ...
On Windows and Linux, two or more database instances can be installed by configuring a separate TB_SID variable and environment file (.tip) while sharing the same Tibero binary and license files.
Windows
The following is the instructions for manually installing two or more Tibero
-
Install the first Tibero “3.1.1. GUI Mode” or “3.1.3. Manual Mode”. The following are the environment variables of the first instance that is installed in this example.
Environment Variable Value TB_HOME C:\Tibero\tibero5 TB_SID tibero1 PATH C:\Tibero\tibero5\bin;C:\Tibero\tibero5\client\bin -
Verify that the TB_UP_HOME or PATCH environment variables are properly configured from the existing Windows command prompt or by opening a new command prompt. If they are not set correctly, manually set the variables.
C:\Tibero\tibero5>echo %TB_HOME%
Then, set the TB_SIDUP_SID environment variable for a new instance. This value must be different from that of the previously installed instance. The following environment variable is set for this example.
set TB_SID=tibero2
-
Enter the following command from the %TB_HOME%\bin directory. The service name must be different from that of the previously installed instance. The service name can be omitted.
tbinstall %TB_HOME% %TB_SID% [-s service name]
When the command is executed, Tibero is registered as a Windows service.
C:\Tibero\tibero5\bin>tbinstall C:\Tibero\tibero5 tibero2
 Microsoft (R) Windows Script Host Version 5.6
 Copyright (C) Microsoft Corporation 1996-2001. All rights reserved.

 TB_HOME = C:\Tibero\tibero5
 TB_SID = tibero2
 service account = LocalSystem
 Tibero_tibero2 installed successfully.
The registered Windows service can be checked from the [Start] > [Settings] > [Control Panel] > [Management Tool] > [Service] tab.
-
Enter the following command from the %TB_HOME%\config directory.
gen_tip.bat
When the command is executed, an environment file (.tip) and the tbdsn.tbr and psm_commands files are created.
C:\Tibero\tibero5\config>gen_tip.bat
 Using TB_SID [tibero2]
C:\Tibero\tibero5\config\tibero2.tip generated
C:\Tibero\tibero5\client\config\tbdsn.tbr generated.
C:\Tibero\tibero5\config\psm_commands.bat generated
Note
1. For more information on how to configure tbdsn.tbr, refer to Appendix A. tbdsn.tbr in the "Tibero Administrator's Guide."
2. For more information on how to configure %TB_SID%.tip, refer to "Appendix A. Example of Initialization Parameters" of the "Tibero Reference Guide."
-
Open the environment file (.tip) that was created in the %TB_HOME%\config directory, and set the LISTENER_PORT to a value different from that of the previously installed instance. The following value is configured for this example.
LISTENER_PORT=9629
Configure the port number of the tbdsn.tbr file as shown below.
tibero2=(
    (INSTANCE=(HOST=localhost)
              (PORT=9629)
              (DB_NAME=tibero2)
    )
)
Note
The default values of the_LSNR_SPECIAL_PORT, _LSNR_SSL_PORT, and CM_PORT initialization parameters are LISTENER_PORT+1, LISTENER_PORT+2, and LISTENER_PORT+3 respectively. Therefore, care should be taken to make sure that the LISTENER_PORT, _LSNR_SPECIAL_PORT, _LSNR_SSL_PORT, and CM_PORT values of the new instance do not overlap with those of the already installed instance(s).
-
The subsequent instructions are the same as the steps 6 -11 of “3.1.3. Manual Mode”. However, when creating a database using the CREATE DATABASE statement according to instruction 7, the log file or data file path should be modified to the TB_SIDUP_SID value of the new instance.
Linux
The following is the instructions for manually installing Tibero
-
Install the first Tibero “3.1.2. Console Mode” or “3.1.3. Manual Mode”. The following are the environment variables of the first instance that is installed in this example.
Environment Variable Value TB_HOME /home/tibero/Tibero/tibero5 TB_SID tibero1 LD_LIBRARY_PATH $TB_HOME/lib:$TB_HOME/client/lib PATH $PATH:$TB_HOME/bin:$TB_HOME/client/bin -
Verify that the TB_UP_HOME or PATCH environment variables are properly configured from the existing shell or by opening a new shell. If they are not set correctly, manually set the variables.
tibero@Tibero:~/Tibero/tibero5$ echo $TB_HOME
/home/tibero/Tibero/tibero5
tibero@Tibero:~/Tibero/tibero5$ echo $LD_LIBRARY_PATH
/home/tibero/Tibero/tibero5/lib:/home/tibero/Tibero/tibero5/client/lib
tibero@Tibero:~/Tibero/tibero5$ echo $PATH
[$PATH]:/home/tibero/Tibero/tibero5/bin:/home/tibero/Tibero/tibero5/client/bin
Then, set the TB_SIDUP_SID environment variable for a new instance. This value must be different from that of the previously installed instance. The following environment variable is set for this example.
export TB_SID=tibero2
-
Enter the following command from the $TB_HOME/config directory.
gen_tip.sh
When the command is executed, an environment file (.tip) and the tbdsn.tbr and psm_commands files are created.
tibero@Tibero:~/Tibero/tibero5/config$ gen_tip.sh
Using TB_SID "tibero2"
/home/tibero/Tibero/tibero5/config/tibero2.tip generated
/home/tibero/Tibero/tibero5/config/psm_commands generated
/home/tibero/Tibero/tibero5/client/config/tbdsn.tbr generated.
Running client/config/gen_esql_cfg.sh
Done.
-
Open the environment file (.tip) that was created in the $TB_HOME/config directory, and set the LISTENER_PORT to a value different from that of the previously installed instance. The following value is configured for this example.
LISTENER_PORT=9629
Configure the port number of the tbdsn.tbr file as shown below.
tibero2=(
    (INSTANCE=(HOST=localhost)
              (PORT=9629)
              (DB_NAME=tibero2)
    )
)
Note
The default values of the_LSNR_SPECIAL_PORT, _LSNR_SSL_PORT, and CM_PORT initialization parameters are LISTENER_PORT+1, LISTENER_PORT+2, and LISTENER_PORT+3 respectively. Therefore, care should be taken to make sure that the LISTENER_PORT, _LSNR_SPECIAL_PORT, _LSNR_SSL_PORT, and CM_PORT values of the new instance do not overlap with those of the already installed instance(s).
-
The subsequent instructions are the same as the steps 5 -10 of “3.1.3. Manual Mode”. However, when creating a database using the CREATE DATABASE statement according to instruction 6, the log file or data file path should be modified to the TB_SIDUP_SID value of the new instance.
When Tibero is installed properly, the following directories are created:
$TB_HOME
    +- bin
    |
    +- client
    |   |
    |   +- bin
    |   +- config
    |   +- include
    |   +- lib
    |   +- ssl
    |   |   |
    |   |   +- man
    |   |   |  +- man1
    |   |   |  +- man3
    |   |   |  +- man5
    |   |   |  +- man7
    |   |   +- misc
    |   +- tbepa
    |   |   |
    |   |   +- java
    |   |       |
    |   |       +- config
    |   |       +- lib
    |   +- win32
    |   +- win64
    |
    +- config
    |
    +- database
    |   +- $TB_SID
    |       |
    |       +- psm
    |
    +- instance
    |   |
    |   +- $TB_SID
    |       |
    |       +- audit
    |       +- log
    |       |  +- dbmslog
    |       |  +- lsnr
    |       |  +- tracelog
    |       +- path
    |
    +- lib
    |
    +- license
    |   |
    |   +- oss_licenses
    |
    +- scripts
         +- pkg
The variable $TB_SID in the above directory structure is replaced with the server's SID for each system environment.
Tibero uses the following directories:
- bin
-
Contains Tibero's executable files and server management utilities. Both tbsvr and tblistener, which are located in this directory, are executable files for organizing Tibero. The tbboot utility and the tbdown utilities start and shut down Tibero respectively.
Both the tbsvr and tblistener utilities must be run with the "tbboot" command.
- client/bin
-
Contains Tibero client executable files. This directory contains the following utilities:
For more information about the utilities, refer to the "Tibero Utility Guide", and for the tbpc utility, refer to the "Tibero tbESQL/C Guide."
- client/config
-
Contains configuration files for executing client applications for Tibero.
- client/include
-
Contains header files necessary to develop a client application for Tibero.
- client/lib
-
Contains library files necessary to develop a client application for Tibero.
For more information, refer to the "Tibero Application Developer's Guide" and the "Tibero tbESQL/C Guide."
- client/ssl
-
Contains a certificate and private key for server security.
- client/tbepa
-
Contains configuration files and log files related to external procedures. For more information, refer to "Tibero External Procedure Guide."
- client/win32
-
Contains ODBC/OLE DB driver for 32 Bit Windows.
- client/win64
-
Contains ODBC/OLE DB driver for 64 Bit Windows.
- config
-
Contains Tibero configuration files. The $TB_SID.tip file is the main Tibero configuration file.
- database/$TB_SID
-
Tibero's database information is saved in this directory or its subdirectories unless there is a particular configuration specifying otherwise.
Contains the following files as well as metadata:
- database/$TB_SID/psm
-
Contains compiled files when compiling tbPSM applications in compile mode. However, Tibero currently only supports the interpreter mode.
For more information, refer to the "Tibero tbPSM Guide."
- instance/$TB_SID/audit
-
Contains files that have audit information about the database's user system privileges and schema object privileges.
- instance/$TB_SID/log
-
Contains the following Tibero trace log files and DBMS log files:
The maximum size of the directory can be specified. Tibero removes old log files to prevent exceeding the specified directory size.
The initialization parameters for configuring the DBMS log files are:
Initialization Parameter Description DBMS_LOG_FILE_SIZE The maximum size of a single DBMS log file. DBMS_LOG_TOTAL_SIZE_LIMIT The maximum size of the directory that contains DBMS log files. TRACE_LOG_FILE_SIZE The maximum size of a single trace log file. TRACE_LOG_TOTAL_SIZE_LIMIT The maximum size of the directory that contains trace log files. - instance/$TB_SID/path
-
Contains socket files for communications between Tibero processes. The files must not be read or modified while Tibero is running.
- lib
-
Contains library files for using spatial-related functions in Tibero.
- license
-
Contains the Tiberolicense file, license.xml. The file can be read with a standard text editor
- license/oss_licenses
-
Contains open source license information that must be complied with.
- scripts
-
Contains various SQL scripts used when Tibero is created. Also contains definitions for various views that show the current status of Tibero.
- scripts/pkg
-
Contains package-related scripts used in Tibero.
If Tibero is installed properly, the following properties are added in the user configuration file:
| Environment Variable | Description |
|---|---|
| TB_HOME | The path where Tibero is installed. If an installation path is not entered during the installation, it is set to {a user's home directory}/Tibero/tibero5 by default. |
| TB_SID | The SID entered during installation. If not entered, it is set to tibero by default. |
| LD_LIBRARY_PATH | The path in which shared libraries for using Tibero exist. All necessary libraries are located in $TB_HOME/lib and $TB_HOME/client/lib. A different variable is set depending on the OS type.
|
| PATH | The path to use Tibero . It is set to $TB_HOME/bin and $TB_HOME/client/bin by default. |
In UNIX, when a process is abnormally terminated, virtual memory information remains on the disk. This process is called a core dump. It requires a lot of computing resources and temporarily lowers system performance during execution, and the created dump file takes up a large amount of disk space. Therefore, this process is not recommended for Tibero. To disable the core dump feature, add the following command to the configuration file (.profile) of the user account.
ulimit -c 0
Although the user configuration file has been created, this does not mean the file has yet been applied. To apply the file, do the following:
-
To apply the configuration file, run the following command for UNIX or Linux:
sh .profile
-
To verify whether the file was applied properly, run the following command:
-
UNIX
echo $TB_HOME -
Windows
echo %TB_HOME%
-
Only database administrators (DBAs) are allowed to start or terminate Tibero.
Startup
Run the tbboot command. A description of the command is below:
tbboot [-h][-v][-t <bootmode>]
| Option | Description |
|---|---|
| -h | Shows help for the tbboot command. |
| -v | Shows the current version of Tibero . |
| -t | Starts the Tibero server. This can be omitted. |
Tibero provides the following boot modes for the tbboot command:
| Boot Mode | Description |
|---|---|
| NOMOUNT | Only starts the processes for Tibero . |
| MOUNT | Used for media recovery. |
| RECOVERY | Used to operate the standby database when Tibero Standby Cluster is configured. |
| NORMAL | Enables all database functions. |
| READONLY | Allows only read operations, but not update operations. |
Termination
Run the tbdown command. A description of the command follows:
tbdown [-h][-t <downmode>]
| Option | Description |
|---|---|
| -h | Shows help for the tbdown command. |
| -t | Terminates the Tibero server. This can be omitted. |
Tibero provides the following down modes for the tbdown command:
| Down Mode | Description |
|---|---|
| NORMAL | Terminates normally. |
| POST_TX | Terminates Tibero after all transactions are finished. |
| IMMEDIATE | Forcibly stops all tasks in progress, rolls back all transactions in progress, and then terminates Tibero |
| ABORT | Forcibly terminates Tibero processes. |
Connecting to the database with a tbSQL utility
Run the tbsql command. The user ID and password can be entered together as shown:
tbsql sys/tibero
To connect to a database through a listener, enter @ and the alias set in the tbdsn.tbr file following the user ID and password.
tbsql sys/tibero@tibero
The following user accounts are automatically created when Tibero is installed.
| User Account | Description |
|---|---|
| SYS | A user account for database management. Creates and manages system packages, synonyms, users, roles, virtual tables, sequences, dynamic views, etc. |
| SYSCAT | Creates and manages the static catalog views for database management. |
| OUTLN | Stores SQL hint to re-execute the same query plan for the same SQL. |
| SYSGIS | Creates and manages the tables that are related to GIS(Geographic Information System). |
| TIBERO | A sample user account that has been granted the CONNECT, RESOURCE and DBA roles. |
| TIBERO1 | A sample user account that has been granted the CONNECT, RESOURCE and DBA roles. |
The two methods for uninstalling Tibero are:
-
The Uninstall menu
Run [Start] > [Programs] > [Tibero] > [Tibero 5] > [Uninstall Tibero 5 SP1].
-
In GUI mode
The following instructions describe how to uninstall Tibero DB in GUI mode.
The following is the Tibero uninstallation process for Windows in GUI Mode:
-
To access the uninstall GUI screen, run the following command at %TB_HOME%\uninstall.
Tibero_Uninstall -
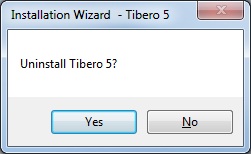
A screen confirming the uninstallation of Tibero appears. To uninstall, click the [Yes] button.
-
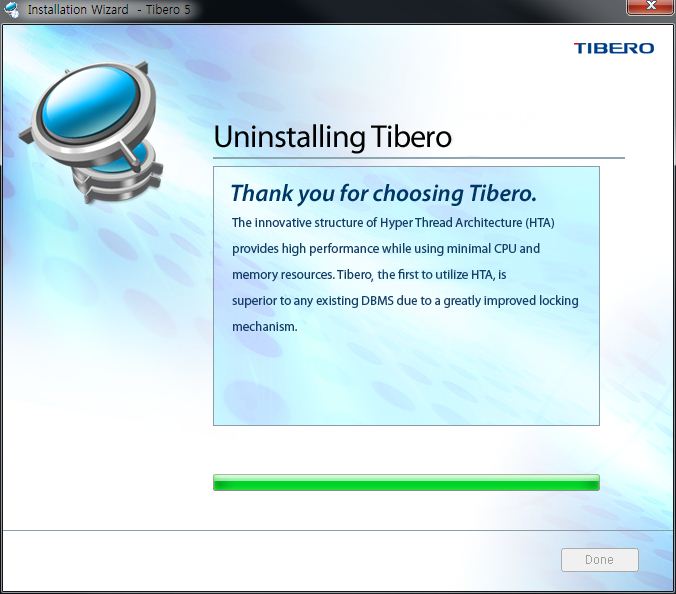
The following screen shows the Tibero uninstallation progress.
-
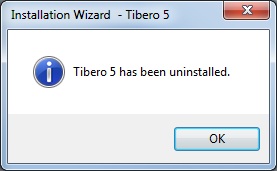
After uninstallation is complete, the following screen appears. Click the [OK] button to continue.
-
When Tibero is uninstalled, database files are removed but physical files are not. The physical files should be removed after the uninstallation process is finished.
To remove all files and directories under %TB_HOME%, run the following command at the command prompt:
C:\>del Tibero
C:\Tibero\*, Do you want to continue (Y/N)? y
C:\>
The following is the Tibero uninstallation process for Linux in console mode:
-
Run the following command at $TB_HOME/uninstall.
$ ./Tibero_Uninstall.bin -
When the following message is displayed, press 'y' and then the <Enter> key to continue.
  Please wait a moment...
  Uninstall Tibero 5 SP1? (y/n) y
  (100) Tibero uninstalltion completed...
-
When Tibero is uninstalled, database files are removed but physical files are not. The physical files should be removed after the uninstallation process is finished.
To remove all physical files, run the following command:
$ rm -rf Tibero
Windows
The following is the uninstallation process for Tibero on Windows in manual mode:
-
Terminate Tibero.
-
Remove information saved in the registry.
C:\>%TB_HOME%/bin/tbuninstall.vbs
-
To remove all directories including the directory where Tibero is installed, execute the following command:
C:\>rmdir /s %TB_HOME% -
Remove TB_HOME and TB_SID from the environment variables and the path entry %TB_HOME% from the environment variable named "path."
-
Windows XP
My Computer (Right-click) >[ Properties] > [Advanced], Click "Environment Variables".
-
Windows 7
My Computer (Right-click) > [Properties] > [Advanced System Properties] on the left side > Click "Environment Variables".
-
Linux
The following is the uninstallation process for Tibero on Linux in manual mode:
-
Terminate Tibero
$ tbdown -
To remove all directories including the directory where Tibero is installed, execute the following command:
$ rm -rf $TB_HOME
