Table of Contents
This chapter describes screen layouts and the usage of functions frequently used by database users. The basic functions described here are SQL Editor, PSM Editor, Schema Browser, Schema Tree Browser, and ASCII Table.
In the SQL Editor, SQL statements can be input and saved, and execution plans of SQL statement can be checked. Templates are provided to help learners write SQL statements more easily.
To start up SQL Editor, select [Database] -> [SQL
Editor] or click the icon  on the tool bar.
The following is a screen layout of the SQL Editor screen.
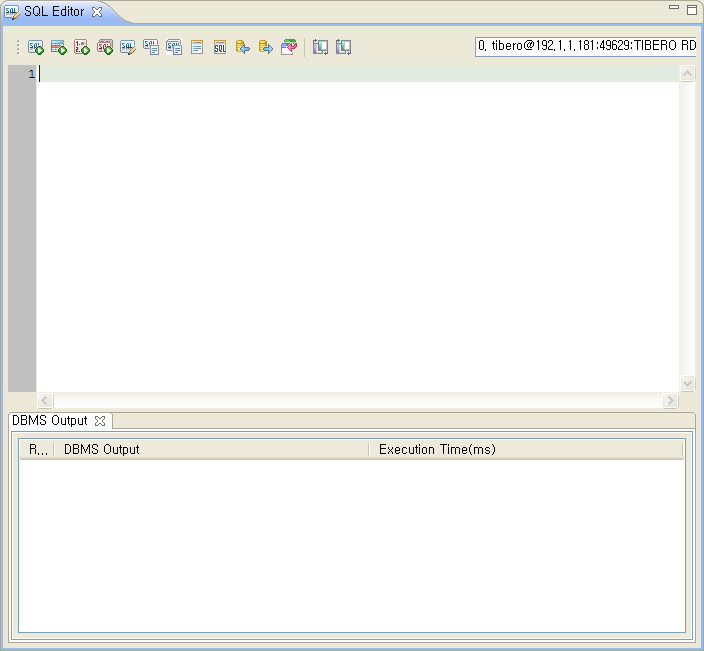
SQL Editor is composed of two parts: the editor in the upper part of the screen where SQL statements can be entered and executed, and the View in the lower part of the screen where execution results or execution plans of SQL statements can be displayed.
Each component of SQL Editor is explained below.
-
Icon
The following are descriptions of the icons that are located in the upper part of the SQL Editor screen.
Icon Description 
Executes a selected SQL statement or multiple SQL statements.
Selecting [Action] -> [Run SQL] in the menu has the same result.

Executes SQL statements from the current cursor to the end.
Selecting [Action] -> [Run All From Cursor] in the menu has the same result.

Executes SQL statements one by one from the current cursor.
Selecting [Action] -> [Run Step] in the menu has the same result.

Executes an SQL statement on the current cursor.
Selecting [Action] -> [Run current SQL] in the menu has the same result.

Changes the mode of the result window to an editable mode in order to edit data more easily.
Selecting [Action] -> [Run And Edit] has the same result.

Displays an execution plan of a selected SQL statement.
Selecting [Action] -> [Plan] has the same result.

Displays an execution plan of the SQL statement.
When clicked, an execution plan of the SQL statement will be displayed in the lower part of the screen.
Selecting [Action] -> [Current Plan] has the same result.

Calls the DML or DDL type for SQL statement, or PL/SQL conditions, grammars or functions and then and displays it (them) on SQL Editor.
When clicked, the [Template] tab which provides useful functions to write an SQL statement will be displayed.

Checks the previously executed SQL statements.
When clicked, the [SQL History] view which provides the list of previously executed SQL statements will be displayed at the bottom of the screen.

Permanently applies the result of DML execution.
Selecting [Action] -> [Commit] in the menu has the same result.

Cancels the result of DML that has been executed so far.
Selecting [Action] -> [Rollback] has the same result.

Changes the name of the currently selected tab.
Selecting [Action] -> [Change Tab title] in the menu has the same effect.

Maximizes the edit screen, which is in the upper part of the SQL Editor.
Selecting [Action] -> [Maximize SQL] in the menu has the same effect.
Maximizes the result screen, which is in the lower part of the SQL Editor.
Selecting [Action] -> [Maximize Result] in the menu has the same effect.
-
Context Menu
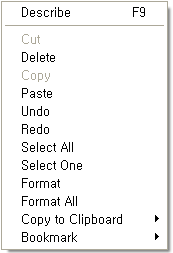
Context menu is used to edit SQL statements. They will appear by right clicking on the selected item in the upper part of the SQL Editor.
The following are descriptions of each command in the context menu.
Command Description Describe Shows the information about the specified table. Cut Cuts the selected area. Delete Deletes the selected area. Copy Copies the selected area. Paste Pastes the selected area. Undo Cancels the execution. Redo Resumes the cancelled execution. Select All Selects all contents. Select One Selects the current SQL statement on the cursor. Format Re-arranges an irregular and difficult SQL statement to be more readable. Format all Re-arranges all the irregular and difficult SQL statements to be more readable. Copy to clipboard Converts an SQL statement to a Visual Basic, C/C++, PowerBuilder, Delphi, Java, or Perl code.
-
Copy as Visual Basic Code
-
Copy as C/C++ Code
-
Copy as PowerBuilder Code
-
Copy as Delphi Code
-
Copy as Java Code
-
Copy as Perl Code
Bookmark When an SQL statement is very long, or when creating various SQL statements such as inline view and sub-query, this bookmark positions the cursor to a desired line, or moves the cursor to a desired position.
-
Bookmarks: To save the bookmark information, select a line from SQL Editor and press Ctrl + [0 ~ 9], or select the [ Action ] -> [ Bookmark] -> [ Bookmarks] -> [ BookMark 0 ~ 9 ] menu.
-
Go to Bookmark: To move to the specified bookmark, press Alt+ [0 ~ 9] or select the [ Action ] -> [ Bookmark] -> [Go to Bookmark] ->[ BookMark 0 ~ 9 ] menu.
-
Users can enter, edit, execute, and save SQL statements in this panel.
Entering and Editing SQL statements
SQL statements can be input and edited in the editor panel as follows.
-
Input of regular SQL statement.
Regular statements can be entered in the editor panel. A single SQL statement can be inserted over multiple lines.
When inputting a single SQL statement over multiple lines, the statement can be separated by clauses to enhance readability and make it easy to edit.
-
SQL statement input through a template
By selecting [Action] -> [Template] in the menu or clicking
at the top of the SQL Editor screen,
templates of DML, DDL, PL/SQL, and PL/SQL Control Structure are
displayed in tree structures.By double clicking a name of each template in the tree, the template of the sentence in the editor panel will be inserted. Users can complete an SQL statement by editing the entered template easily.
-
Comment input
When entering SQL statements, comments can be entered. A comment starts with two minus symbols (−−) and it will be recognized as a comment to the end of the line. A comment can be written on a line by itself or can be entered at the end of another line.
-
Using short-cut keys
Like other text editors, the SQL editor provides short-cut keys such as Redo (<Ctrl> + <Y>), Undo (<Ctrl> + <Z>), and Find/Replace (<Ctrl> + <F>).
Executing and Saving SQL statements
SQL statements can be executed and saved in the editor panel as follows.
-
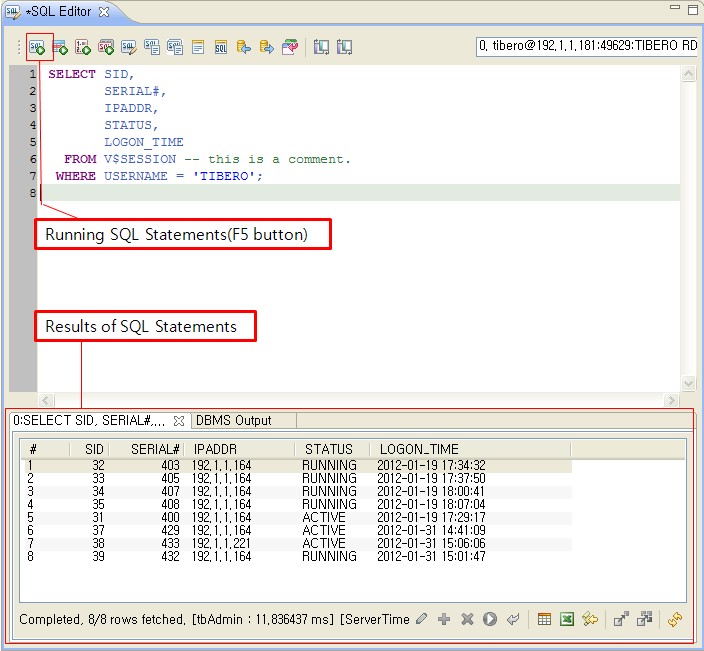
Executing multiple SQL statements
When executing SQL statements, users can execute all the SQL statements in the editor (<F5>) or execute only the selected statements (<Ctrl> + <Enter>). When executing multiple SQL statements, a tab is created for each SQL statement and each result can be checked individually in the View box, in the lower part of the screen.
-
Saving SQL statements and changing the name of the editor tab
SQL statements can be saved (<Ctrl> + <S>) in the SQL Editor. When an existing SQL file is retrieved, the name of the editor tab will be changed to the file name. To change the tab name, select [Action] -> [Change tab title] in the menu or click the icon
in the upper part of SQL Editor.
The execution result or an execution plan of an SQL statement can be checked.
The result of SQL statement execution
Enter an SQL statement in the editor panel and click the icon
in the upper part of SQL Editor or press
<F5>, the result of executing the SQL
statement is displayed in View, in the lower part of the screen.
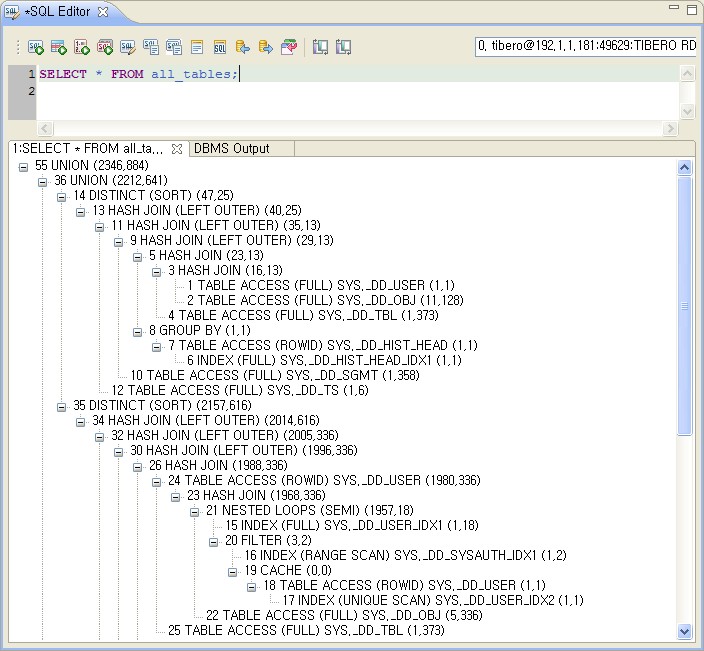
Execution Plan
Enter an SQL statement in the editor panel and click the icon
 in the upper part of the SQL Editor. The
execution plan of the SQL statement will then be displayed in the view
panel.
in the upper part of the SQL Editor. The
execution plan of the SQL statement will then be displayed in the view
panel.
Users can check the execution plan of an SQL statement. Also, the query can be tuned to optimise an SQL statement.
Users can easily retrieve the previously executed SQL statements in this panel.
Click the icon at the top of SQL Editor to bring up SQL
History View. The previously executed SQL statements will be displayed
here.
In addition, statements can be edited by double clicking the item to be edited.
As well as SQL statements, PSM (Persistent Stored Module) statements can also be written and executed.
To start PSM Editor select the [Database] -> [PSM
Editor] menu or click the icon  in the tool bar.
The following shows the PSM Editor screen.
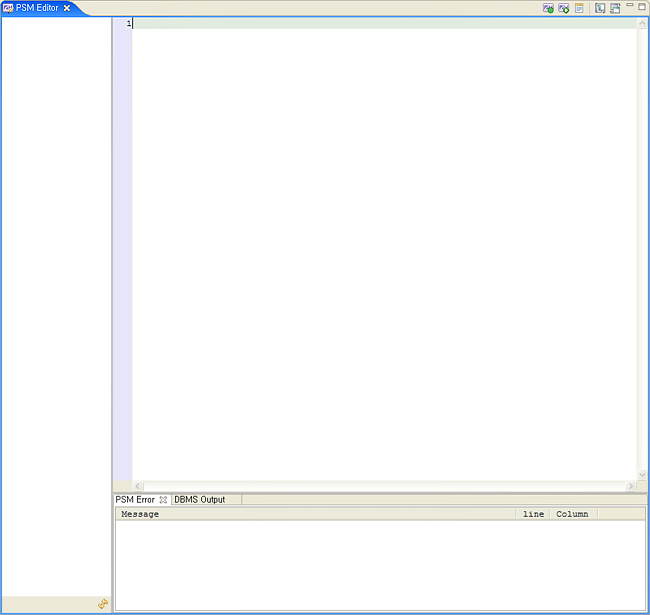
The PSM Editor is composed of the editor area in the upper part, in which PSM statements can be executed, and the view area in the lower part, in which the results of execution statements and the execution plan of a PSM statement can be viewed. On the left side of the PSM Editor, a tree is located.
When the icon  at the bottom left is clicked, the list of PSM
statements will be updated. The pane toggle icon at the top of the screen
can be used to display or hide additional information displaying
view.
at the bottom left is clicked, the list of PSM
statements will be updated. The pane toggle icon at the top of the screen
can be used to display or hide additional information displaying
view.
Each component of PSM Editor is explained below.
-
Icon
The following is descriptions for the icons at the top of PSM Editor.
Icon Description 
Compiles PSM statements. 
Executes PSM statements. 
Displays the [Template] tab which provides templates to help write PSM statements. 
Shows or hides the tree at the left side of PSM Editor. 
Shows or hides the view at the lower part of PSM Editor.
-
Context Menu
Context menu is used to edit PSM statements. They will appear by right clicking on the selected item in the upper part of the PSM screen. Menus are the same as the context menus in “3.1. SQL Editor”.
Users can enter, edit, execute, and save PSM statements in this panel.
Entering and Editing PSM statements
PSM statements can be entered and edited in the editor panel as follows.
-
Input of regular SQL statements
Regular statements can be entered in the editor panel. A single SQL statement can be input over multiple lines.
When entering a single SQL statement over multiple lines, the statement can be separated by clauses to enhance readability and make it easy to edit.
-
PSM statement input through a template
By clicking
at the top of the SQL Editor screen,
templates of DML, DDL, PL/SQL, and PL/SQL Control Structure are
displayed in tree structures.By double clicking the name of each template in the tree, the template of the sentence in the editor panel will be inserted. Users can complete SQL statements by editing the entered template easily.
-
Comment input
When entering SQL statements, comments can be entered. A comment starts with two minus symbols (−−) and it will be recognized as a comment to the end of the line. A comment can be written on a line by itself or can be entered at the end of another line.
-
Using short-cut keys
Like other text editors, the SQL editor provides short-cut keys such as Redo (<Ctrl> + <Y>), Undo (<Ctrl> + <Z>), and Find/Replace (<Ctrl> + <F>).
Executing and Saving PSM statements
PSM statements can be executed and saved in the editor panel as follows.
-
Saving PSM statements and changing the name of the editor tab
PSM statements can be saved (<Ctrl> + <S>) in the SQL editor. When an existing SQL file is retrieved, the name of the editor tab will be changed to the file name.
Users can check the execution results of PSM statements in this panel.
The result of PSM statement execution
Enter a PSM statement in the editor panel and click the icon
at the top of the SQL Editor or press
<F5>. The result of the executed PSM
statement will be displayed in View, in the lower part of the
screen.
Users can view the list of schema objects in a tree structure.
To start the Schema Browser, select the [Database] -> [Schema
Browser] menu on the main page or click the icon
 in the tool bar.
The following shows the Schema Browser screen.
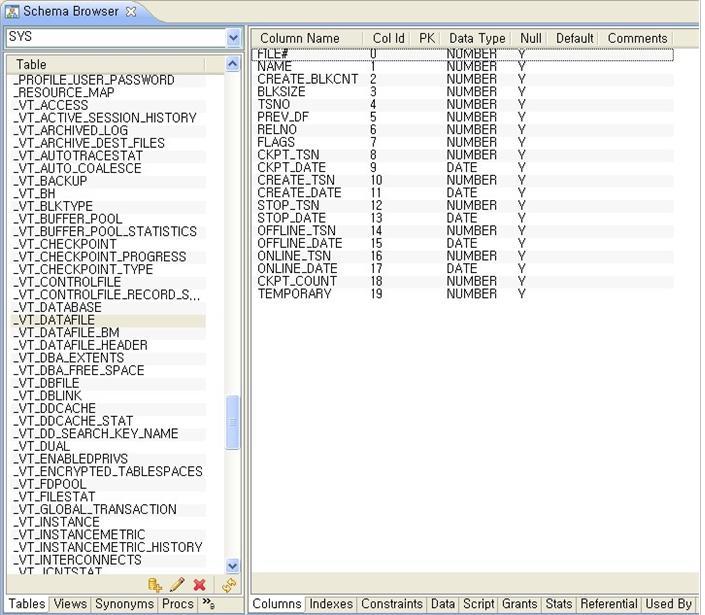
The Schema Browser is composed of two parts; the left side which displays each schema object as a list, and the right side which displays details of selected schema object.
Each component of PSM Editor is explained below.
-
The list of schema objects
A list of schema objects are displayed on the left side of the Schema Browser panel. If a schema is selected from the drop-down menu, schema objects are shown by types.
Schema objects are displayed as a tree or a table according to the type. The displayed schema object type can be changed by clicking the tab in the lower left side of the screen.
Selectable schema objects are as follows:
-
Tables
-
Views
-
Synonyms
-
Procs
-
Triggers
-
Indexes
-
Constraints
-
Sequences
-
Rollback Segments
-
Tablespaces
-
System Privileges
-
Role
-
User
-
-
The details of schema objects
When a schema object is selected on the left side of the Schema Browser screen, the information of the selected object will be displayed in the right side of the screen. Some schema objects are displayed with DDL statements, but most of them are shown in a table.
Users can view the information of the schema objects of the database connected to tbAdmin
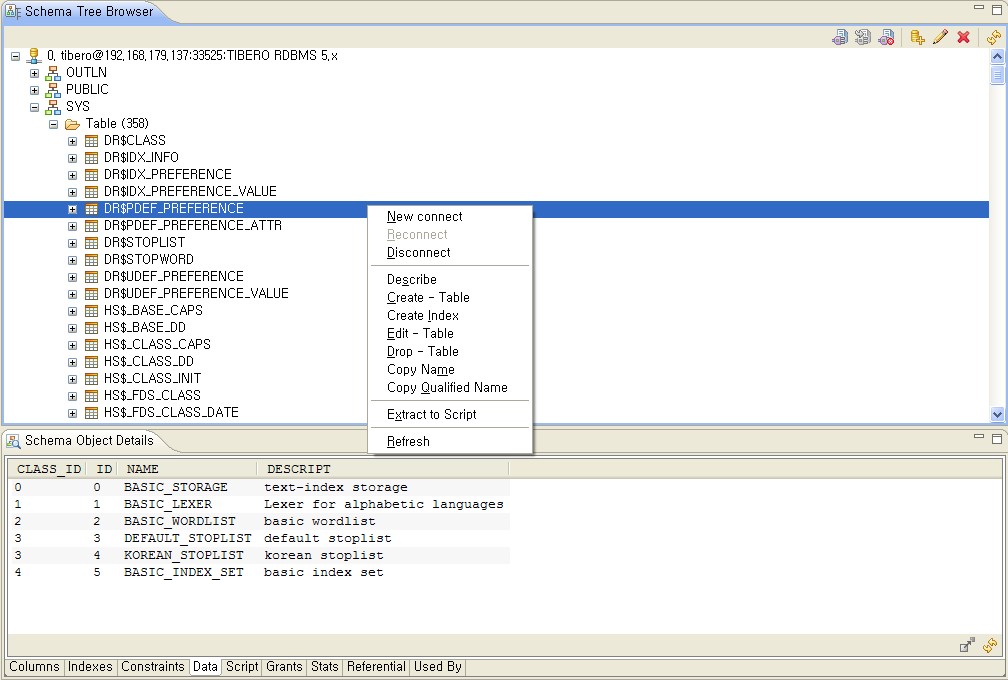
The Schema Tree Browser is composed of two parts; the upper part which displays each schema object, in a tree structure, and the lower part which displays details of selected schema object.
Each component of the Schema Tree Browser is explained below.
-
Icon
The following is the list of icons located at the top right of the Schema Tree Browser.
Icon Description 
Establishes a new connection to the database. 
Reconnects to the database. 
Closes a connection to the database. 
Creates a new schema, tablespace, or schema object. 
Edits the selected schema object. 
Deletes the selected schema object. Refreshes the selected schema object.
-
Context Menu
To display the context menu right click on the selected schema object in the upper part of the screen. The context menus vary depending on the schema object.
Schema objects can be created, edited, and deleted through the context menu. Creating, editing, and deleting the schema objects can be done without writing an SQL statement, but by simply entering the items in the corresponding dialog box.
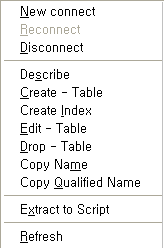
The following is the list of menus in the Context Menu Pop-up Dialog.
Menu Description New connect Establishes a new connection to the database. Reconnect Reconnects to the database. Disconnect Disconnects from the database. Describe Displays a description of the selected schema object. Create {the schema object} Creates a schema, tablespace, or a schema object. Edit {the schema object} Edits the selected schema object. Drop {the schema object} Deletes the selected schema object. Copy Name Copies the selected schema object to the clipboard. Copy Qualified Name Copies the selected schema name and schema object name to the clipboard. Extract Script Copies the script used for creating schema objects to a file or a clipboard. Refresh Refreshes schema objects.
Users can enter ASCII characters.
To start the ASCII table, select the [Tool] -> [ASCII Table] menu. To exit the ASCII table dialog box, press the [Close] button or click the [x] button at the top right side of the screen.
The following is the ASCII table dialog box.
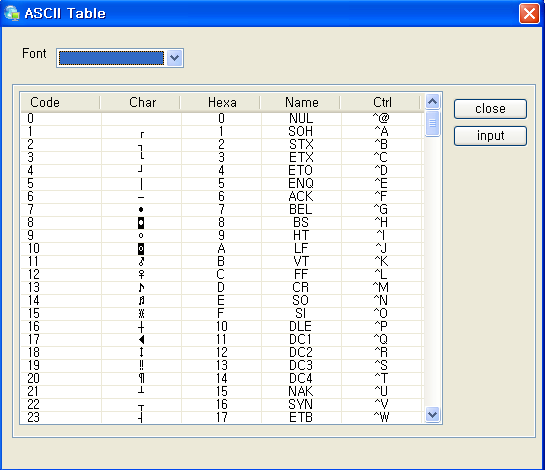
ASCII characters can be entered as follows.
-
Select a desired font from the Font drop-down menu.
-
Select an ASCII character from the lower part of the screen, and press the [input] button.
-
The ASCII character is entered in the Editor.