Table of Contents
This chapter describes the methods and required configurations for adding servers to a domain. It also describes how to change the server configuration.
In JEUS, WebAdmin or the console tool can be used to change the server configurations. If applications that run on the server engine do not require security authentication and authorization checks, the security functions should be disabled on JEUS.
In addition, tuning of the sub-components must be checked separately. For more information, refer to the relevant chapter for each component.
This section describes how to add servers to a domain by using WebAdmin or the console tool. It also describes the minimum required configurations for adding a server. For more information, refer to "2.3. Server Configurations".
When adding a server, all server configurations can be added in WebAdmin, but not when using commands in the console tool.
The following describes how to add a server in WebAdmin.
-
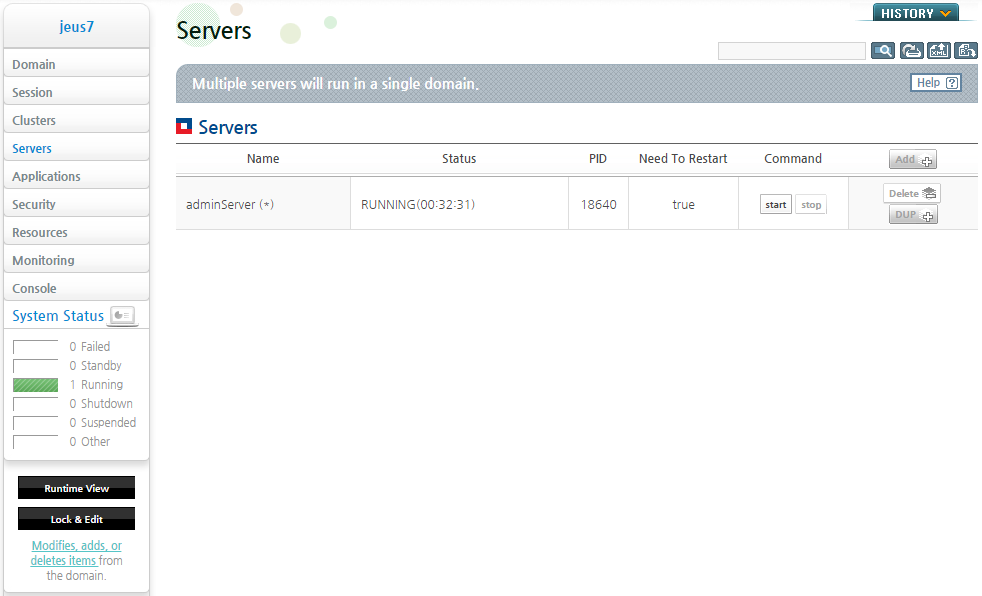
Choose [Servers] from the left pane of WebAdmin to go to the server list screen.
-
To add a server, get the lock for changing the configurations in advance. Click [Lock & Edit] at the bottom of the left menu to change to the dynamic configuration mode.
-
Click [Add] at the top of the screen to go to the server configuration screen.
-
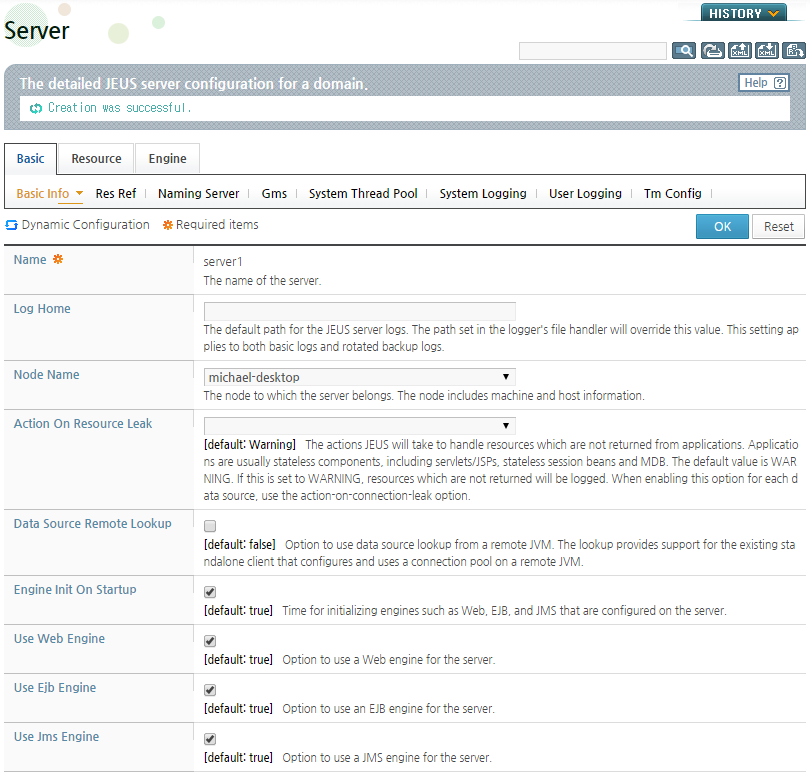
Configure the name of the server to add and Jvm Option on the server configuration screen, and click [OK].
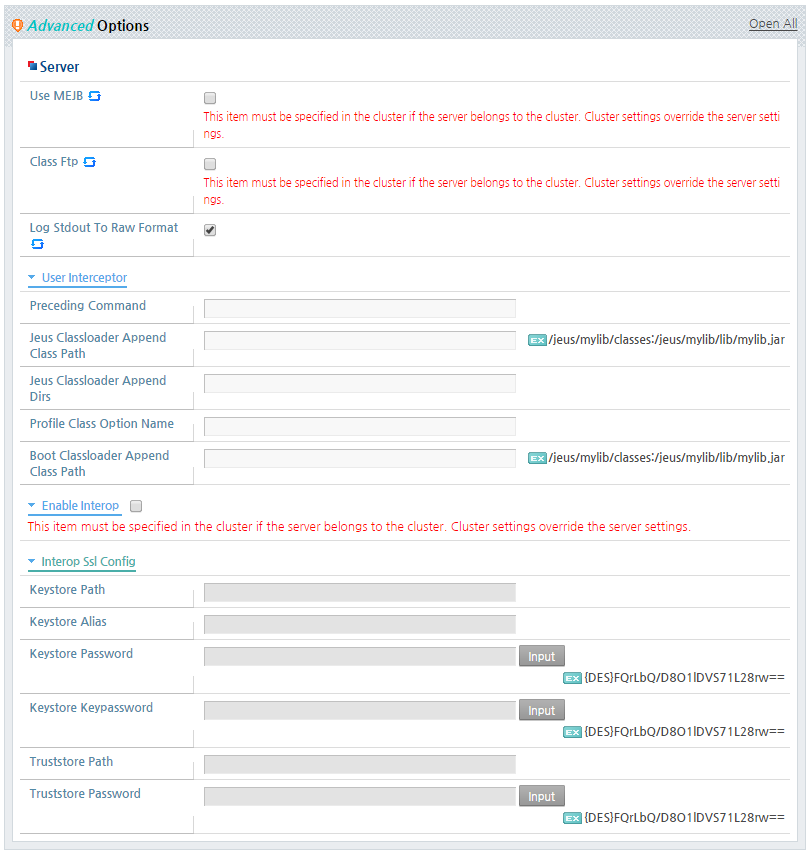
Configure the server's Advanced Options when needed. Since advanced option are not required when adding a server, detailed configurations are omitted.
The following is the description of the main configuration items. For more information about each item, refer to the description of the screen.
Item Description Node Name Name of the node that the server belongs to. For more information about the node manager, refer to "JEUS Node Manager User Guide". Log Home Path where various logs are saved. For more information, refer to "8.2. Basic JEUS Logger Structure". Action On Resource Leak For more information, refer to "2.3.1.2. Action On Resource Leak". Data Source Data source to use on the server among data sources configured in the domain. For more information about data sources, refer to "Chapter 6. DB Connection Pool and JDBC". Engine Init On Startup Initialization time of the internal server engines (Web, EJB, and JMS). For more information, refer to "3.2.2. Engine Initialization Time Configuration".
If set, the internal engines are initialized when the server is initialized. If not, they are initialized when an application is deployed. But, for the JMS engine, if the EJB application is the MDB(Message Driven Bean), the internal engines are initialized when an application is deployed. This configuration is applied after a server restart.
Use Web Engine Option to use the internal engine for web applications on the server. For more information, refer to "3.2.1. Option to Use an Engine".
If set to 'not to use', application deployment will fail. This configuration is applied after a server restart.
Use Ejb Engine Option to use the internal engine for EJB applications on the server. For more information, refer to "3.2.1. Option to Use an Engine". Use Jms Engine Option to use the internal engine for JMS services on the server. For more information, refer to "3.2.1. Option to Use an Engine". Log Stdout To Raw Format For more information, refer to "8.3.3. Standard Output and Standard Error Log Format Configuration". Enable Interop Required for using EJB RMI/IIOP. For more information about Enable Interop, refer to JEUS EJB Guide. "5.2.2. Interoperability Activation Configuration". Caution
When a server is included in a cluster, the 'Use MEJB' and 'Class Ftp' settings and Enable Interop related settings configured in the cluster are applied first.
-
The changes are saved and the result is displayed at the top of the screen.
-
Go to [Basic] > [System Thread Pool] from the top of the screen to go to the System Thread Pool configuration screen. Change the Max value, and click [OK].
The changes are saved and the result is displayed at the top of the screen.
-
After the system thread pool is saved, the server listener information must be configured.
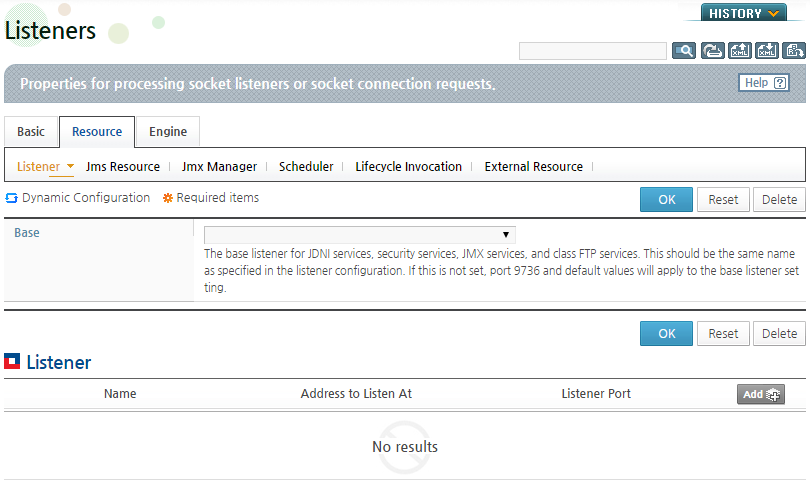
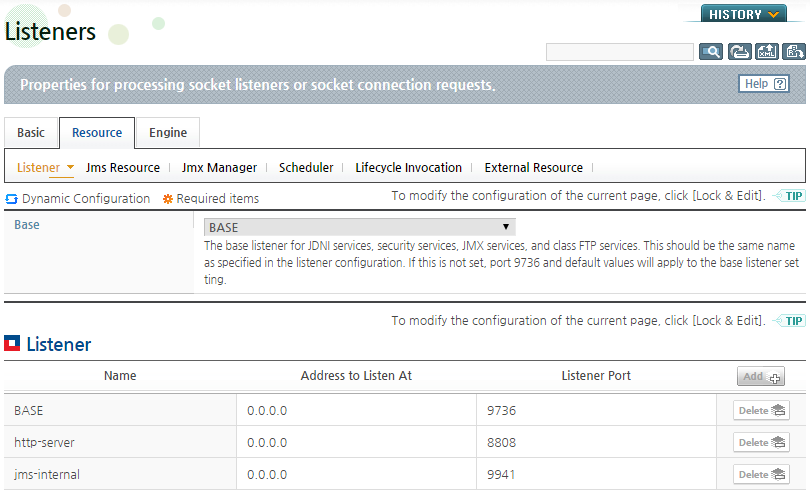
Go to [Resource] > [Listener] and the listener list appears. Click [Add] from the listener list to create a basic listener for the server.
-
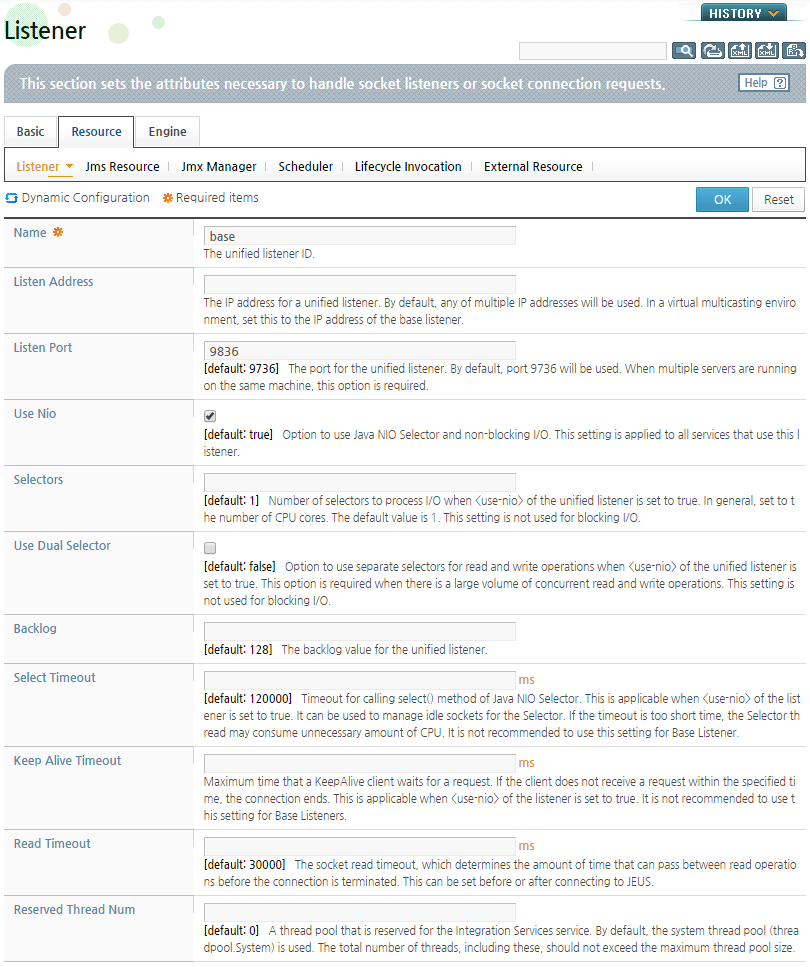
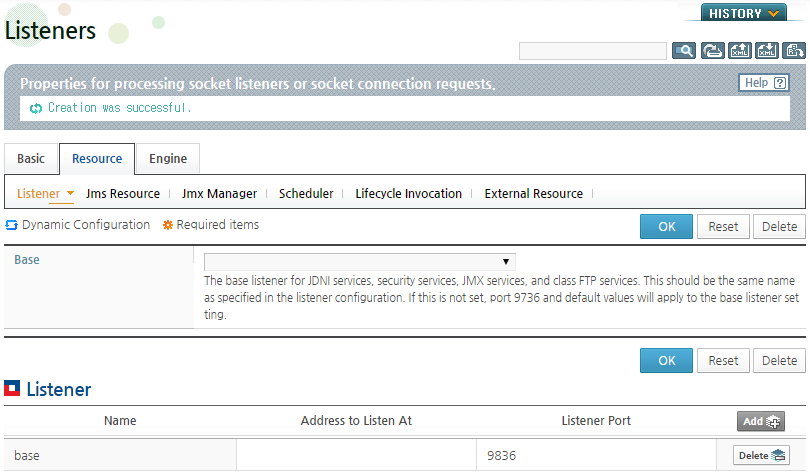
Enter the name of the basic listener and the address and port number that the server can refer to, and click [OK]. In the following example, no value is entered for the Listen Address.
-
The changes are saved and the result is displayed at the top of the screen. The newly added listener appears in the listener list.
-
Configure the newly added listener as the basic listener. Select the added listener as the Base item.
Click [OK]. The changes are saved on the server and the following message is displayed. Note that at this point the configurations are temporarily saved and have not been applied to the server yet.
-
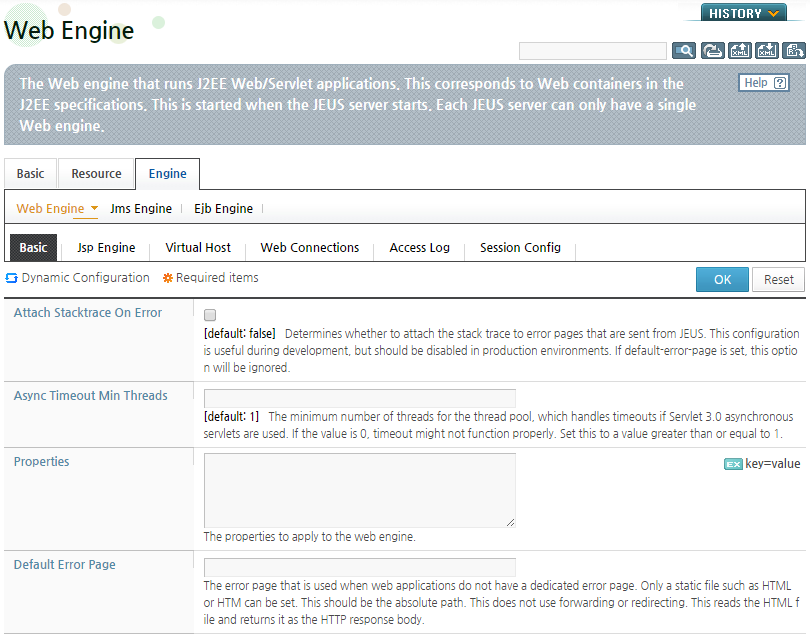
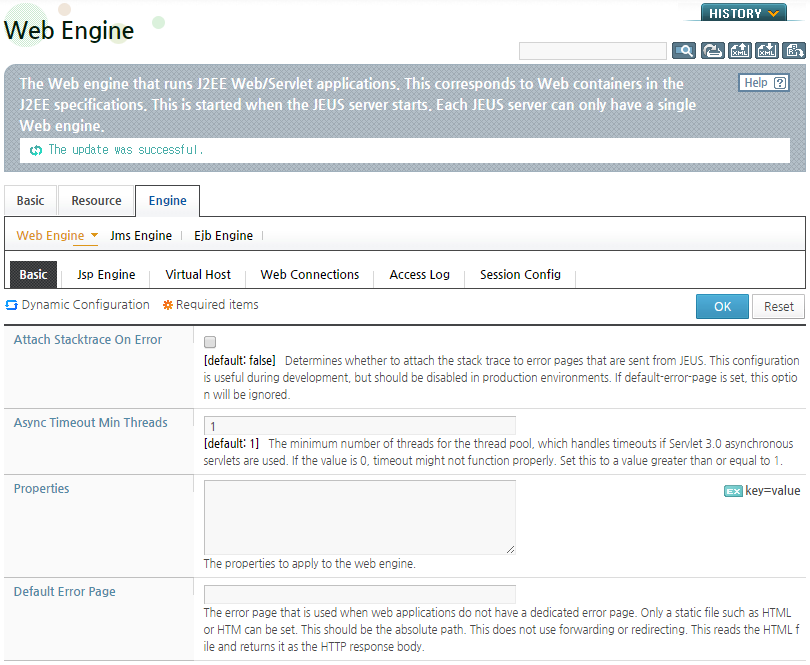
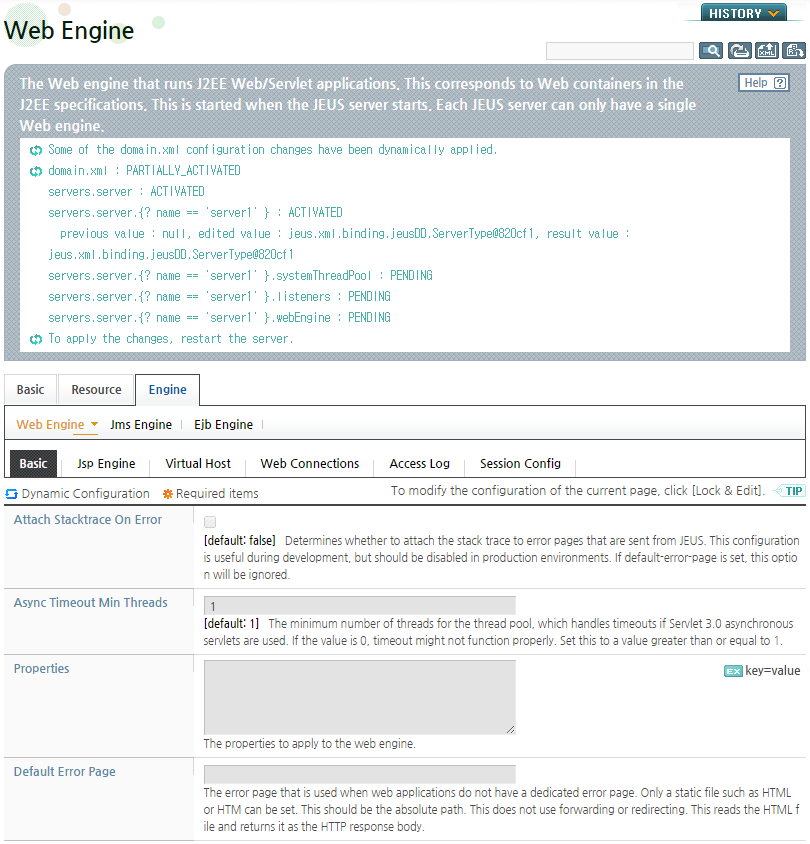
Configure the engine by choosing one of [Web Engine], [JMS Engine], and [Ejb Engine] menu from the [Engine] tab.
-
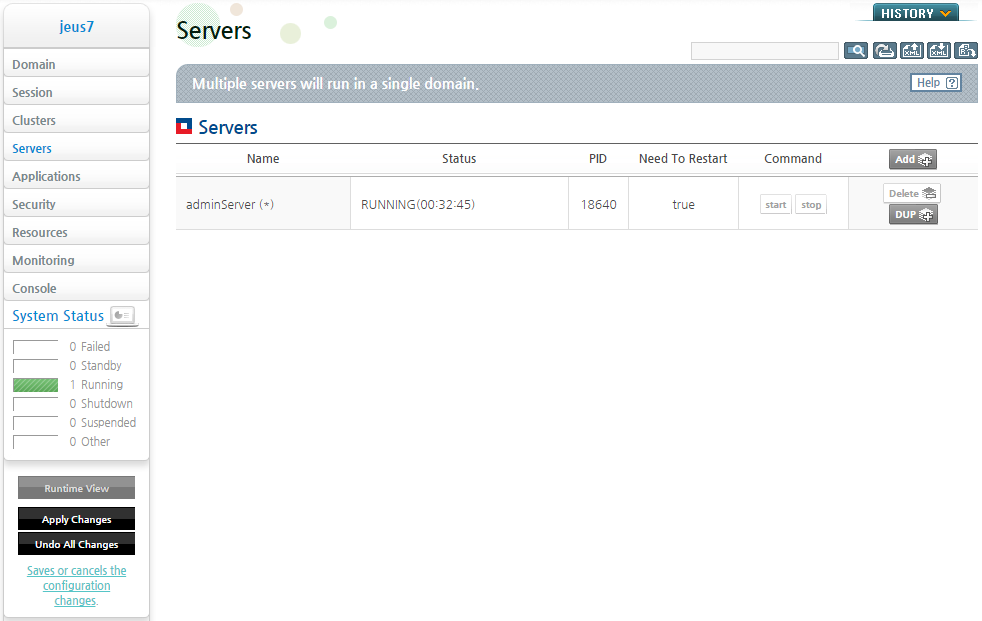
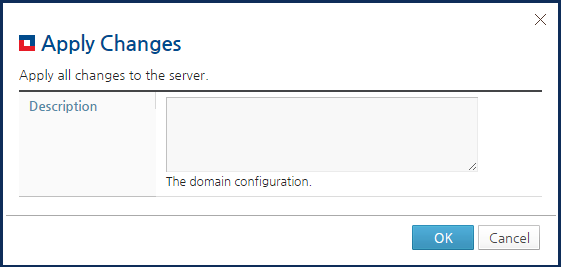
Once each configuration step is complete, click [Apply Changes] to apply the configuration changes to the server.
Click [Apply Changes] and a pop-up window that says "Apply all changes to the server." appears. Click [OK] to apply the changes.
-
After the changes have been made on DAS, the server is added to the domain. The result is displayed in detail at the top of the screen.
Release the lock setting after it is confirmed that the changes have been successfully applied. [Lock & Edit] will be visible on the screen again. For more information about the lock setting, refer to "JEUS WebAdmin User Guide".
-
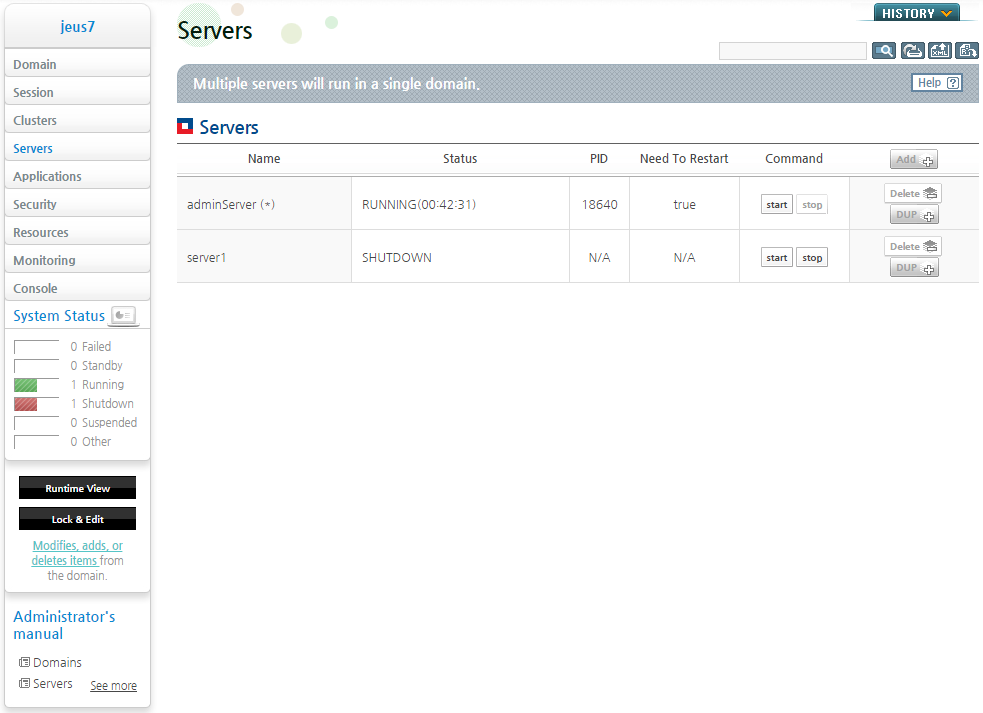
Select [Servers] from the left menu to go to the server list. The newly added server appears in the list.
-
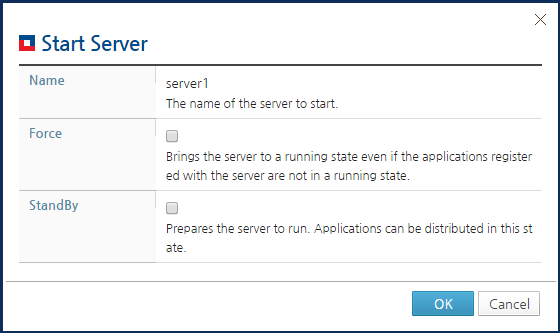
Click [start] from the server list to start the server. A configuration screen is displayed as shown in the following screen. For more information about starting a server, refer to "3.1.2. Starting a Managed Server".
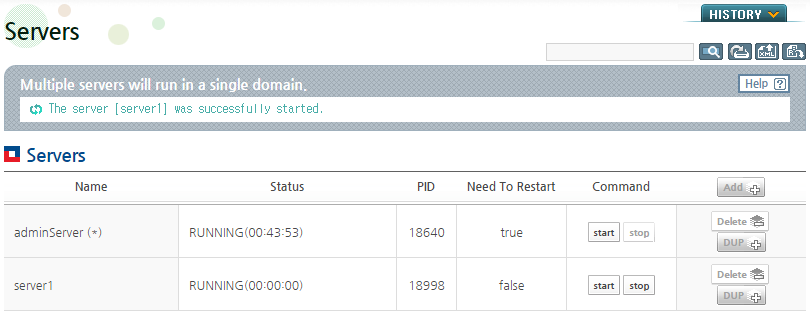
When a server starts, the result is displayed at the top of the screen, and the server status is changed to RUNNING.


A server can be added through the add-server command in the console tool. Since only some configurations can be added through this command, other commands must be used to add additional configurations after the server has been added. To change the engine configuration, use the web engine, EJB engine, and JMS engine commands.
Note
For more information about the commands for changing the web engine configurations, refer to (JEUS Reference Book. "4.2.8. Web Engine Commands"). For more information about commands for changing the EJB engine configurations, refer to (JEUS Reference Book. "4.2.7. EJB Engine Commands"). For more information about changing the JMS engine configurations, refer to (JEUS Reference Book. "4.2.9. JMS Engine Commands").
The following is an example of adding a server using jeusadmin.
[Example 2.1] Adding a Server Using Jeusadmin
[DAS]domain1.adminServer>serverinfo

Information about Domain (domain1)
===============================================================================================
+--------+----------+-----+------+-----+----------------+---------+-------------+-------------+
| Server |  Status  | Node|  PID | Clus|  Latest Start  | Need to | Listen Ports| Running     |
|        |          |Name |      | ter |Time / Shutdown | Restart |             | Engines     |
|        |          |     |      |     |      Time      |         |             |             |
+--------+----------+-----+------+-----+----------------+---------+-------------+-------------+
| adminSe| RUNNING  | N/A | 2864 | N/A | Mon May 21     | false   | base-0.0.0.0| jms,ejb,web |
|rver(*) |(2575 sec)|     |      |     |20:42:15 KST    |         |:9736        |             |
|        |          |     |      |     |2012            |         | http-server-|             |
|        |          |     |      |     |                |         |0.0.0.0:8088 |             |
+--------+----------+-----+------+-----+----------------+---------+-------------+-------------+
| server1| RUNNING  |host1| 3232 | N/A | Mon May 21     | false   | base-192.168| jms,ejb,web |
|        |(220 sec) |     |      |     |21:22:13 KST    |         |.0.4:9836    |             |
|        |          |     |      |     |2012            |         |             |             |
+--------+----------+-----+------+-----+----------------+---------+-------------+-------------+
===============================================================================================

[DAS]domain1.adminServer>add-server server2 -addr 192.168.0.4 -baseport 9936 -node host1 -jvm "-Xmx512m -XX:MaxPermSize=128m"
Successfully performed the ADD operation for server (server2).
Check the results using "list-servers or add-server"

[DAS]domain1.adminServer>modify-system-thread-pool server2 -max 200
Successfully performed the MODIFY operation for The system thread pool of the se
rver (server2)., but all changes were non-dynamic. They will be applied after re
starting.
Check the results using "modify-system-thread-pool server2 or show-system-thread
-pool server2"

[DAS]domain1.adminServer>modify-web-engine-configuration -server server2 ....
....

[DAS]domain1.adminServer>serverinfo

Information about Domain (domain1)
==============================================================================================
+--------+----------+-----+------+-----+---------------+---------+-------------+-------------+
| Server |  Status  | Node|  PID | Clus|  Latest Start | Need to | Listen Ports| Running     |
|        |          |Name |      | ter |Time / Shutdown| Restart |             | Engines     |
|        |          |     |      |     |     Time      |         |             |             |
+--------+----------+-----+------+-----+---------------+---------+-------------+-------------+
| adminSe| RUNNING  | N/A | 2864 | N/A | Mon May 21    | false   | base-0.0.0.0| jms,ejb,web |
|rver(*) |(2846 sec)|     |      |     |20:42:15 KST   |         |:9736        |             |
|        |          |     |      |     |2012           |         | http-server-|             |
|        |          |     |      |     |               |         |0.0.0.0:8088 |             |
+--------+----------+-----+------+-----+---------------+---------+-------------+-------------+
| server1| RUNNING  |host1| 3232 | N/A | Mon May 21    | false   | base-192.168| jms,ejb,web |
|        |(491 sec) |     |      |     |21:22:13 KST   |         |.0.4:9836    |             |
|        |          |     |      |     |2012           |         |             |             |
+--------+----------+-----+------+-----+---------------+---------+-------------+-------------+
| server2| SHUTDOWN |host1| N/A  | N/A | N/A           | N/A     | N/A         | N/A         |
+--------+----------+-----+------+-----+---------------+---------+-------------+-------------+
==============================================================================================

[DAS]domain1.adminServer>start-server server2
The server [server2] was successfully started.

[DAS]domain1.adminServer>serverinfo

Information about Domain (domain1)
==============================================================================================
+--------+----------+-----+------+-----+---------------+---------+-------------+-------------+
| Server |  Status  | Node|  PID | Clus|  Latest Start | Need to | Listen Ports| Running     |
|        |          |Name |      | ter |Time / Shutdown| Restart |             | Engines     |
|        |          |     |      |     |     Time      |         |             |             |
+--------+----------+-----+------+-----+---------------+---------+-------------+-------------+
| adminSe| RUNNING  | N/A | 2864 | N/A | Mon May 21    | false   | base-0.0.0.0| jms,ejb,web |
|rver(*) |(3085 sec)|     |      |     |20:42:15 KST   |         |:9736        |             |
|        |          |     |      |     |2012           |         | http-server-|             |
|        |          |     |      |     |               |         |0.0.0.0:8088 |             |
+--------+----------+-----+------+-----+---------------+---------+-------------+-------------+
| server1| RUNNING  |host1| 3232 | N/A | Mon May 21    | false   | base-192.168| jms,ejb,web |
|        |(729 sec) |     |      |     |21:22:13 KST   |         |.0.4:9836    |             |
|        |          |     |      |     |2012           |         |             |             |
+--------+----------+-----+------+-----+---------------+---------+-------------+-------------+
| server2| RUNNING  |host1| 1900 | N/A | Mon May 21    | false   | base-192.168| jms,ejb,web |
|        |(146 sec) |     |      |     |21:32:05 KST   |         |.0.4:9936    |             |
|        |          |     |      |     |2012           |         |             |             |
+--------+----------+-----+------+-----+---------------+---------+-------------+-------------+
==============================================================================================
A server can be configured by using WebAdmin or jeusadmin.
Unlike in WebAdmin, some configurations cannot be modified in the console tool. The main configurations that are frequently used can be configured through the console tool, and WebAdmin can be used to modify configurations that cannot be modified in the console tool.
This section describes the basic configurations. For configurations that are not described here, refer to the relevant guides.
The basic server configurations that can be changed dynamically
are Class FTP, Use MEJB, and Log Stdout To Raw Format. The dynamically
applied configurations are marked with the ![]() icon in WebAdmin and can be checked in the
console tool by executing the help command for modify-server command.
For more information, refer to "JEUS Reference Book".
icon in WebAdmin and can be checked in the
console tool by executing the help command for modify-server command.
For more information, refer to "JEUS Reference Book".
Using WebAdmin
The following are the steps for modifying the basic configurations dynamically in WebAdmin.
-
Select [Servers] from the left menu of WebAdmin to see the server list.
-
Select a server(server1) from the server list and go to the server configuration screen. Click the [Basic] tab in the configuration screen.
-
To change the configuration, get the lock for changing the configurations in advance. Click [Lock & Edit] at the bottom of the left menu to switch to the dynamic configuration mode.
-
In the Advanced Options, configure 'Use MEJB' and 'Log Stdout To Raw Format' settings.
-
When the configuration is complete, click [OK]. Click [Apply Changes] to apply the changes.
-
The result is displayed at the top of the screen. It confirms that the 'Use MEJB' and 'Log Stdout To Raw Format' settings have been changed and applied to the server.
Using the Console Tool
The following is an example of dynamically changing the basic configurations by using the console tool.
[Example 2.2] Dynamically Changing Configuration Using the Console Tool
[DAS]domain1.adminServer>modify-server server1
Shows the current configuration.
server (server1)
================================================================================
+----------------------------------+-------------------------------------------+
| Node                             | node1                                     |
+----------------------------------+-------------------------------------------+
| JVM Configs                      | -Xmx256m -XX:MaxPermSize=128m             |
+----------------------------------+-------------------------------------------+
| Action On Resource Leak          | WARNING                                   |
+----------------------------------+-------------------------------------------+
| Stdout to Raw Format             | false                                     |
+----------------------------------+-------------------------------------------+
| MEJB                             | false                                     |
+----------------------------------+-------------------------------------------+
| Class FTP                        | false                                     |
+----------------------------------+-------------------------------------------+
| Server Log Home Directory        | none                                      |
+----------------------------------+-------------------------------------------+
================================================================================

[DAS]domain1.adminServer>modify-server server1 -logStdoutToRawFormat false -mejb
 true -classFtp true
Successfully performed the MODIFY operation for server (server1).
Check the results using "list-servers server1 or modify-server server1"

[DAS]domain1.adminServer>modify-server server1
Shows the current configuration.
server (server1)
================================================================================
+----------------------------------+-------------------------------------------+
| Node                             | node1                                     |
+----------------------------------+-------------------------------------------+
| JVM Configs                      | -Xmx256m -XX:MaxPermSize=128m             |
+----------------------------------+-------------------------------------------+
| Action On Resource Leak          | WARNING                                   |
+----------------------------------+-------------------------------------------+
| Stdout to Raw Format             | false                                     |
+----------------------------------+-------------------------------------------+
| MEJB                             | true                                      |
+----------------------------------+-------------------------------------------+
| Class FTP                        | true                                      |
+----------------------------------+-------------------------------------------+
| Server Log Home Directory        | none                                      |
+----------------------------------+-------------------------------------------+
================================================================================
The 'Action On Resource Leak' setting allows the user to know when there is resource leak and performs the configured operations by checking whether the resources that are used on the server are closed. This server function is called the invocation manager.
On the server, the invocation manager tracks the external resources like JDBC Connections and Webt Connections that are used during a call of stateless methods such as Servlet/JSP, EJB Stateless Session Bean, and MDB. It leaves a log or returns the resource depending on the mode configured among the following three modes.
| Mode | Description |
|---|---|
| NoAction | No action is taken even if there are unreturned resources. |
| Warning | Logs about unreturned resources after the component call (default value). |
| AutoClose | Logs about unreturned resources and closes them after the component call. |
Using WebAdmin
The following is an example of configuring the 'Action On Resource Leak' setting in WebAdmin.
-
Select [Servers] from the left menu of WebAdmin to see the server list. Select server1 on the list and go to the server configuration screen. Select [Basic] on the screen.
-
To change the configuration, get the lock for changing the configurations in advance. Click [Lock & Edit] at the bottom of the left menu to switch to the dynamic configuration mode.
-
Change the configuration of 'Action On Resource Leak' and click [OK].
-
To apply the changes, click [Apply Changes].
The result is displayed at the top of the screen and the changes to the 'Action On Resource Leak' setting can be verified.
If the 'Action On Resource Leak' setting is changed while the server is running, the result shows that the change has been saved successfully, but has not been applied to the server yet. To apply the 'Action On Resource Leak' setting to the server, restart the server.
Using the Console Tool
The following is an example of changing the 'Action On Resource Leak' setting by executing the modify-server setting in jeusadmin.
-
Check the current server configurations that need to be modified by using the modify-server command before booting the server.
[DAS]domain1.adminServer>modify-server server1 Shows the current configuration. server (server1) ================================================================================ +----------------------------------+-------------------------------------------+ | Node | node1 | +----------------------------------+-------------------------------------------+ | JVM Configs | -Xmx256m -XX:MaxPermSize=128m | +----------------------------------+-------------------------------------------+ | Action On Resource Leak | WARNING | +----------------------------------+-------------------------------------------+ | Stdout to Raw Format | true | +----------------------------------+-------------------------------------------+ | MEJB | false | +----------------------------------+-------------------------------------------+ | Class FTP | false | +----------------------------------+-------------------------------------------+ | Server Log Home Directory | none | +----------------------------------+-------------------------------------------+ ================================================================================ -
Set the 'Action On Resource Leak' setting of server1 to 'AutoClose'.
[DAS]domain1.adminServer>modify-server server1 -actionOnResourceLeak AutoClose
Successfully performed the MODIFY operation for server (server1), but all change
s were non-dynamic. They will be applied after restarting.
Check the results using "list-servers server1 or modify-server server1"
Note
When options are not dynamically applied, they must be modified before starting the server. If static configurations are modified at runtime, the server must be restarted to apply the changes.
-
Verify that the modified configurations have been applied correctly by using the modify-server or list-servers command.
[DAS]domain1.adminServer>modify-server server1 Shows the current configuration. server (server1) ================================================================================ +----------------------------------+-------------------------------------------+ | Node | node1 | +----------------------------------+-------------------------------------------+ | JVM Configs | -Xmx256m -XX:MaxPermSize=128m | +----------------------------------+-------------------------------------------+ | Action On Resource Leak | AUTO_CLOSE | +----------------------------------+-------------------------------------------+ | Stdout to Raw Format | true | +----------------------------------+-------------------------------------------+ | MEJB | false | +----------------------------------+-------------------------------------------+ | Class FTP | false | +----------------------------------+-------------------------------------------+ | Server Log Home Directory | none | +----------------------------------+-------------------------------------------+ ================================================================================ -
Start server1.
[DAS]domain1.adminServer>start-server server1
The server [server1] was successfully started.
Note
SSH needs to be available for use and the node must be configured in order to use the start-server command in jeusadmin or WebAdmin. For more information about the node manager, refer to "JEUS Node Manager Guide".
-
Change the 'Action On Resource Leak' setting of server1 from 'AUTO_CLOSE' to 'WARNING'.
This configuration cannot be applied while the server is running. To apply the modified configuration, restart the server.
[DAS]domain1.adminServer>modify-server server1 -actionOnResourceLeak Warning Successfully performed the MODIFY operation for server (server1), but all change s were non-dynamic. They will be applied after restarting. Check the results using "list-servers server1 or modify-server server1" -
Verify that the modified configurations have been applied correctly by using the modify-server or list-servers command.
[DAS]domain1.adminServer>modify-server server1
Shows the current configuration.
server (server1)

================================================================================
+----------------------------------+-------------------------------------------+
| Node                             | node1                                     |
+----------------------------------+-------------------------------------------+
| JVM Configs                      | -Xmx256m -XX:MaxPermSize=128m             |
+----------------------------------+-------------------------------------------+
| Action On Resource Leak          | WARNING                                   |
+----------------------------------+-------------------------------------------+
| Stdout to Raw Format             | true                                      |
+----------------------------------+-------------------------------------------+
| MEJB                             | false                                     |
+----------------------------------+-------------------------------------------+
| Class FTP                        | false                                     |
+----------------------------------+-------------------------------------------+
| Server Log Home Directory        | none                                      |
+----------------------------------+-------------------------------------------+
================================================================================
Note
For more information about the console tool commands used in this example, refer to JEUS Reference Book. "4.2.3. Server Management Commands".
JVM Config is used to define parameters that are added to an individual JVM to start a server. Before starting the server with the launcher process, read and add the values that are configured in this section as parameters to create the server JVM. Refer to JEUS Reference Book. "1.2. Server System Properties" for the list of available JEUS parameters. The standard JVM parameters can also be configured.
JVM Config also includes JVM options that are applied to the server, system properties, and the system properties provided by JEUS. JVM memory or options are usually configured with values that are suitable for the server operating environment. For more information about JVM Config, refer to JEUS Domain Guide. "3.6.2. Changing a Server's JVM Settings".
Caution
JVM config values cannot be applied while a server is running because they are not dynamic configurations. The server must be restarted in order to apply the chnages.
Using WebAdmin
The following describes the process of configuring JVM Config in WebAdmin.
-
Select [Servers] from the left menu of WebAdmin to go to the server list screen. Select a server(server1) from the server list and go to the server configuration screen. Click the [Basic] tab in the configuration screen.
-
To change the configuration, get the lock for changing the configurations in advance. Click [Lock & Edit] at the bottom of the left menu to switch to the dynamic configuration mode.
-
Change the Jvm Option setting and then click [OK]. The changes are saved and the result is displayed.
-
Click [Apply Changes] to apply the changes.
The result is displayed at the top of the screen and the changes to the server's JVM configuration can be verified. If JVM Config is changed while the server is running, a message is displayed that says that the configuration change has been successfully saved, but the changes cannot be applied to the server. In this case, the server must be restarted to apply the change.
Using the Console Tool
A server's JVM configuration can be changed by using the modify-server, add-jvm-option, modify-jvm-option, and remove-jvm-option commands. For more information about add-jvm-option, modify-jvm-option, and remove-jvm-option commands, refer to JEUS Domain Guide. "3.6.2. Changing a Server's JVM Settings".
The following is an example of changing the JVM configurations of a server by using the modify-server command.
-
Before starting a server, check the server settings to change by executing the modify-server command.
[DAS]domain1.adminServer>modify-server server1 Shows the current configuration. server (server1) ================================================================================ +----------------------------------+-------------------------------------------+ | Node | node1 | +----------------------------------+-------------------------------------------+ | JVM Configs | -Xmx512m | +----------------------------------+-------------------------------------------+ | Action On Resource Leak | WARNING | +----------------------------------+-------------------------------------------+ | Stdout to Raw Format | true | +----------------------------------+-------------------------------------------+ | MEJB | false | +----------------------------------+-------------------------------------------+ | Class FTP | false | +----------------------------------+-------------------------------------------+ | Server Log Home Directory | none | +----------------------------------+-------------------------------------------+ ================================================================================ -
Add the JVM option to server1.
Set the maximum heap memory of JVM to 512MB and the maximum permanent memory to 128MB.
[DAS]domain1.adminServer>modify-server server1 -jvmOptions "-XX:MaxPermSize=128m"
Successfully performed the MODIFY operation for server (server1), but all change
s were non-dynamic. They will be applied after restarting.
Check the results using "list-servers server1 or modify-server server1"
Note
Options that cannot be dynamically applied must be changed before starting the server. When the configuration is changed while the server is running, the server must be restarted to apply the changes.
-
Check that the configurations changed by executing modify-server or list-servers have been applied correctly.
[DAS]domain1.adminServer>modify-server server1 Shows the current configuration. server (server1) ================================================================================ +----------------------------------+-------------------------------------------+ | Node | node1 | +----------------------------------+-------------------------------------------+ | JVM Configs | -Xmx512m, -XX:MaxPermSize=128m | +----------------------------------+-------------------------------------------+ | Action On Resource Leak | WARNING | +----------------------------------+-------------------------------------------+ | Stdout to Raw Format | true | +----------------------------------+-------------------------------------------+ | MEJB | false | +----------------------------------+-------------------------------------------+ | Class FTP | false | +----------------------------------+-------------------------------------------+ | Server Log Home Directory | none | +----------------------------------+-------------------------------------------+ ================================================================================ -
Start server1.
[DAS]domain1.adminServer>start-server server1
The server [server1] was successfully started .
Note
To execute start-server in the console tool or WebAdmin, SSH should be available for use and the node should be set. For more information about the node manager, refer to "JEUS Node Manager Guide".
-
Add the JVM option to server1.
An option that creates a Heap Dump file has been added for when OutOfMemoryError occurs on the server. Since this configuration cannot be applied to the server while the server is running, the server must be restarted to apply the changes.
[DAS]domain1.adminServer>modify-server server1 -jvmOptions "-XX:+HeapDumpOnOutOf
MemoryError"
Successfully performed the MODIFY operation for server (server1), but all change
s were non-dynamic. They will be applied after restarting.
Check the results using "list-servers server1 or modify-server server1"
-
Verify the changed configuration by executing modify-server or list-servers.
[DAS]domain1.adminServer>modify-server server1
Shows the current configuration.
server (server1)
=====================================================================================
+------------------------------+----------------------------------------------------+
| Node                         | node1                                              |
+------------------------------+----------------------------------------------------+
| JVM Configs                  | -Xmx512m -XX:MaxPermSize=128m,                     |
|                              |-XX:+HeapDumpOnOutOfMemoryError                     |
+------------------------------+----------------------------------------------------+
| Action On Resource Leak      | WARNING                                            |
+------------------------------+----------------------------------------------------+
| Stdout to Raw Format         | true                                               |
+------------------------------+----------------------------------------------------+
| MEJB                         | false                                              |
+------------------------------+----------------------------------------------------+
| Class FTP                    | false                                              |
+------------------------------+----------------------------------------------------+
| Server Log Home Directory    | none                                               |
+------------------------------+----------------------------------------------------+
=====================================================================================
Note
For more information about the console tool commands used in the previous example, refer to JEUS Reference Book. "4.2.3. Server Management Commands".
This section describes how to add additional classpaths to a server. The configuration for adding classpaths to a server is only available in WebAdmin.
Caution
Since this configuration cannot be applied to the server while the server is running, the server must be restarted to apply the changed configuration.
The following is an example of adding classpaths to a server in WebAdmin.
-
Select [Servers] from the left menu of WebAdmin to see the server list. Select server1 on the list and go to the server configuration screen. Select [Basic] on the screen.
-
To change the configuration, get the lock for changing the configurations in advance. Click [Lock & Edit] at the bottom of the left menu to switch to the dynamic configuration mode.
-
Add a classpath from User Interceptor of Advanced Options. After the configuration is complete, click [OK].
-
Click [Apply Changes] to apply the changed configuration. The result is displayed at the top of the screen, and the changed 'User Interceptor' configuration can be verified.
If the 'User Interceptor' setting is changed while the server is running, the result shows that the change has been saved successful, but has not been applied to the server yet. To apply the 'User Interceptor' setting to the server, restart the server.
This section describes the network listener configuration that is used on a server.
The network listener configuration is referenced by system services or various types of engines. Since port-integrated services are applied to this listener, it can be shared and used by different services or engines. As a simplified example, a basic listener can be used to provide all services.
Caution
Since this configuration cannot be applied to the server while the server is running, the server must be restarted to apply the changed configuration.
The following shows how to configure the basic listener in WebAdmin. The basic listener is selected from the configured listeners. It is used by WebAdmin, the most basic system services of JEUS, etc.
The following is the basic method for configuring individual listeners. The name that is referred to by other systems or engines must be configured, and the port number must be configured to prevent creating duplicate listeners.

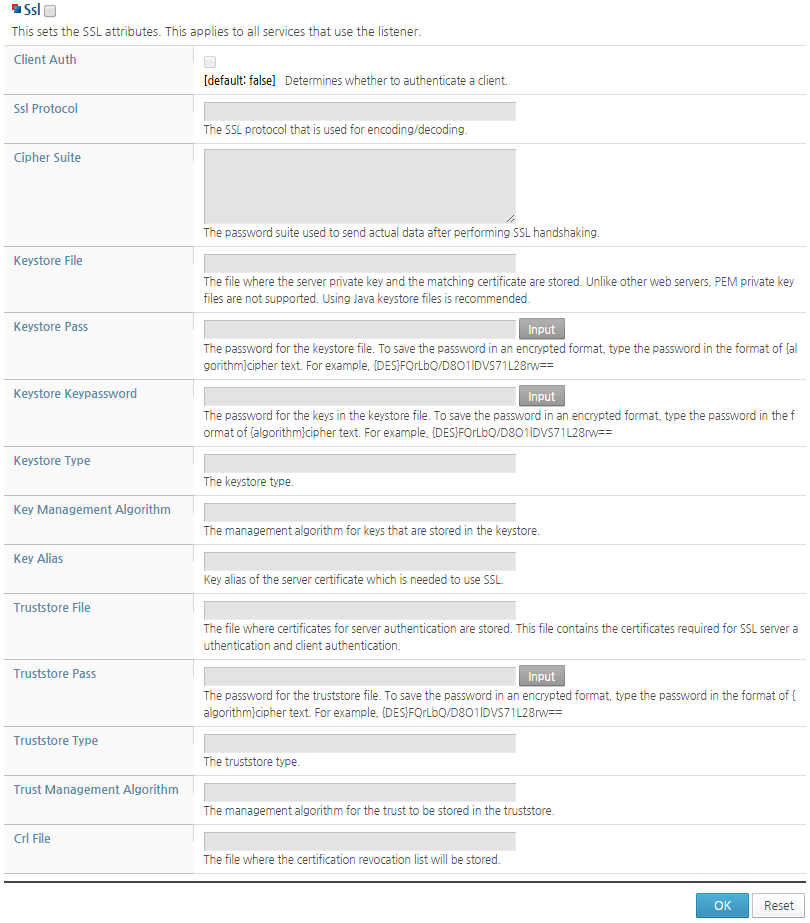
The following is the SSL (Secure Socket Layer) configuration that can be applied to the listener. The services or engines that use the listener provide services over SSL. (example: https)
This section describes how to configure common thread pools used on a server.
If the services used on a server are not configured with a dedicated thread pool, then they all use the common thread pool. The transaction service and scheduler service use the common thread pool. These services can either use the common thread pool or a dedicated thread pool depending on the configuration. If the common thread pool is used, the allowed minimum number of threads for use can be assigned in advance.
Note
The engine that handles requests from applications does not use a common thread pool. For more information about how to use a dedicated thread pool in a service, refer to "Chapter 4. JNDI Naming Server", "Chapter 7. Transaction Manager", and "JEUS Scheduler guide".
Using WebAdmin
The following describes how to set a thread pool by using WebAdmin.
-
Select [Servers] from the left menu of WebAdmin to see the server list. Select server1 on the list and go to the server configuration screen. Select [Basic], and then select [System Thread Pool] from the sub-menu.
-
To change the system thread pool configuration, get the lock for changing the configurations in advance.
Before getting the lock, it is possible to check the current configuration of the system thread pool. Click [Lock & Edit] at the bottom of the left menu to switch to the dynamic configuration mode. The system thread pool configuration screen appears.
-
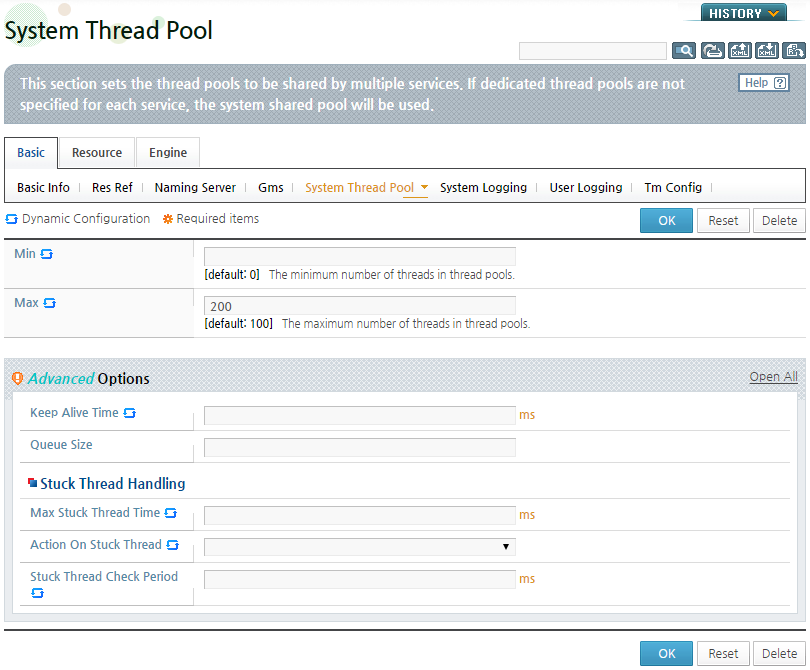
Change 'Max' and 'Keep Alive Time' settings of the thread pool and click [OK].
The following describes the configuration items.
-
Default configurations
Item Description Min Minimum number of threads that can be managed by the thread pool. The threads are created as needed (Default value: 0). Max Maximum number of threads that can be managed by the thread pool (Default value: 100).
-
Advanced options
Item Description Keep Alive Time Interval for automatically cleaning up idle threads in the thread pool. Any threads equal or greater than the Min value that are idle for the specified time are deleted from the thread pool. The default value for the common thread pool is 5 minutes. (Unit: ms) Queue size Size of the queue that stores the tasks that are processed by the thread pool.
(Default value: 4096)
-
Stuck thread handling
Option to execute specific actions on the thread when the thread is occupied for more than a set time period.
Item Description Max Stuck Thread Time Used to determine if a thread is occupied. If a thread has been occupied for a set time period, then the thread will be considered as a stuck thread.
(Default value: 1 hour, Unit: ms)
Action On Stuck Thread Action to perform on the thread determined to be stuck. The default value of the common thread pool is IgnoreAndReplace and the following are the options.
-
None: No action is taken on the stuck thread.
-
Interrupt: Sends an interrupt signal to the stuck thread.
-
IgnoreAndReplace: Ignores the stuck thread and replaces it with a new thread.
Stuck Thread Check Period Time interval for checking whether the thread is stuck or not.
(Default Value: 5 minutes, unit: ms)
-
-
-
-
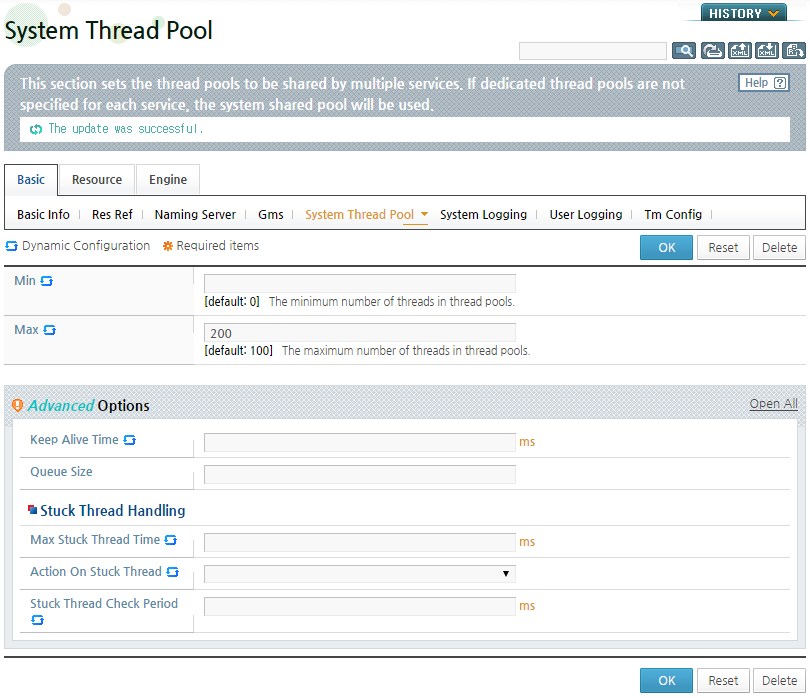
To apply the configuration, click [Apply changes]. The result is displayed at the top of the screen, and the changed system thread pool configuration can be verified.
Using the Console Tool
The following is an example of checking and modifying a common thread pool by using the console tool.
Note
For more information about the commands used in the example, refer toJEUS Reference Book. "4.2.5. Thread Management Commands". For information about the thread pool configurations used by each service, refer to the individual service manual.
The following is an example of changing the 'Max' from 100 to 200 and 'Keep Alive Time' from 5 minutes to 10 minutes for the thread pool.
[DAS]domain1.adminServer>show-system-thread-pool server1
Shows the current configuration.
The system thread pool of the server (server1).
================================================================================
+---------------------------------------------------------+--------------------+
| Min                                                     | 0                  |
| Max                                                     | 100                |
| Keep-Alive Time                                         | 300000             |
| Queue Size                                              | 4096               |
| Max Stuck Thread Time                                   | 3600000            |
| Action On Stuck Thread                                  | IGNORE_AND_REPLACE |
| Stuck Thread Check Period                               | 300000             |
| Reserved Threads for the Service transaction            | 0                  |
+---------------------------------------------------------+--------------------+
================================================================================


[DAS]domain1.adminServer>modify-system-thread-pool server1 -max 200 -keep 600000
Successfully performed the MODIFY operation for The system thread pool of the se
rver (server1)..
Check the results using "modify-system-thread-pool server1 or show-system-thread
-pool server1"

[DAS]domain1.adminServer>show-system-thread-pool server1
Shows the current configuration.
The system thread pool of the server (server1).
================================================================================
+---------------------------------------------------------+--------------------+
| Min                                                     | 0                  |
| Max                                                     | 200                |
| Keep-Alive Time                                         | 600000             |
| Queue Size                                              | 4096               |
| Max Stuck Thread Time                                   | 3600000            |
| Action On Stuck Thread                                  | IGNORE_AND_REPLACE |
| Stuck Thread Check Period                               | 300000             |
| Reserved Threads for the Service transaction            | 0                  |
+---------------------------------------------------------+--------------------+
================================================================================
The following is an example of configuring the thread to be preallocated in the common thread pool of the JNDI service.
[DAS]domain1.adminServer>show-system-thread-pool server1
Shows the current configuration.
The system thread pool of the server (server1).
================================================================================
+---------------------------------------------------------+--------------------+
| Min                                                     | 0                  |
| Max                                                     | 200                |
| Keep-Alive Time                                         | 600000             |
| Queue Size                                              | 4096               |
| Max Stuck Thread Time                                   | 3600000            |
| Action On Stuck Thread                                  | IGNORE_AND_REPLACE |
| Stuck Thread Check Period                               | 300000             |
| Reserved Threads for the Service transaction            | 0                  |
| Reserved Threads for the Service namingserver           | 0                  |
+---------------------------------------------------------+--------------------+
================================================================================

[DAS]domain1.adminServer>modify-system-thread-pool server1 -service namingserver
 -r 10
Successfully performed the MODIFY operation for The namingserver thread pool of
the server (server1)., but all changes were non-dynamic. They will be applied af
ter restarting.
Check the results using "show-system-thread-pool server1 -service namingserver o
r modify-system-thread-pool server1 -service namingserver"

[DAS]domain1.adminServer>show-system-thread-pool server1
Shows the current configuration.
The system thread pool of the server (server1).
================================================================================
+---------------------------------------------------------+--------------------+
| Min                                                     | 0                  |
| Max                                                     | 200                |
| Keep-Alive Time                                         | 600000             |
| Queue Size                                              | 4096               |
| Max Stuck Thread Time                                   | 3600000            |
| Action On Stuck Thread                                  | IGNORE_AND_REPLACE |
| Stuck Thread Check Period                               | 300000             |
| Reserved Threads for the Service transaction            | 0                  |
| Reserved Threads for the Service namingserver           | 10                 |
+---------------------------------------------------------+--------------------+
================================================================================
JEUS offers Lifecycle Invocation to allow users to perform tasks in accordance with the server lifecycle. The server invokes the user configured event when the computer starts up or shuts down. Lifecycle Invocation can only be configured in WebAdmin.
Caution
When the configuration is changed while the server is running, the server must be restarted to apply the changes.
The following is an example of registering a typical Java class for Lifecycle Invocation.
This class must exist in the 'SERVER_HOME/lib/application' directory of the server to be able to call this class according to the server lifecycle.
[Example 2.3] <<LifeCycleTester.java>>
package lifecycle;

public class LifeCycleTester {
    public void boot() {
        System.out.println("Boot");
        // do somethig
    }

    public void beforeDeploy() {
        System.out.println("Before Deploy");
        // do somethig
    }

    public void afterDeploy() {
        System.out.println("After Deploy");
        // do somethig
    }

    public void ready() {
        System.out.println("Ready");
        // do somethig
        try {
            System.out.println("Sleeping for 15 seconds ....");
            Thread.sleep(15000L);
        } catch (Exception e) {
            //ignored
        }
    }

    public void beforeUndeploy() {
        System.out.println("Before Undeploy");
        // do somethig
    }

    public void afterUndeploy() {
        System.out.println("After Undeploy");
        // do somethig
    }
}
The following describes the process of configuring the Lifecycle Invocation class of the server in WebAdmin by using the previous example.
-
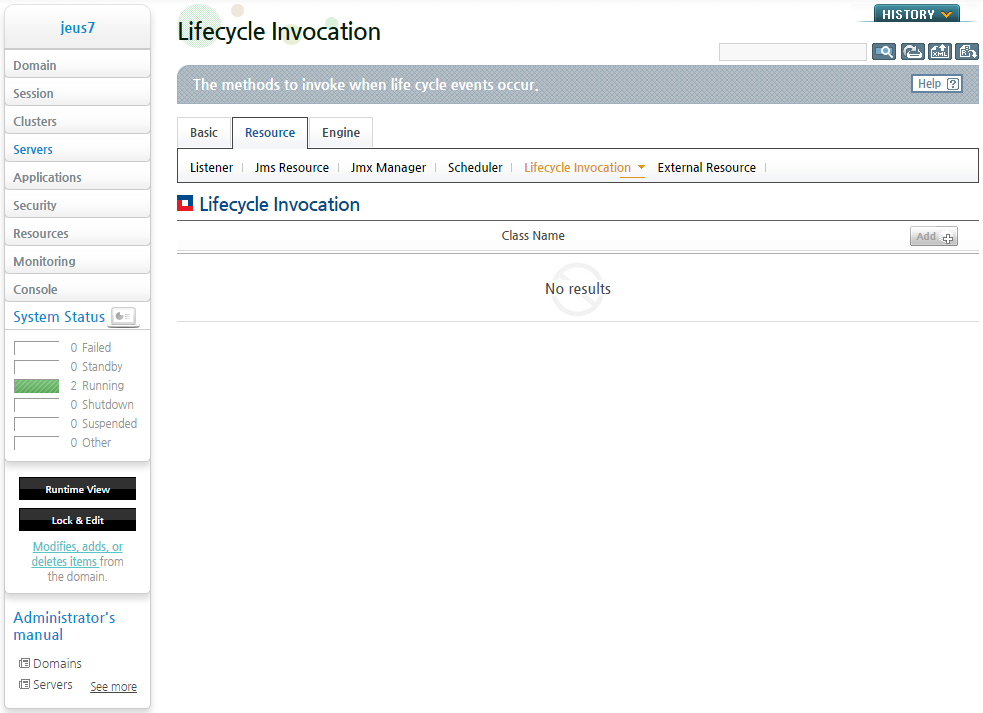
Select [Servers] from the left menu of WebAdmin to go to the server list screen. Select adminServer from the list to go to the server configuration screen. Select [Resource] in the configuration screen and then [Lifecycle Invocation]. The current Lifecycle Invocation configuration appears.
-
Get the lock by clicking [Lock & Edit] at the bottom of the left menu. To add a Lifecycle Invocation, click [Add] at the top of the table.
-
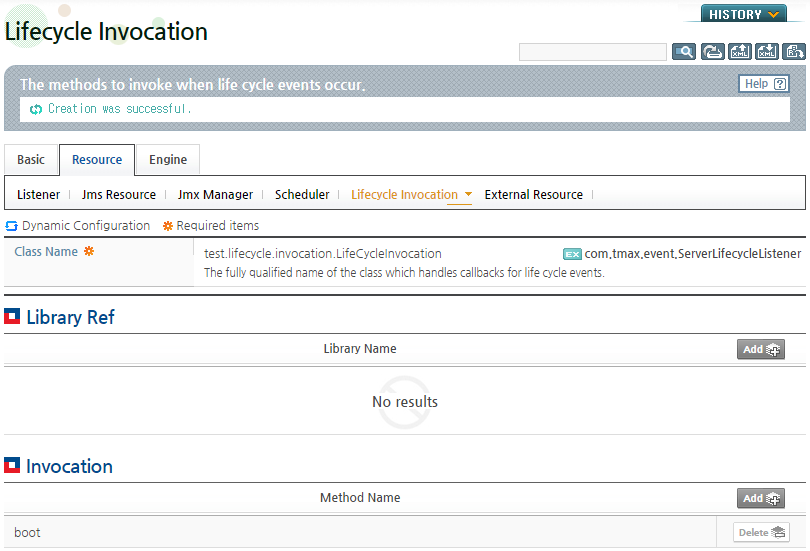
Enter 'test.lifecycle.invocation.LifeCycleInvocation' as the class name of the lifecycle invocation and click [OK].
-
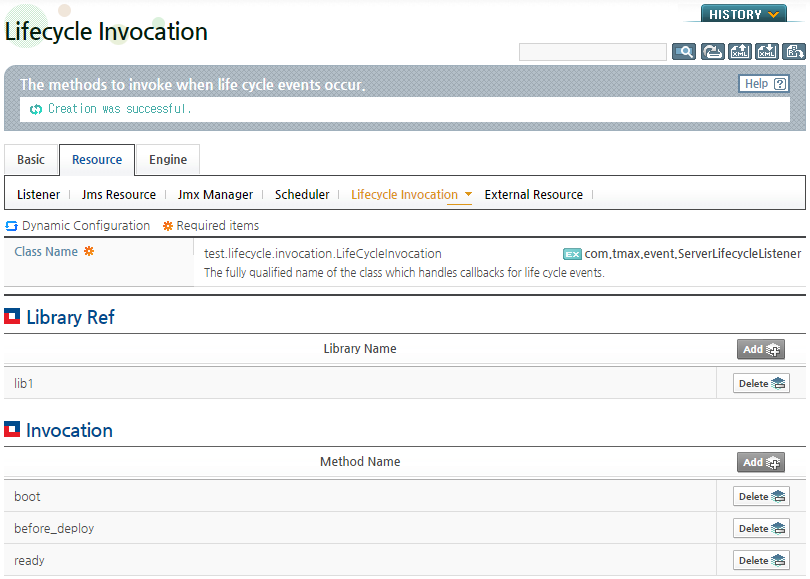
After the configuration is complete, the lifecycle invocation class appears in the Lifecycle Invocation list. Click on the newly added Lifecycle Invocation class name.
-
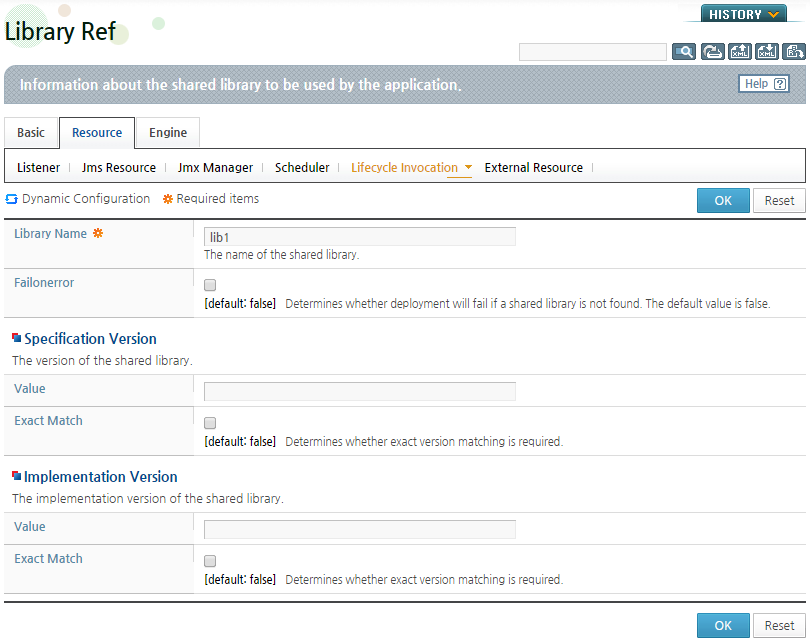
Configure the library that is used in the Lifecycle Invocation class. To add a method that corresponds to the Lifecycle Invocation type, click [Add] in the Library Ref list.
The following is a screenshot of configuring a library reference that is used in the class. The library must be in the 'lib/shared' folder. For more information about the shared library, refer to JEUS Applications and Deployment Guide. "3.3.2. Shared Library".
The following table describes the configuration items.
Item Description Library Name Name of the library. Specification Version Specification version of the library. Implementation Version Implementation version of the library. -
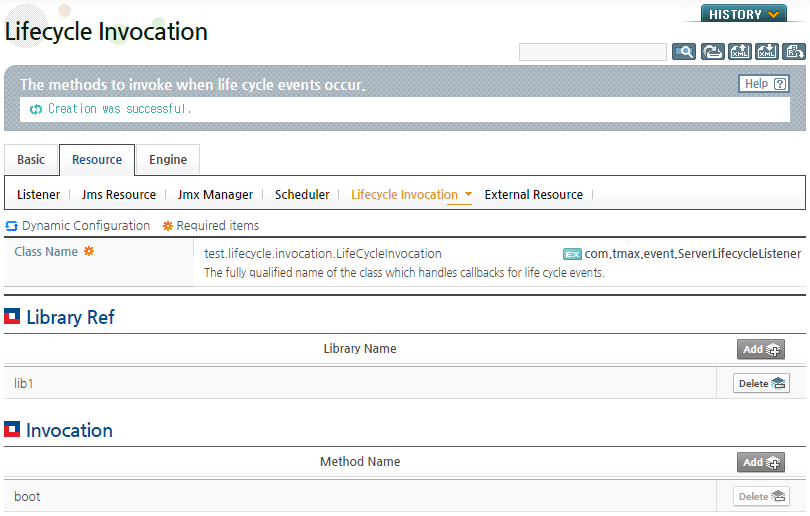
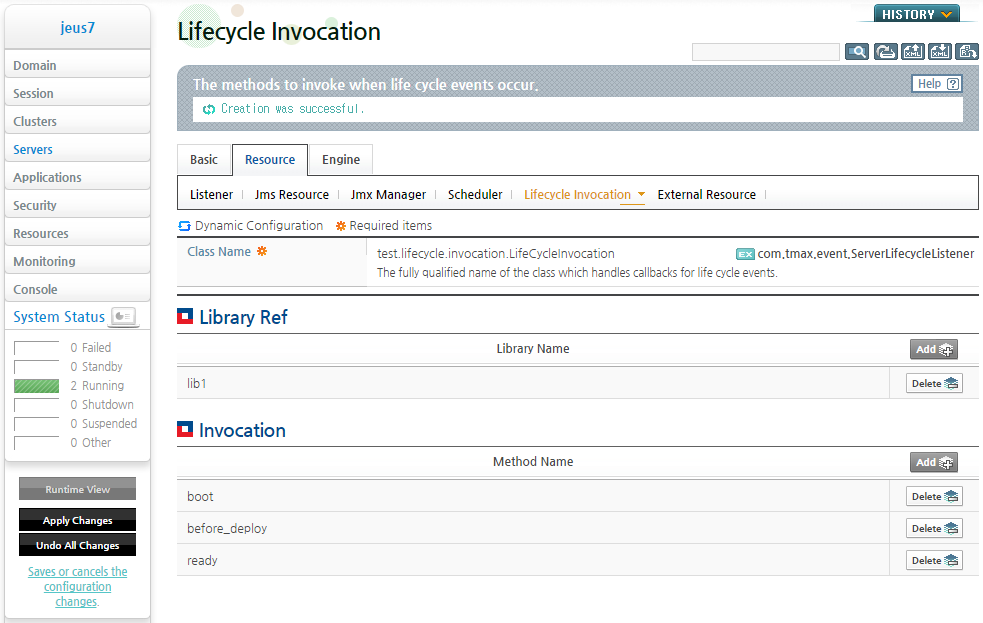
The following screenshot shows the result of saving the newly added library by clicking [OK]. To add a method that is implemented according to the Lifecycle Invocation type, click [Add] from the Invocation list.
-
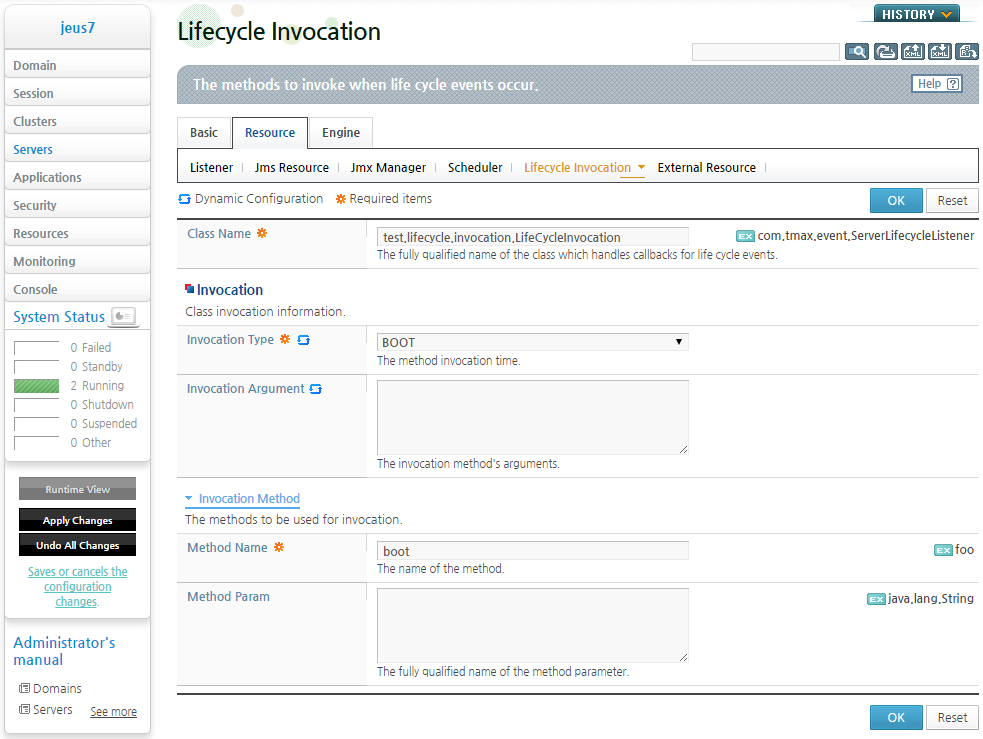
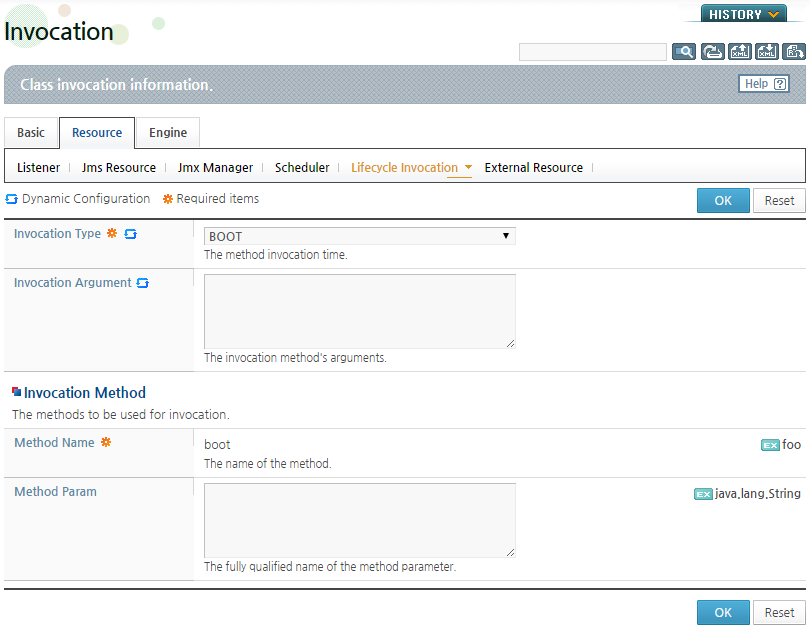
Configure the following to call the BOOT method of test.lifecycle.invocation.LifeCycleInvocation when the server starts up, and click [OK].
The following table describes the configuration items.
-
Method Param
Item Description Invocation Type When the method is called.
-
BOOT : After the server starts and before the engines start.
-
BEFORE_DEPLOY : After the server starts, but before the applications that are registered on the server are distributed.
-
AFTER_DEPLOY : After the server starts and all the applications that are registered on the server are distributed.
-
READY : After the server starts and all the applications that are registered on the server are deployed and ready to provide services.
-
BEFORE_UNDEPLOY : After the server receives the stop command and before all the applications that are running services on the server are undeployed.
-
AFTER_UNDEPLOY : After the server receives the stop command and all the applications that are running services on the server are undeployed.
Invocation Argument Arguments that are used in the method call. Method Name Method to invoke. Method Param Parameters of the method. -
-
-
Click [OK] to save the Lifecycle Invocation Method settings and display the result.
-
Configure additional Lifecycle Invocation methods depending on when the method is set for invocation.
-
After modifying the lifecycle invocation configurations, click [Apply Changes] to apply the changes.
The following is the result of modifying the lifecycle invocation configuration. The result is displayed at the top of the screen and the changes to the lifecycle invocation configurations can be verified.


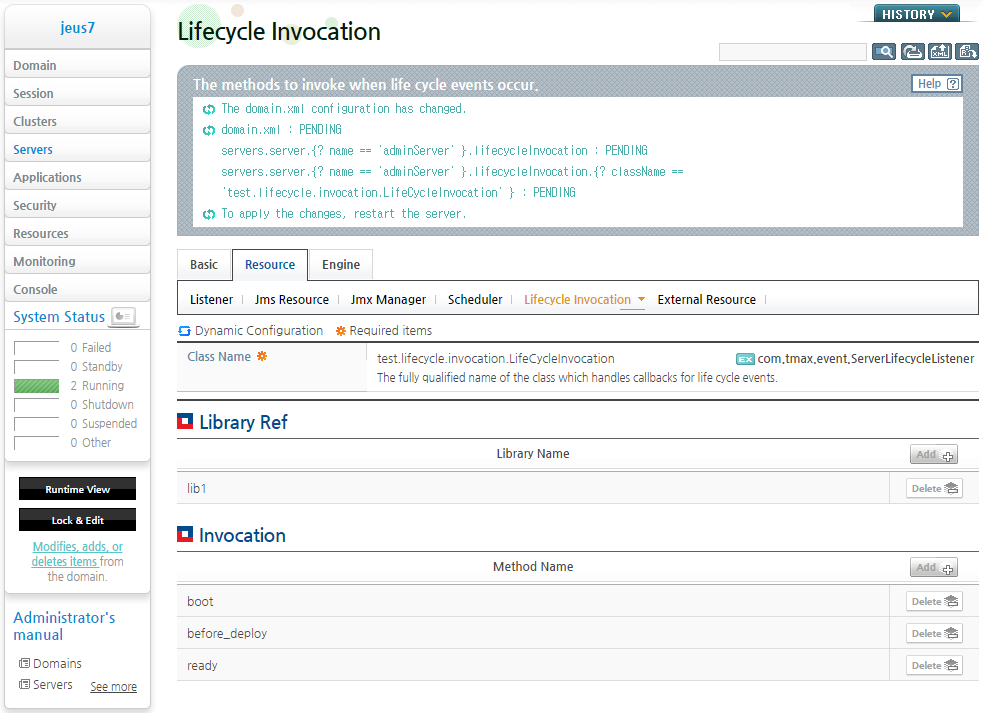
Note
If the Lifecycle Invocation configuration is changed while the server is running, a message is displayed that says that the configuration change has been successfully saved, but the changes cannot be applied to the server. In this case, the server must be restarted in order to apply the changes.
Configure the common mapping information for the resources used by the applications on the server.
The names of the resources that are used in the applications are registered in the JNDI storage of the server where each application is serviced. When resource mapping is configured, regardless of the registered name, the applications can always use the resource by using the same name.
Caution
When a server is in a cluster, the value configured in the cluster is applied first to the resource reference setting.
The following describes the steps for configuring the resource reference in WebAdmin.
-
Select [Servers] from the left menu of WebAdmin to go to the server list screen.
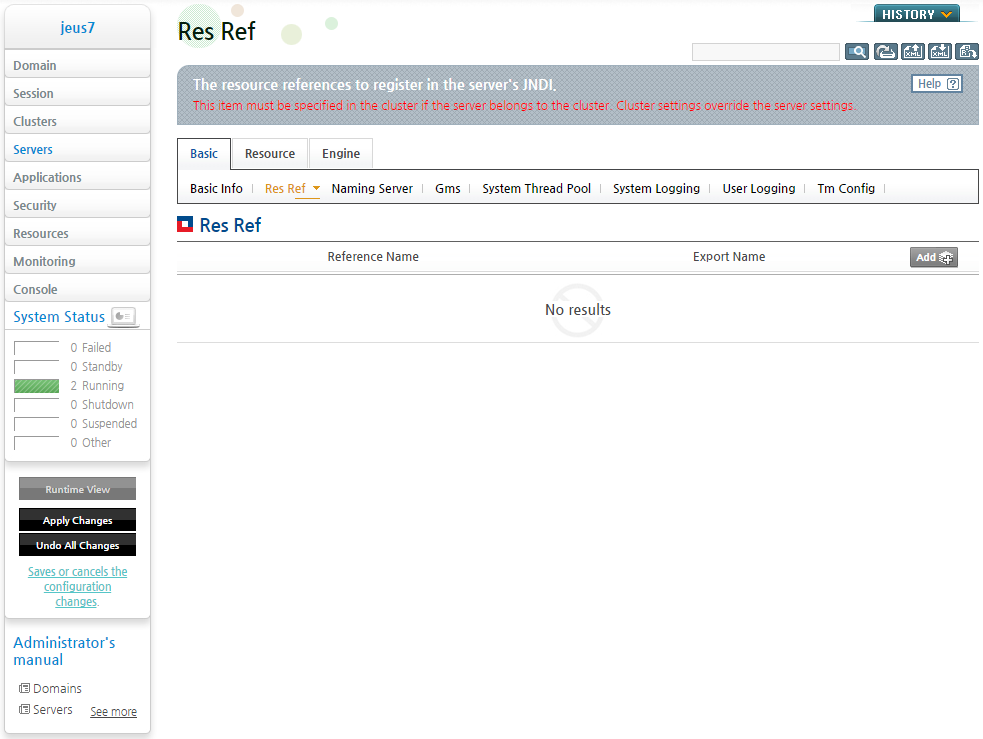
Select a server to go to the server configuration screen. Select the [Basic] tab and then select [Res Ref] to go to the Res Ref screen.
To change the configuration, get the lock for changing the configurations in advance. Click [Lock & Edit] at the bottom of the left menu to switch to the dynamic configuration mode. The resource reference configuration screen appears.
-
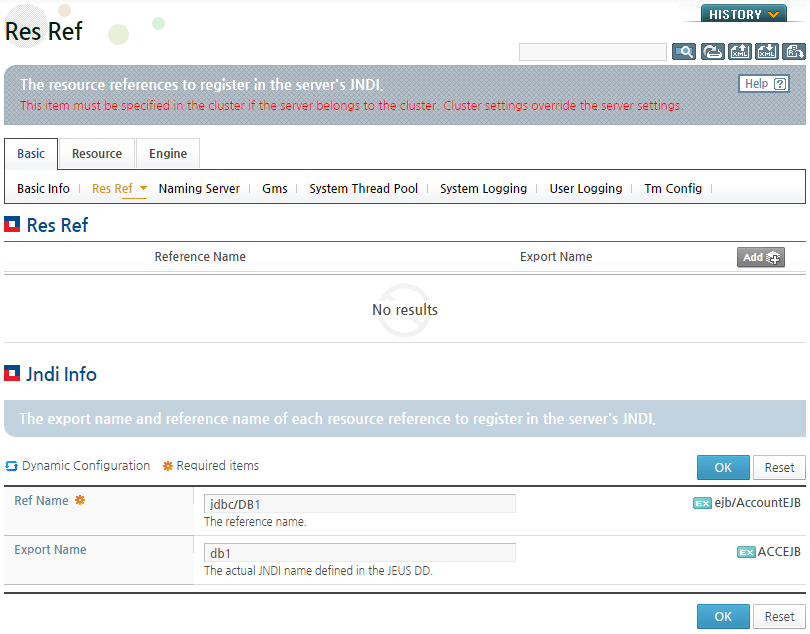
To add a resource reference, click [Add] in the list of resource references.
-
Configure the 'Ref Name' to map the resource to and 'Export Name' to bind the resource to, and then click [OK].
The following table describes the configuration items.
Item Description Ref Name Reference name to map the resource to. This name is used to implement lookup in the applications. Export Name Resource name that is bound to the server. This is the resource's JNDI name that is registered in the server's JNDI repository. -
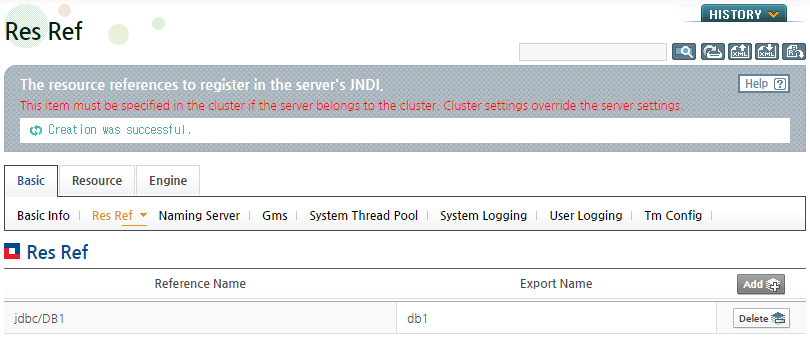
After clicking [OK], the new resource mapping is saved, and the new resource mapping information appears in the resource mapping list.
-
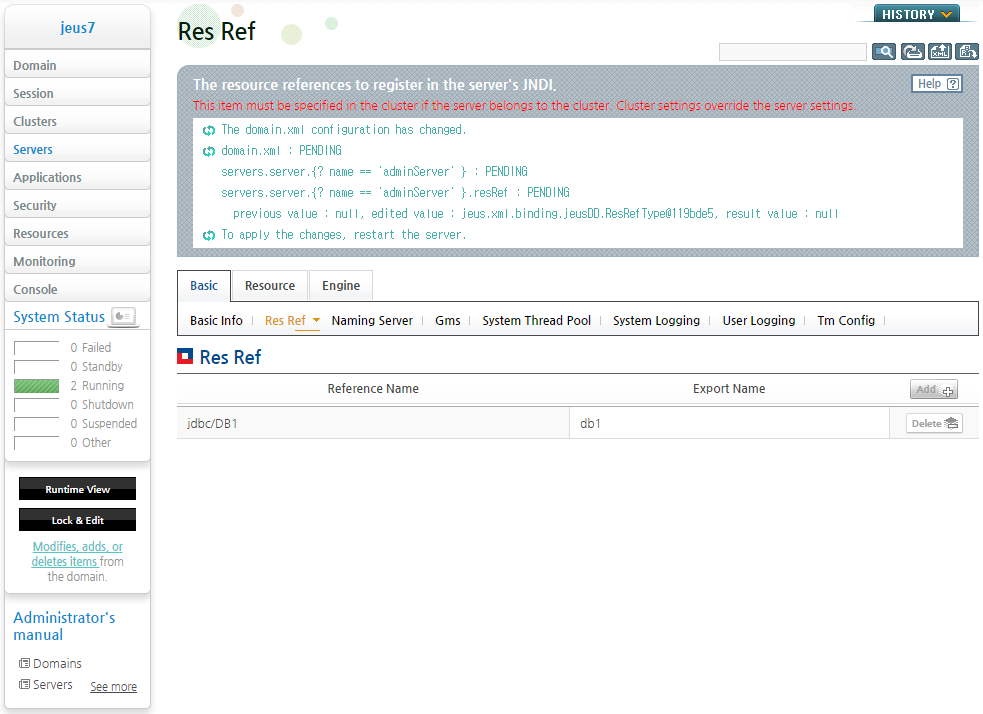
Click [Apply Changes] to apply the changes.
-
The following screenshot shows the result of changing the resource mapping configuration.
The result is displayed at the top of the screen and the changes to the resource mapping configuration can be verified. If the resource mapping configuration is changed while the server is running, a message is displayed that says that the configuration change has been successfully saved, but the changes cannot be applied to the server. In this case, the server must be restarted in order to apply the changes.

The servers and clusters in a domain can check each other's status by using the Group Management Service(GMS). Each server or cluster periodically sends its own status to other servers or clusters in the domain and checks the status of others. In WebAdmin, it is possible to configure how often a server or a cluster performs a status check and how many retries are attempted to detect a failure.
The following are the steps for changing the configuration in WebAdmin.
-
Select [Servers] from the left menu of WebAdmin and go to the server list screen.
Select server1 to go to the server configuration screen. Select [Basic] > [Gms] to go to the GMS configuration screen.
-
To dynamically change the configuration, get the lock by clicking [Lock & Edit] at the bottom of the left menu.
-
Change 'Failure Verification Timeout' to 10 seconds and click [OK].
-
Apply the changed configuration to the server by clicking [Apply Changes]. The result is displayed at the top of the screen and the changed configuration can be verified.
If the group management configuration is changed while the server is running, a message is displayed that says that the configuration change has been successfully saved, but the changes cannot be applied to the server. In this case, the server must be restarted in order to apply the changes.