Table of Contents
- 1.1. Overview
- 1.2. Components
- 1.3. Major Functions
- 1.4. Management Tools
- 1.5. Directory Structure
- 1.6. Environment Configurations
- 1.6.1. XML Configuration Files
- 1.6.2. Monitoring
- 1.6.3. Default Error Page
- 1.6.4. Stack Trace Attachment
- 1.6.5. Encoding
- 1.6.6. JSP Engines
- 1.6.7. Response Headers
- 1.6.8. Cookie Policy
- 1.6.9. Sessions
- 1.6.10. Logs
- 1.6.11. Async Servlet Timeout Processing
- 1.6.12. Web Engine Level Properties
- 1.6.13. Preventing Web Attacks
- 1.6.14. Blocking HTTP Requests with a Specific URL Pattern
- 1.7. Web Engine Tuning
This chapter describes the components and major functions of JEUS web engines and how to configure them.
Java EE web applications (hereafter web applications) consist of dynamic web content such as servlets and JSPs, and static resources such as HTML files. TmaxSoft provides JEUS web engines to efficiently handle these web applications.
This chapter introduces JEUS web engines and describes how to control and monitor them in JEUS.
This section explains the components of web engines and the external resources that interact with web engines.
Web engines are the objects that manage and run web applications that conform to the Java EE, servlet, JSP, and EL standards. Web engines can handle dynamic resources like servlets and JSPs, and static resources like HTML.
Note
A web engine is also known as a web container or a servlet engine.
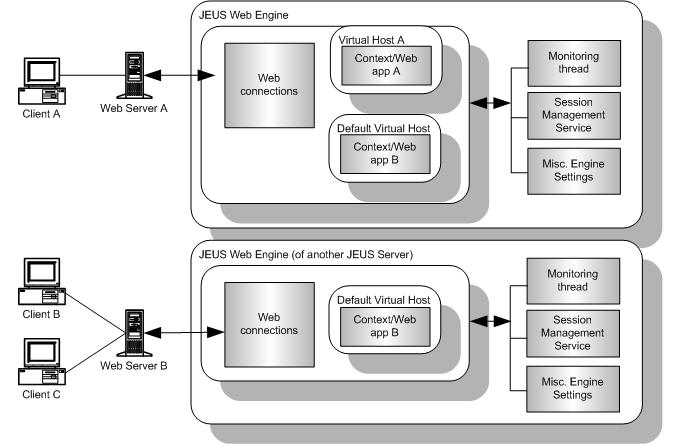
The following are the major web engine components.
-
Web connections allow web engines to connect to client programs, web servers, and other servers.
A large cluster of web servers and web engines are configured by using web connections to improve performance and reliability.
For more information, refer to "Chapter 2. Web Connection Management".
-
A virtual host allows client programs to call web applications by host name. A web application can be deployed to a particular virtual host. For more information, refer to "Chapter 5. Virtual Hosts".
-
When a web application is deployed to a web engine, a web context is created. Web applications are typically packaged as a web archive (WAR) file and deployed to a virtual host in the web engine. For more information, refer to "Chapter 3. Web Contexts".
-
Monitoring threads monitor multiple components of the web engine. For more information, refer to "1.3. Major Functions".
-
The session management service provides an environment to manage client sessions in a distributed environment and to use the client sessions in multiple web engines. For detailed information, refer to JEUS Session Management Guide. "Chapter 1. Session Tracking".
-
Other Web Engine Configurations
These include configurations that apply to all web engines such as default error page configurations, encoding configurations, JSP engine configurations, and response header configurations.
Note
The context group that was used in JEUS 6 and earlier is no longer used in JEUS 7. Most of the context group functions are provided by the web engine.
The following are the external resources that interact with web engines.
-
Clients send service requests to JEUS web engines, typically through an HTTP-based web browsers.
-
Web servers send client HTTP requests to a JEUS web engine. JEUS web engines typically work with web servers to handle the HTTP client requests. For more information, refer to "Chapter 2. Web Connection Management".
The following are the major functions of a web engine.
-
Managing web applications
Web engines can deploy, undeploy, and suspend web applications that conform to the Java EE standards. Web engines can also redeploy web applications while the applications are running to provide seamless service. For more information, refer to "Chapter 3. Web Contexts".
-
Monitoring
Web engines monitor resource states to respond if problems occur. There are three types of monitoring. Refer to "1.6.2. Monitoring" for more information about configuring each monitoring type.
-
Thread pool monitoring
Monitors the thread pool that each web connection has. Refer to "Chapter 2. Web Connection Management" for more information.
-
Class loader monitoring
Monitors servlet classes of web applications to check if they have changed. Refer to "Chapter 3. Web Contexts" for more information.
-
Session service monitoring
Checks the expirations of client sessions and deletes expired sessions. Refer to JEUS Session Management Guide. "Chapter 1. Session Tracking" for more information about session service monitoring.
-
-
Default error page
Web engines can set the default error page that will be shown if the context is not ready.
For more information about this configuration, refer to "1.6.3. Default Error Page".
-
Attaching the stack trace
Web engines can configure the option to attach the stack trace when an error occurs. For more information about this configuration, refer to "1.6.4. Stack Trace Attachment".
-
Encoding
Web engines configure the encoding that applies to all registered contexts. For more information about the configuration, refer to "1.6.5. Encoding".
-
JSP engines
A JSP engine is created for each web application. When clients request JSP resources, the JSP engine converts the JSP pages to Java files, and then compiles the Java files to create the servlet byte code. This process creates Java files, used for debugging jsp files, and class files for each JSP.
For more information about this configuration, refer to "4.4. Configuring JSP Engines".
-
Response headers
Web engines can configure name-value pairs for user defined HTTP response headers. If a response header is set, the defined header will be included in all responses from the web engine.
For more information about this configuration, refer to "1.6.7. Response Headers".
-
Managing sessions
Web engines can configure session management. All configurations related to sessions such as clustered session participation, session object sharing, session cookie configuration, and timeouts can be set. For more information about the configurations, refer to "1.6.9. Sessions" and JEUS Session Management Guide. "Chapter 1. Session Tracking".
-
Logging events
Web engines create server logs and access logs. Web applications create user logs using servlet context log method.
For information about the default paths of JEUS logs, refer to "1.5. Directory Structure". For more information about the log configuration, refer to "1.6.10. Logs".
-
Graceful Shutdown
This function guarantees the completion of running services if an administrator shuts down a JEUS server. If the administrator executes the shutdown command, the following two actions occur:
-
The server will no longer receive requests.
-
Services that are already running will complete and then shutdown will continue.
If the services that are already running take too long to complete, JEUS can set the timeout option when running the shutdown command. For more information about graceful shutdown, refer to JEUS Server Guide. "3.1.3. Shutting Down a Managed Server".
Note
The shutdown-timeout configuration that was provided by JEUS 6 is no longer available. Instead, the same function is provided if the shutdown timeout option is configured through the console tool (jeusadmin).
-
-
Handling web attacks
Web engines provide settings that prevent attacks like denial of service (DoS).
The limits for the POST request size, the number of parameters included in GET and POST requests, the number of headers included in a request, the size of headers included in a request, and the query string size of a GET request can be configured. For more information about these settings, refer to "1.6.13. Preventing Web Attacks".
This section describes the tools that control and monitor web engines.
The following are the web engine tools.
-
A tool for managing web engines through a web browser.
Refer to "JEUS WebAdmin Guide" for more information about using JEUS WebAdmin(WebAdmin).
-
A tool for controlling web engines through the console. This tool provides basic control and monitoring functions. For more information about the console tool, refer to JEUS Server Guide. "Chapter 3. Controlling and Monitoring JEUS Servers" and JEUS Reference Book. "4.2.8. Web Engine Commands".
Tools can be used to control and monitor web engines.
Controlling Web Engines
Controlling a web engine includes starting and shutting down the engine. This can be accomplished by using WebAdmin or the console tool.
-
Using WebAdmin
For more information, refer to JEUS Server Guide. "Chapter 3. Controlling and Monitoring JEUS Servers".
-
Using the console tool
Web engines are part of JEUS servers and there is no way to control web engines independently from the servers. For more information, refer to JEUS Server Guide. "Chapter 3. Controlling and Monitoring JEUS Servers".
Monitoring Web Engines
WebAdmin or the console tool can be used to monitor web engines.
-
Using the console tool
Jeusadmin can display basic information about web engines. Refer to "JEUS Server Guide" and JEUS Reference Book. "4.2.8. Web Engine Commands".
-
Using WebAdmin
WebAdmin can be used to monitor web engines by using web engine statistics.
-
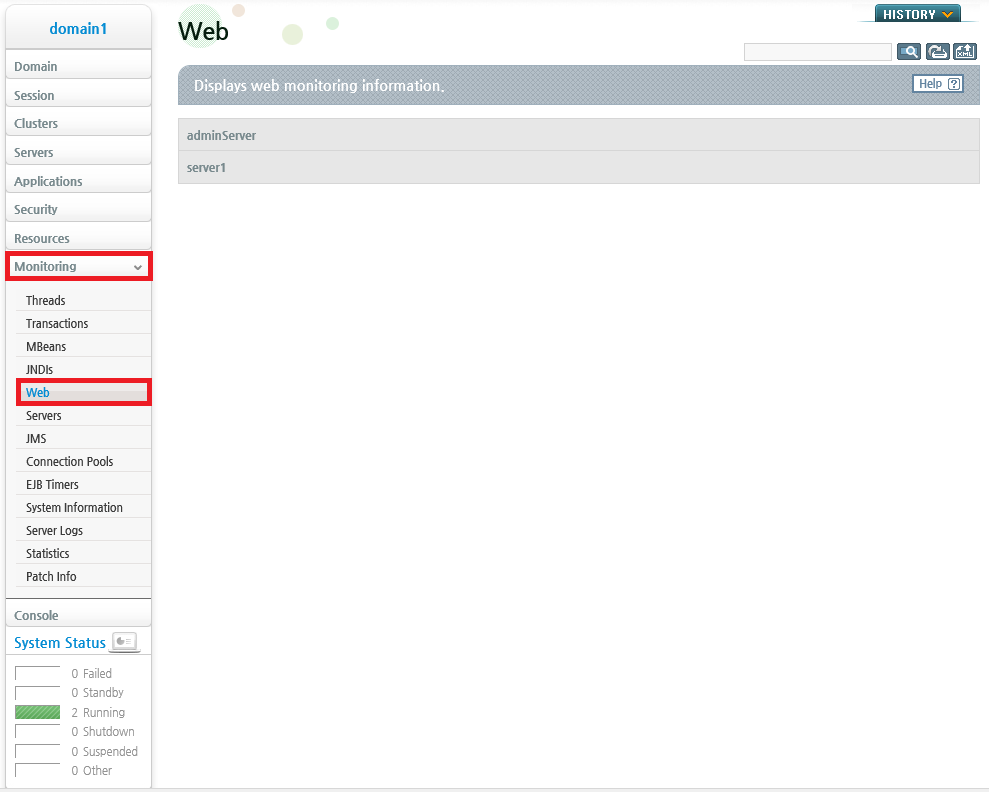
Click [Monitoring] from the WebAdmin menu to see the list of modules that can be monitored. Click [Web] to show or reset statistics about the web engines.
-
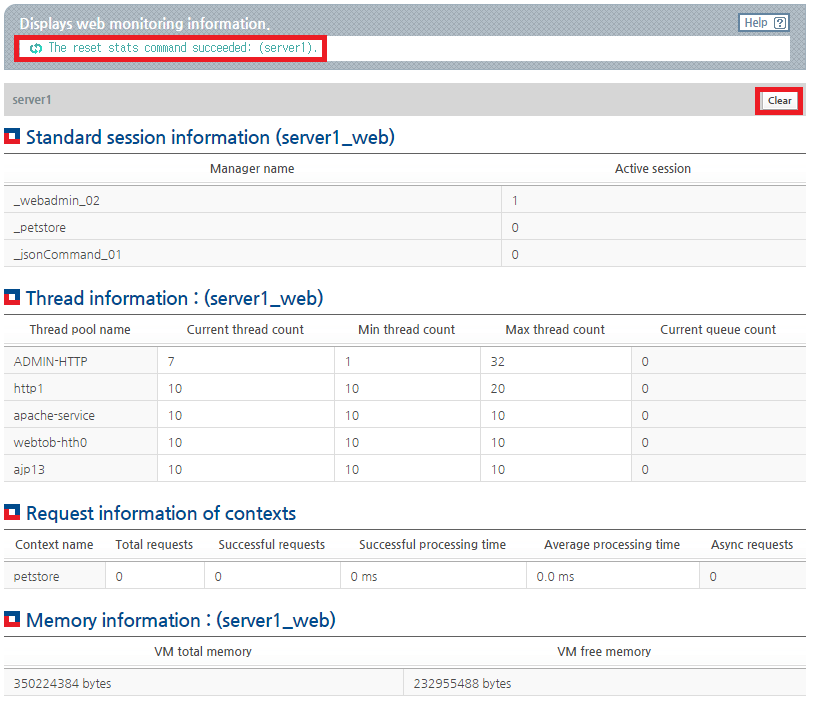
On the Webinfo screen, select a server from the 'Server' dropdown list to show statistics about the web engine. Click [Clear] to reset the Request information of contexts statistics.
The following describes each section of the Webinfo screen.
Statistics Description Standard session information Displays statistics about the session manager in the web engine of the server. By default, the number of sessions is displayed. Distributed session information Displays statistics about the session manager in the web engine of the server in a clustered environment. Displays information about the session manager's sessions and backup servers. Refer to JEUS Session Management Guide. "2.2. Basic Concepts" for detailed information about clustered environments and configurations. Thread information Displays statistics about the threads in the thread pool of each listener and connector in the web engine of the server. Request information of contexts Displays the total number of requests, the total processing time, and the average request processing time for each web application that is deployed to the web engine of the server. Click [Clear] to reset this information. Memory information Displays the total and available amount of memory for the server.
-
The following is the directory structure of JEUS web engines.
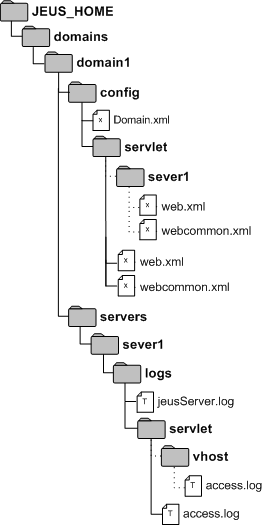
- JEUS_HOME
-
JEUS installation home directory.
- domains/domain1/config/
-
The domains directory in JEUS_HOME contains a directory for each domain name. The web engine configuration files are in the config directory, and domain1 is a domain name used as an example.
Domain.xml is an integrated configuration file that contains all server configurations for the domain. Web engines can also be configured by each server.
Note
1. For more information about domain.xml, refer to "JEUS Server Guide".
2. As of JEUS 7, WEBMain.xml is no longer used.
3. As of JEUS 7, there is a separate JVM for each web engine, so a configuration directory for each engine is not needed.
-
servlet/
This directory contains the XML configuration file that is used by all servers in the domain when deploying web applications.
File Description web.xml As of Servlet 3.0, web.xml is not needed, but since Tomcat Jasper, a JSP parser, checks the application version based on the file, it is recommended to keep the file. Web applications that do not contain web.xml will also use this file. webcommon.xml Shared configuration file that applies to all web applications. The file type is same as web.xml. Note
When servers in the domain start, they receive web.xml and webcommon.xml from the Domain Administration Server to maintain synchronization.
-
servlet/server1/
If webcommon.xml and web.xml exist in the servlet configuration directory, the files only apply to that server. This configuration has a higher precedence than those in the parent directories.
Note
If web.xml or webcommon.xml exists in a server directory, they are not managed automatically by JEUS, so the server administrator must manage the files manually.
-
- domains/domain1/servers/server1/logs
-
Files that have been created while a server is running in the domain are created in the server specific directory of the server directory. For more information, refer to JEUS Server Guide. "Chapter 8. Logging".
Log files are created in the logs directory. Logs created by web engines are stored in JeusServer.log. The file name can change due to log rotation, but it is initially set to JeusServer.
-
servlet/
This directory contains the web application access log, access.log.
If access logs are created by each virtual host in this directory, directories will be created with the virtual host names and the access logs will be stored in the corresponding directory. For more information, refer to "Chapter 5. Virtual Hosts".
This directory also contains the user.log or user_appname.log file that contains logs created through the log method of the ServletContext API. User logs can be stored in user.log or in a separate file, user_appname.log, depending on the configuration.
-
This section describes environment and web engine configuration files.
It is recommended to use WebAdmin to configure web engines. The following knowledge is required to configure web engines in WebAdmin.
-
To change each configuration, click [Lock & Edit] from the left menu to change to configuration mode. Otherwise, the settings cannot be modified.
-
[OK] and [Reset]
After changing the configurations, click [OK] to save the changes. Click [Reset] to restore the default values.
-
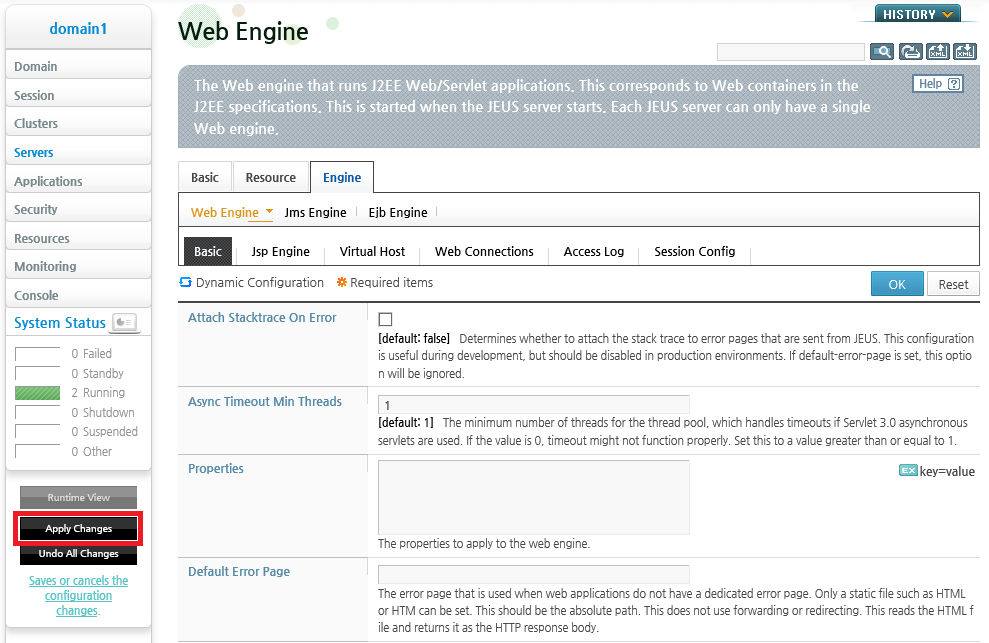
To apply the changes, click [Apply Changes]. If changes are not dynamically applied to the server, a message saying that the changes are pending and to restart the server to apply changes will be displayed. In this case, the pending changes are applied to the server by restarting the server.
-
Web engines have basic and advanced configurations.
-
Basic configurations
A description is shown for basic configurations.
-
Advanced options
A separate area where advanced options can be configured. Descriptions are not displayed for each option. Click 'Open All' at the top of Advanced Options to show the description of each option.
-
Note
For more information about how to use WebAdmin, refer to "JEUS WebAdmin Guide".
The following XML configuration files are related to web engines.
-
Location JEUS_HOME/domains/<domain-name>/config Purpose JEUS web engine configurations Details "JEUS Server Guide"
XML schema files are in the 'JEUS_HOME/lib/schemas/jeus/' directory.
The files must start with the XML header defined by JEUS. The root element must specify the namespace of the JEUS XML schema with the existing namespace.
The following are the headers used by each file. The XML header in web.xml is included in the servlet standard.
-
XML header in domain.xml
[Example 1.1] XML Header : <<domain.xml>>
<?xml version="1.0" encoding="UTF-8"?>
<domain xmlns="http://www.tmaxsoft.com/xml/ns/jeus" version="7.0">
-
XML header in jeus-web-dd.xml
[Example 1.2] XML Header : <<jeus-web-dd.xml>>
<?xml version="1.0" encoding="UTF-8"?>
<jeus-web-dd xmlns="http://www.tmaxsoft.com/xml/ns/jeus">
-
XML header in web.xml
[Example 1.3] XML Header : <<web.xml >>
<?xml version="1.0" encoding="UTF-8"?>
<web-app version="3.0" xmlns="http://java.sun.com/xml/ns/javaee">
Note
All tags used in this guide are written in the same order as the XML schema. Since it is not easy to maintain the order, JEUS provides a sorting function that automatically orders the tags. Users do not need to maintain the order when editing an XML configuration file. Refer to "JEUS XML Reference" for more information about the configuration order.
In the previous examples, the standard header is omitted for readability. Actual XML configuration files contain the standard header.
Web engines can monitor the changes of threads, classes, and sessions. Web engines can also change the monitoring interval.
WebAdmin can be used to set the monitoring interval using the following steps.
-
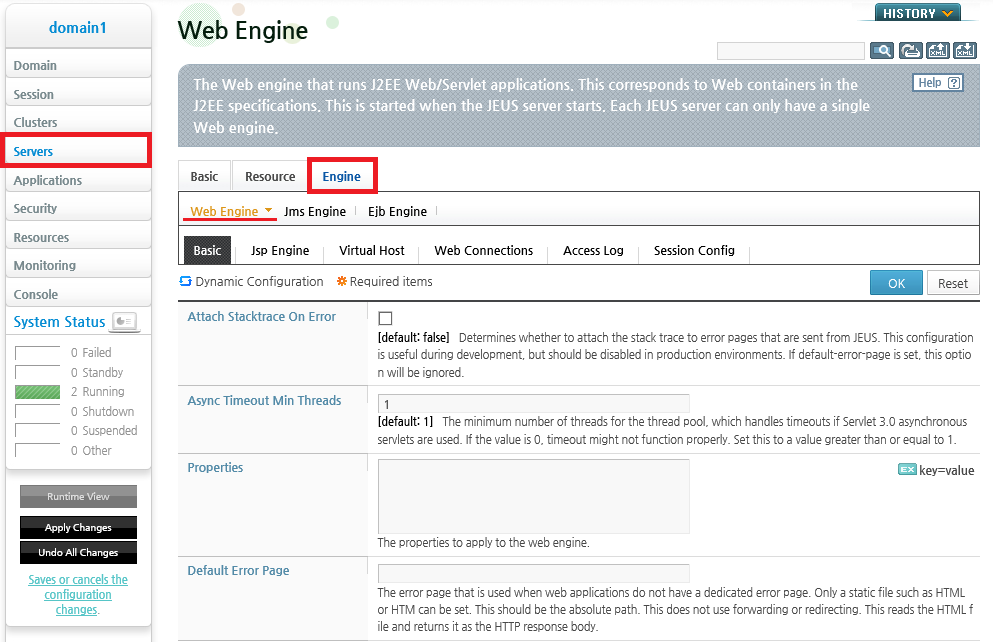
Click [Servers] from the left menu to go to the list of servers. Click a server from the list to go to the server configuration page. On the screen, go to [Engine] > [Web Engine] > [Basic].
-
Click [Lock & Edit] to change to configuration mode.
-
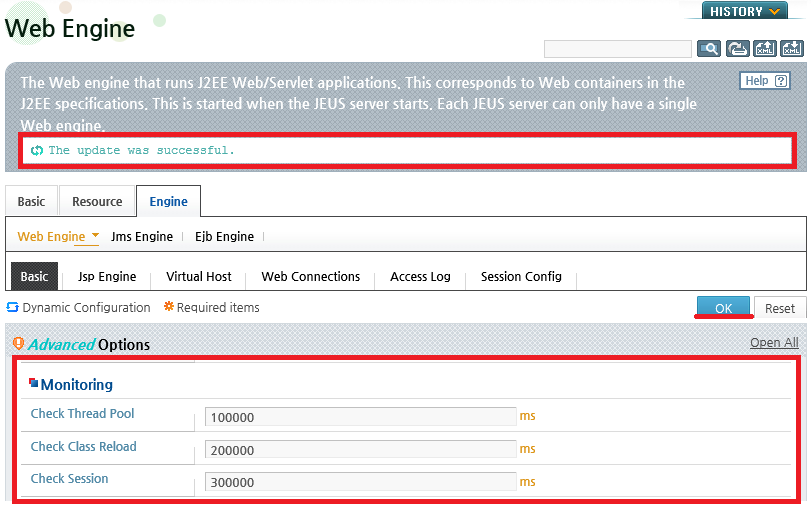
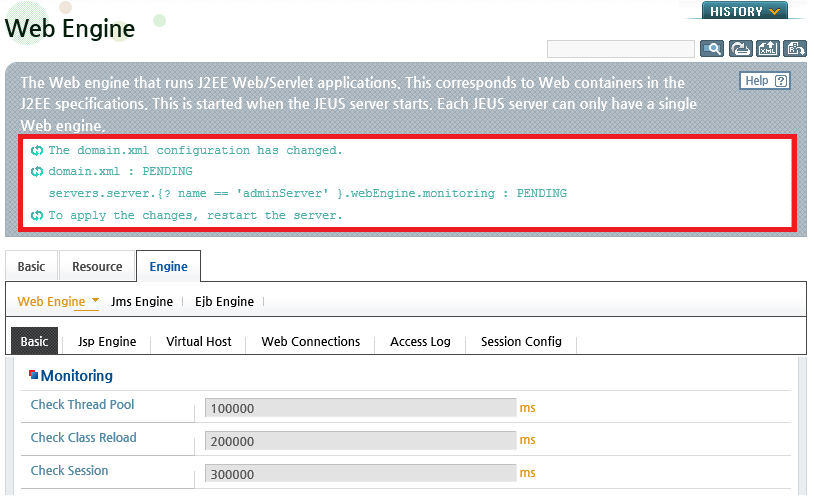
In the Advanced Options section of the Web Engine configuration screen, configure each item in the Monitoring section and click [OK].
The following describes each option in the Monitoring section.
-
After completing the configurations, click [Apply Changes] to apply the changes to the server. (Refer to [Figure 1.5])
-
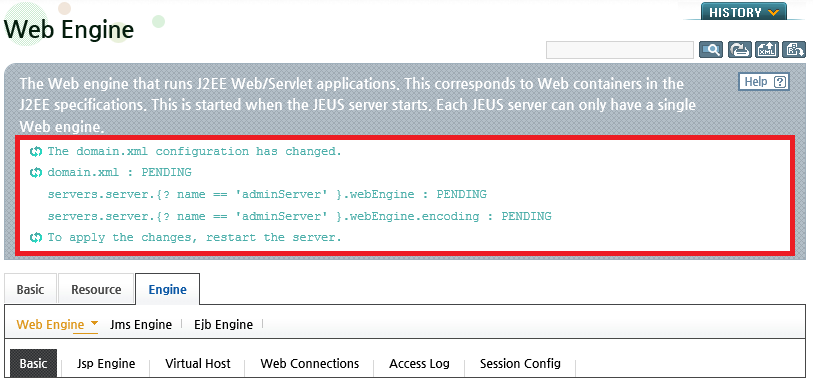
The following result is displayed. Since the monitoring configurations cannot be applied dynamically, the server must be restarted to apply the changes.
When a web context exists for a request, the web context handles any errors that occur.
However, if a web context does not exist, the web engine must handle the error by displaying an error page. In this case, since the default error page might not be in a form suitable for the user, the absolute path to the desired error page can be configured on the web engine.
This configuration is only used for HTTP responses. Only HTML or HTM files can be used, and forwarding is not allowed.
WebAdmin can be used to set the default error page.
-
Click [Servers] from the left menu to see the server list. Click a server from the list to go to the server configuration page. On the screen, go to [Engine] > [Web Engine] > [Basic]. (Refer to [Figure 1.7])
-
Click [Lock & Edit] to change to configuration mode.
-
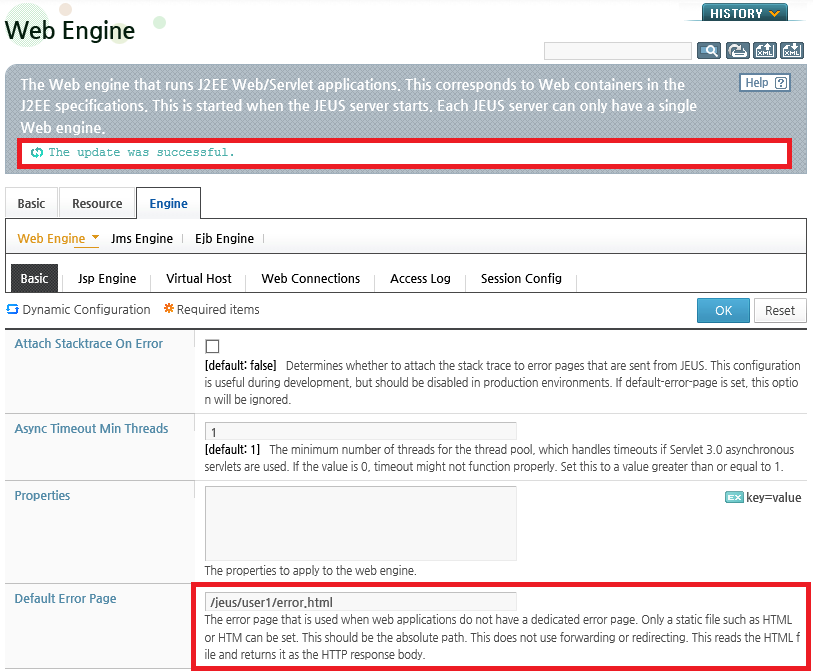
On the Web Engine screen, enter the absolute path to the error page in 'Default Error Page' and click [OK].
-
After completing the configurations, click [Apply Changes]. (Refer to [Figure 1.5])
-
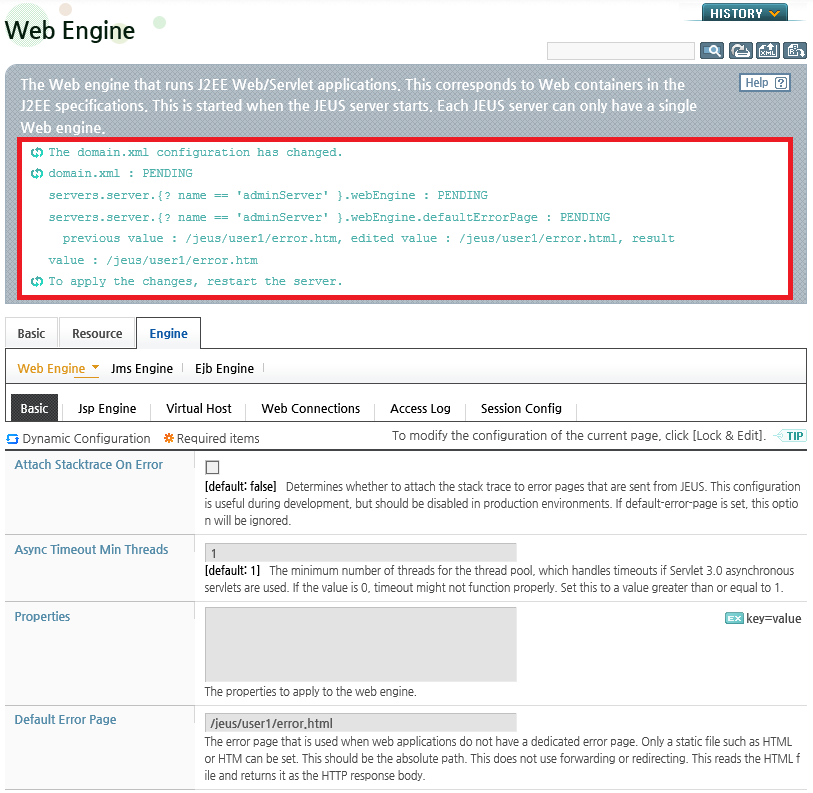
The following result is displayed. Since the 'Default Error Page' configuration cannot be applied dynamically, the server must be restarted to apply the changes.
This configuration determines whether to display details about the error on the default error page provided by JEUS if an error occurs while a web engine is processing a request. The stack trace details are useful in a development environment, but it is not recommended to display them to the user in the production environment. The configuration can be set in WebAdmin or in jeus-web-dd.xml of each application. For more information about configuring jeus-web-dd.xml, refer to "3.3.1. jeus-web-dd.xml Configurations".
WebAdmin can be used to set the option to attach the stack trace if an error occurs in the following way.
-
Click [Servers] from the left menu to see the server list. Click a server from the list to go to the server configuration page. On the screen, go to [Engine] > [Web Engine] > [Basic]. (Refer to [Figure 1.7])
-
Click [Lock & Edit] to change to configuration mode.
-
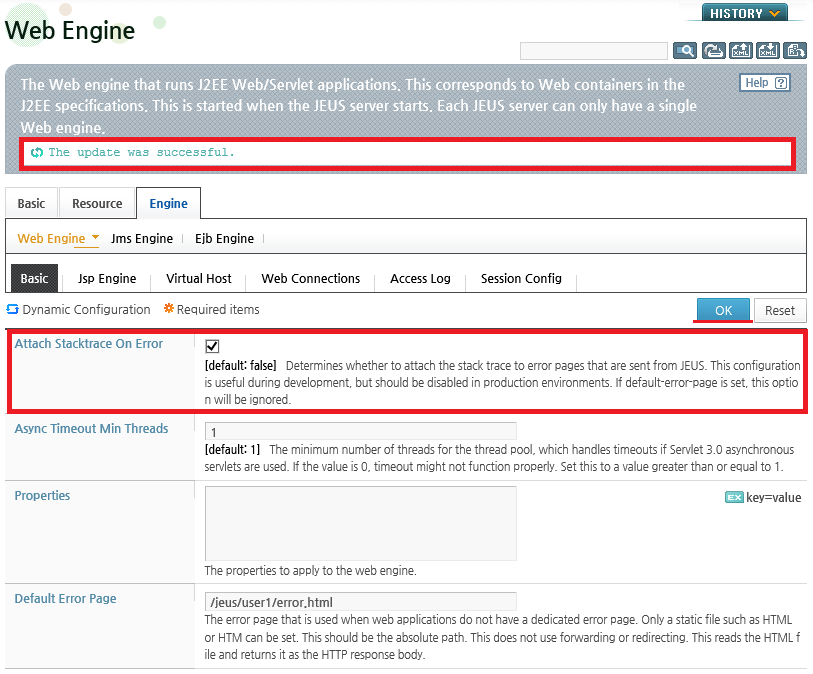
On the Web Engine screen, set 'Attach Stacktrace On Error' as true or false and then click [OK]. The default value is false. If it is set to true and 'Default Error Page' is not set, the stack trace will be attached to the default error page of the web engine.
For more information about configuring the default error page, refer to "1.6.3. Default Error Page".
-
After completing the configuration, click [Apply Changes] to apply the changes. (Refer to [Figure 1.5])
-
The following result is displayed. Since the 'Attach Stacktrace On Error' configuration cannot be applied dynamically, the server must be restarted to apply the changes.

There are three types of encoding configurations that can be used by all contexts in the engine. They can be applied to each application, virtual host, or server by using jeus-web-dd.xml. The xml configurations are applied in the aforementioned order. The administrator can set the encoding in domain.xml by using a tool such as WebAdmin. However, since encoding configuration can vary depending on each web application, it is recommended to set it in jeus-web-dd.xml.
-
The encoding for URI's query string in request lines of an HTTP request.
The request URL encoding is applied to String objects returned after query strings are parsed when ServletRequest.getParameter() is called. If <request-encoding> is set, this encoding will be only applied to values set in forced.
-
The request URL encoding is applied in the following order.
-
The "forced" encoding of <request-url-encoding> defined in domain.xml.
-
The "default" encoding of <request-url-encoding> defined in domain.xml.
-
ISO-8859-1
-
-
-
The encoding that is applied to query strings and cookies in the HTTP request header, and the HTTP body.
-
Query strings in HTTP request lines are encoded in the following order. Query strings described to process forward and include in a Servlet or JSP are also encoded in the same order.
-
The "forced" encoding of <request-url-encoding> that is set in domain.xml.
-
The "forced" encoding of <request-encoding> that is set in xml.
-
The "client-override" encoding of <request-encoding> that is set in xml.
-
The "default" encoding of <request-encoding> that is set in xml.
-
ISO-8859-1
-
-
Cookies in HTTP request headers are encoded in the following order.
-
The "charset-encoding" value of <cookie-policy><write-value-on-header-policy> that is set in xml.
-
The "forced" encoding of <request-encoding> that is set in xml.
-
The "client-override" encoding of <request-encoding> that is set in xml.
-
The "default" encoding of <request-encoding> that is set in xml.
-
ISO-8859-1
The same precedence order is applied to the cookies of the HTTP Response header. To consistently configure cookie encoding, it is recommended to set the same value to "charset-encoding" described in 1. for all web engines.
-
-
HTTP Bodies are encoded in the following order.
-
The "forced" encoding of <request-encoding> defined in xml.
-
The Servlet/JSP application configuration, which is set through request.setCharacterEncoding().
-
The "client-override" encoding of <request-encoding> defined in xml.
-
The encoding that is set by charset in Content-Type of the HTTP request.
-
The "default" encoding of <request-encoding> defined in xml.
-
ISO-8859-1
If a request is POST and Content-Type is application/x-www-form-urlencoded, a web engine will read the body and process parameters when a web application calls ServletRequest.getParameter().
Note that since ServletRequest.getParameter() also processes URI query strings, if encoding set in <request-url-encoding><forced> is different from that in <request-encoding>, String objects to which different encodings are applied can be returned.
Bodies are encoded when ServletRequest.getReader() is called.
-
Warning
The "forced" option has a higher precedence than the ServletAPI starting from JEUS v7.0 Fix #2. The client-override configuration must be used to keep the "forced" configuration in Fix #1 or earlier.
The request encoding precedence order is different from JEUS 6. Hence, the encoding configuration must be modified according to the said order or compatibility options must be applied in applications where HTTP request encoding was processed in JEUS 6.
-
-
The encoding that is applied to a body of HTTP response messages.
Response encoding decides which encoding to use for web container responses when converting ServletOutputStream.println() or PrintWriter.println() to a byte array, setting the "XXX" value of "Content-Type:text/html;charset=XXX" in the HTTP header, etc. It can also be set in jeus-web-dd.xml.
-
The response encoding is applied in the following order.
-
The "forced" encoding of <response-encoding>
-
The encoding by the API call, JSP Response Character Encoding
-
The "default" encoding of <response-encoding>
-
ISO-8859-1
-
JSP page encoding is for JSP files. However, <response-encoding><forced> is used for JSP file encoding because JSP page encoding and JSP response encoding are rarely used differently. If BOM exists in a JSP file, UTF-8 is used.
Note
<response-encoding><forced> replaces JSP page encoding to help JSP developers to correct an invalid pageEncoding value described in a page tag only by configuring JEUS. For example, when EUC-KR is set for JSP files and pageEncoding is set to UTF-8, this issue can be resolved by setting <response-encoding><forced> to EUC-KR.
The following precedence order is used to read a JSP file.
BOM > <response-encoding><forced> > JSP Page Character Encoding > JSP Response Character Encoding > default
For detailed information about the JSP Page Character Encoding and Response Character Encoding, refer to the JSP standard.
-
Using WebAdmin
The encoding can be set in WebAdmin using the following steps.
-
Click [Servers] from the left menu to go to the list of servers. Click a server from the list to go to the server configuration page. On the screen, go to [Engine] > [Web Engine] > [Basic]. (Refer to [Figure 1.7])
-
Click [Lock & Edit] to change to configuration mode.
-
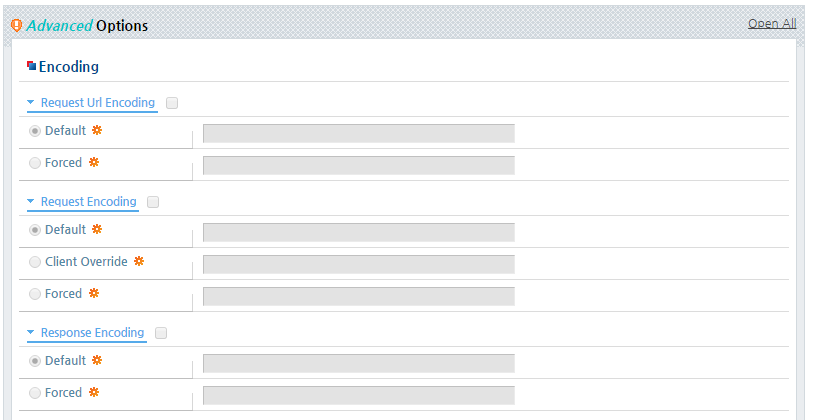
In the Encoding section of the Advanced Options, set 'Request URL Encoding', 'Request Encoding', 'Response Encoding' and click [OK].
Except for 'Request URL Encoding', the configurations can also be set in jeus-web-dd.xml.
Select either 'Default' or 'Forced' and enter the encoding name.
Value Description Default Use the default value if no encoding is specified. Forced Always use the encoding. -
After completing the configurations, click [Apply Changes] to apply the changes. (Refer to[Figure 1.5])
-
The following result is displayed. Since the encoding configurations cannot be applied dynamically, the server must be restarted to apply the changes.
Note
In JEUS 6 and earlier versions, both <default> and <forced> could be set, but only the <forced> setting will be applied overriding the <default> setting. Starting from JEUS 7, only one of <default> or <forced> can be set.
Character Encoding Configurations and Compatibility Guide
JEUS provides encoding configuration in xml to provide application developers with the ease of development and application users or administrators with ease of management. However, in the process of determining and implementing the encoding policy, there arose problems such as the mismatch of "forced" configuration definition between the request and response encodings or the violation of the servlet standard.
Starting from JEUS 7, efforts have been made to improve the consistency and correctness of the encoding policy. This may cause compatibility issues with existing applications. This guide will help modify applications or to use the compatibility option to maintain operation.
Note
It is recommended to configure the compatibility option in jeus-web-dd.xml. If it is configured in domain.xml of each server, it affects all applications deployed to the server.
-
-
Starting from JEUS 7, the Accept-Language Header of an HTTP Request is not referenced, and no compatibility option is provided for this.
-
The forced encoding of <request-url-encoding> is used only to process query strings included in a request URL as parameters.
-
When a Servlet calls ServletRequest.getParameter() for POST requests (Content-Type: application/x-www-form-urlencoded), it must be determined whether to use the forced encoding of <request-url-encoding> according to whether a query string will be processed after included in an HTTP body or will be recognized as an HTTP header. To process a query string as an HTTP body, set the forced encoding. To process a query string as an HTTP header, do not set the forced encoding. In the case of GET requests, the forced encoding of <request-url-encoding> must be set because only query strings that are included in a request URL are processed as parameters.
-
Query strings become parameters when a Servlet first calls ServletRequest’s parameter API.
-
-
-
Applied to query strings, cookies, and request bodies.
-
If forced is configured for <request-url-encoding><forced>, query strings are not affected.
-
For cookies, top precedence is given to charset-encoding configuration in <cookie-policy><write-value-on-header-policy>. The jeus.servlet.request.cookie.encoding and jeus.servlet.urldecode.cookie settings used in JEUS 6 and earlier versions are no longer supported.
-
From JEUS v7.0 Fix #2, <request-encoding><forced> has higher priority than request.setCharacterEncoding() to unify <request-encoding><forced> and <response-encoding><forced>. If <request-encoding><forced> is used in a version earlier than JEUs v7.0 Fix #2, it is replaced by <request-encoding><client-override>.
-
The problem with request.setCharacterEncoding() in JEUS 6 is that it applies encoding to the HTTP body as well as query strings and cookies. But the servlet standard limits the API to be applied to only the HTTP body. This is no longer an issue in JEUS 7. To use the API in JEUS 6, the jeus.servlet.request.6CompatibleSetCharacterEncoding property must be set to true, and it is recommended to set it in jeus-web-dd.xml for the relevant application.
-
It is not recommended to configure <request-encoding><forced>. Web application developers do not need to call request.setCharacterEncoding() whenever writing a program if client-override of default is set.
String objects can be directly created by passing an encoding value to new String() as in the following example.
String param = request.getParameter();
String realParam = new String(param.getBytes("ISO-8859-1"), "EUC-KR");
In the above example, to create the param object with ISO-8859-1, the default encoding (ISO-8859-1) must be set in a web engine. The realParam String object is created by a web application through JVM without a web engine.
-
From JEUS v7.0 Fix #4, <request-encoding><url-mapping> is added in jeus-web-dd.xml. <request-encoding> in jeus-web-dd.xml replaces <request-encoding> in domain.xml.
-
<request-encoding> in jeus-web-dd.xml replaces <request-encoding> in domain.xml.
-
If only <url-mapping> is set, only requests specified in <servlet-path> are encoded. Requests that are not specified in <servlet-path> are encoded by ISO-8859-1, the Servlet standard.
-
If <url-mapping> and <default> are set together, requests that are not specified in <servlet-path> are encoded by using the setting in <default>.
-
Setting in <request-url-encoding><forced> of domain.xml is only applied to POST bodies.
-
<request-encoding><url-mapping> has lower priority than the charset of a Count-Type header sent by a client.
[Example 1.4] JSP Example that Sets Page Character Encoding: Request Encoding
<?xml version="1.0" encoding="UTF-8"?>
<jeus-web-dd>
    <encoding>
        <request-encoding>
            <url-mapping>
                <servlet-path>/test/test1</servlet-path>
                <encoding>EUC-KR</encoding>
            </url-mapping>
            <url-mapping>
                <servlet-path>/test/*</servlet-path>
                <encoding>UTF-8</encoding>
            </url-mapping>
            <url-mapping>
                <servlet-path>*.jsp</servlet-path>
                <encoding>EUC-KR</encoding>
            </url-mapping>
        </request-encoding>
    </encoding>
</jeus-web-dd>
-
-
-
-
Applied to the response bodies.
-
Cookies are not affected by the response encoding. charset-encoding setting in <cookie-policy><write-value-on-header-policy> is a top priority.
-
The <response-encoding><forced> option has a higher precedence than response.setCharacterEncoding(), setContentType(), and setLocale(). However, the precedence in applying the "forced" option is not defined in JEUS 6 up to JEUS v7.0 Fix #1. This resulted in incorrect implementations, and in order to continue to use the applications that use these operations, the jeus.servlet.response.6CompatibleForcedEncoding property must be set to true. It is recommended to set the property in jeus-web-dd.xml for a corresponding application.
-
Until JEUS 6, if "forced" is configured, response.setCharacterEncoding() has the top precedence. If a user still wants to maintain this operation, the jeus.servlet.response.6CompatibleSetCharacterEncoding property must be set to true. It is recommended to set the property in jeus-web-dd.xml for a corresponding application.
-
It is not recommended to configure <response-encoding><forced>. Web application developers can avoid having to configure encoding every time by using the default option. If the default configuration fails to work, the response encoding must be configured using the response API.
-
-
JSP
-
According to the JSP standard, JSP has two kinds of character encoding, the page character encoding and the response character encoding.
-
The page character encoding is used for reading JSP files from the file system. This can be clearly distinguished from the response character encoding. Even though the file's encoding is UTF-8, the HTTP response created from executing the JSP file can be sent as EUC-KR. However, the response character encoding must be referenced if the page character encoding is unknown. If the response character encoding is also unknown, read the file using ISO-8859-1. Refer to the JSP standard for the precedence of the page character encoding. In most cases, it is preferable to clearly set it for each JSP file as in the following.
[Example 1.5] Page Character Encoding Configuration in <<sample.jsp>>
<%@ page pageEncoding="UTF-8"%>
-
The response character encoding is the charset value written in the contentType property of <page>. If this value does not exist, the page character encoding is used. If the page encoding is also unknown, there is no default value specified in the JSP standard and it is determined by the configuration or operation of the web container.
[Example 1.6] Response Character Encoding in <<sample2.jsp>>
<%@ page contentType="text/html; charset=UTF-8"%>
-
It is recommended to set both of the previous values. If a user wants to apply then in a batch, add the following configurations to web.xml.
[Example 1.7] Page and Response Character Encoding Configurations in <<web.xml>>
<?xml version="1.0" encoding="UTF-8"?>
<web-app xmlns="http://java.sun.com/xml/ns/javaee"
         xmlns:xsi="http://www.w3.org/2001/XMLSchema-instance"
         xsi:schemaLocation="http://java.sun.com/xml/ns/javaee
                      http://java.sun.com/xml/ns/javaee/web-app_3_0.xsd"
         version="3.0">
    <jsp-config>
        <jsp-property-group>
            <url-pattern>*.jsp</url-pattern>
            <page-encoding>UTF-8</page-encoding>
            <default-content-type>text/html; UTF-8</default-content-type>
        </jsp-property-group>
    </jsp-config>
</web-app>
-
The <response-encoding> is configuration for HTTP response and is clearly separate from the JSP page character encoding configuration. But, it is very rare for a developer to create a JSP file with a full understanding of all this. Thus, <response-encoding><forced> has precedence over the JSP page character encoding and response character encoding.
-
Since web engines contain JSP engines, JSPs must be configured by each web engine or each application. For more information, refer to "Chapter 4. JSP Engine".
A user-defined HTTP response header can be defined by using name-value pairs.
The default user-defined header to include in a response can be set in WebAdmin using the following steps.
-
Click [Servers] from the left menu to go the list of servers. Click a server from the list to go to the server configuration page. On the screen, go to [Engine] > [Web Engine] > [Basic]. (Refer to [Figure 1.7])
-
Click [Lock & Edit] to change to configuration mode.
-
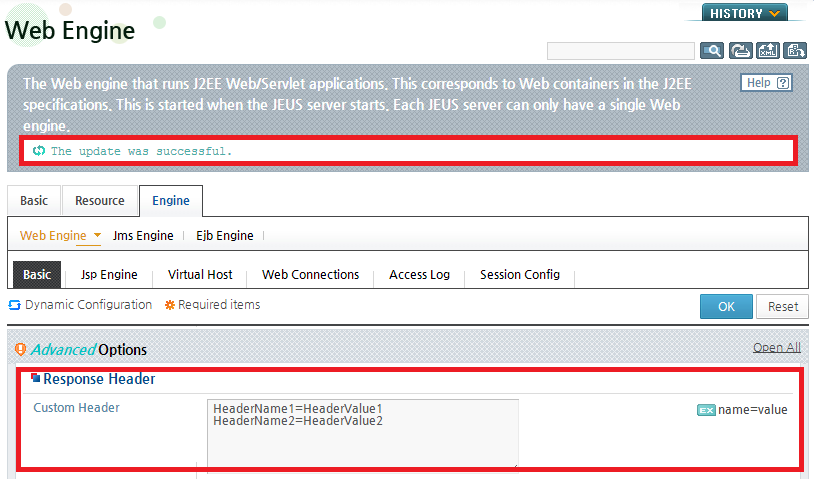
Configure the items in the Response Header section of Advanced Options and click [OK].
The following example sets two user-defined response headers. When setting more than one response header, put each pair on a separate line, and separate each header name and value with a '='.
A following describes each option.
Option Description Custom Header Defines the custom field that will be added to HTTP responses. -
After completing the configuration, click [Apply Changes] to apply the changes. (Refer to[Figure 1.5])
-
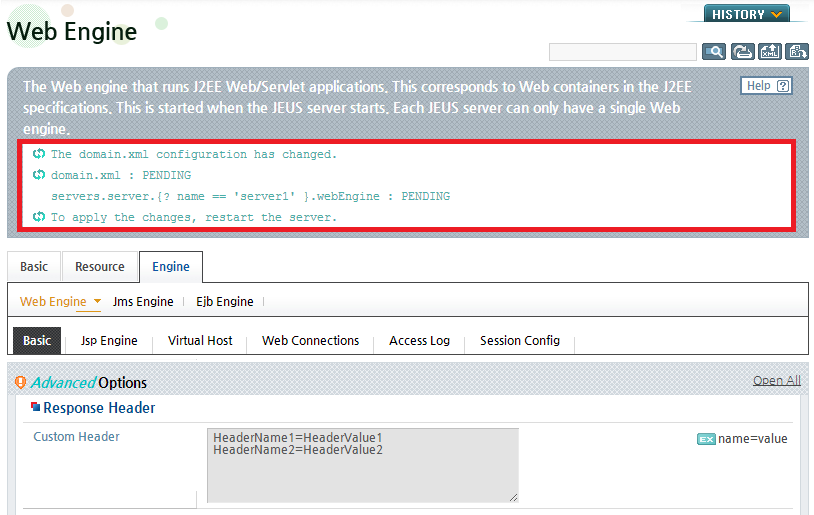
The following result is displayed. Since the 'Custom Header' configuration cannot be applied dynamically, the server must be restarted to apply the changes.
A policy can be configured for reading a cookie from an HTTP request header or sending a cookie that was created by the application as an HTTP response. The cookie policy can be configured in WebAdmin or in jeus-web-dd.xml by each application.
The cookie policy can be set in WebAdmin using the following steps.
-
Click [Servers] from the left menu to go the list of servers.
Click a server from the list to go to the server configuration page. On the screen, go to [Engine] > [Web Engine] > [Basic]. (Refer to [Figure 1.7])
-
Click [Lock & Edit] to change to configuration mode.
-
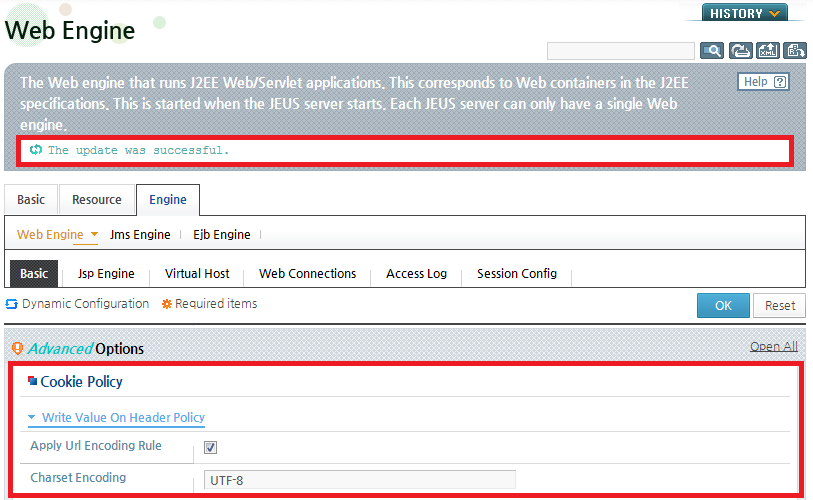
In Advanced Options, configure the Cookie Policy section and click [OK].
The following example sets the cookie encoding to UTF-8 as a cookie policy.
Configuration Description Apply URL Encoding Rule Option to apply the URL encoding rule. Charset Encoding Charset encoding that is used when cookies are used for a response or interpretation regardless of whether the URL encoding rule will be applied. If not set, the request encoding will be used. -
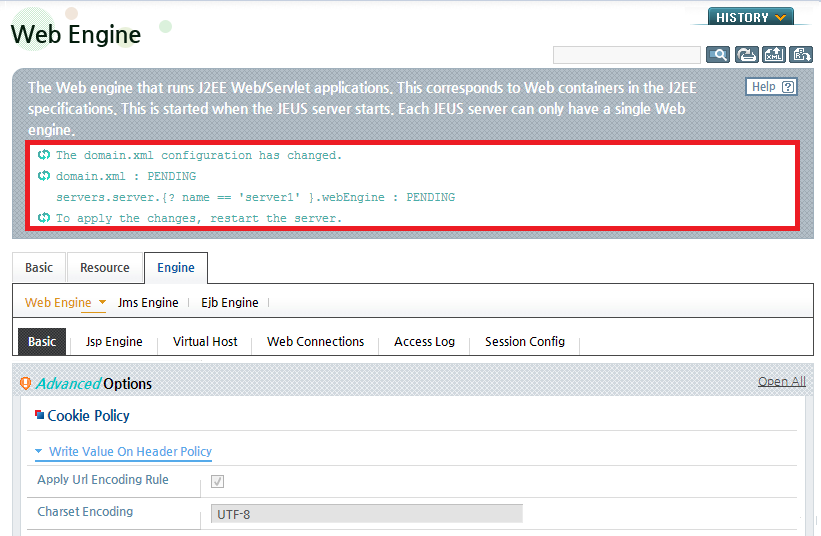
After completing configurations, click [Apply Changes] to apply the changes. (Refer to[Figure 1.5])
-
The following result is displayed. Since the cookie policy settings cannot be applied dynamically, the server must be restarted to apply the changes.
The web engine session settings configure items such as session object sharing, session cookie configurations, and timeouts that are required to manage sessions.
The session configurations can be divided into the following levels.
-
Web engine level
Sessions are configured in WebAdmin. For more information about configuring sessions in WebAdmin, refer to JEUS Session Management Guide. "1.6.1. Session Configuration".
-
Context level
Sessions are configured in the <jeus-web-dd> element of jeus-web-dd.xml.
If sessions are configured at the web engine level, the configurations are shared within the web engine even if they are not configured at the context level. If sessions are configured both at the web engine level and the context level, the context level configurations have a higher precedence. The precedence of the configuration values is context level > web engine level.
If an item is not configured at the context level, the web engine configuration will be used. If neither level contains the configuration, the default value of the web engine will be used.
Note
For more information about sessions in a clustered environment, refer to JEUS Session Management Guide. "Chapter 1. Session Tracking".
This section describes how to configure logs.
-
Configuring server logs
-
Configuring access logs
-
Configuring access logs by virtual hosts
-
Formatting access logs
-
Filtering access logs
-
Configuring user logs
Configuring Server Logs
For more information about server logs, refer to JEUS Server Guide. "Chapter 8. Logging".
Configuring Access Logs
Web engine access logs can be configured in WebAdmin. Access logs are written to a file by default.
Note
As of JEUS v6.0 Fix #8, the access logs are set to use log rotation by default.
Log rotation saves the log file with a new name when the file exceeds a specified size or at a specified time, and records new logs in the existing file.
Access logs can be configured in WebAdmin using the following steps.
-
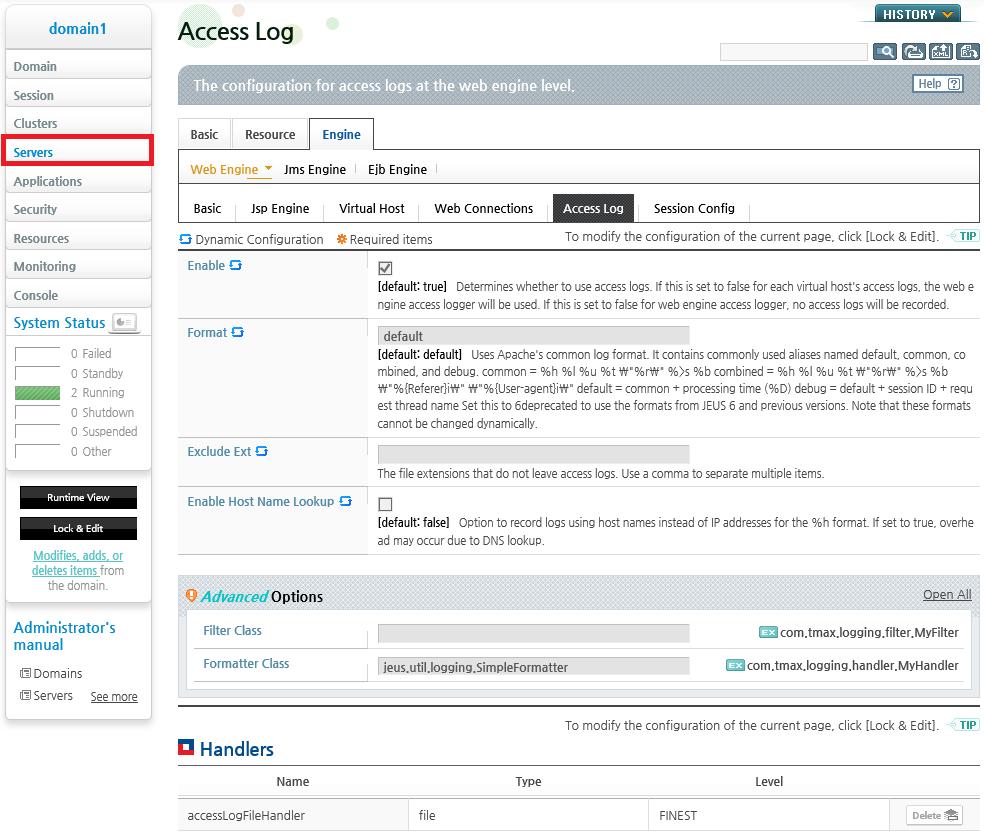
Click [Servers] from the left menu to go to the list of servers. Click a server from the list to go to the server configuration page. On the screen, go to [Engine] > [Web Engine] > [Access Log].
-
Click [Lock & Edit] to change to configuration mode.
-
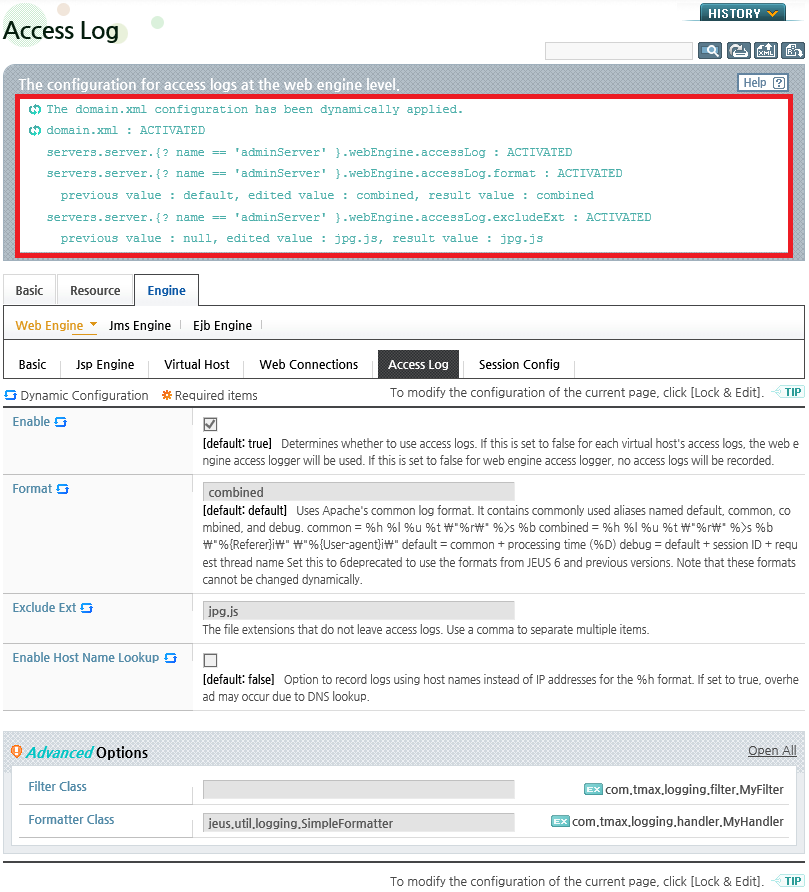
Configure the items, or simply use the default values. The access log format and whether to exclude certain file extensions can be configured. Use the Handlers section to add a handler other than the default file handler. For more information about handlers, refer to JEUS Server Guide. "Chapter 8. Logging".
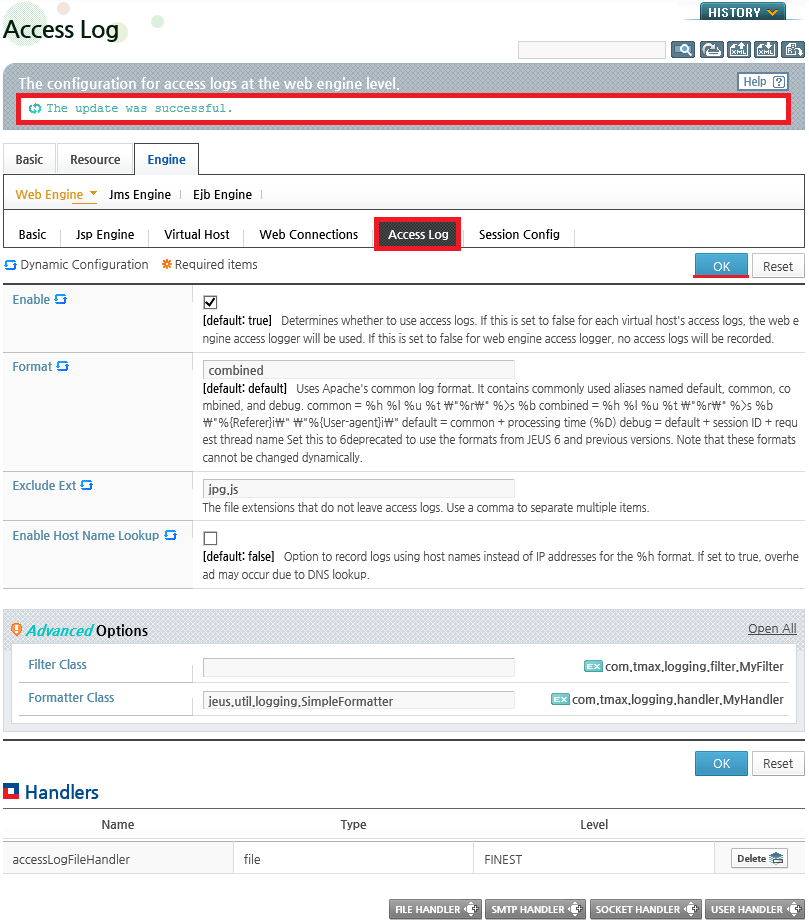
The following is an example of changing the access log format from the default format to a customized one.
Descriptions of each item in Advanced Options follow:
Option Description Filter Class Filter class of the logger. Formatter Class Formatter class name of the logger handler. -
After completing the configurations, click [Apply Changes] to apply the changes. (Refer to [Figure 1.5])
-
The following result is displayed. Since some access log configurations cannot be applied dynamically, the server must be restarted to apply the changes.
Configuring Access Logs by Virtual Host
To create access logs by virtual host, the access logs must be configured in each virtual host. For more information, refer to"5.4. Configuring Virtual Hosts".
Formatting Access Logs
The access log format can be configured in WebAdmin. Click [Servers] from the left menu to go to the list of servers. Click a server from the list to go to the server configuration page. On the screen, go to [Engine] > [Web Engine] > [Access Log]. On the Access Log screen, set the 'Format' field. (Refer to [Figure 1.21])
In the format, '%' can be used to express data, and any character strings can be used. Starting from JEUS 7, the Common Log Format (hereafter CLF) is used.
Note
1. For more information about CLF, refer to http://httpd.apache.org/docs/2.0/logs.html.
2. For more information about changing the format using the console tool, refer to JEUS Reference Book. "4.2.8.21. modify-web-engine-configuration".
Web engines provide the following format aliases.
-
Default format provided by JEUS. This format adds the processing time (%D) to the common format that is the most commonly used in CLF.
%h %l %u %t /"%r/" %>s %b %D
-
Most commonly used format in CLF. It is an alias for the following format.
%h %l %u %t /"%r/" %>s %b
-
Prints the Referrer and User-agent from the HTTP header. It is an alias for the following format.
%h %l %u %t /"%r/" %>s %b /"%{Referer}i/" /"%{User-agent}i/" -
Adds the session ID (%S) and response processing thread name (%I) to the default format.
%h %l %u %t /"%r/" %>s %b %D %S /"%I/"
-
Format provided in JEUS 6 and earlier versions. It is not recommended for JEUS 7 because a separate log analyzer is not provided.
The format can be set with an alias from the previous list.
default %S
In this case, the common alias is replaced by the following format and is registered to the web engine.
%h %l %u %t /"%r/" %>s %b %D %S
Format setting can be modified and applied while a service is running. Hence, if the currently running service has a problem, set the debug format to record the session ID and response processing thread name.
Filtering Access Logs Programmatically
Access log filtering is provided to record only logs that meet specific conditions.
Note
1. Requests can be filtered by file extension using <exclude-ext>.
2. Starting from JEUS 7, the package jeus.servlet.util has been changed to jeus.servlet.logger.
JEUS provides the jeus.servlet.logger.AccessLoggerFilter interface and jeus.servlet.logger.AbstractAccessLoggerFilter abstract class.
[Example 1.8] Definition of jeus.servlet.logger.AccessLoggerFilter Interface
package jeus.servlet.logger;

import java.util.logging.Filter;
import java.util.logging.LogRecord;

/**
 * This interface provides the information required to filter access logger.
 * This interface inherits {@link Filter}. It can define various filtering policies in
 * {@link Filter#isLoggable(java.util.logging.LogRecord)} using additionally provided interfaces.
 */
public interface AccessLoggerFilter extends Filter {
    /**
     * Returns the address of the remote client that accesses the server.
     *
     * @param record a LogRecord
     * @return remote client address. Returns null if the address is invalid.
     */
    public String getRemoteAddr( LogRecord record );

    /**
     * Returns the HTTP method of the request, e.g., GET, POST, PUT, etc.
     *
     * @param record a LogRecord
     * @return request method. Returns null if the return value is invalid.
     */
    public String getMethod( LogRecord record );

    /**
     * Returns the URI of the request.
     *
     * @param record a LogRecord
     * @return request uri. Returns null if the uri is invalid.
     */
    public String getRequestURI( LogRecord record );

    /**
     * Returns the response status, e.g., 200, 404
     *
     * @param record a LogRecord
     * @return status.
     */
    public int getStatus( LogRecord record );

    /**
     * Returns the processing duration in milliseconds.
     * @param record a LogRecord
     * @return the processing duration. Returns -1 if the return value is invalid.
     */
    public long getProcessingTimeMillis( LogRecord record );
}
To use filters for certain patterns in the access log, the AccessLoggerFilter interface and AbstractAccessLoggerFilter abstract class can be used to easily implement and apply the filters.
User-created filter classes inherit jeus.servlet.logger.AbstractAccessLoggerFilter interface and must implement the isLoggable() method of the java.util.logging.Filter interface. When implementing the isLoggable() method, use the methods from the jeus.servlet.logger.AccessLoggerFilter API that are needed by the user.
The following example defines a filter class that disables leaving access logs if the request extension is '.gif'.
[Example 1.9] Example of Defining a Filter Class
package sample;

import jeus.servlet.logger.AbstractAccessLoggerFilter;
import java.util.logging.*;

public class SimpleAccessLoggerFilter extends AbstractAccessLoggerFilter {
    public boolean isLoggable(LogRecord record) {
        String requestURI = getRequestURI(record);
        return requestURI != null && !requestURI.endsWith(".gif");
    }
}
Once the class is defined, compile the class. Add the file to the 'JEUS_HOME/domains/DOMAIN_HOME/lib/application' directory as a JAR file, and configure the filter for the web engine access log. For more information about configuring access logs, refer to "Access log default configurations".
Configuring User Logs
By default, logs are stored in the server log file (JeusServer.log). To use a separate log file, configure a user log. For more information about the default user log file and its location, refer to "1.5. Directory Structure".
Like server logs, user logs can be registered at the JEUS server level as well as in jeus-web-dd.xml for web applications. User logs can be created by each web application or in a specific log file.
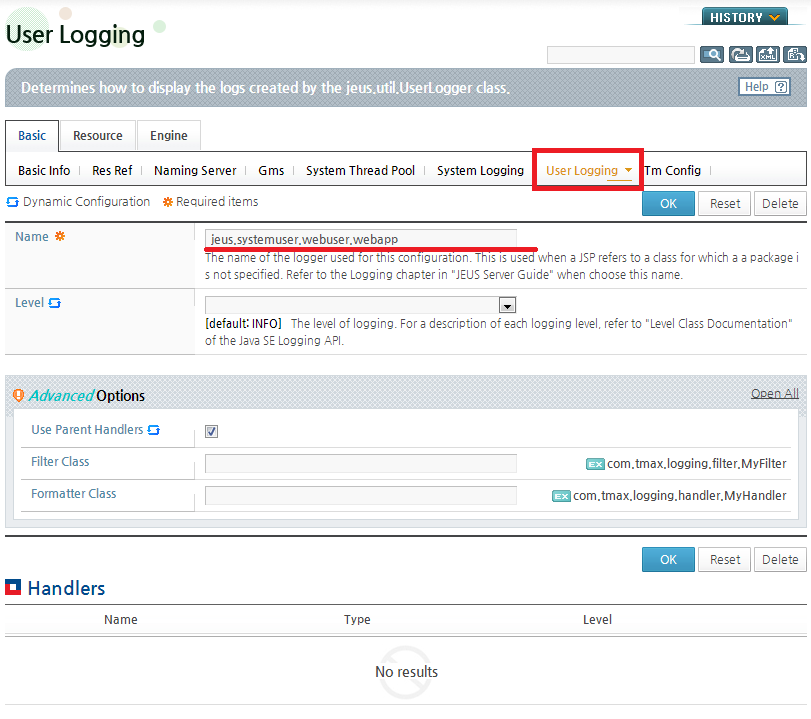
User logs can be configured in WebAdmin using the following steps.
-
The access log format can be configured in WebAdmin. Click [Servers] on the left menu to go to the list of servers. Click a server from the list to go to the server configuration page. On the screen, go to [Basic] > [User Logging].
-
Click [Lock & Edit] to change to configuration mode.
-
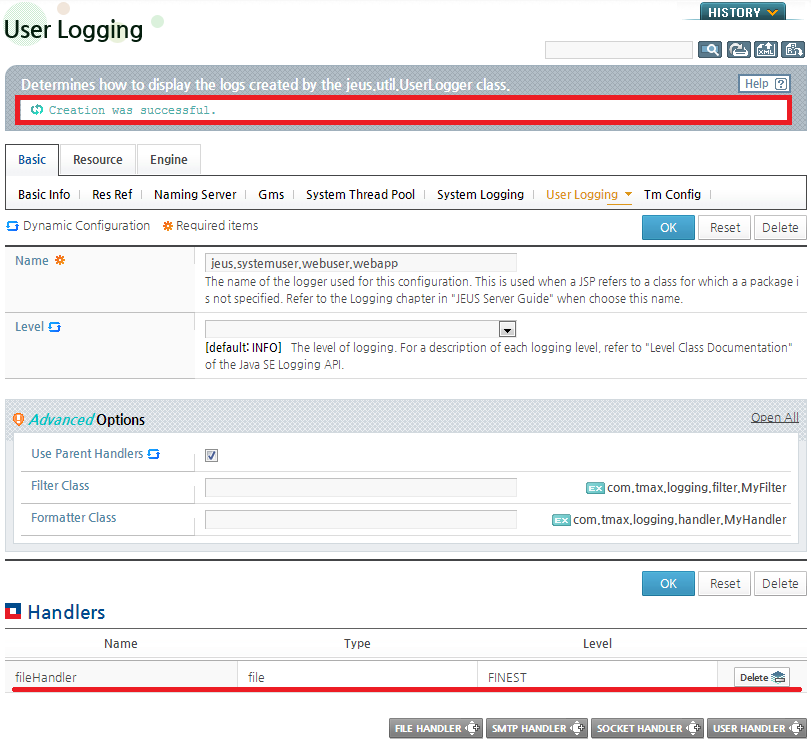
To create logs only for a web application named webapp, set 'Name' as in the following. If 'jeus.systemuser' is entered without the name webapp, the user logs are configured for all web applications. For more information about each item in the Advanced Options section, refer to "Access log default configurations". The 'Level' and Advanced Options can be optionally set as needed.
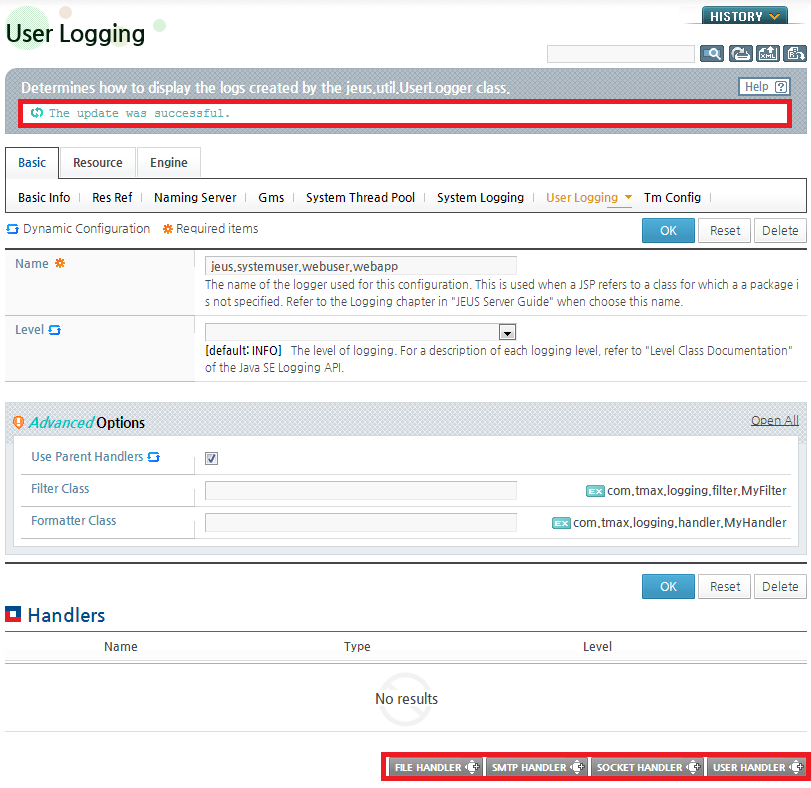
-
After configure the log name, click [OK]. Buttons for adding a handler will appear below the Handlers section. Click one of [FILE HANDLER], [SMTP HANDLER], [SOCKET HANDLER] or [USER HANDLER]. For more information about configuring handlers, refer to JEUS Server Guide. "Chapter 8. Logging".
This example uses [FILE HANDLER].
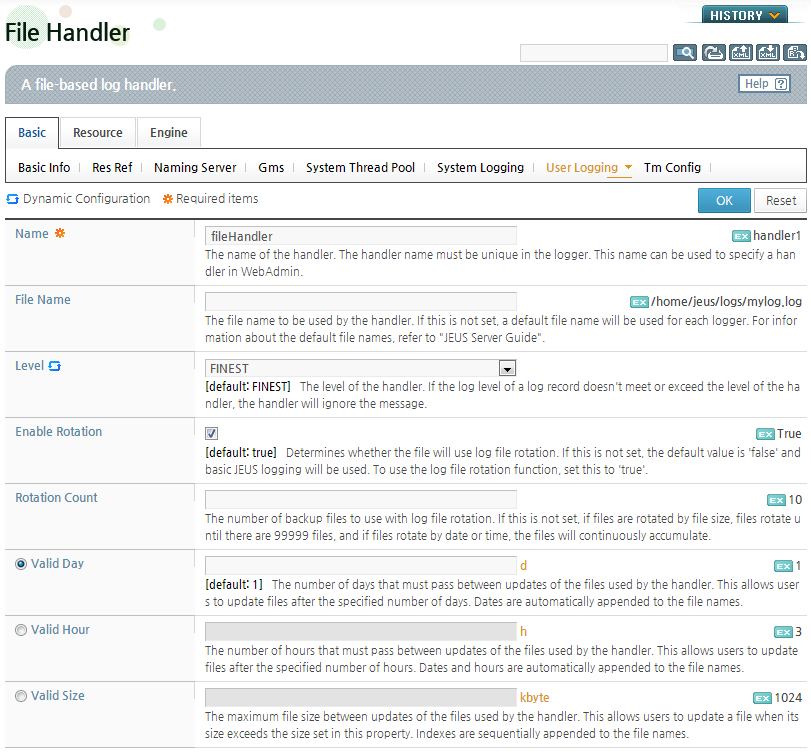
-
Configure each item on the File Handler screen and then click [OK] to add the handler.
-
The following message will be displayed to confirm that the handler has been added.
-
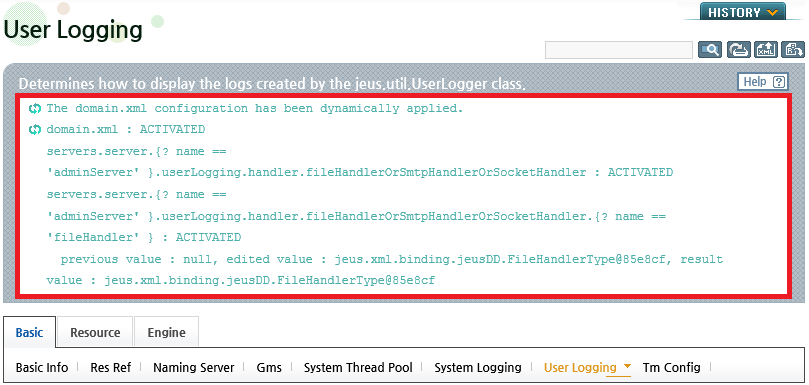
After completing the configurations, click [Apply Changes] to apply the changes. (Refer to [Figure 1.5])
-
The following result is displayed. Since the user log configurations cannot be applied dynamically, the server must be restarted to apply the changes.
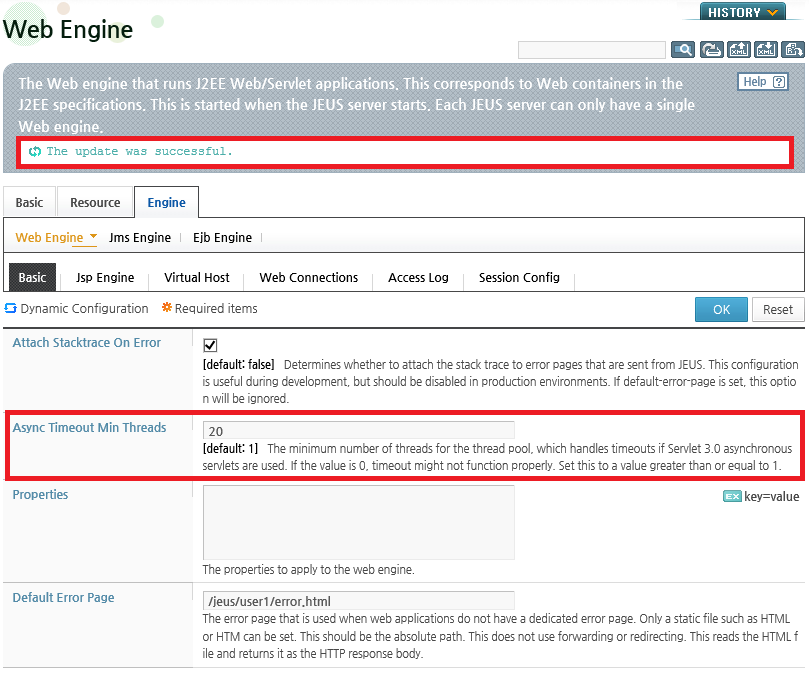
As of Servlet 3.0, the number of threads that is required to process an async servlet timeout must be configured.
The async servlet timeout processing can be set in WebAdmin using the following steps.
-
Click [Servers] from the left menu to go to the list of servers. Click a server from the list to go to the server configuration page. On the screen, go to [Engine] > [Web Engine] > [Basic]. (Refer to [Figure 1.7])
-
Click [Lock & Edit] to change to configuration mode.
-
On the Web Engine screen, set 'Async Timeout Min Threads' and click [OK].
-
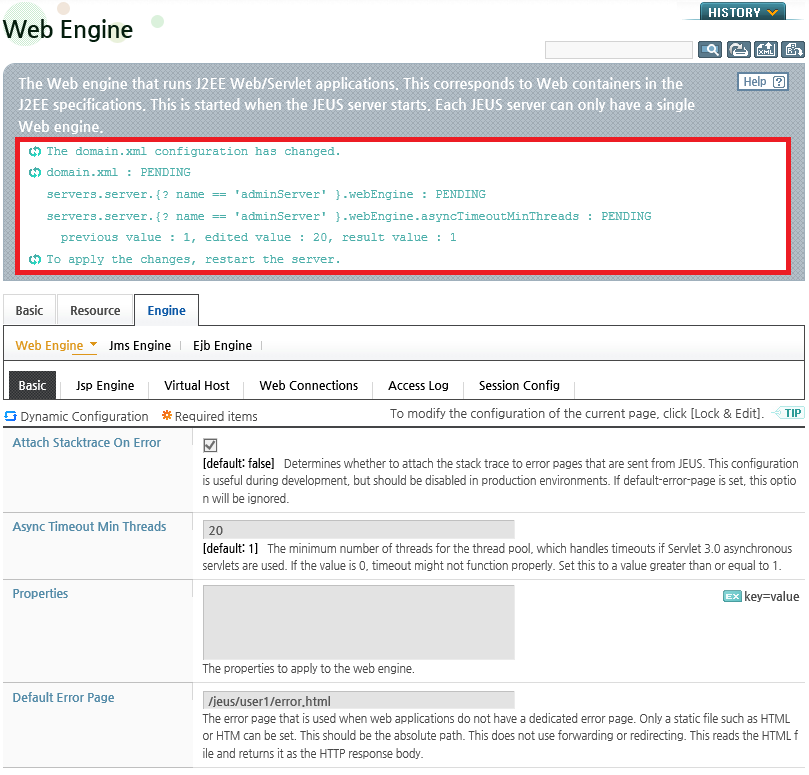
After completing the configuration, click [Apply Changes] to apply the changes (Refer to [Figure 1.5])
-
The following result is displayed. Since the async servlet timeout configuration cannot be applied dynamically, the server must be restarted to apply the changes.
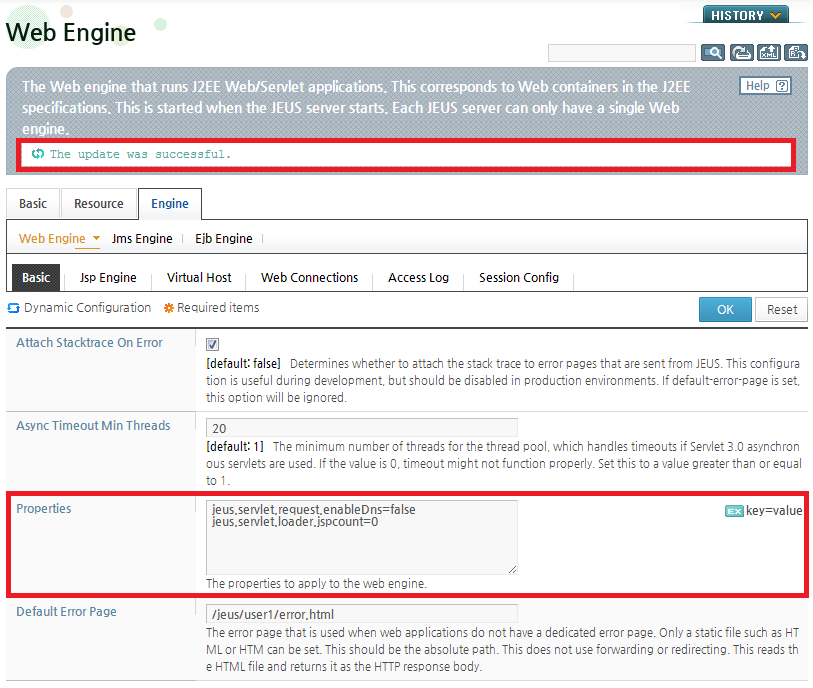
The properties defined in JEUS can be set in WebAdmin. For more information about web engine properties, refer to JEUS Reference Book. "1.6. Web Engine Properties".
The properties can be set in WebAdmin using the following steps.
-
Click [Servers] from the left menu to go to the list of servers. Click a server from the list to go to the server configuration page. On the screen, go to [Engine] > [Web Engine] > [Basic]. (Refer to [Figure 1.7])
-
Click [Lock & Edit] to change to configuration mode.
-
Set the 'Properties' as in the following. Separate the property name and value with a "=". Enter each property on a new line. After entering all the properties, click [OK].
Note
It is recommend to use WebAdmin to set the 'Properties', but the properties can also be set in 'Jvm Option' from [Servers] > [Basic] > [Basic Info].
-
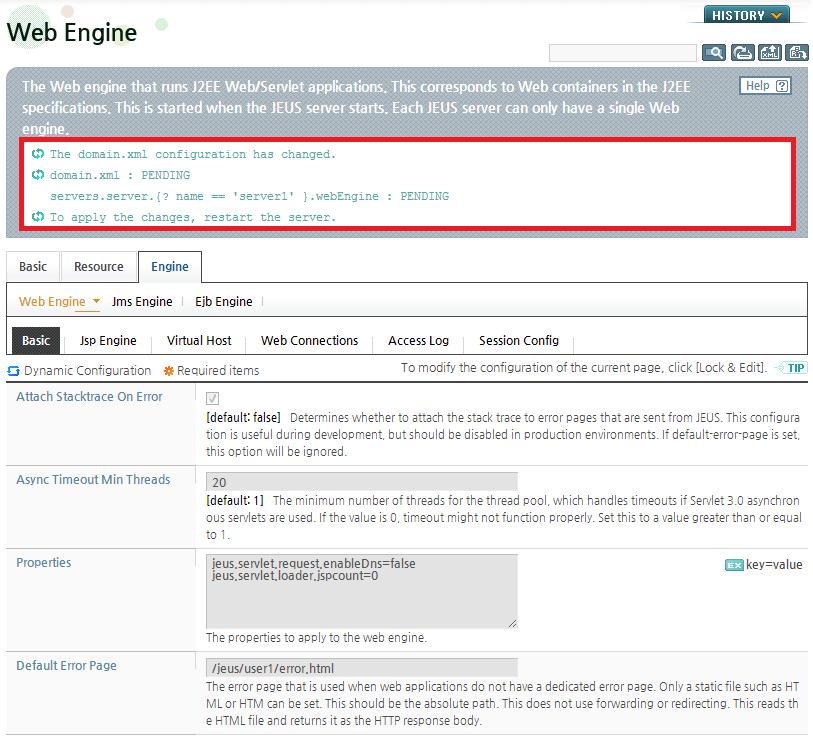
After completing the configuration, click [Apply Changes] to apply the changes. (Refer to [Figure 1.5])
-
The following result is displayed. Since the properties cannot be applied dynamically, the server must be restarted to apply the changes.
Malicious users can attack JEUS by sending a large volume of requests with a large amount of data. When this happens, normal requests can be delayed or fail to receive a response.
To prevent these kinds of attacks, the JEUS administrator can set conditions to determine which requests are malicious and deny them. By default, this is configured in the web engine of the server but can also be set for each listener or connector that receives the request from the web engine. They can be configured in the HTTP listener, WebtoB connector, and AJP13. For more information about configuring each listener or connector, refer to "2.3.1. Common Listener Settings".
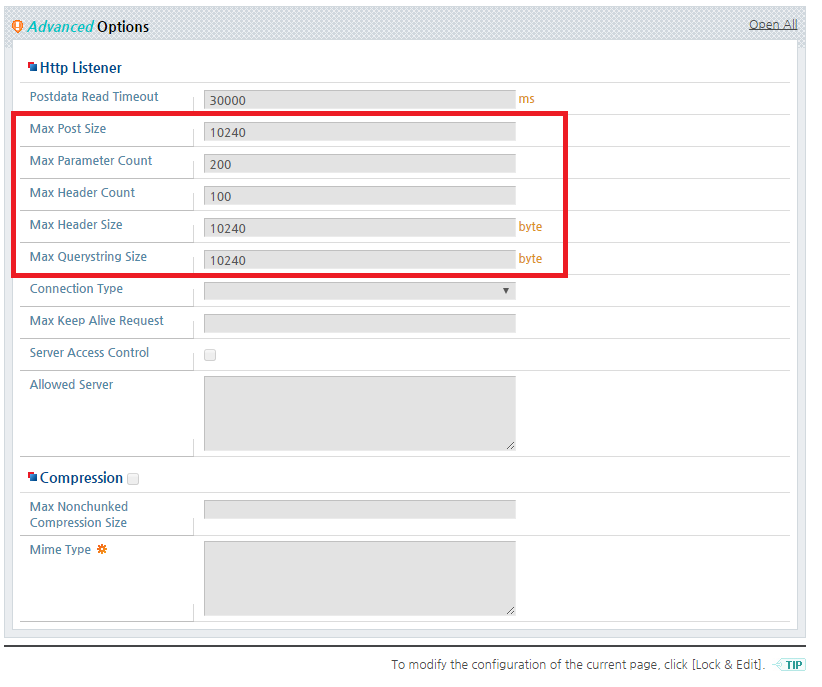
Properly configure the following items to prevent web attacks.
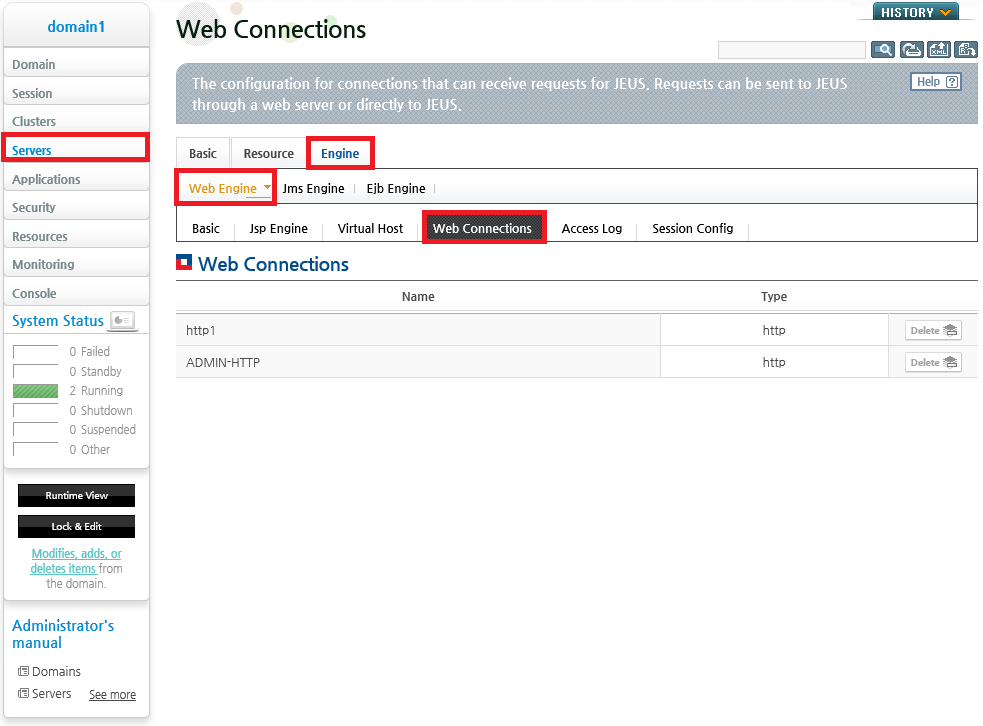
The items can be set in WebAdmin using the following steps.
-
Click [Servers] from the left menu to go to the list of servers. Click a server from the list to go to the server configuration page. On the screen, go to [Engine] > [Web Engine] > [Web Connections]. A list of web connections will be displayed. Click a web connection from the list.
-
Click [Lock & Edit] to change to configuration mode.
-
In Advanced Options, configure each item in the Http Listener section. Each listener can use these settings to prevent web attacks.
For more information about each configuration item, refer to"2.3.1. Common Listener Settings".
For an example of blocking HTTP requests with a specific URL pattern, let's assume that the HTTP client sent the following request.
GET /examples/%2e%2e%2fdb.txt HTTP/1.1
The web container must URL decode the request URI first.
/examples/../db.txt
By doing this, the user can access files that are not related to the actual HTTP service. Typically, clients with a malicious intent send the request URI in this way.
Since the web container cannot detect all requests with a malicious intent, the user must directly provide settings to prevent malicious patterns. The settings are applied only to HTTP requests and if any match is found within the URI except for the query string, the request is handled as a '404 Not Found' unconditionally.
Note
This setting was configured in the property file from JEUS 6 to JEUS v7.0 Fix #1, but starting from JEUS v7.0 Fix #2, it is configured in domain.xml.
The setting can be configured in WebAdmin using the following steps.
-
Select [Servers] from the left menu of WebAdmin to go to the server list screen. Select a server to start and go to the server configuration screen. Select [Engine] > [Web Engine] to go to the basic configuration search screen, and then scroll down to the advanced options section.
-
To set or modify the configuration, click [Lock & Edit] on the left to change to configuration mode.
-
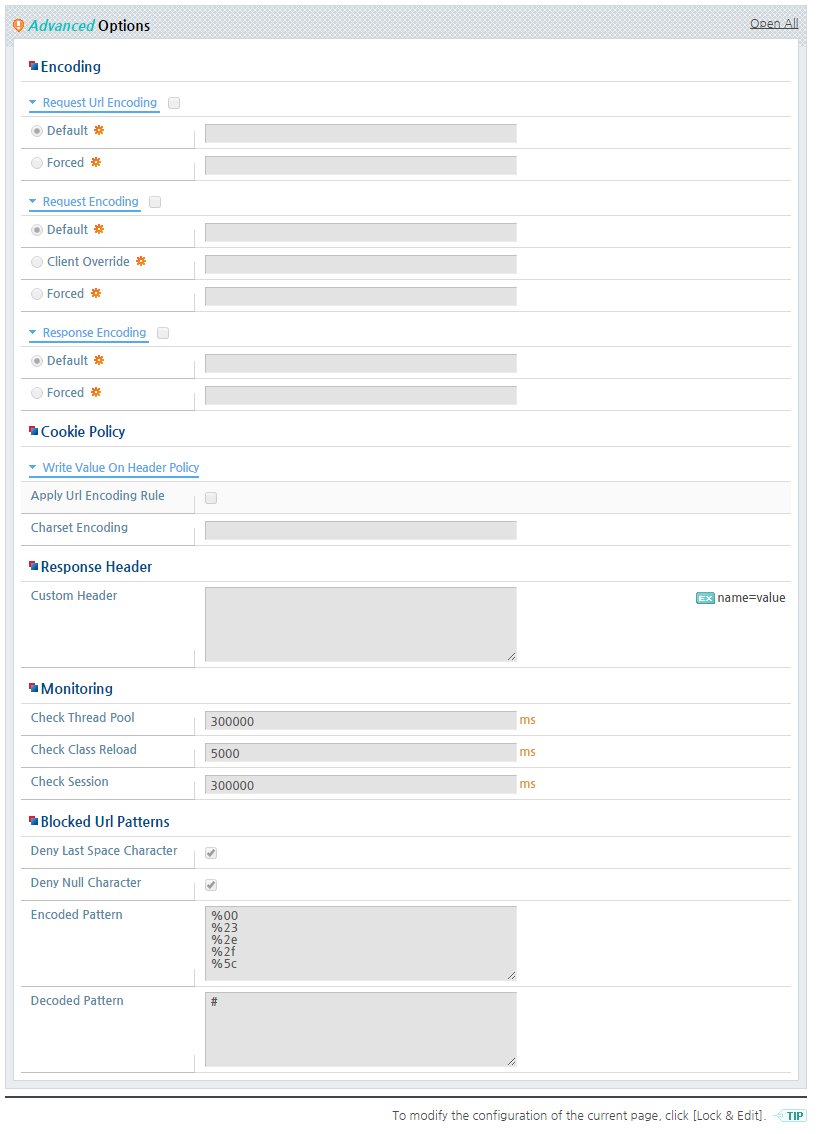
Configure Blocked Url Patterns as in the following.
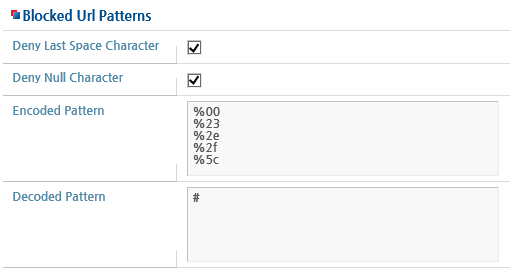
'Encoded Pattern' is used to check if the URI from the HTTP client contains the specified string. The URI from the client is used after it is URL decoded by the web container. At this time, it is checked whether the 'Decoded Pattern' is included in the URI. Even if one 'Encoded Pattern' is configured, the basic pattern will not be processed. This also applies for the 'Decoded Pattern'.
Note
If no configuration exists, the web container processes %2e, %2f, %5c, %23, and %00 as 404 in case of an Encoded Pattern and # as 404 in case of a Decoded Pattern.
Patterns are not case-sensitive. They are always converted to lower case letters before being processed.
Consider the following items for the best web engine performance.
-
Set <output-buffer-size> to an appropriate size. If using with WebtoB, set appropriate values for <send-buffer-size> and <receive-buffer-size> inside <webtob-connector><webtob-connector>.
-
Set <check-included-jspfile> to 'false' unless the included JSPs have been modified. If it is set to false, the included JSP files will not be checked for modification to improves performance.
-
If the JSP files have not been modified, the jeus.servlet.jsp.reload property is set to false. This prevents querying the metadata from the file system on every JSP call.