Table of Contents
This chapter describes how to manage and set listeners and connectors provided by the web engine.
JEUS calls both web connectors and web listeners web connections. Starting from JEUS 7, the concepts of listener and connector are distinguished based on what created the connection.
The connections provided by a web engine includes connections to WebtoB and other web servers, direct connections to HTTP/TCP clients, and connections to Tmax. The web server receives an HTTP request from a client and delivers it to the corresponding web engine.
WebtoB and Apache are the typical web servers that are used. They provide the following connectors.
-
WebtoB provides the WebtoB connector since JEUS acts as the client when a connection is created.
-
Apache provides the AJP listener since JEUS acts as the server when a connection is created. Other commercial web servers such as IIS and SunOne(Iplanet) also support AJP, and therefore the AJP listener can be used to connect to other web servers.
The web engine provides the following listeners and connectors to directly create and manage connections for each client.
Since listeners operate according to the JEUS server configurations, configure JEUS server and its listeners to use secure listeners (SSL).
Note
For more information about configuring JEUS server, refer to JEUS Server Guide. "2.3.2. Listener Configuration".
This section describes thread pools that are used by the listeners and connectors that are provided by the web engine.
Listeners are web engine channels that can be accessed by HTTP/TCP clients and web servers that follow the AJP protocol.
The following figure show the connections between the web engine listeners, each clients, and protocols.
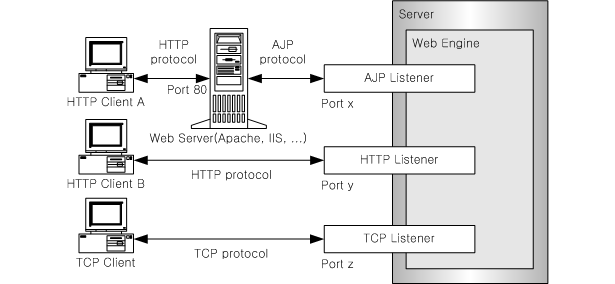
The following describes each listener.
-
AJP listener allows web servers other than WebtoB, such as Apache, IIS, and SunOne(Iplanet), to interact with JEUS web applications. It is supported by the mod_jk module, uses the AJP1.3 protocol, and supports SSL.
For more information about AJP listeners refer to "2.3.2. AJP Listeners" and "2.4. Configuring Web Server Load Balancing". For more information about the configuration of SSL server listeners, refer to "JEUS Server Guide".
-
HTTP listener is used when the web engine directly receives HTTP requests. It supports SSL. For more information, refer to "2.3.3. HTTP Listeners".
For more information about configuring SSL for HTTP listeners, refer to "JEUS Server Guide".
-
TCP listener is used for clients that use a custom protocol instead of the HTTP protocol.
For more information about TCP listeners, refer to "2.3.4. TCP Listeners" and "2.5. Using TCP Listeners".
Connectors are channels that connect to WebtoB or Tmax from the web engine.
The following figure show the connections between the web engine connectors, each clients, and protocols.
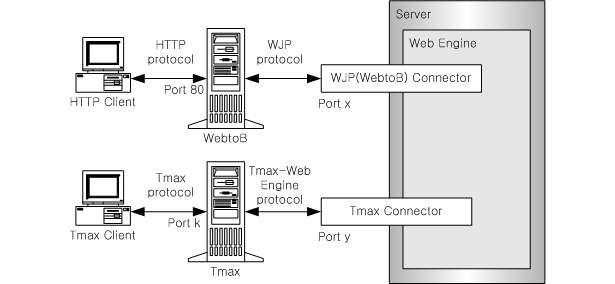
The following describes each connector.
-
WebtoB is a web server that is provided by TmaxSoft. Either the WebtoB that is embedded in JEUS, or a standalone installation of WebtoB can be used.
WebtoB connector can directly connect to WebtoB since JEUS acts as the client when a connection is created. This feature allows connections to be made to WebtoB without configuring the firewall.
For more information about the WebtoB connector, refer to "2.4. Configuring Web Server Load Balancing".
WJP stands for WebtoB-JEUS Protocol.
-
Tmax is a system software that manages XA transactions in a distributed environment.
Like WebtoB connectors, JEUS acts as a client for Tmax connectors. The Tmax connector can be used to exchange information between JEUS and Tmax, or to receive HTTP requests through the Tmax gateway in order to integrate communication channels. For more information about the Tmax connector, refer to "2.3.6. Tmax Connectors".
Note
JEUS only acts as a client when the connection is created. JEUS actually receives requests from external clients through WebtoB or Tmax, but it does not send requests to WebtoB or Tmax. JEUS functions as a server during service processing.
Listeners and connectors have a worker thread pool that is required to process client requests. The worker thread pool manages worker threads.
When a listener receives a request, a worker thread is allocated to process the request. For a connector, an individual connection to WebtoB or Tmax is created, and a worker thread is allocated to that connection. Since the minimum and maximum values of the worker thread pool affects the service processing performance, set appropriate min and max values when configuring listeners and connectors.
Note
Starting from JEUS v7.0 Fix #1, the result of executing the thread pool management using the web engine monitoring thread is not logged. Each thread pool manages its own status and the monitoring thread logs the result periodically. Hence, the changes in the log can be different from the actual changes of the thread pool.
Active-Management and Status Notification
The worker thread pool contains configurations for active management.
The administrator can configure active management to allow the web engine to send a warning message via e-mail or to recommend restarting the server of the engine.
To requires configuring the number of blocked worker threads that will trigger an action like sending a warning message via e-mail or a recommendation to restart the server.
Caution
If the recommendation to restart is displayed, the administrator must determine whether to restart the server because it is likely that the server cannot process requests normally.
Separate vendor-specific configurations are required to use an AJP listener, a WebtoB connector, or a Tmax connector. Since all web connections are managed by the engines, this section only describes the web engine configurations.
For more information about configuring web servers, refer to "2.4. Configuring Web Server Load Balancing".
Note
1. Starting from JEUS 7, context groups are no longer supported. Most items that were managed by the context group are now managed by the web engine.
2. Starting from JEUS 7, a unified service listener provided by the server is used as web listener, so AJP, HTTP, and TCP listeners are configured on the server and the they are referenced for use. 'Server Listener Ref' has been added to the configuration for this purpose. However, JEUS uses the current configuration for WebtoB and Tmax connectors because JEUS functions as a client when using these connectors.
Connectors are added, changed, or deleted in WebAdmin and the console tool. It is recommended to configure connectors by in WebAdmin which is described in this section. Refer to JEUS Reference Book. "4.2.8. Web Engine Commands" for detailed information about configuring connectors by using the console tool.
This section describes the common listener settings.
-
Unique name that identifies the web connection. This is a required option and must be unique within the web engine.
-
Represents the server listener that the listener references.
-
HTTP and AJP listeners can reference the same server listener, but if the HTTP listener is configured for management, the HTTP listener cannot share the server listener. If not set, the default server listener will be used.
-
TCP listener cannot reference a server listener that is referenced by another listener.
-
2 or more protocol listeners cannot reference the same server listener. For example, if two AJP listeners are configured, but neither listener is configured with a server listener, an error will occur because both reference the default server listener. One must refer to a different server listener.
If the server listener's <use-nio> setting is configured as true, client idle connections can be closed by using the server listener's <keep-alive-timeout> setting. (Unit: ms)
Note
From JEUS 7 Fix #4, to apply postdata-read-timeout to HTTP and TCP listeners, <keep-alive-timeout> of a server listener must be configured.
-
-
-
Forcibly sets the "Connection" header for responses that are sent through each listener or connector by using one of the following options.
Value Description keep-alive Keep the connection after sending the response. close Terminate the connection after sending the response. none Set the "Connection" response header based on the properties defined in the request header. If not set, the default action is same as 'none'.
Note
The 'Connection Type' cannot be configured for AJP listeners. It is recommended to follow the configurations of the web server, like Apache, for AJP listeners.
-
-
Worker thread pool configurations. WebtoB connectors do not use this setting. A separate thread pool must be configured for WebtoB connectors.
The following describes each configuration item.
-
The size of the output buffer that is used by applications. If the buffer is full, its data will automatically be flushed by the web engine. (Unit: Byte)
For AJP listeners, it is recommended that this value match the value of max_packet_size in the workers.properties file of mod_jk. For more information about configuring mod_jk, refer to "2.4. Configuring Web Server Load Balancing".
-
-
The maximum amount of waiting time allowed when reading request bodies. Applied in the ServletInputStream.read() method. (Unit: ms)
-
From JEUS 7 Fix #4, the point in time when timeout is applied is changed for HTTP and TCP listeners. Since I/O control threads that exist in each listener read all request bodies, it is determined whether timeout occurred or not before the bodies are sent to a Servlet. If timeout occurs while reading request bodies, the 500 error is returned. If use-nio is set to false or an HTTP request is chunked, … when a Servlet calls ServletInputStream.read().
-
-
-
A POST data request that is too large and too many resources are required to read and analyze them may prevent other requests from getting processed. This configuration is used to prevent this by blocking requests that are too large and burdensome for processing. (Default value: -1)
-
Limits the maximum data size in bytes of POST requests based on the request Content-type.
-
If Content-Type is x-www-form-urlencoded
Stops processing the request and send a 413 Request Entity Too Large response if the request size or the total size of chunked data is greater than the specified value.
-
If Content-Type is multipart/form-data
Limits the size of uploaded files and the total size of a POST request. To limit the size of uploaded files, it is recommended to use the multi-part configuration of Servlet 3.0.
-
-
Servlet 3.0 web application deployment descriptor affects this configuration in the following ways.
-
<multipart-config> in web.xml.
If the <multipart-config> setting exists in web.xml, its child settings, <max-file-size> and <max-request-size>, are used. Otherwise, the web engine does not set a limit, so it is recommended to configure <multipart-config> for each application.
-
<content-length>
If the <content-length> setting exists and the content length exceeds the specified value, the request will not be processed. If <content-length> is not set and the sum of the bytes of the name/value pairs of parameters exceeds the specified value, the request will not be processed.
-
-
A negative value is considered as the default value, which means there is no limit on the data size.
-
Applies to listeners and connectors that receive HTTP requests. It does not apply to TCP listeners or Tmax connectors.
-
-
A request with too many parameters increases the resources required to analyze and manage the parameters. This configuration can be used to prevent such a problem. (Default value: -1)
-
Limits the total number of parameters that can be included in GET and POST requests.
-
If the number of parameters in a multipart/form request, a POST request, or query string of a GET request exceeds the specified value, a 413 Request Entity Too Large response will be sent and the request will not be processed.
-
A negative value is considered as the default value, which means there is no limit on the number of parameters.
-
Applies to listeners and connectors that receive HTTP requests. It does not apply to TCP listeners or Tmax connectors.
-
-
A request with too many headers increases the resources required to read the request. This problem can be avoided by blocking the request. (Default value: -1)
If a request contains more headers than the specified value, a 400 Bad Request response will be sent and the connection will be terminated.
-
A negative value is considered as the default value, which means there is no limit on the number of headers.
-
Applies to listeners and connectors that receive HTTP requests. It does not apply to TCP listeners or Tmax connectors.
-
-
A request with a large header size increases the resources required to read the request. This problem can be avoided by blocking the request. (Default value: -1)
If a request contains a header, which includes the header name, delimiter, and header value, with a total byte size that is greater than the specified value, a 400 Bad Request response will be sent and the connection will be terminated.
-
A negative value is considered as the default value, which means there is no limit on the header size.
-
Applies to listeners and connectors that receive HTTP requests. It does not apply to TCP listeners or Tmax connectors.
-
-
A GET request with a long query string increases the resources required to read the request. This problem can be avoided by limiting the query string size. (Default value: 8192, Unit: Byte)
If a request contains a query sting whose size is greater than the specified number of bytes, a 400 Bad Request will be sent and request will not be processed.
-
If the value is negative, there is no limit on the query string size. Internally, JEUS limits the Request Line to 64 KB, so if the greater number is set, it will not be used.
-
Applies to listeners and connectors that receive HTTP requests. It does not apply to TCP listeners or Tmax connectors.
-
-
-
Responses sent through HTTP listeners or WebtoB connectors can be compressed after configuration.
-
If a request's Accept-encoding has gzip, compression is executed when mime-type is the same as this configuration.
-
This configuration is only applied for HTTP 1.1 connections. If responses are compressed, "content-encoding : gzip" will be added to response headers.
-
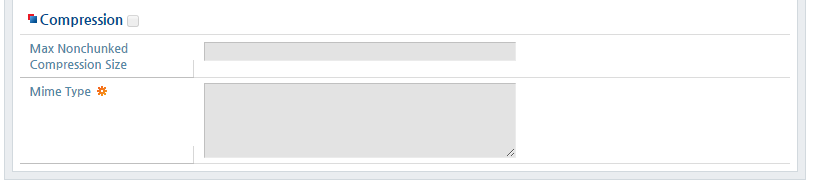
The following figure shows the configuration screen.
Item Description Mime Type One or more mime types to be compressed. Max Nonchunked Compression Size If the size of responses to be compressed is too large, too much memory may be used. If the content-length value specified by a Servlet exceeds the value set here, responses will be sent as chunked responses.
(Unit: KB, default value: 128 KB)
-
AJP listeners can be added, modified, or deleted in WebAdmin or the console tool.
Using WebAdmin
-
Adding and Modifying a Listener
AJP listeners can be added and modified in WebAdmin using the following steps.
-
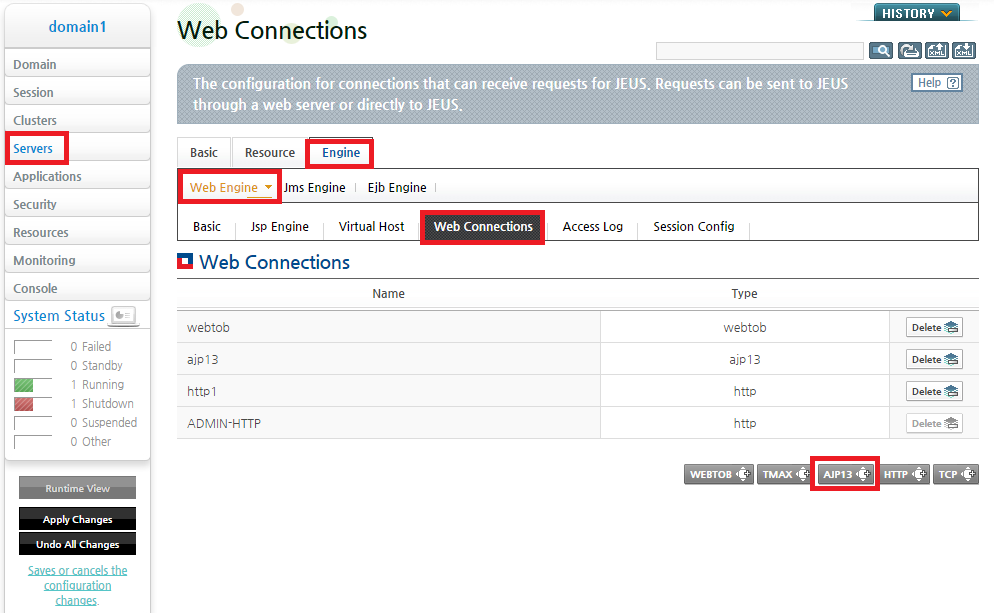
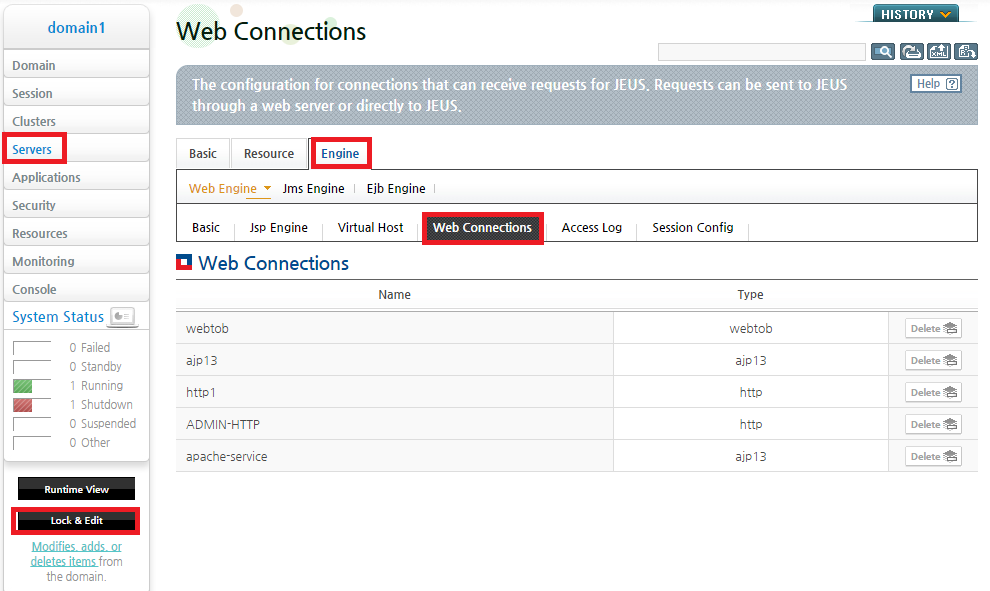
Click [Servers] from the left menu to go to the list of servers.
Click a server from the list to go to the server configuration. On the server configuration screen, go to [Engine] > [Web Engine] > [Web Connections] to display a list of web connections.
-
Click [Lock & Edit] to change to configuration mode.
-
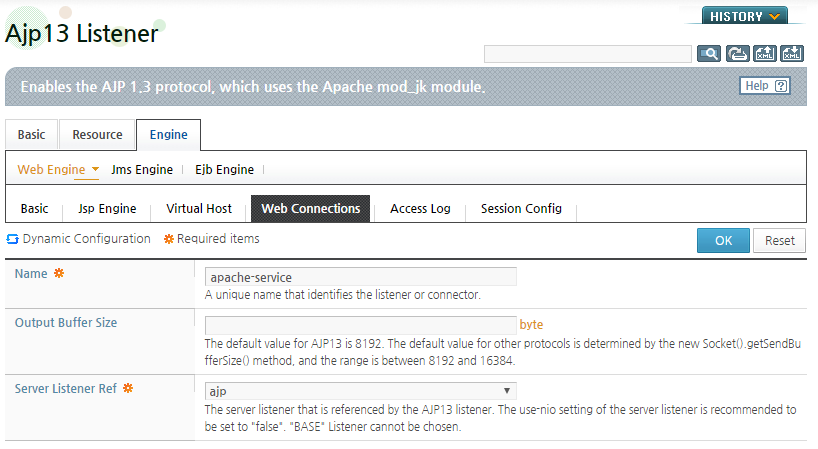
Click [AJP13] to add an AJP listener. To change an AJP listener, click the 'ajp13' type from the web connection list. Set the basic information on the Ajp 13 Listener screen.
Note
The AJP listener uses AJP version 1.3.
-
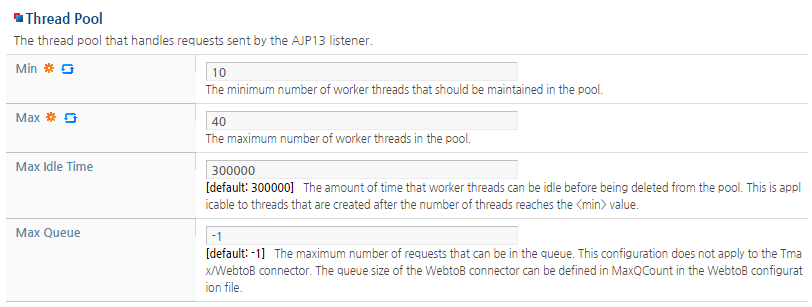
Configure the thread pool that will be allocated to the listener in the Thread Pool section.
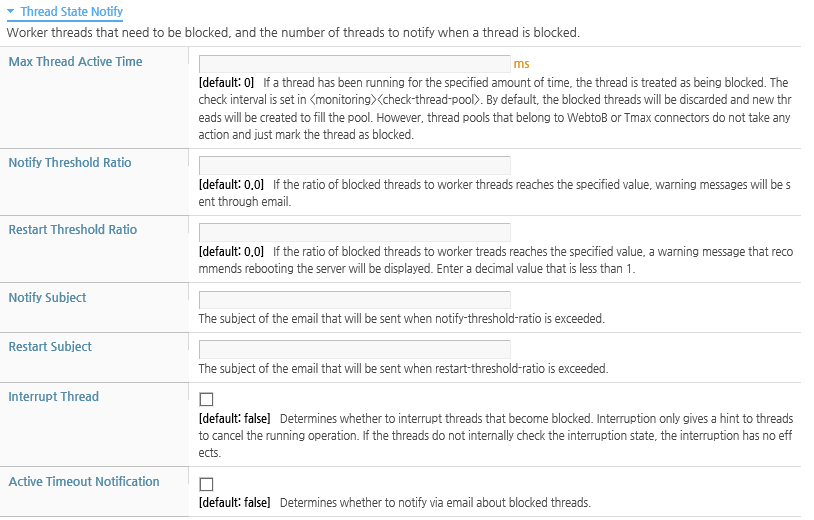
In the Thread State Notify section, set the automatic notification configurations for the threads that are allocated to the listener. For more information, refer to "2.3.7. Automatic Thread Pool Management (Thread State Notification)".
-
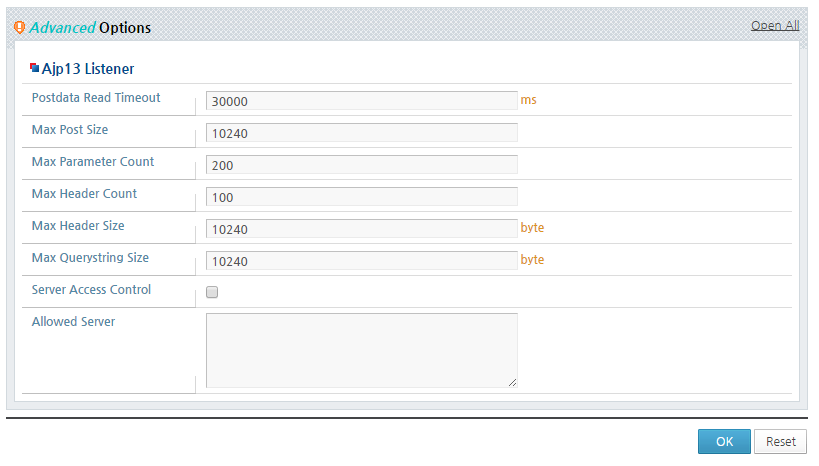
Configure the settings in the Advanced Options section. This includes options for preventing web attacks.
The following describes each configuration option. For information about other options, refer to "2.3.1. Common Listener Settings".
-
After completing the configurations, click [OK]. The 'ajp13' listener will be added as follows.
-
After completing the configuration, click [Apply Changes] to apply the changes. The following result is displayed.
-
-
Deleting a Listener
An AJP listener can be deleted in WebAdmin using the following steps.
-
Click [Servers] from the left menu to go to the list of servers. Click a server from the list to go to the server configuration. On the server configuration screen, go to [Engine] > [Web Engine] > [Web Connections] to display the web connection list.
-
Click [Lock & Edit] to change to configuration mode.
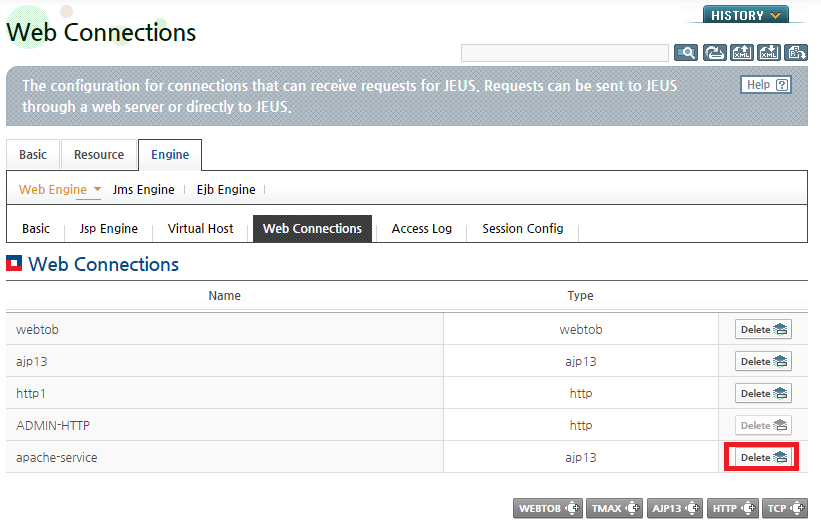
-
Click [Delete] next to the listener to delete it.
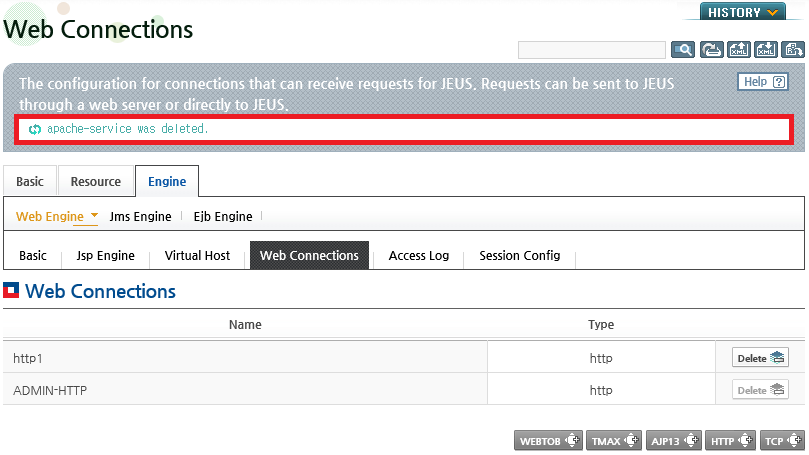
-
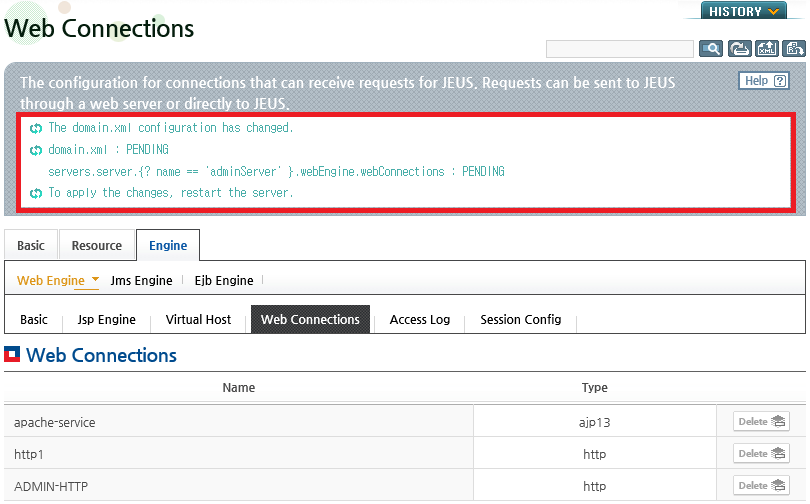
The following result is displayed.
-
Click [Apply Changes] to apply the changes. The result is displayed. Refer to [Figure 2.10].
-

Using the Console Tool
The following shows how to add, modify, and delete AJP listeners using the console tool.
-
Adding a Listener
To add AJP listeners, execute the add-web-listener command. For more information about the command, refer to JEUS Reference Book. "4.2.8.8. add-web-listener".
add-web-listener [-cluster <cluster-name> | -server <server-name>]
                 [-f, --forceLock]
                 -name <web-connection-name>
                 -tmin <minimum-thread-num>
                 [-tmax <maximum-thread-num>]
                 [-ajp | -http | -tcp]
                 -slref <server-listener-ref-name>
                 [-dcc <dispatcher-config-class>]
-
Modifying a Listener
To modify a listener, execute the modify-web-listener command. For more information about the command, refer to JEUS Reference Book. "4.2.8.22. modify-web-listener".
modify-web-listener [-cluster <cluster-name> | -server <server-name>]
                    [-f, --forceLock]
                    -name <web-connection-name>
                    [-tmin <minimum-thread-num>]
                    [-tmax <maximum-thread-num>]
                    [-tidle <max-idle-time>]
                    [-obuf <output-buffer-size>]
-
Deleting a Listener
To delete a listener, execute the remove-web-listener command. For more information about the command, refer to JEUS Reference Book. "4.2.8.32. remove-web-listener".
remove-web-listener [-cluster <cluster-name> | -server <server-name> | -f, --forceLock]
                    <web-connection-name>
HTTP listeners can be added, modified, and deleted in WebAdmin or the console tool. Using HTTP listeners is only recommended for internal management.
Using WebAdmin
-
Adding and Modifying a Listener
HTTP listeners can be added and modified in WebAdmin.
-
Click [Servers] from the left menu to go to the list of servers. Click a server from the list to go to the server configuration. On the server configuration screen, go to [Engine] > [Web Engine] > [Web Connections] to display the web connection list. (Refer to [Figure 2.4].)
-
Click [Lock & Edit] to change to configuration mode.
-
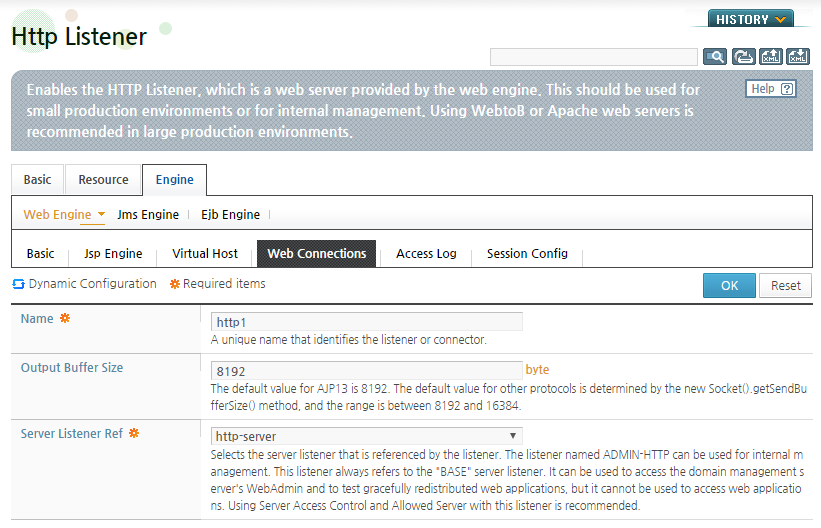
Click [HTTP] to add an HTTP listener. To modify a listener, click an 'http' listener from the web connection list. Set the basic information on the Http Listener screen.
-
Since the Thread Pool configuration is similar to that for AJP listeners, refer to "2.3.2. AJP Listeners". For information about configuring Thread State Notify setting, refer to "2.3.7. Automatic Thread Pool Management (Thread State Notification)".
-
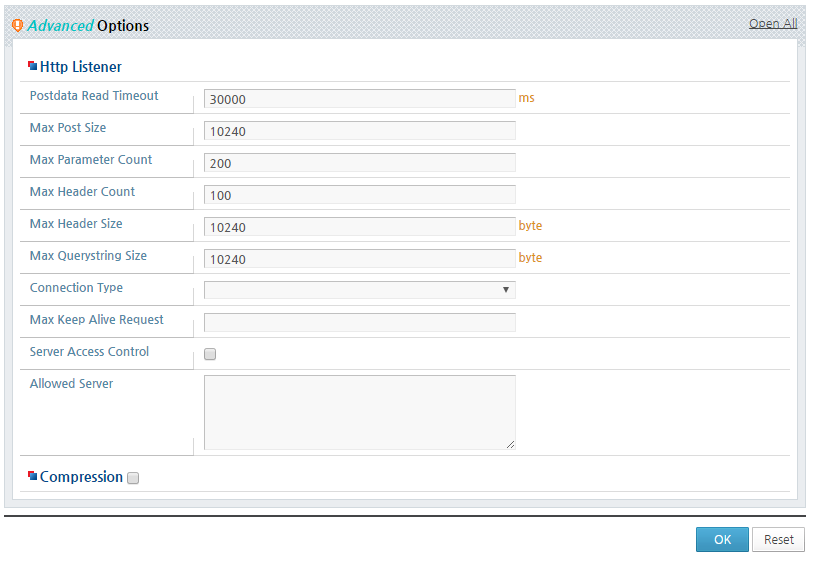
Configure the items in the Advanced Options section.
The following describes each configuration option. For information about other options, refer to "2.3.1. Common Listener Settings".
-
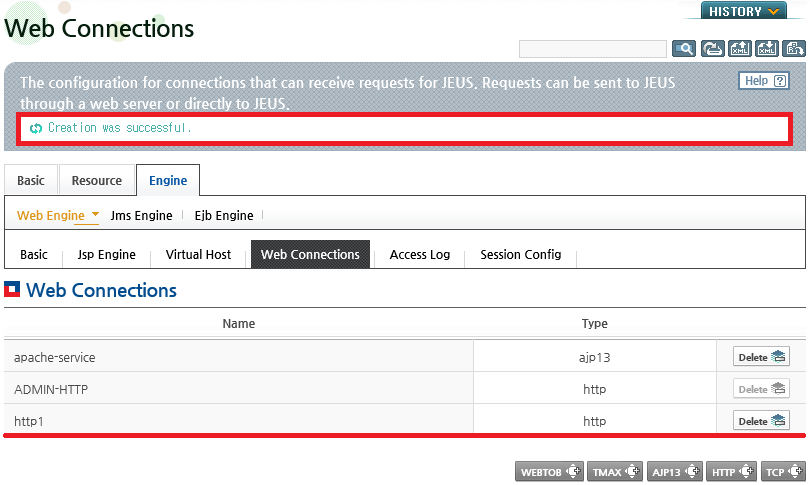
After completing the configurations, click [OK]. The 'http' type listener will be added as follows.
-
Click [Apply Changes] to apply the changes. The result is displayed. (Refer to [Figure 2.10])
-
-
Deleting a Listener
HTTP listeners can be deleted in WebAdmin.
-
Click [Servers] from the left menu to go to the list of servers. Click a server from the list to go to the server configuration screen. On the server configuration screen, go to [Engine] > [Web Engine] > [Web Connections] to display the web connection list. (Refer to [Figure 2.11].)
-
Click [Lock & Edit] to change to configuration mode.
-
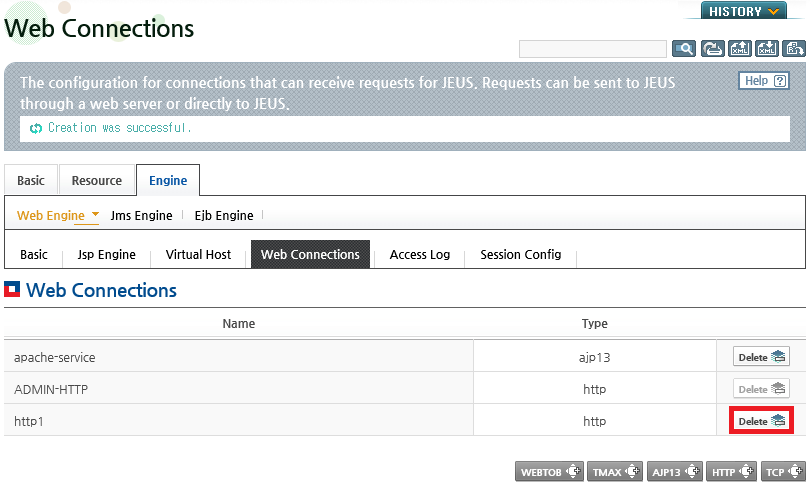
Click [Delete] next to the listener to delete it.
-
The following result is displayed.
-
Click [Apply Changes] to apply the changes. The result is displayed. (Refer to [Figure 2.10].)
-
Using the Console Tool
Similar to AJP listeners, HTTP listeners can be added, modified, or deleted using the console tool. For more information, refer to "Using the Console Tool" in "2.3.2. AJP Listeners".
A TCP listener is a special listener that allows custom protocols to communicate with each other. TCP listener cannot share server listeners with other web listeners, so a dedicated listener for the TCP listener must be added to the server. TCP listeners can be added or modified in WebAdmin or the console tool.
Using WebAdmin
-
Adding and Modifying a Listener
The TCP listener can be added or modified in WebAdmin using the following steps.
-
Click [Servers] from the left menu to go to the list of servers. Click a server from the list to go to the server configuration. On the server configuration screen, go to [Engine] > [Web Engine] > [Web Connections] to display the web connection list. (Refer to [Figure 2.4].)
-
Click [Lock & Edit] to change to configuration mode.
-
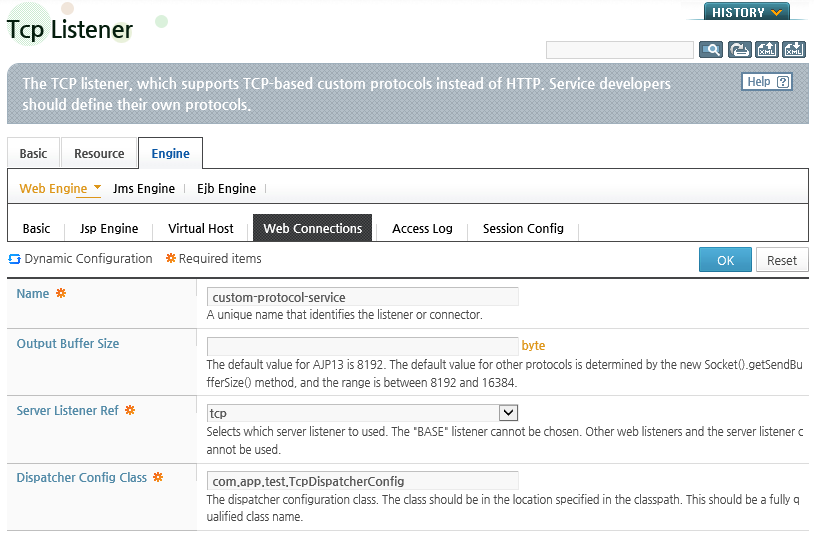
Click [TCP] to add a TCP listener. To modify a listener, click on the 'tcp' listener. Set the basic information on the Tcp Listener screen.
The following describes each configuration option. For information about other options, refer to "2.3.1. Common Listener Settings".
Item Description Dispatcher Config Class Name of the dispatcher config class that defines the protocol between TCP listeners and clients. The class must implement the jeus.servlet.tcp.TCPDispatcherConfig interface.
If the dispatcher config class does not exist, the TCP listener will not work. The implemented classes must exist in the 'JEUS_HOME/lib/application' directory.
The web context that will be deployed to the web engine must contain the class that implements jeus.servlet.tcp.TCPServlet and the class must be mapped in web.xml. For more information, refer to "2.5. Using TCP Listeners".
-
Since the Thread Pool configuration is similar to that for AJP listeners, refer to "2.3.2. AJP Listeners". For information about configuring Thread State Notify setting, refer to "2.3.7. Automatic Thread Pool Management (Thread State Notification)".
-
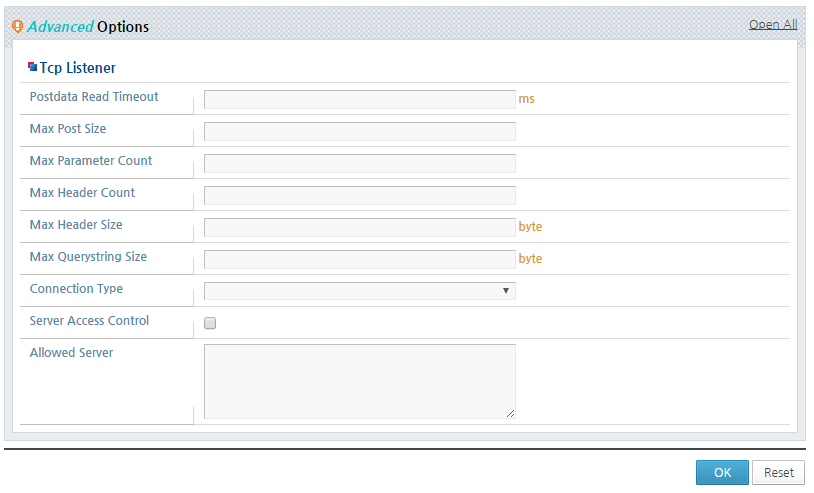
Configure the items in the Advanced Options section.
The following describes each configuration option. For information about other options, refer to "2.3.1. Common Listener Settings".
-
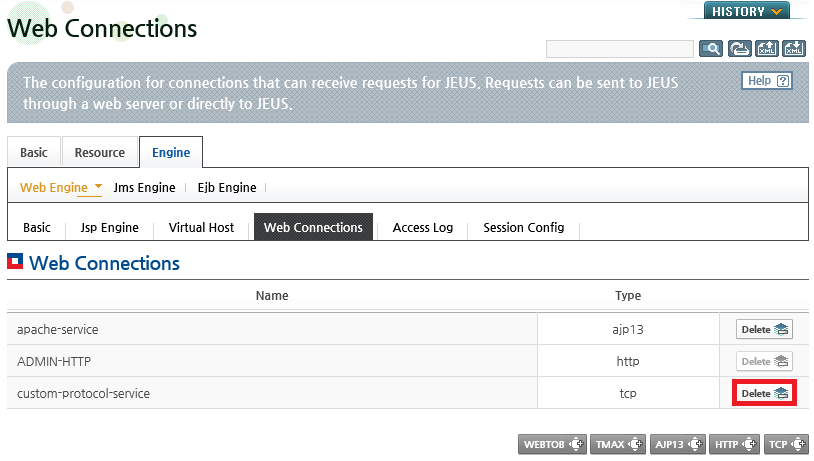
After completing the configuration, click [OK]. The 'tcp' listener will be added as in the following.
-
Click [Apply Changes] to apply the changes. The result message is displayed. (Refer to [Figure 2.10].)
-
-
Deleting a Listener
TCP listeners can be deleted in WebAdmin.
-
Click [Servers] from the left menu to go to the list of servers. Click a server from the list to go to the server configuration. On the server configuration screen, go to [Engine] > [Web Engine] > [Web Connections] to display the web connection list. (Refer to[Figure 2.11].)
-
Click [Lock & Edit] to change to configuration mode.
-
Click [Delete] next to the listener to delete it.
-
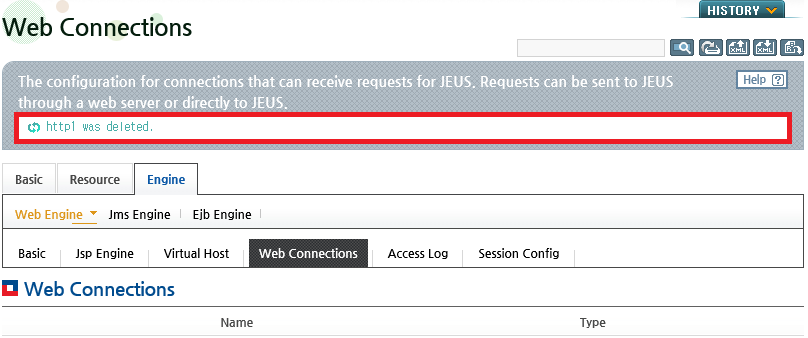
After the selected listener is deleted, the following message will be displayed.
-
Click [Apply Changes] to apply the changes. The result message is displayed. (Refer to [Figure 2.10].)
-


Using the Console Tool
Similar to AJP listeners, HTTP listeners can be added, modified, or deleted using the console tool. For more information, refer to "Using the Console Tool" in "2.3.2. AJP Listeners".
Since JEUS acts as a client when a WebtoB connector creates a connection, the address and port of WebtoB are required. WebtoB connectors can be added, modified, and deleted in WebAdmin or the console tool.
Note
Starting from JEUS 7 Fix #2, the version of the WJP, the communication protocol between WebtoB and JEUS, has been upgraded from 1 to 2(hereafter WJPv1 and WJPv2). WJPv2 uses a smaller packet sizes than WJPv1 and provides various additional functions. If the WebtoB that JEUS will connect to does not provide WJPv2, WJPv1 is used instead. Since WebtoB cannot obtain the WJP version information, it must be configured in the <wjp-version> option of JEUS. WJP means "WebtoB-JEUS Protocol".
If <use-nio> is set to true, the Java NIO Selector can be used for WebtoB-JEUS communication. Since WJP connection is not managed by the servlet request thread but the thread that is in charge of the selector, there are separate WJP connection and servlet request threads. This way, HTTP requests from WebtoB can be processed by using less number of threads. The threadinfo and list-webtob-connections commands must be used to check the state of WJP connections.
Using WebAdmin
-
Adding and Modifying a Connector
WebtoB connector can be added or modified in WebAdmin.
-
Click [Servers] from the left menu to go to the list of servers. Click a server from the list to go to the server configuration. On the server configuration screen, go to [Engine] > [Web Engine] > [Web Connections] to display the web connection list. (Refer to[Figure 2.4].)
-
Click [Lock & Edit] to change to configuration mode.
-
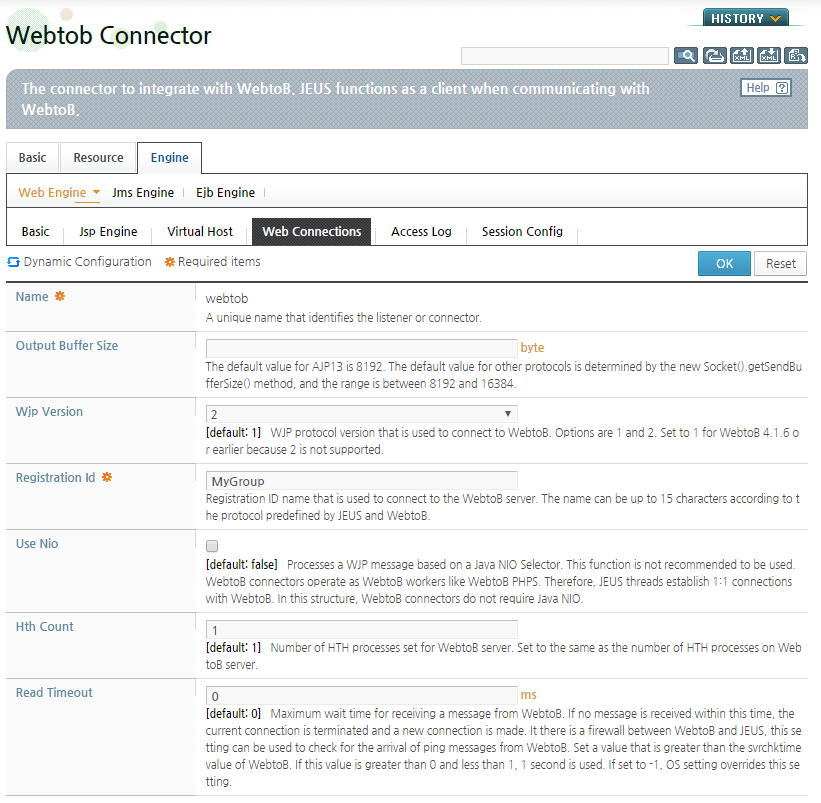
To add a WebtoB connector, click [WEBTOB]. To modify a connector, click a 'webtob' connector. Set the basic information on the Webtob Connector screen.
The following describes each configuration option. For information about other options, refer to "2.3.1. Common Listener Settings".
Item Description Hth Count Must match the number of HTH processes specified in the Node section of the WebtoB configuration file. Refer to "2.4. Configuring Web Server Load Balancing". Registration Id Must be same as the value of the server in the WebtoB configuration file. Can be up to 15 letters if WJPv1 is used. (Required) WJP Version Version of the WJP used to communicate with WebtoB. WJPv2 is supported starting from JEUS 7 Fix #2. Read Timeout WebtoB continuously sends a ping message to a web engine at the interval of the value set in svrchktime defined in a configuration file.
A web engine checks WebtoB status at the interval of the value set in this item. If a ping message of WebtoB is not found during the interval period, it will be regarded that a connection is disconnected. Therefore, the value set in this item must be larger than the value set in svrchktime.
-
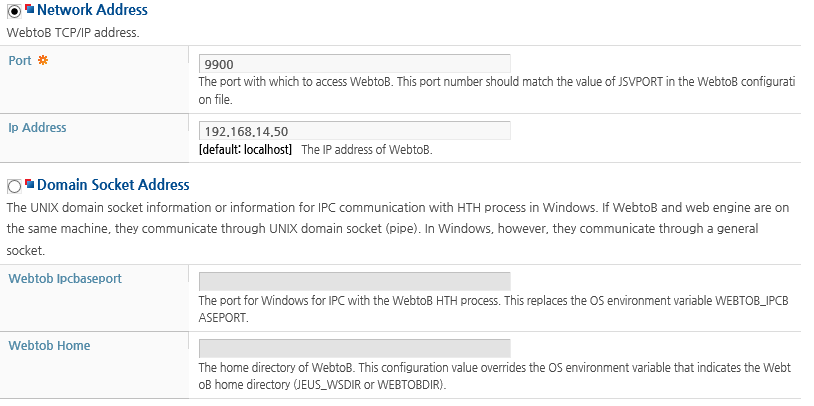
The Network Address and Domain Socket Address must be configured exclusively. Only one can be configured.
In Network Address, set the IP address and the port that are required to connect to the WebtoB server. If the Network Address is not configured, the Domain Socket Address must be set. The Domain Socket Address is used when using domain socket with UNIX or IPC communication with Windows HTH process. This configuration only works when WebtoB is on the same server.
-
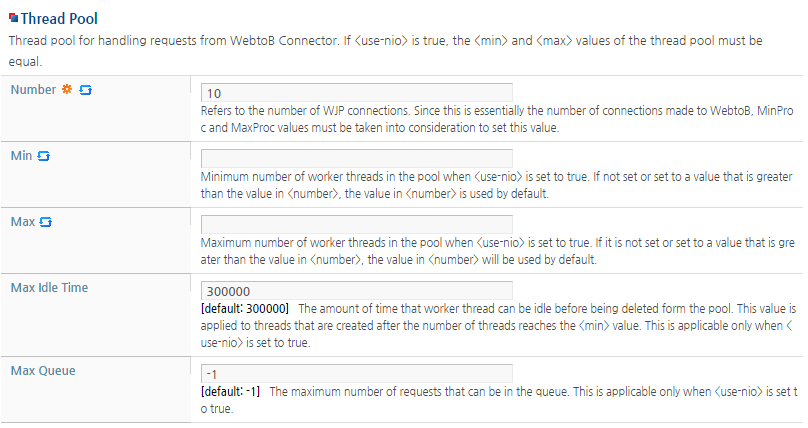
In the Thread Pool section, configure the worker threads that handle the HTTP requests from WebtoB.
The following describes each configuration option.
Item Description Number Number of connections to WebtoB. Set this value based on the 'MinProc' and 'MaxProc' values. For more information about 'MinProc' and 'MaxProc', refer to "2.4.4. Load Balancing with WebtoB".
Definition can change depending on the <use-nio> configuration.
-
If <use-nio> is false, the number of connections and worker threads is the same as those in JEUS v7.0 Fix #1 and earlier versions.
-
If <use-nio> is true, It is used as the number of worker threads when the <min> and <max> configurations are not configured.
Min Minimum number of worker threads when <use-nio> is true. A value greater than <number> has no effect. If not set, the <number> value is used. Max Maximum number of worker threads when <use-nio> is true. A value greater than <number> has no effect. If not set, the <number> value is used. Max Idle Time Maximum idle time allowed for a worker thread before it is removed from the thread pool. This value is applied to the threads created when the <min> value has been exceeded. It is only applicable when <use-nio> is true. Max Queue Maximum number of requests that can be in the request processing queue when the processing is delayed. It is only applicable when <use-nio> is true. Note
In JEUS 6, the minimum and maximum values of worker threads were used, but they did not affect the actual operations. A single 'Number' setting is used in JEUS 7 to configure these values.
In the Thread State Notify section, configure the automatic state notification of threads that are allocated to the listener. For more information about the configuration, refer to "2.3.7. Automatic Thread Pool Management (Thread State Notification)".
-
-
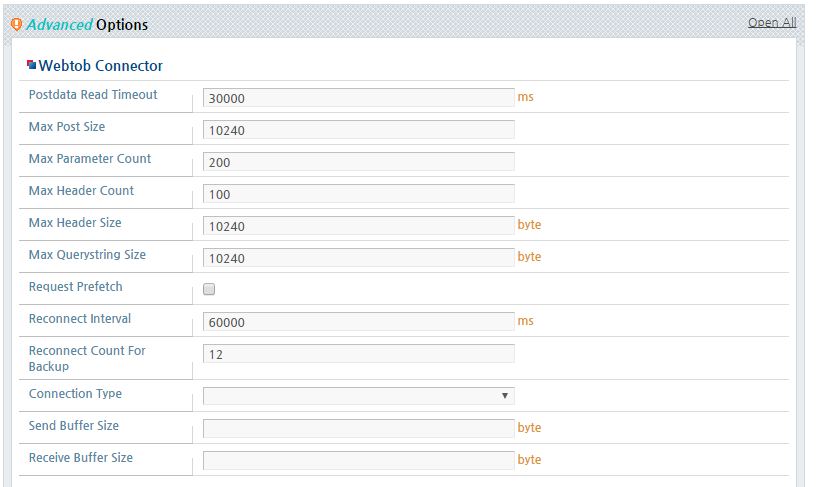
Configure the settings in the Advanced Options.
The following describes each configuration option. For information about other options, refer to "2.3.1. Common Listener Settings".
-
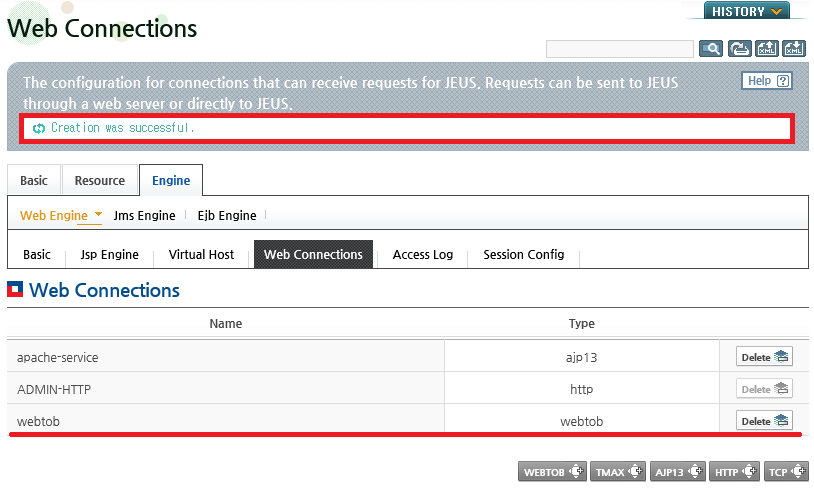
After completing the configuration, click [OK]. A 'webtob' connector will be added as in the following.
-
Click [Apply Changes] to apply the changes. The result message is displayed. (Refer to [Figure 2.10].)
-
-
Deleting a Connector
WebtoB connectors can be deleted in WebAdmin using the following steps.
-
Click [Servers] from the left menu to go to the list of servers. Click a server from the list to go to the server configuration. On the server configuration screen, go to [Engine] > [Web Engine] > [Web Connections] to display the web connection list. (Refer to[Figure 2.11].)
-
Click [Lock & Edit] to change to configuration mode.
-
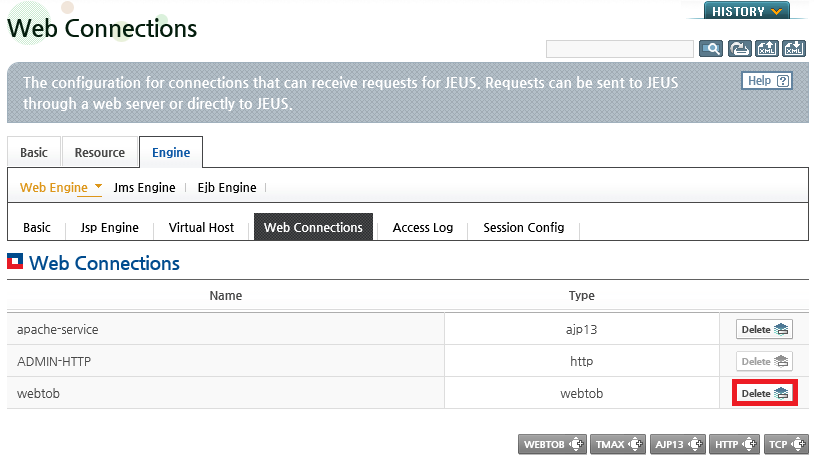
Click [Delete] next to the connector to delete it.
-
The result message is displayed as in the following.
-
Click [Apply Changes] to apply the changes. The result message is displayed. (Refer to [Figure 2.10].)
-

Using the Console Tool
The following shows how to add, modify, and delete WebtoB connectors.
-
Adding a Connector
To add a WebtoB connector, execute the add-webtob-connector command. For more information about the command, refer to JEUS Reference Book. "4.2.8.9. add-webtob-connector".
add-webtob-connector [-cluster <cluster-name> | -server <server-name>]
                     [-f,--forceLock] -name <web-connection-name>
                     -num <thread-number> -regid <registration-id>
                     [-addr <server-address>] -port <server-port> | -dsocket
                     [-wbhome <webtob-home>]-ipcport <ipc-base-port>]
                     [-sndbuf <send-buffer-size> ] [-rcvbuf <receive-buffer-size> ]
-
Modifying a Connector
To modify a WebtoB connector, execute the modify-webtob-connector command. For more information about the command, refer to JEUS Reference Book. "4.2.8.23. modify-webtob-connector".
modify-webtob-connector [-cluster <cluster-name> | -server <server-name>]
                        [-f,--forceLock] -name <web-connection-name>
                        [-num <thread-number>] [-obuf <output-buffer-size>]
                        [-addr <server-address>] [-port <server-port>]
                        [-regid <registration-id>] [-sndbuf <send-buffer-size> ]
                        [-rcvbuf <receive-buffer-size> ]
-
Deleting a Connector
To delete a WebtoB connector, execute the remove-webtob-connector command. For more information about the command, refer to JEUS Reference Book. "4.2.8.33. remove-webtob-connector".
remove-webtob-connector [-cluster <cluster-name> | -server <server-name>]
                        <web-connection-name>
Like with WebtoB connectors, since JEUS functions as a client when a Tmax connector creates a connection, the address and port of Tmax are required.
Tmax connectors can be added, modified, and deleted in WebAdmin or the console tool.
Using WebAdmin
-
Adding and Modifying a Connector
Tmax connector can be added and modified in WebAdmin using the following steps.
-
Click [Servers] from the left menu to go to the list of servers. Click a server from the list to go o the server configuration. On the server configuration screen, go to [Engine] > [Web Engine] > [Web Connections] to display the web connection list. (Refer to[Figure 2.4].)
-
Click [Lock & Edit] to change to configuration mode.
-
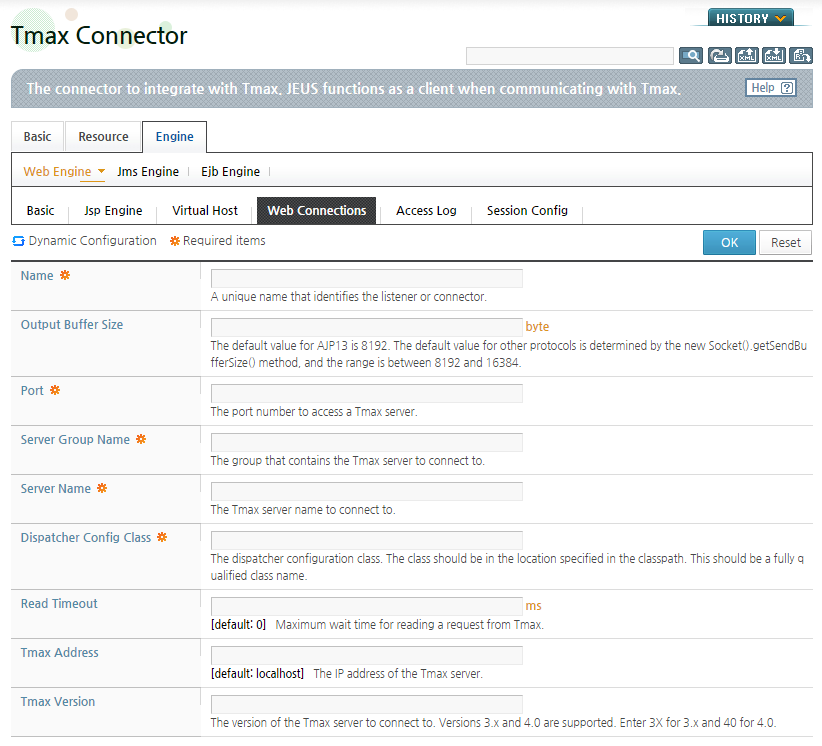
To add a Tmax connector, click [TMAX]. To modify a connector, click on a 'tmax' connector from the web connection list. Set the basic information on the Tmax Connector screen.
The following describes each configuration option. For information about the other items, refer to "2.3.1. Common Listener Settings".
-
The Thread Pool configuration is similar to that for AJP listeners, so refer to "2.3.2. AJP Listeners", and for information about configuring Thread State Notify, refer to "2.3.7. Automatic Thread Pool Management (Thread State Notification)".
-
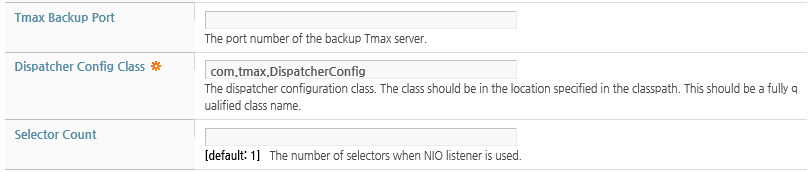
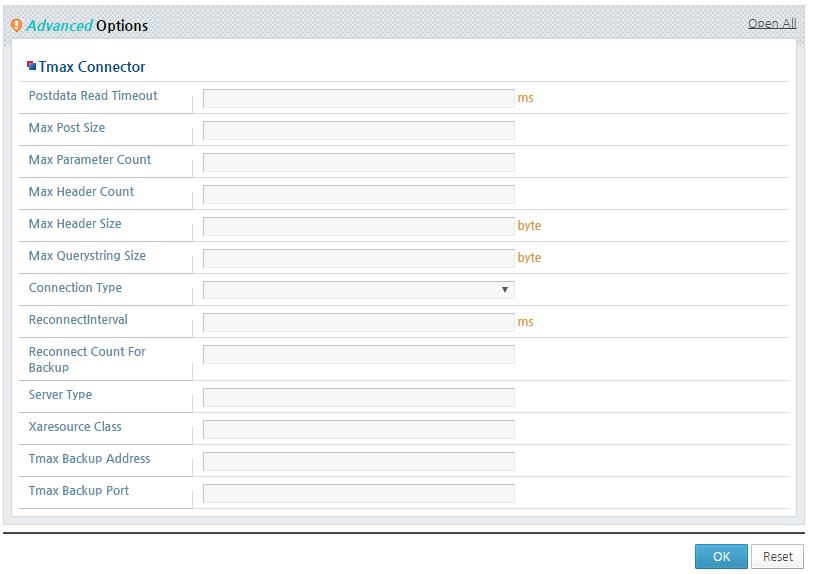
Configure the settings in the Advanced Options.
The following describes each configuration option. For information about other options, refer to "2.3.1. Common Listener Settings".
-
After completing the configuration, click [OK]. The 'tmax' connector will be added as follows.
-
Click [Apply Changes] to apply the changes. The result message is displayed.
(Refer to [Figure 2.10].)
-
-
Deleting a Connector
Tmax connectors can be deleted in WebAdmin using the following steps.
-
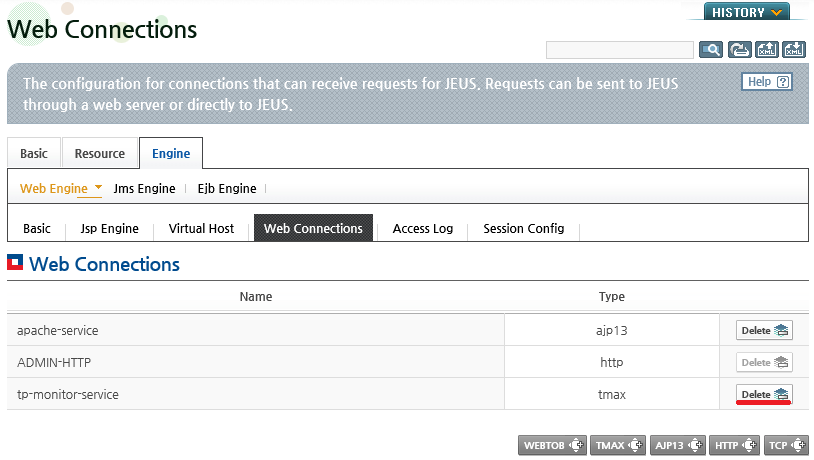
Click [Servers] from the left menu to go to the list of servers. Click on a server from the list to go to the server configuration. On the server configuration screen, go to [Engine] > [Web Engine] > [Web Connections] to display the web connection list. (Refer to[Figure 2.11].)
-
Click [Lock & Edit] to change to configuration mode.
-
Click [Delete] next to the connector to delete it.
-
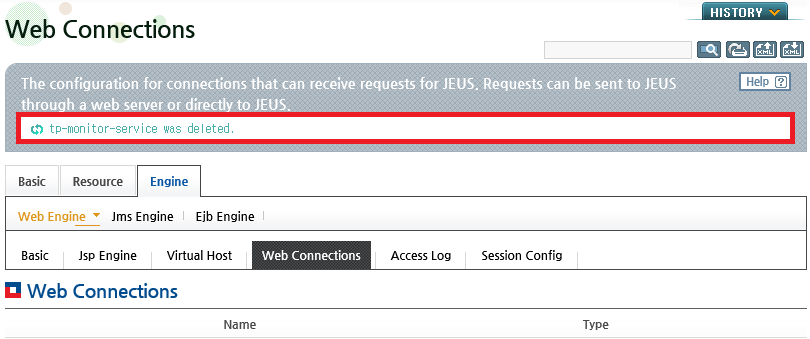
The following result message is displayed.
-
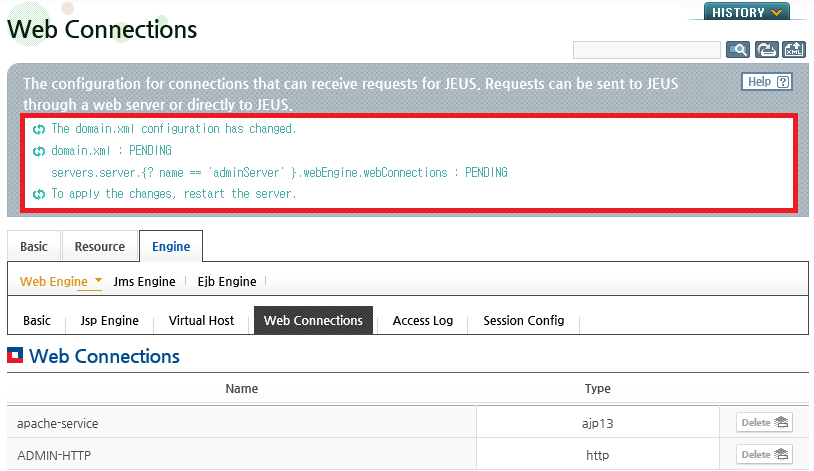
Click [Apply Changes] to apply the changes. The following result message is displayed.
-

Using the Console Tool
The following shows how to add, modify, and delete a Tmax connector using the console tool.
-
Adding a Connector
To add a Tmax connector, execute the add-tmax-connector command. For more information about the command, refer to JEUS Reference Book. "4.2.8.6. add-tmax-connector".
add-tmax-connector [-cluster <cluster-name> | -server <server-name>]
                   [-f,--forceLock]
                   -name <web-connection-name>
                   -tmin <minimum-thread-num>
                   [-tmax <maximum-thread-num>]
                   -addr <server-address>
                   -port <server-port>
                   -svrg <server-group-name>
                   -svr <server-name>
                   -dcc <dispatcher-config-class>
-
Modifying a Connector
To modify a Tmax connector, execute the modify-tmax-connector command. For more information about the command, refer to JEUS Reference Book. "4.2.8.19. modify-tmax-connector".
modify-tmax-connector [-cluster <cluster-name> | -server <server-name>]
                      [-f,--forceLock]
                      -name <web-connection-name>
                      [-tmin <minimum-thread-num>]
                      [-tmax <maximum-thread-num>]
                      [-tidle <max-idle-time>]
                      [-obuf <output-buffer-size>]
                      [-addr <server-address>]
                      [-port <server-port>]
                      [-svrg <server-group-name>]
                      [-svr <server-name>]
-
Deleting a Connector
To delete a Tmax connector, execute the remove-tmax-connector command. For more information about the command, refer to JEUS Reference Book. "4.2.8.30. remove-tmax-connector".
remove-tmax-connector [-cluster <cluster-name> | -server <server-name> |
                        -f,--foreceLock]
                        <web-connection-name>
Thread state notification setting defines the minimum number of worker threads that will trigger a notification via e-mail or to recommend restarting the server. Configure the Thread State Notify setting from the listener or connector configuration screen.
If automatic thread pool management is configured, worker threads are managed based on the 'Max Thread Active Time' value.
Threads for which the request processing time exceeds the Max Thread Active value are considered as blocked threads. If the number of threads, excluding blocked threads, is less than the minimum thread pool size, enough new worker threads are created to maintain the minimum value.
Since WebtoB connectors are not configured with a minimum value but only a total number of connections, they operate differently from other listeners and connectors. For WebtoB connectors, the sum of blocked threads and regular threads must be same as the number of connections. As soon as a blocked thread completes a request, it will be deleted and any new requests will use a new worker thread.
Thread state notifications can be configured in the thread pool to receive notifications.
The following example configures an e-mail notifier for an AJP listener. For more information about configuring an e-mail using the e-mail notifier, refer to the SMTP handler configuration in JEUS Server Guide. "8.3. Logging Configuration".

The following describes each configuration option.
This section describes how to configure web servers and how to connect web connections to the web engine.
Web servers and web engines (servlet engines) can be organized to improve the system performance when processing HTTP requests.
First, web servers distribute the HTTP requests to the web engines. After that, they direct the same connections or session requests to the web engine that processed the first request by using HTTP session clustering services to improve service processing efficiency.
If an error occurs in the web engine that first processed the request, requests that are received after the error occurrence will be sent to another web engine to provide seamless services. A cluster is required to perform this task. For more information about HTTP session clustering, refer to JEUS Session Management Guide. "Chapter 2. Distributed Session Servers".
Even if web engines are used without web servers, equipment or software that can deliver further requests to the web engine that processed the first request can be used to increase efficiency like when using web servers. However, JEUS neither provides this kind of software nor recommends using one.
Warning
Web server and mod_jk configurations can differ according to the web server version. The configuration method described here is used for enhancing the understanding of JEUS. When configuring web servers in the production environment, refer to each relevant web server documentations and configuration examples provided by local/overseas communities.
When a web site needs to handle a large number of requests, a single web server and web engine are not sufficient in handling the requests. In such cases, multiple servers and web engines are required for load balancing.
The following diagram shows a load balancing structure in which two web servers are connected to four web engines.
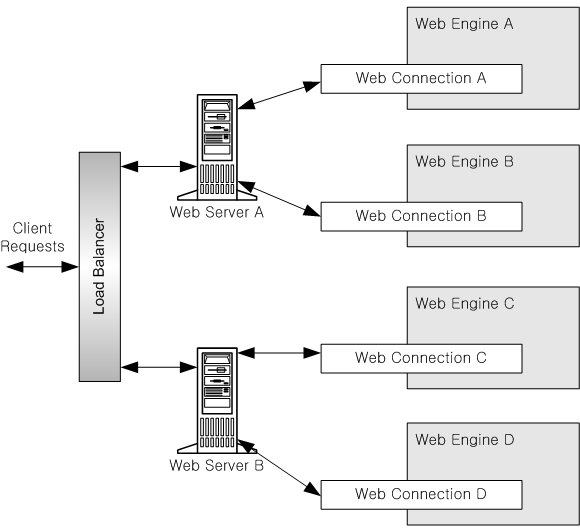
The same web context must be deployed to each engine. In this environment, the most important issue is whether or not the sessions are shared. Web engines must be clustered in order to manage applications more easily or if distributed sessions are required. For more information about session clustering, refer to JEUS Session Management Guide. "Chapter 1. Session Tracking".
Execute the following steps to integrate Apache with the web engines.
-
Install the mod_jk library in Apache.
-
Configure an AJP13 listener in the JEUS web engine.
-
Create and modify the workers.properties file.
-
Insert the integration settings in the httpd.conf file for the Apache web server.
-
Restart the Apache web server.
Note
Apache and mod_jk 1.2.20 is described based on 1.2.20.
To use Apache web servers with web engines, the mod_jk module must be added to Apache. The mod_jk module implements the Apache JServ Protocol 1.3(AJP 1.3), a communication protocol between servers and engines.
Note
Download the source from http://tomcat.apache.org/download-connectors.cgi, and compile it on the server. Starting from April 2014, an executable file for Windows is provided from the site.
After the mod_jk library has been installed, configure the AJP13 listener in the JEUS web engine. For more information about configuring AJP13 listeners, refer to "2.3.2. AJP Listeners".
Configuring the workers.properties File
The workers.properties file is a configuration file for mod_jk.
As an example, there are two JEUS servers named server1 and server2 and the host names are server1 and server2. The name of the web engine for each server is server_servelt and server2_servlet. The AJP listeners configured on each web engine are 9901 and 9902.
The following is an example of the workers.properties file in the JEUS environment.
[Example 2.1] mod_jk Configuration File Example: <<workers.properties>>
worker.list=jeus_load_balancer_workers
worker.jeus_load_balancer_workers.type=lb
worker.jeus_load_balancer_workers.balance_workers=server1_servlet, server2_servlet
worker.jeus_load_balancer_workers.sticky_session=true

###########################################
# listener specific configuration
###########################################
worker.server1_servlet.host=server1
worker.server1_servlet.port=9901
worker.server1_servlet.type=ajp13
worker.server1_servlet.route=ZG9tYWluMS9zZXJ2ZXIx

worker.server2_servlet.host=server2
worker.server2_servlet.port=9902
worker.server2_servlet.reference=server1_servlet
worker.server2_servlet.route=ZG9tYWluMS9zZXJ2ZXIy
The workers.properties file uses the "worker.<worker_name>.<directive>=<value>" format to define most settings. The following describe the major configuration options.
-
Worker names. Multiple workers can be defined and each worker name is separated by a comma (",").
The following example defines a worker with the name "jeus_load_balancer_workers":
worker.list=jeus_load_balancer_workers
-
Worker types. 'ajp13', 'ajp14', 'jni', 'lb', and 'status' can be used. To support AJP13, setting 'ajp13', and 'lb' are sufficient in JEUS.
The following example defines "jeus_load_balancer_workers" as a load balancer.
worker.jeus_load_balancer_workers.type=lb
-
worker.<worker_name>.balance_workers
A comma (',') can be used to list the workers for load balancing. The workers written in worker.list above cannot be in this list.
When integrating with an AJP13 listener in JEUS, the worker names must be the servlet engines of JEUS for the workers to properly function as load balancers or sticky sessions. JEUS uses the servlet engine names for the session ID routing information, and mod_jk uses the worker names.
-
worker.<worker_name>.sticky_session
Option to support routing based on session ID. Options are 'true'(or 1) or 'false'(or 0). Since JEUS supports sticky sessions, this must be always set to 'true'. (Default value: true)
The following example sets the "jeus_load_balancer_workers" setting to support sticky sessions.
worker.jeus_load_balancer_workers.sticky_session=true
-
Host name or IP address where the AJP13 listener exists.
-
AJP listener port number in JEUS.
-
worker.<worker_name>.reference
Useful for configuring multiple load balancer workers. The specified workers can be referenced.
For example, if "worker.castor.reference=worker.pollux" is set, all pollux worker configurations will be inherited except configuration values that are explicitly set for castor workers.
-
If the specified value is received in a sticky request, the corresponding worker handles the request.
A sticky session is a session routing technology used in sessions that are created by the JEUS session manager. By matching the session with a worker, this can improve the availability of local sessions. For more information about session routing, refer to JEUS Session Management Guide. "1.2. Session Tracking Structure".
The value domain_name/server_name is encoded in Base16. The encoded value can be retrieved by using the encryption command in the 'JEUS_HOME/bin' directory.
The following is an example of using the encryption command.
jeus/bin/encryption -algorithm base64 -text domain1/server1
Note that a form of "domain name/server" name like "domain1/server1" or "domain1/server2" is used instead of an engine name like "server1_servlet".
Warning
Since this configuration information may not be current for the latest version of mod_jk, use the examples in this section only for reference. To configure the settings, mod_jk related descriptions in the Tomcat site must be followed.
Configuring httpd.conf
To use the mod_jk module, add the following to the httpd.conf file:
[Example 2.2] Configuration mod_jk in Apache: <<httpd.conf>>
. . .
LoadModule    jk_module  "/usr/local/apache/modules/mod_jk.so"
JkWorkersFile "/usr/local/apache/conf/workers.properties"
JkLogFile     "/usr/local/apache/logs/mod_jk.log"
JkLogLevel    info
JkMount /examples/* jeus_load_balancer_workers
. . .
Warning
Since this configuration information may not be current for the latest version of Apache, use the examples in this section only for reference. Refer to the Apache manuals.
IIS and Iplanet support the AJP13 protocol. The workers.properties file is configured in the same way as JEUS, but mod_jk is installed and configured differently. Refer to the manual of each web server.
This section describes how to configure load balancing between WebtoB and JEUS, and provides examples.
The following shows the server structure of the example. Each engine is connected a WebtoB server. In the following example, there are two WebtoB servers and each one is connected to two web engines.
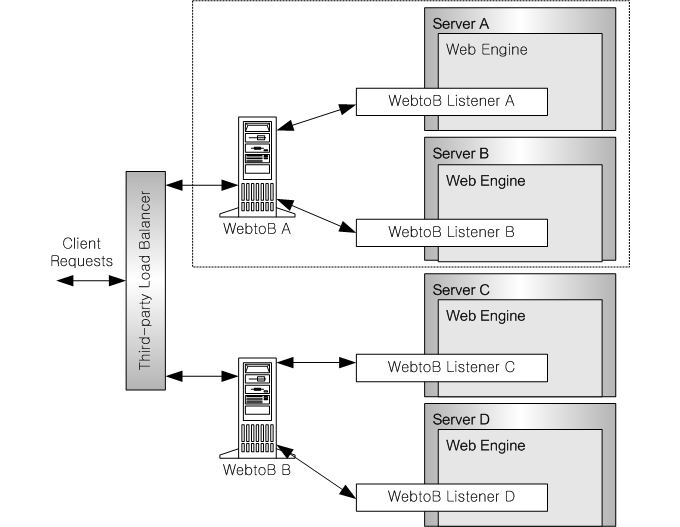
The same context must be deployed to each server.
In general, in a structure like the previous figure, servers A through D become clustered and distributed session servers are used accordingly. Clustering is not necessary if user sessions are not used.
The following diagram shows the dotted box in detail and displays each WebtoB connector configurations.
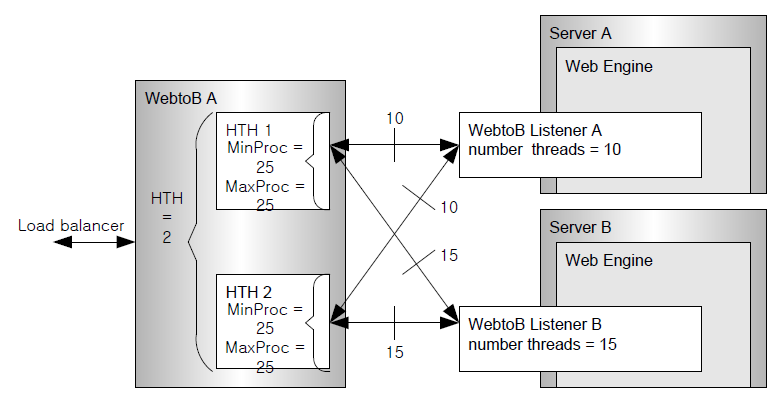
When configuring WebtoB connectors, consider the number of
WebtoB HTH processes.
A WebtoB HTH process functions as if it has multiple sub-processes. It is connected to a worker thread of WebtoB connector as one to one. Choose appropriate values for the WebtoB connector's 'Worker Thread Pool Max' setting and the WebtoB server's 'MaxProc' setting.
The number of HTH processes in the WebtoB configuration can be set in the 'Hth Count' setting of the WebtoB connector. The 'MaxProc' value of WebtoB and the 'Worker Thread Pool Max' value of the WebtoB connector can be expressed using the following formulas.
MinProc =
Listener A number threads + Listener B number threads + … + Listener X number threads setting.
MaxProc =
Listener A number threads + Listener B number threads + … + Listener X number threads setting.
The 'Hth Count' of the WebtoB connector must be the same as the number of HTH processes of the *NODE configuration in the WebtoB configuration file. For more information about configuring WebtoB connectors, refer to "2.3.5. WebtoB Connectors".
The following example of the http.m file configures WebtoB A from the previous example.
[Example 2.3] WebtoB Configuration Example: <<http.m>>
*NODE
foo     …
   HTH = 2,
   JSVPORT = 9900,
   …
*SVRGROUP
jsvg    NODENAME = foo, SVRTYPE = JSV
*SERVER
default    SVGNAME = jsvg, MinProc = 6, MaxProc = 25
*URI
uri1  Uri = "/examples/", Svrtype = JSV
uri2  Uri = "/test/", Svrtype = JSV
*EXT
jsp  MimeType = "application/jsp", SvrType = JSV
Note the values of min and max. The min and max values are set as in the following.
HTH MinProc = 6 = 2 thread + 4 thread, HTH MaxProc = 25 = 10 thread + 15 thread
TCP listeners can define a communication protocol between TCP clients and TCP servlets, but they are only recommended when the HTTP and HTTPS protocols are not sufficient.
Execute the following steps to use a TCP listener.
-
Define a customized communication protocol.
-
Implement the dispatcher config class (Protocol configuration)
-
Implement the TCP handler servlet (Protocol implementation)
-
Set the TCP listener to implement the custom protocol.
-
Implement the TCP client.
-
Compile and execute the TCP client.
The following are the terms used in this section.
| Term | Description |
|---|---|
| Protocol (Communication Protocol) | Defines the message structure and contents that are exchanged between the TCP client and TCP handler (TCP listener is a mediator) |
| Message | Data that is exchanged between the TCP client and TCP handler. Must follow the structure defined in the protocol. |
| TCP Client | External application, which is processed by the TCP handler, that communicates and exchanges messages with the TCP listener. A standard socket is used to exchange messages. |
| TCP Handler | Receives messages from the TCP listener and processes them. The TCP handler is implemented as a subclass of jeus.servlet.tcp.TCPServlet and is registered in the web engine like regular servlets. The TCP handler works as if it is the provider or implementation class of the custom protocol that exist above the TCP protocol. |
| TCP Dispatcher Configuration Class | Extended class of jeus.servlet.tcp.TCPDispatcherConfig. This class sends the custom protocol information to the TCP listener and processes non-HTTP messages. Put the class in the 'DOMAIN_HOME/lib/application' directory, and configure 'Dispatcher Config Class' for the TCP listener in the web engine configuration. Refer to "2.3.4. TCP Listeners". |
| TCP Listener | Interprets custom messages and provides the routing infrastructure. This acts as a non-HTTP mediator between the TCP client and TCP handler. Similar to other HTTP listeners, this exists in the web engine. |
The TCP listener divides all messages that are exchanged between TCP client and TCP handler into two parts, the header and body. In general, the header is fixed in size and contains standard information. The body contains user data, such as the HTML code in an HTTP response, to transmit.
This section defines a simple protocol (message structure) to describe how to use the TCP listener.
The custom communication protocol (custom message structure) contains the following contents.
-
-
The header starts with a 4 byte magic number. This is used to identify the protocol. For the example, set it to '7777'.
-
Next is a 1 byte type field. '0' indicates a request and '1' indicates a response.
-
The third item is a 4 byte body length. This item contains the body length in bytes. It is fixed at 128 bytes.
-
The last item is a 32 byte string called service name. For the example, enter the name of the TCP servlet that handles the request.
-
A dispatcher configuration class is a subclass of the jeus.servlet.tcp.TCPDispatcherConfig class. The abstract method of the class must implement the information required for the TCP listener to deliver messages to the appropriate TCP handler. The methods are described in the JEUS_HOME/docs/api/jeusapi/index.html file.
Starting from JEUS v7.0 Fix #1, the getBodyLengthLong method has been added. If the TCP Body is 2GB or more, the Body length can be set to 8Byte by using this method.
The following code shows how the dispatcher configuration class is implemented based on the defined protocol. Refer to the comments to understand how the methods are used.
[Example 2.4] TCPDispatcherConfig Implementation: <<SampleConfig.java>>
package sample.config;

import javax.servlet.*;
import javax.servlet.http.*;
import jeus.servlet.tcp.*;

/*
  This class extends the abstract class jeus.servlet.tcp.
  TCPDispatcherConfig class. This implementation provides
  routing and handling information to the TCP listener
  according to our defined communications protocol.
*/
public class SampleConfig extends TCPDispatcherConfig {
    /*
      Any init code goes into this method. This method will be
      Called once after starting the TCP listener.
      We leave this method empty for our simple example.
    */
    public void init() {}

    /*
      This method returns the fixed-length of the header so
      that the TCP listener knows when to stop
      reading the header. The header length for
      our example is 41 (bytes): 4 (magic) + 1
      (type) + 4 (body length) + 32 (service name).
    */
    public int getHeaderLength() {
        return 41;
    }

    /*
      This method must return the length of the body.
      For our example, this length is represented as an
      “int” in the header, starting at position “5”
      (see the protocol definition above).
    */
    public int getBodyLength(byte[] header) {
        return getInt(header, 5);
    }

    /**)
     * Returns the long-size length of request body of
     * incoming request packet.
     * If you don't need to support long, you may map to
     * {@link #getBodyLength(byte[])}.
     */
    public long getBodyLengthLong(byte[] header) {
        return getBodyLength(header);
    }

    /*
      This method must return the context path so that the
      request can be routed by the TCP listener to the context
      that contains the TCP handler (TCPServlet implementation).
      For our example, we always use the context path “/tcptest”.
    */
    public String getContextPath(byte[] header) {
        return "/tcptest";
    }

    /*
      This method must return the name (path) of the TCP
      handler(TCPServlet) relative to the context path.
      For our example, we fetch this name from the 9th position
      in the header.
    */
    public String getServletPath(byte[] header) {
        return "/" + getString(header, 9, 32);
    }

    /*
      This method returns some path info from the header.
      It is not used in our example and thus returns “null”.
    */
    public String getPathInfo(byte[] header) {
        return null;
    }

    /*
      This method returns any session ID embedded in the header.
      It is not used in our example and thus returns “null”.
    */
    public String getSessionId(byte[] header) {
        return null;
    }

    /*
      This method determines whether the TCP listener
      should keep the socket connection open after the TCP handler
      has delivered its response. If it returns “false”, the
      connection will be dropped like in HTTP communications.
      If it returns “true” the connection will be kept open
      like in the Telnet or FTP protocols. For our example,
      we choose to make it persistent (connection not closed
      by the TCP listener).
    */
    public boolean isPersistentConnection() {
        return true;
    }
}
TCP servlets are always a subclass of the jeus.servlet.tcp.TCPServlet class. The handler always contains the abstract void service(TCPServletRequest req, TCPServletResponse, res) method that is overridden.
The service method must be implemented to process messages that follow the custom protocol. The web container reads a header and sends it to the TCPServletRequest object, and the TCP servlet writes a response to an output stream of the TCPServletResponse object.
The following is an implementation of the TCP servlet that processes the message that follows the custom protocol.
[Example 2.5] TCPServlet Implementation: <<SampleTCPServlet.java>>
package sample.servlet;

import java.io.*;
import javax.servlet.*;
import javax.servlet.http.*;
import jeus.servlet.tcp.*;

/**
 * Sample TCPServlet implementation
 *
 * Protocol scheme:
 *
 * common header (for request and response) : total 41 byte
 *
 *   magic field: length = 4 byte, value = 7777
 *   type field : length = 1 byte, 0 : request, 1:response
 *   body length field : length = 4, value = 128
 *   service name field : length = 32
 *
 * request and response body
 *
 *   message1 field : length = 64
 *   message2 field : length = 64
 *
 */

public class SampleTCPServlet extends TCPServlet {

    public void init(ServletConfig config) throws ServletException {
    }

    public void service(TCPServletRequest req, TCPServletResponse res)
        throws ServletException, IOException {
        ServletContext context = req.getServletContext();
        byte[] header = req.getHeader();
        byte[] body = new byte[req.getContentLength()];
        int read = req.getInputStream().read(body);
        if (read < body.length) {
            throw new IOException("The client sent the wrong content.");
        }

        String encoding = res.getCharacterEncoding();
        if (encoding == null)
            encoding = "euc-kr";

        DataInputStream in = new DataInputStream(new ByteArrayInputStream(header));
        int magic = in.readInt();
        context.log("[SampleTCPServlet] received magic = " + magic);

        byte type = (byte)in.read();
        context.log("[SampleTCPServlet] received type = " + type);

        int len = in.readInt();
        context.log("[SampleTCPServlet] received body length = " + len);

        byte[] svcname = new byte[32];
        in.readFully(svcname);
        context.log("[SampleTCPServlet] received service name = "
                     + (new String(svcname)).trim());

        String rcvmsg = null;
        rcvmsg = (new String(body, 0, 64)).trim();
        context.log("[SampleTCPServlet] received msg1 = " + rcvmsg);

        try {
            rcvmsg = (new String(body, 64, 64, encoding)).trim();
        } catch (Exception e) {}
        context.log("[SampleTCPServlet] received msg2 = " + rcvmsg);

        String msg1 = "test response";
        String msg2 = "test response2";

        byte[] result1 = null;
        byte[] result2 = null;
        if (encoding != null) {
            try {
                result1 = msg1.getBytes(encoding);
                result2 = msg2.getBytes(encoding);
            } catch (UnsupportedEncodingException uee) {
                result1 = msg1.getBytes();
                result2 = msg2.getBytes();
            }
        } else {
            result1 = msg1.getBytes();
            result2 = msg2.getBytes();
        }

        header[4] = (byte)1; // mark as response

        ServletOutputStream out = res.getOutputStream();
        out.write(header);

        byte[] buf1 = new byte[64];
        System.arraycopy(result1, 0, buf1, 0, result1.length);
        out.write(buf1);

        byte[] buf2 = new byte[64];
        System.arraycopy(result2, 0, buf2, 0, result2.length);
        out.write(buf2);

        out.flush();
    }

    public void destroy() {
    }
}
Note
Starting from JEUS 7 Fix #2, it is not recommended to use the TCPServletRequest.getBody() method. This method may cause a memory issue if the request body is too big. It is recommended to use the ServletInputStream class defined in the servlet standard instead. This object can be obtained by using the TCPServletRequest.getInputStream() method.
Configure the TCP listener based on the SampleConfig.java and SampleTCPServlet.java implementations and using the following steps.
-
Configure the TCP listener information in the web engine. For more information about TCP listeners, refer to "2.3.4. TCP Listeners".
Set the server listener port to which the TCP listener refers to '5555', and set 'Dispatcher Config Class' to 'sample.config.SampleConfig'.
-
Start the JEUS server and deploy the web application that contains the previous TCP servlet. The following is an example of the deployment descriptor for the web application.
[Example 2.6] TCP Handler Deployment Descriptor: <<web.xml>>
<?xml version="1.0" encoding="UTF-8"?>
<web-app version="3.0" xmlns="http://java.sun.com/xml/ns/javaee" xmlns:xsi="http://www.w3.org/2001/XMLSchema-instance"
         xsi:schemaLocation="http://java.sun.com/xml/ns/javaee http://java.sun.com/xml/ns/javaee/web-app_3_0.xsd">
    <display-name>test</display-name>
    <distributable/>
    <servlet>
        <servlet-name>SampleServlet</servlet-name>
        <servlet-class>sample.servlet.SampleServlet</servlet-class>
        <load-on-startup>0</load-on-startup>
        <async-supported>true</async-supported>
    </servlet>
    <servlet-mapping>
        <servlet-name>SampleServlet</servlet-name>
        <url-pattern>/sample</url-pattern>
    </servlet-mapping>
    <login-config>
        <auth-method>BASIC</auth-method>
    </login-config>
</web-app>
TCP clients connect to TCP listeners using a socket and uses the connection to send messages. The messages are byte streams that follow the custom protocol defined in "2.5.1. Defining Custom Communication Protocols".
The TCP listener receives the messages and calls the service() method of the SampleTCPservlet class based on dispatch information defined in the SampleConfig class. The SampleTCPServlet creates the response based on the client data and delivers it. The client receives the response and outputs it using System.out.
The following is an example of a TCP client implementation.
[Example 2.7] TCP Client Implementation: <<Client.java>>
package sample.client;

import java.io.*;
import java.net.*;

public class Client {
    private String address;
    private int port;

    private int magic = 7777;
    private byte type = 0;
    private int bodyLength = 128;
    private byte[] serviceName="sample".getBytes();

    public Client(String host, int port) {
        this.address = host;
        this.port = port;
    }

    public void test()
        throws IOException, UnsupportedEncodingException {
        Socket socket = new Socket(address, port);
        DataOutputStream out = new DataOutputStream(
            new BufferedOutputStream(socket.getOutputStream()));
        DataInputStream in = new DataInputStream(
            new BufferedInputStream(socket.getInputStream()));

        out.writeInt(7777);
        out.write(type);
        out.writeInt(bodyLength);
        byte[] buf = new byte[32];
        System.arraycopy(serviceName, 0, buf, 0, serviceName.length);
        out.write(buf);
        byte[] msg1 = "test request".getBytes();
        byte[] msg2 = "test request2".getBytes();
        buf = new byte[64];
        System.arraycopy(msg1, 0, buf, 0, msg1.length);
        out.write(buf);
        buf = new byte[64];
        System.arraycopy(msg2, 0, buf, 0, msg2.length);
        out.write(buf);

        out.flush();

        // rx msg
        int magic = in.readInt();
        System.out.println("[Client] received magic = " + magic);

        byte type = (byte)in.read();
        System.out.println("[Client] received type = " + type);

        int len = in.readInt();
        System.out.println("[Client] received body length = " + len);

        byte[] svcname = new byte[32];
        in.readFully(svcname);
        System.out.println("[Client] received service name = " +
                           (new String(svcname)).trim());

        byte[] body = new byte[128];
        in.readFully(body);
        String rcvmsg = null;
        rcvmsg = (new String(body, 0, 64)).trim();
        System.out.println("[Client] received msg1 = " + rcvmsg);
        rcvmsg = (new String(body, 64, 64, "euc-kr")).trim();
        System.out.println("[Client] received msg2 = " + rcvmsg);

        out.close();
        in.close();
        socket.close();
    }

    public static void main(String[] argv) throws Exception {
        Client client = new Client("localhost", 5555);
        client.test();
    }
}
In the previous client code, note the various field
configurations of the header that are required for the protocol.
The 'magic' number is set to '7777', the 'type' is set to '0' (request), the 'body length' is set to '128 bytes', and the 'service name' is set to 'sample', which is the name in web.xml. After creating two messages, the header information is sent and the messages are sent to the TCP listener. Finally, the 'hostname' is set to 'localhost' and the port number is set to '5555'.
Assume that the TCP listener is set to 'localhost' with the port number '5555'.
The TCP client is compiled and executed using the following steps.
-
Compile Client.java.
javac -classpath /usr/local/jeus/lib/system/jeus.jar-d . Client.java
-
Execute Client.class.
java -classpath /usr/local/jeus/lib/system/jeus.jar:.sample.client.Client
-
The JEUS administrator console tool must show the result of the TCP handler. (SampleServlet class).
[SampleServlet] received magic = 7777
[SampleServlet] received type = 0
[SampleServlet] received body length = 128
[SampleServlet] received service name = sample
[SampleServlet] received msg1 = test request
[SampleServlet] received msg2 = test request2
-
The following messages are displayed on the client screen.
[Client] received magic = 7777
[Client] received type = 1
[Client] received body length = 128
[Client] received service name = sample
[Client] received msg1 = test response
[Client] received msg2 = test response2
Consider the following when configuring listeners for optimal performance
-
Increase the out buffer size by using many system resources or prolonging the waiting time.
-
In general, if the min, max, and step values of the worker thread pool are large, performance improves when many clients access the web engine. To use less memory, lower these values.
-
Disabling the 'Server Access Control' setting may improve performance.
-
As described earlier, in the WebtoB connector, set the number of worker threads for the web connector of the web engine equal to the value in http.m.